
OOo Off the Wall: Floating Windows
Floating windows are one of the keys to using OpenOffice.org efficiently. In the same way that the design of OpenOffice.org nudges users towards styles and templates, it also leads them towards using floating windows to manage and apply resources. OpenOffice.org is not the first program to use floating windows; Adobe products such as PhotoShop and Illustrator have used them for years, and FrameMaker uses them for applying styles. No other office program that I am aware of, however, makes them such an essential part of the work flow. And no program of any sort customizes their positioning in the same way that OpenOffice.org does.
A floating window seems simple enough when described. It is a window that can be moved in or out of the editing window, moving over existing material while leaving it untouched. Yet this simple concept is one of the main reasons why--outside of the free software philosophy--OpenOffice.org is my office program of choice.
In OpenOffice.org Writer, four main floating windows are available for managing and inserting content:
The Gallery: Graphic and sound files
The Data Source Window: Databases and other data sources
The Navigator: Headings and inserted objects
The Stylist: Styles
In its own area, each of these floating windows quickly becomes essential once you discover it.
The Gallery is a collection of clip art graphics and sounds included with OpenOffice.org. When you select Tools -> Gallery, the Gallery opens at the top of the editing window.
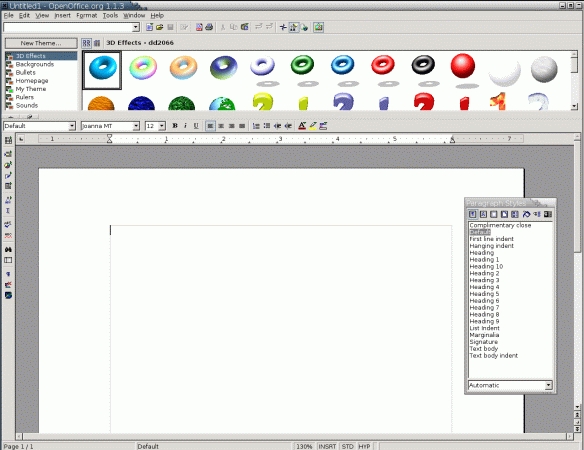
Figure 1. The Gallery Floating Window
Items in the Gallery are organized by folders, also called themes. To find an item, select its theme and then select the item in the pane on the right side of the Gallery. By default, items are displayed as thumbnails, but you can change to the detail view if you prefer to search by files. When you find an item to use, drag and drop it into the document--it's as simple as that.
The default themes are, well, basic would be the polite word. They consist mainly of graphical bullets, buttons, lines and backgrounds suited to a mid-1990s Web site. They can't be edited, either. To add your own graphics or sounds, click the New Theme button. Name the theme on the General tab, and navigate to the files on the Files tab. OpenOffice.org supports a broad array of file formats, so compatibility is rarely a problem. After a theme is created, right-click it and select Properties -> Files to add to its content.
The Data Source window is a floating window available in Writer and Calc. It contains the tools to manage and choose information from all databases, spreadsheets and Mozilla address books that have been added to OpenOffice.org using Tools -> Data Sources. It is opened by clicking View -> Data Sources or pressing the F4 key. It probably is the most underrated of the four floating windows, mostly because relatively few people are familiar with databases.
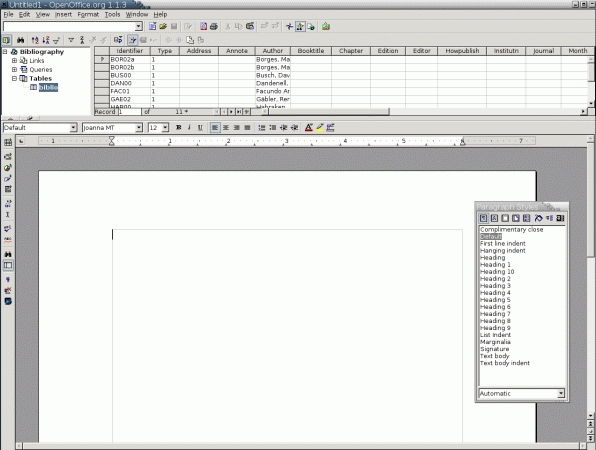
Figure 2. The Data Source Floating Window
As with Gallery, the Data Source window is docked at the top of the editing window. It is divided into two panes. On the left is a tree view of data sources; this pane is called the Explorer. If you select the plus sign beside a data source, the links, queries and tables for the data source open. You also can edit the available data sources by selecting Administrate Data Sources from the right-click menu.
To view data, select an individual table from the tree view. The records for the table then display in the right pane. The columns in the table are fields in the data source, while the rows are records. If necessary, you can use the buttons in the tool bar for finding, filtering and sorting records.
As in the Gallery, you can select individual cells in the data source window and drag them to the last cursor position in your document. This feature especially is useful when the data source contains information such as contact information or repeated information, including standard language about a company or a product.
The Navigator is one of OpenOffice.org's strongest assets. As the name suggests, one of its main uses is for jumping around in a document, but don't be fooled by its name. In addition, the navigator also is an outliner, an inserter of hyperlinks and copies of text and the table of contents for master documents. You can open it by selecting Edit -> Navigator or by pressing F5.
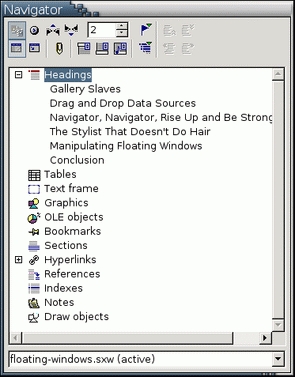
Figure 3. The Navigator Window
The Navigator offers several ways to move around documents. The toolbar has buttons for moving to the previous or next page or to any page that you enter. You can jump between documents at the bottom of the window or by using the Display item option on the right-click menu. In addition, however, the pane of the Navigator lists the types of objects that might be found in the application you are using. In Writer, for instance, the Navigator lists such items as headings, tables and graphics. By contrast, the Calc Navigator includes sheets and database ranges, while Draw and Impress Navigator show slides. Finally, if you want to cycle through all the objects of the same type, you can click the Navigation button to open a much smaller floating window of icons with previous and next buttons.
Objects are listed in the Navigator by the name they are given when they are added. To take full advantage of the Navigator, try adding a descriptive name rather than accepting the default names given by OpenOffice.org, such as Graphic1 or Table14. That way, you know where you are when jumping between objects. For graphics that are linked rather than embedded in the document, the file name often is useful as the object name. Another useful alternative is captions, if they are short.
Another use of the Navigator is for outlining and editing. This use has already been described in "The Outlining and the Ecstasy". Basically, the Writer Navigator displays all the outline levels defined in Tools -> Outline Numbering, regardless of whether they use numbering. By default, these levels are the Heading 1 through 10 paragraph styles. From the Navigator, you can change the style of a particular heading by one level or reposition the heading and all its contents until the next heading of the same level in a new position in the document. Serious outliners complain that these outlining tools are too basic, but using the Navigator is far quicker than cutting and pasting. It also is less error prone. If nothing else, there's no danger of a telephone call interrupting when you've just cut several paragraphs, making you lose data because you've forgotten what you were doing.
A third use of Navigator is its drag-mode, available from the right-click menu of any item listed. This feature refers to what happens when you drag an item in the Navigator to the document. For any type of item, you can add a hyperlink. For headings, you also can choose to insert a section that is either an independent copy of the material below the heading or a linked version that is updated when the original changes.
Finally, in a master document, the Navigator becomes the tool for adding files, indexes or tables of contents and for rearranging the contents, as when outlining in a shorter document. If you write short documents with few objects in them, you may notice the Navigator rarely if at all. However, if your documents are long or complex, get to know the Navigator immediately. Once you understand its features, expect the Navigator to be as essential as your right or, in my case, left hand.
The Stylist is a floating palette for styles. I've raved about the Stylist repeatedly when talking about different aspect of styles, but it's worth another look here. If you are designing or applying styles, then the Stylist in its own way is as important as is the Navigator.
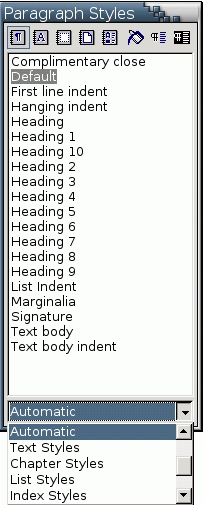
Figure 4. The Stylist
Open the Stylist by selecting Format -> Stylist or by pressing the F11 key. Across the top of the window, you find buttons for changing the view, one for each of the types of styles you can use in Writer. From left to right, they are Paragraph, Character, Frame, Page and Numbering Styles. Once you select the type of style, you can filter the styles displayed from the drop-down list at the bottom. The default display of styles, Automatic, shows a selection of commonly used styles. Most likely, you want to change the display several times as you work. Some useful displays are:
All Styles: A complete lists of all styles of the current type. With some types of styles, this view is too long to use regularly and should be used as little as possible. However, it is preferable to the Automatic view.
Custom styles: A list of user-defined styles. Use this display mode if you prefer to define your own styles and don't want to see the pre-defined ones.
Applied Styles: Styles actually used in the current document. This view duplicates the list on the far left of the Function Bar but is more convenient because it always is open. In a long document, this view usually is the most useful one.
Hierarchical: A tree view that shows which styles are based on which. You can manipulate the hierarchy using the Linked with field on the Organizer tab of each style to reduce the amount of editing you have to do.
HTML Styles: Limits the styles to those directly mapped to HTML tags. If you limit your selections to these styles, the result is a basic, non-style sheet oriented HTML file.
At the top right of the Stylist are three tools:
Fill Format Mode: Applies the current style. With a style and the Fill Format icon selected, place the mouse cursor where you want to apply the style and then drag the cursor to cover the areas to which you want to apply it. Not available for frame or list styles.
New Style from Selection: Creates a new style from the current selection. Make a selection, then click the icon and give the new style a name. Not available for page styles. Use this sparingly, as it quickly can undermine the advantages of using styles.
Update Style: Updates a style based on the current selection. Make a selection, then select the style and this icon. Available only for paragraph and list styles. Use this sparingly, as it quickly can undermine the advantages of using styles.
To modify a style, right-click in the Stylist's pane. A right-click menu opens. Depending on where you click, a menu opens with up to three choices:
New: Create a new style based on the currently selected one. Right-clicking within the Stylist with no style selected is the same as creating a new style when the Default style is selected.
Modify: Edit the currently selected style.
Delete: Delete the currently selected style. Pre-defined styles cannot be deleted, and do not have this option on the right-click menu.
Applying a style is as simple as selecting the contents or placing the mouse cursor in it and then clicking on the style in the Stylist. If the style is not visible, try another display type to see it.
The Stylist is not set up for users who prefer keyboard shortcuts. However, for mouse-users who have suffered drilling down through MS Word's style catalogs, the Stylist is nothing short of a full-tile revelation. For those who like the familiar, Writer does duplicate MS Word's style catalog, but once you discover the Stylist, why would you want it?
Both the Navigator and the Stylist can be docked to one side of the editing window by dragging the title bar while pressing the Ctrl key. As the window nears one side, an outline rectangle displays, showing that the window can be docked on that side. The Stylist can be docked on the right or the left side, while the Navigator also can be docked on the bottom. To undock the window, drag on it while holding the Ctrl key.
Figure 5. Docking a Floating Window
Unlike the Stylist and the Navigator, the Gallery and Data Source floating windows cannot be moved from the top of the main window. However, the size of all floating windows can be adjusted. You also can select the Hide button or use the Floating/Stick button to control whether floating windows hide the contents of the window beneath them or retract to show the content.
Floating windows may be a new concept to many users, but they are worth exploring, especially if you are doing long or highly formatted documents. To coin a phrase, mileage varies, but I estimate that the Navigator and the Stylist alone increase my productivity by 20-25%.
Figure 6. A Tear-Off Floating Window
No wonder, then, that the concept of floating windows is so ubiquitous in Writer. Many of the buttons on the Main menu on the left of the editing bar feature tear-off menus of icons that form small additional floating windows. Moreover, the developer builds of version OOo 2.0 take the concept even further, allowing each tool bar to be dragged into its own floating window. Other programs have similar features, of course, but with so much of my monitor space already taken up by the four main floating windows, I seriously am considering investing in a larger monitor before OpenOffice.org 2.0 comes out in the spring of 2005.
For me, floating windows are to office programs what tabs are to Web browsers: a simple, even obvious feature that makes me more productive than ever before.
Bruce Byfield was product manager at Stormix Technologies and marketing and communications director at Progeny Linux System. He also was a contributing editor at Maximum Linux and the original writer of the Desktop Debian manual. Away from his computer, he listens to punk-folk music, raises parrots and runs long, painful distances of his own free will.
