
Database Replication with Slony-I
Database management systems have been a crucial component of infrastructures for many years now. PostgreSQL is an advanced, object-relational database management system that is frequently used to provide such services. Although this database management system has proven to be stable for many years, the two available open-source replication solutions, rserv and ERServer, had serious limitations and needed replacement.
Fortunately, such a replacement recently became available. Slony-I is a trigger-based master to multiple slaves replication system for PostgreSQL being developed by Jan Wieck. This enterprise-level replication solution works asynchronously and offers all key features required by data centers. Among the key Slony-I usage scenarios are:
Database replication from the head office to various branches to reduce bandwidth usage or speed up database requests.
Database replication to offer load balancing in all instances. This can be particularly useful for report generators or dynamic Web sites.
Database replication to offer high availability of database services.
Hot backup using a standby server or upgrades to a new release of PostgreSQL.
This article walks you through the steps required to install Slony-I and replicate a simple database located on the same machine. It also describes how Slony-I can be combined with high-availability solutions to provide automatic failover.
To install Slony-I and replicate a simple database, first install PostgreSQL from source. Slony-I supports PostgreSQL 7.3.2 or higher; 7.4.x and 8.0 need the location of the PostgreSQL source tree when being compiled. If you prefer using PostgreSQL packages from your favorite distribution, simply rebuild them from the package sources and keep the package build location intact so it can be used when compiling Slony-I. That said, obtain the latest Slony-I release, which is 1.0.5, compile and install it. To do so, proceed with the following commands:
% tar -zxvf slony1-1.0.5.tar.gz
% cd slony1-1.0.5
% ./configure \
--with-pgsourcetree=/usr/src/redhat/BUILD/postgresql-7.4.5
% make install
In this example, we tell the Slony-I's configure script to look in /usr/src/redhat/BUILD/postgresql-7.4.5/ for the location of the PostgreSQL sources, the directory used when building the PostgreSQL 7.4.5 RPMs on Red Hat Enterprise Linux. The last command compiles Slony-I and installs the following files:
$postgresql_bindir/slonik: the administration and configuration script utility of Slony-I. slonik is a simple tool, usually embedded in shell scripts, used to modify Slony-I replication systems. It supports its own format-free command language described in detail in the Slonik Command Summary document.
$postgresql_bindir/slon: the main replication engine. This multithreaded engine makes use of information from the replication schema to communicate with other engines, creating the distributed replication system.
$postgresql_libdir/slony1_funcs.so: the C functions and triggers.
$postgresql_libdir/xxid.so: additional datatype to store transaction IDs safely.
$postgresql_datadir/slony1_base.sql: replication schema.
$postgresql_datadir/slony1_base.v73.sql.
$postgresql_datadir/slony1_base.v74.sql.
$postgresql_datadir/slony1_funcs.sql: replication functions.
$postgresql_datadir/slony1_funcs.v73.sql.
$postgresql_datadir/slony1_funcs.v74.sql.
$postgresql_datadir/xxid.v73.sql: a script used to load the additional datatype previously defined.
Generally, $postgresql_bindir points to /usr/bin/, $postgresql_libdir to /usr/lib/pgsql/ and $postgresql_datadir to /usr/share/pgsql/. Use the pg_config --configure command to display the parameters used when PostgreSQL was built to find the various locations for your own installation. Those files are all that is needed to offer a complete replication engine for PostgreSQL.
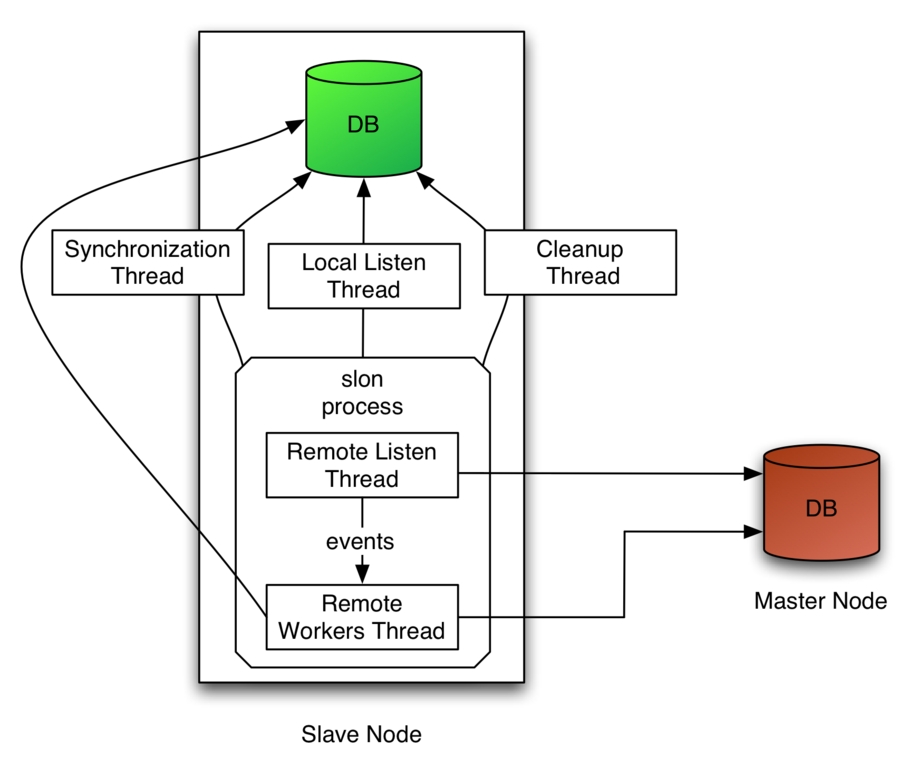
Figure 1. How the Slony-I replication engines work for a master with a slave database.
As you can see in Figure 1, Slony-I's main replication engine, slon, makes use of many threads. The synchronization thread verifies at a configurable interval if there has been replicable database activity, generating SYNC events if such activity happens. The local listen thread listens for new configuration events and modifies the cluster configuration and the in-memory configuration of the slon process accordingly.
As its name implies, the cleanup thread performs maintenance on the Slony-I schema, like removing old events or vacuuming the tables. The remote listen thread connects to the remote node's database to receive events from its event provider. When it receives events or confirmations, it selects the corresponding information and feeds the internal message queue of the remote workers thread. The replication data is combined into groups of transactions. The remote workers thread, one per remote node, does the actual data replication, events storing and generation of confirmations. At any moment, the slave knows exactly what groups of transactions it has consumed.
We first create the database we will replicate. This database contains a single table and sequence. Let's create a user contactuser, the contactdb database and activate the plpgsql programming language to this newly created PostgreSQL database by proceeding with the following commands:
% su - postgres
% createuser --pwprompt contactuser
Enter password for user "contactuser": (specify a
password)
Enter it again:
Shall the new user be allowed to create databases?
(y/ n) y
Shall the new user be allowed to create more new
users? (y/ n) n

% createdb -O contactuser contactdb
% createlang -U postgres -h localhost plpgsql \
contactdb
Then, we create the sequence and the table in the database we will replicate and insert some information in the table:
% psql -U contactuser contactdb

contactdb=> create sequence contact_seq start with 1;

contactdb=> create table contact (
 cid         int4 primary key,
 name        varchar(50),
 address     varchar(255),
 phonenumber varchar(15)
);

contactdb=> insert into contact (cid, name, address,
phonenumber) values ((select nextval('contact_seq')),
'Joe', '1 Foo Street', '(592) 471-8271');
contactdb=> insert into contact (cid, name, address,
phonenumber) values ((select nextval('contact_seq')),
'Robert', '4 Bar Roard', '(515) 821-3831');
contactdb=> \q
For the sake of simplicity, let's create a second database on the same system in which we will replicate the information from the contactdb database. Proceed with the following commands to create the database, add plpgsql programming language support and import the schema without any data from the contactdb database:
% su - postgres
% createdb -O contactuser contactdb_slave
% createlang -U postgres -h localhost plpgsql \
contactdb_slave
% pg_dump -s -U postgres -h localhost contactdb | \
psql -U postgres -h localhost contactdb_slave
Once the databases are created, we are ready to create our database cluster containing a master and a single slave. Create the Slonik cluster_setup.sh script and execute it. Listing 1 shows the content of the cluster_setup.sh script.
Listing 1. cluster_setup.sh
#!/bin/sh

CLUSTER=sql_cluster
DB1=contactdb
DB2=contactdb_slave
H1=localhost
H2=localhost
U=postgres

slonik <<_EOF_

cluster name = $CLUSTER;

node 1 admin conninfo = 'dbname=$DB1 host=$H1 user=$U';
node 2 admin conninfo = 'dbname=$DB2 host=$H2 user=$U';

init cluster (id = 1, comment = 'Node 1');

create set (id = 1, origin = 1,
       comment = 'contact table');

set add table (set id = 1, origin = 1, id = 1,
        full qualified name = 'public.contact',
        comment = 'Table contact');

set add sequence (set id = 1, origin = 1, id = 2,
        full qualified name = 'public.contact_seq',
        comment = 'Sequence contact_seq');

store node (id = 2, comment = 'Node 2');
store path (server = 1, client = 2,
      conninfo = 'dbname=$DB1 host=$H1 user=$U');

store path (server = 2, client = 1,
           conninfo = 'dbname=$DB2 host=$H2 user=$U');

store listen (origin = 1, provider = 1, receiver = 2);
store listen (origin = 2, provider = 2, receiver = 1);
The first slonik command (cluster name) of Listing 1 defines the namespace where all Slony-I-specific functions, procedures, tables and sequences are defined. In Slony-I, a node is a collection of a database and a slon process, and a cluster is a collection of nodes, connected using paths between each other. Then, the connection information for node 1 and 2 is specified, and the first node is initialized (init cluster). Once completed, the script creates a new set to replicate, which is essentially a collection containing the public.contact table and the public.contact_seq sequence. After the creation of the set, the script adds the contact table to it and the contact_seq sequence. The store node command is used to initialize the second node (id = 2) and add it to the cluster (sql_cluster). Once completed, the scripts define how the replication system of node 2 connects to node 1 and how node 1 connects to node 2. Finally, the script tells both nodes to listen for events (store listen) for every other node in the system.
Once the script has been executed, start the slon replication processes. A slon process is needed on the master and slave nodes. For our example, we start the two required processes on the same system. The slon processes must always be running in order for the replication to take place. If for some reason they must be stopped, simply restarting allows them to continue where they left off. To start the replication engines, proceed with the following commands:
% slon sql_cluster "dbname=contactdb user=postgres" &
% slon sql_cluster "dbname=contactdb_slave user=postgres" &
Next, we need to subscribe to the newly created set. Subscribing to the set causes the second node, the subscriber, to start replicating the information of the contact table and contact_seq sequence from the first node. Listing 2 shows the content of the subscription script.
Listing 2. subscribe.sh
#!/bin/sh

CLUSTER=sql_cluster
DB1=contactdb
DB2=contactdb_slave
H1=localhost
H2=localhost
U=postgres

slonik <<_EOF_

cluster name = $CLUSTER;

node 1 admin conninfo = 'dbname=$DB1 host=$H1 user=$U';
node 2 admin conninfo = 'dbname=$DB2 host=$H2 user=$U';

subscribe set (id = 1, provider = 1, receiver = 2, forward = yes);
Much like Listing 1, subscribe.sh starts by defining the cluster namespace and the connection information for the two nodes. Once completed, the subscribe set command causes the first node to start replicating the set containing a single table and sequence to the second node using the slon processes.
Once the subscribe.sh script has been executed, connect to the contactdb_slave database and examine the content of the contact table. At any moment, you should see that the information was replicated correctly:
% psql -U contactuser contactdb_slave
contactdb_slave=> select * from contact;
 cid |  name  |   address    |  phonenumber
-----+--------+--------------+----------------
   1 | Joe    | 1 Foo Street | (592) 471-8271
   2 | Robert | 4 Bar Roard  | (515) 821-3831
Now, connect to the /contactdb/ database and insert a row:
% psql -U contact contactdb
contactdb=> begin; insert into contact (cid, name,
 address, phonenumber) values
 ((select nextval('contact_seq')), 'William',
 '81 Zot Street', '(918) 817-6381'); commit;
If you examine the content of the contact table of the contactdb_slave database once more, you will notice that the row was replicated. Now, delete a row from the /contactdb/ database:
contactdb=> begin; delete from contact
 where cid = 2; commit;
Again, by examining the content of the contact table of the contactdb_slave database, you will notice that the row was removed from the slave node correctly.
Instead of comparing the information for contactdb and contactdb_slave manually, we easily can automate this process with a simple script, as shown in Listing 3. Such a script could be executed regularly to ensure that all nodes are in sync, notifying the administrator if that is no longer the case.
Listing 3. compare.sh
#!/bin/sh

CLUSTER=sql_cluster
DB1=contactdb
DB2=contactdb_slave
H1=localhost
H2=localhost
U=postgres

echo -n "Comparing the databases..."
psql -U $U -h $H1 $DB1 >dump.tmp.1.$$ <<_EOF_
        select 'contact'::text, cid, name, address,
	  phonenumber from contact order by cid;
_EOF_
psql -U $U -h $H2 $DB2 >dump.tmp.2.$$ <<_EOF_
        select 'contact'::text, cid, name, address,
	  phonenumber from contact order by cid;
_EOF_

if diff dump.tmp.1.$$ dump.tmp.2.$$ >dump.diff ; then
        echo -e "\nSuccess! Databases are identical."
        rm dump.diff
else
        echo -e "\nFAILED - see dump.diff."
fi
rm dump.tmp.?.$$
Although replicating a database on the same system isn't of much use, this example shows how easy it is to do. If you want to experiment with a replication system on nodes located on separate computers, you simply would modify the DB2, H1 and H2 environment variables from Listing 1 to 3. Normally, DB2 would be set to the same value as DB1, so an application always refers to the same database name. The host environment variables would need to be set to the fully qualified domain name of the two nodes. You also would need to make sure that the slon processes are running on both computers. Finally, it is good practice to synchronize the clocks of all nodes using ntpd or something similar.
Later, if you want to add more tables or sequences to the initial replication set, you can create a new set and use the merge set slonik command. Alternatively, you can use the set move table and set move sequence commands to split the set. Refer to the Slonik Command summary for more information on this.
In case of a failure from the master node, due to an operating system crash or hardware problem, for example, Slony-I does not provide any automatic capability to promote a slave node to become a master. This is problematic because human intervention is required to promote a node, and applications demanding highly available database services should not depend on this. Luckily, plenty of solutions are available that can be combined with Slony-I to offer automatic failover capabilities. The Linux-HA Heartbeat program is one of them.
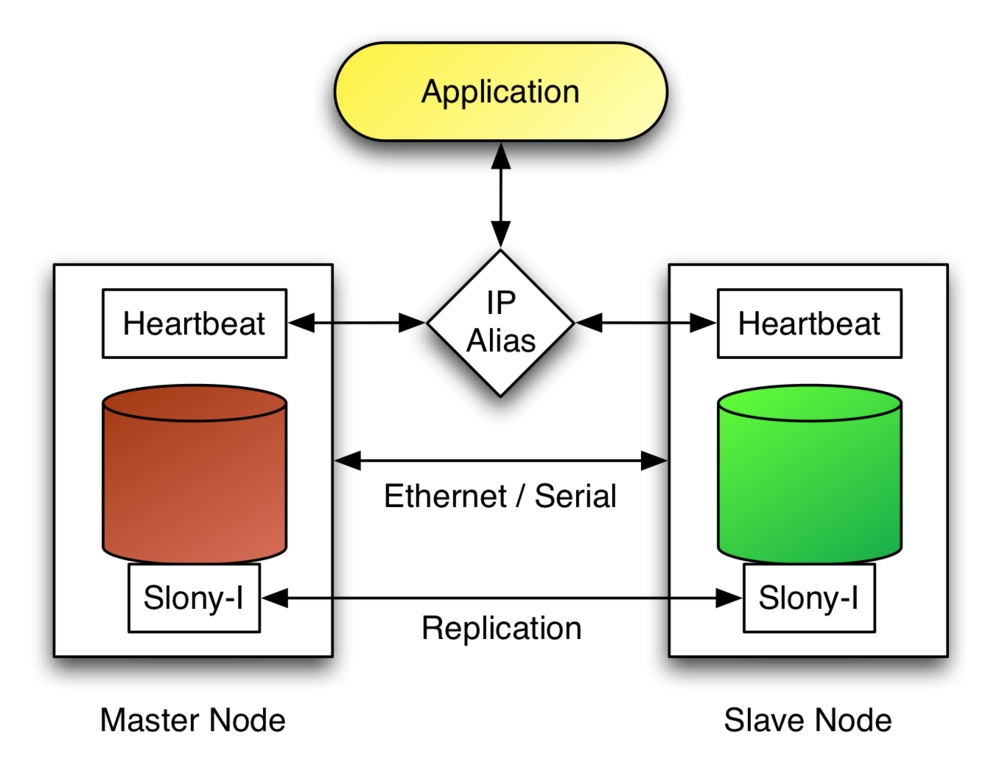
Figure 2. Heartbeat switches the IP alias to the slave node in case the master fails.
Consider Figure 2, which shows a master and slave node connected together using an Ethernet and serial link. In this configuration, the Heartbeat is used to monitor the node's availability through those two links. The application makes use of the database services by connecting to PostgreSQL through an IP alias, which is activated on the master node by the Heartbeat. If the Heartbeat detects that the master node has failed, it brings the IP alias up on the slave node and executes the slonik script to promote the slave as the new master.
The script is relatively simple. Listing 4 shows the content of the script that would be used to promote a slave node, running on slave.example.com, so it starts offering all the database services that master.example.com offered.
Listing 4. promote.sh
#!/bin/bash

CLUSTER=sql_cluster
H1=master.example.com
H2=slave.example.com
U=postgres

DB1=contactdb
DB2=contactdb

su - postgres -c slonik <<_EOF_
cluster name = $CLUSTER;

node 1 admin conninfo = 'dbname=$DB1 host=$H1 user=$U';
node 2 admin conninfo = 'dbname=$DB2 host=$H2 user=$U';

failover (id = 1, backup node = 2);
drop node (id = 1, event node = 2);
From Listing 4, the failover Slonik command is used to indicate that the node with id = 1, the node running on master.example.com, has failed, and that the node with id = 2 will take over all sets from the failed node. The second command, drop node, is used to remove the node with id = 1 from the replication system completely. Eventually, you might want to bring back the failed node in the cluster. To do this, you must configure it as a slave and let Slony-I replicate any missing information. Eventually, you can proceed with a switchback to the initial master node by locking the set (lock set), waiting for all events to complete (wait for event), moving the set to a new origin (move set) and waiting for a confirmation that the last command has completed. Please refer to the Slonik Command Summary for more information on those commands.
Replicating databases using Slony-I is relatively simple. Combined with the Linux-HA Heartbeat, this allows you to offer high availability of your database services. Although the combination of Slony-I and Linux HA-Heartbeat is an attractive solution, it is important to note that this is not a substitute for good hardware for your database servers.
Even with its small limitations, like not being able to propagate schema changes or replicate large objects, Slony-I is a great alternative to both rserv and ERServer and is now, in fact, the preferred solution for replicating PostgreSQL databases. Slony-II even supports synchronous multimaster replication and is already on the design table.
To conclude, I would like to thank Jan Wieck, the author of Slony-I, for reviewing this article.
Resources for this article: /article/8202.
Ludovic Marcotte (ludovic@sophos.ca) holds a Bachelor's degree in Computer Science from the University of Montréal. He is currently a software architect for Inverse, Inc., an IT consulting company located in downtown Montréal.

