
Encrypt Your Root Filesystem
In the Linux Journal article “Implementing Encrypted Home Directories” (August 2003), I described how to encrypt home directories transparently. This article describes how to implement another technique, an encrypted root filesystem. I discuss the GNU/Linux boot process and software requirements, present some instructions, introduce Open Firmware and discuss other relevant considerations. The system I use to teach these concepts is a New World PowerPC-based Apple iBook running a pre-release of Fedora Core 3. Despite these specifics, the concepts and procedures in this article can be applied to any device, architecture or operating system. My instructions assume you have a spare USB Flash disk and your system's firmware has the ability to boot off of it.
I also assume the reader is comfortable applying source patches and compiling programs. As of Fedora Core 3 Test 3, the mkinitrd and initscripts packages require patching to support an encrypted root filesystem. A basic understanding of how to manage partitions and create filesystems also is required. Performing a basic install of a Linux distribution is beyond the scope of this article.
Before presenting the technical steps involved, a higher-level concept must be discussed, trust. Trust is intertwined with cryptography and authentication. An implicit assumption of trustworthiness is given to any device that has an electronic key. For example, when I share my bank account PIN with an automatic teller machine, I trust that the ATM will not share my PIN with an inappropriate third party. In the same way, when I provide an encryption key to my computer, I assume the key will not be shared with anyone else. I trust the computer to keep the secret between us.
So, can you trust your computer? Unless you carry it with you everywhere, you really can't. This is true even if the disks have been encrypted. Consider this scenario: someone steals your computer as you sleep. The thief makes a copy of the encrypted contents of the computer, even though they are useless to him without their encryption key. He then replaces the encrypted laptop contents with something a little more diabolical and puts the computer back. When you wake up the next day, the computer prompts for an encryption password as it does every morning. But this time when you provide the key it electronically transmits the key to the thief. Because he now has a copy of your data and key, he can read your files.
This scenario may be a bit far-fetched, but it does illustrate a point. You can't trust your laptop. It's too big to keep your eyes on all the time. Therefore, no matter how well implemented your encryption system is, it is built without the prerequisite foundation of trust.
To ensure that we can trust the computer's boot process, we need to separate it from the computer. Consider this: you carry the keys to your car with you instead of carrying your car. Your encryption key is a natural conceptual leap from your car key. You can protect your encryption key more easily, so you don't have to carry your computer everywhere. To take things a little further and to address the above scenario, we also will place the software required to boot the computer on this key. The Flash disk will serve as this key. By protecting the software that boots the system initially, in addition to the encryption key, we can mitigate the risk of the boot process being hijacked.
An understanding of how your computer boots is required, because unlocking an encrypted root filesystem is integral to the bootstrap process. The current, stable kernel series, 2.6, optionally uses initramfs to help boot, as documented in LWN.net's “Initramfs Arrives”. Initramfs is a cpio archive that the kernel now knows how to unpack into a RAM-based disk. This unpacked filesystem contains a script that traditionally loads kernel modules needed to mount the root filesystem. In our case, this script also unlocks the encrypted root filesystem. More information on this subject can be found in the files buffer-format.txt and initrd.txt that are distributed with the Linux kernel sources.
Several filesystem encryption interfaces are available for Linux. Jari Ruusu's Loop-AES is one such project. Several cryptoloop variations that provide an encrypted loopback device also exist. This article focuses on the dm-crypt interface provided by recent 2.6 Linux kernels. This interface currently is preferred by the Fedora Project, and dm-crypt modules are provided by Fedora's kernel packages. Also required is a statically linked cryptsetup. This utility simplifies the management of dm-crypt devices. Finally, parted and hfsutils are used to manage the boot filesystem.
Unfortunately, Fedora Core's anaconda installer does not yet support installing to an encrypted filesystem out of the box. To bypass this limitation, you must leave a partition free, install Fedora, format the free partition as an encrypted filesystem and copy the originally installed data onto the new encrypted filesystem. For the purpose of simplicity, I assume Fedora is to be installed onto two partitions: /dev/hda4, mounted at /home, and /dev/hda5, mounted at /. Because /home is not populated until after Fedora is installed, we can use /dev/hda4 as our spare partition and /dev/hda3 as the swap partition.
Install Fedora Core 3, mounting /dev/hda4 at /home and /dev/hda5 at /. Do not add any nonroot users yet, as /home will be wiped clean later. At this point, you should have a fully functioning Linux system.
Before an encrypted filesystem is set up, you should randomize the partition it will occupy. This eliminates a potential leak of information about the disk's contents. Figure 1 demonstrates an abstract disk that is half-full and not randomized properly. Figure 2 demonstrates a disk that was randomized properly before being formatted to contain an encrypted filesystem. Notice that, given Figure 1, one can gain some knowledge about its contents (such as that they span one-half of the disk). Figure 2 affords an adversary no such luxury. In this case, the disk could as easily be empty as full. A partition is randomized by overwriting its contents with random data: dd if=/dev/urandom of=/dev/hda4. This process can take a long time, because creating random data is somewhat difficult.

Figure 1. When you don't randomize the disk partition before creating the filesystem, an attacker can see how full it is.

Figure 2. Randomizing the partition hides how much is used.
To create an encrypted ext3 filesystem on /dev/hda4, use the following steps:
1) Ensure that the aes, dm-mod and dm-crypt modules have been loaded into the kernel.
2) Unmount the partition that will host the encrypted root filesystem, /dev/hda4, from /home:
# umount /dev/hda4
3) Create a random 256-bit encryption key and store it at /etc/root-key:
# dd if=/dev/urandom of=/etc/root-key bs=1c count=32
This key will be copied to the Flash disk later.
4) Create a dm-crypt device, encrypted using the key you just generated:
# cryptsetup -d /etc/root-key create root /dev/hda4
Accessing /dev/mapper/root now provides an encrypted layer on top of /dev/hda4. By default, cryptsetup creates an AES-encrypted dm-crypt device and assumes a keyspace of 256 bits.
5) Create an ext3 filesystem on /dev/mapper/root:
# mkfs.ext3 /dev/mapper/root
6) Mount the new filesystem:
# mkdir /mnt/encroot
# mount /dev/mapper/root /mnt/encroot
7) Now that you have an encrypted filesystem, you must populate it with the contents of /dev/hda5 (the original root filesystem):
# cp -ax / /mnt/encroot
8) Finally, create an entry in /mnt/encroot/etc/crypttab so that various utilities know how the filesystem was configured:
root /dev/hda4 /etc/root-key cipher=aes
Now that we have our encrypted filesystem ready, it is necessary to understand a little more about the target architecture's boot process. Generally, computers have firmware that hands off execution to the software that will complete the system boot. Protecting firmware is beyond the scope of this article, so we assume that the system's firmware can be trusted. Most readers probably are familiar with the BIOS, the boot firmware used by the PC platform. I focus on Open Firmware, a boot system used by computer manufacturers such as Apple, Sun and IBM.
The installation instructions for NetBSD/macppc provide a good introduction to Open Firmware. We are interested in using Open Firmware's command-line interface to configure the computer to boot from a removable Flash disk. Open Firmware allows you to view the devices connected to a computer and view and set the value of firmware variables.
The Open Firmware prompt can be accessed by holding down option-command-o-f on a New World (G3 and later) Apple computer during the initial boot process.
The variable boot-device is used to determine what device the system should use to boot. The printenv command allows one to inspect its current value:
> printenv
[...]
boot-device	hd:,\\:txbi	hd:,\\:txbi
This essentially means “boot by executing the file of HFS type txbi on the first IDE disk.” The second : character (before txbi) causes the token to be interpreted as an HFS file type. Otherwise, txbi would be interpreted as the path to a file. In my case, the token hd is actually an alias to the more complicated /pci@f4000000/ata-6@d/disk@0. This string represents the path through various subsystems to the first IDE disk. You can see what device an alias resolves to using Open Firmware's devalias command.
To set the boot-device correctly we need to discover by what name Open Firmware knows our Flash disk. Examining the device tree printed by the ls command reveals the path to the Flash disk:
> dev / ls
[...]
	/pci@f2000000
		[...]
		/usb@1b,1
			[...]
			/disk@1
[...]
Now that we know a little bit about the firmware's view of the computer, we must spend some time investigating the software the firmware initially executes: the bootloader. Generally, Linux systems that run on Apple's PowerPC architecture employ a program called yaboot to boot the system. yaboot is similar to LILO or GRUB and contains two key programs, ofboot.b and yaboot. ofboot.b provides the first stage of the bootstrap process. Essentially, it is ofboot.b's job to determine what operating system to boot. For example, if a system has both Mac OS X and Linux installed, ofboot.b executes Mac OS X or Linux's bootloader. If the user chooses to load Linux, ofboot.b executes yaboot, the second stage of the bootstrap process. yaboot then loads the Linux kernel and, in our case, an initrd. Figure 3 provides a illustration of how Linux boots using an encrypted root filesystem on the PowerPC architecture.
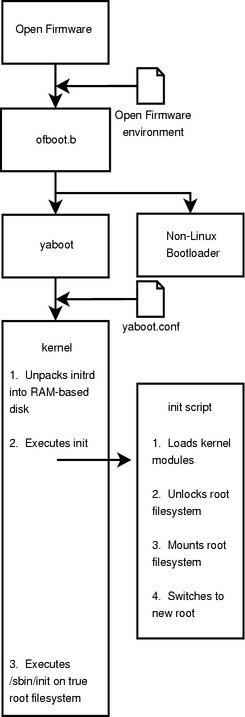
Figure 3. The Booting Process on a PowerPC-Based System with Open Firmware
Our removable boot device requires the ofboot.b and yaboot programs, a Linux kernel and an initrd that contains the encryption key. Apple's current PowerPC-based architecture expects its boot media formatted using HFS.
1) Use the parted program to create the proper bootable partition on the Flash disk (mine is 64MB and is accessed using the device node /dev/sda):
# parted /dev/sda
(parted) mklabel mac
(parted) print
Disk geometry for /dev/sda: 0.000-62.500 megabytes
Disk label type: mac
Minor    Start       End     Filesystem  Name                  Flags
1          0.000      0.031              Apple
(parted) mkpart primary hfs 0.031 62.500
(parted) print
Disk geometry for /dev/sda: 0.000-62.500 megabytes
Disk label type: mac
Minor    Start       End     Filesystem  Name                  Flags
1          0.000      0.031              Apple
2          0.031     62.500              untitled
(parted) set 2 boot on
(parted) name 2 Apple_Boot
(parted) quit
2) Create an HFS on the boot partition:
# hformat /dev/sda2
3) Configure yaboot to boot off the appropriate device by modifying /mnt/encroot/etc/yaboot.conf. The following is a minimum configuration:
boot=/dev/sda2
ofboot=/pci@f2000000/usb@1b,1/disk@1:2
partition=2
install=/usr/lib/yaboot/yaboot
magicboot=/usr/lib/yaboot/ofboot
default=linux
image=/vmlinux
        label=linux
        root=/dev/hda4
        initrd=/initrd.gz
        read-only
The value /pci@f2000000/usb@1b,1/disk@1:2 comes from our earlier inspection of the Open Firmware device tree, and /pci@f2000000/usb@1b,1/disk@1 is the first disk on the USB bus on the PCI bus at f2000000. The device we are interested in is a disk, and :2 means partition 2.
4) Install the bootstrap programs and kernel to /dev/sda2:
# ybin --config /mnt/encroot/etc/yaboot.conf -v
# mount /dev/sda2 /media/usbstick
# cp /boot/vmlinux /media/usbstick
At this point, the crypto-aware initrd must be installed onto the Flash disk. Fedora provides a tool named mkinitrd that can create an initrd. However, at the time this article was written, mkinitrd did not know how to mount an encrypted root. The patch at https://bugzilla.redhat.com/bugzilla/show_bug.cgi?id=124789 provides this functionality. Once the patch is applied, mkinitrd reads /etc/crypttab and creates an appropriate initrd:
1.  mkinitrd --authtype=paranoid -f /media/usbdisk/initrd.gz <kernel version>
2.  umount /media/usbstick
The file /mnt/encroot/etc/fstab should be updated to reflect the changes made:
/dev/mapper/root / ext3 defaults 1 1
Encrypted swap or the absence of swap space entirely is a prerequisite for an encrypted filesystem. Reasons for this can be found in “Implementing Encrypted Home Directories” and in a BugTraq mailing-list thread titled “Mac OS X stores login/Keychain/FileVault passwords on disk”. When the patch at https://bugzilla.redhat.com/bugzilla/show_bug.cgi?id=127378 is applied to the initscripts package, Fedora allows users to encrypt their swap partitions using a randomly generated session key. Because swap space isn't generally required to be consistent across reboots, the session key is not saved when the system is powered down. To enable encrypted swap, complete the following steps:
1) Add the following line to /mnt/encroot/etc/fstab, replacing any previous swap record:
/dev/mapper/swap swap swap defaults 0 0
2) Add the following line to /mnt/encroot/etc/crypttab to tell the system how to perform the encryption:
swap /dev/hda3 /dev/urandom swap
At this point we should be able to reboot the system and use our encrypted filesystem. Again, we need to hold down option-command-o-f to enter the Open Firmware prompt.
As demonstrated above, the path to the Flash drive's second partition is /pci@f2000000/usb@1b,1/disk@1:2. Knowing this, we can build the path /pci@f2000000/usb@1b,1/disk@1:2,\ofboot.b. The , deliminates between the partition number and the filesystem path; \ofboot.b is the filesystem path, and \ is like UNIX's / with the filesystem root at the device's root:
> dir /pci@f2000000/usb@1b,1/disk@1:2,\
Untitled            GMT                   File/Dir
   Size/      date       time  TYPE       Name
   bytes   9/ 3/ 4   21:44:41  ???? ????  initrd.gz
 2212815   8/28/ 4   12:24:21  tbxi UNIX  ofboot.b
    3060   9/ 3/ 4    2:21:20  ???? ????  vmlinux
  141868   9/28/ 4   12:24:22  boot UNIX  yaboot
     914   9/28/ 4   12:24:22  conf UNIX  yaboot.conf
This confirms that Open Firmware can read the files required to boot the system. Setting the value of the boot-device variable to /pci@f2000000/usb@1b,1/disk@1:2,\ofboot.b causes the system to boot from the Flash disk: setenv boot-device /pci@f2000000/usb@1b,1/disk@1:2,\ofboot.b.
Once the system successfully boots from the encrypted root, it is necessary to destroy all of the data on /dev/hda5. This can be done with the same procedure used to randomize the root filesystem's partition: dd if=/dev/urandom of=/dev/hda5. You may want to perform this overwrite several times. For one standard on sanitizing disks, see Chapter 8 of the US Department of Defense's “National Industrial Security Program Operating Manual”.
Following a safe sanitization, /dev/hda5 may be used as /home. The /home filesystem also should be encrypted. Luckily, this is a much simpler process, because the system need not boot off of /home. Creating the filesystem itself is similar to the steps taken to create the root filesystem.
1) Ensure that the aes, dm-mod and dm-crypt modules have been loaded into the kernel.
2) Unmount the partition that will host the encrypted home filesystem, /dev/hda5, from /home:
# umount /dev/hda5
3) Create a random 256-bit encryption key, and store it at /etc/home-key. One way to do this is:
# dd if=/dev/urandom of=/etc/home-key bs=1c count=32
4) Create a dm-crypt device, encrypted using the key you just generated:
# cryptsetup -d /etc/home-key create home /dev/hda5
5) Create an ext3 filesystem on /dev/mapper/home:
# mkfs.ext3 /dev/mapper/home
6) Mount the new filesystem:
# mount /dev/mapper/home /home
7) Create an entry in /etc/crypttab, so that various utilities know how the filesystem was configured:
root /dev/hda5 /etc/home-key cipher=aes
8) Finally, update /etc/fstab to contain an entry for /home:
/dev/mapper/home /home ext3 defaults 1 2
At this point, it is appropriate to begin adding nonroot local user accounts to the system. Setting up the encrypted root filesystem is now complete.
Having all of your data encrypted can be dangerous. If the encryption key is lost, your data is lost. Because of this, it is important to make backup copies of the Flash disk containing your key. It also is crucial to perform plain-text backups of the encrypted data. If you maintain a bootable rescue disk, it may make sense to rethink the system components that should be on it. A copy of your root and home filesystem keys, parted, hfsutils, the cryptography-related kernel modules and cryptsetup are excellent candidates.
How effective is this technique in protecting your data? In his book, Secrets and Lies, Bruce Schneier presents a technique that is useful in evaluating this. An attack tree can be used to model threats. Figure 4 presents the beginning of an attack tree for our encrypted filesystem. It is important to note that this attack tree is not complete and probably never will be.
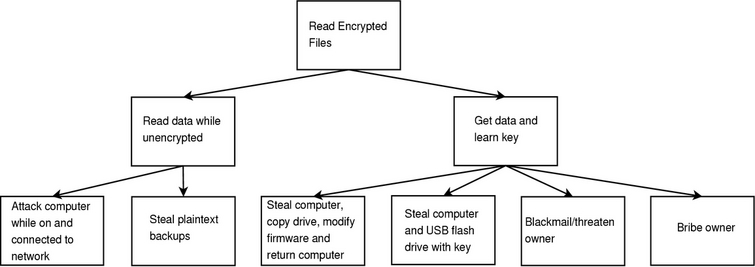
Figure 4. How can an attacker read the encrypted filesystem?
By using the techniques in this article and a little creative thinking, it is possible to make the data on your hard disk more resistant to certain types of theft. It is important to keep in mind the types of attacks that circumvent these defensive techniques. Though other techniques must be used to protect against network-based and other attacks, those described here are a powerful tool toward the goal of overall system security.
Resources for this article: /article/7865.
Mike Petullo currently is working at WMS Gaming as a test engineer. He has been tinkering with Linux since 1997 and welcomes your comments at lj@flyn.org.

