
Building Panoramic Images in The GIMP
Panoramic landscapes make for some amazing photos. There's nothing like the feeling of relaxation and tranquility gained by gazing over the vivid images of sweeping wilderness, minus the hassle of actually getting there. Using a digital camera, it's possible to stitch photos together to simulate the expensive effects of a landscape filter. After I'd bought my digital camera (a Nikon Coolpix 4300) and set it up to work under Linux, getting software to stitch photos together was my next task.
The Nikon Coolpix 4300, like most digital cameras, comes with software on CD to perform rudimentary photo-stitching. Unfortunately, the software is not for Linux. Using Google, it was hard to find anything that would do the job under Linux, until I remembered The GIMP. There are two ways to use The GIMP to create a panoramic photo, easy and hard. The hard way is to set up layers out of the different photos, edit filter and layer masks, mess about with transparency and layer them together, manually.
The easy way is to use Pandora. Pandora is a plugin for The GIMP that takes photos and tries to match the edges of the photos together, using a best guess at where one photo ends and the next begins.

Figure 1. A panorama of suburban Japan. The consistency of the light has made this an easy set of photos to stitch together.
Because Pandora is a GIMP plugin, to install it, you need The GIMP version 1.2 or 1.3, as well as Gimptool, which is provided in The GIMP development package. Untar Pandora to a working directory, cd into it, and run make. Pandora detects which version of The GIMP is available and installs it automatically.
Fire up The GIMP. Pandora should now be available under the Extensions (Xtns) menu as Make Panorama. Select the photos you want to stitch together and click the Add File button; under The GIMP 1.2, you need to add the photos individually, as they should appear from left to right. It's possible to create vertical panoramas, but you need to make use of the rotate feature, as Pandora works horizontally.
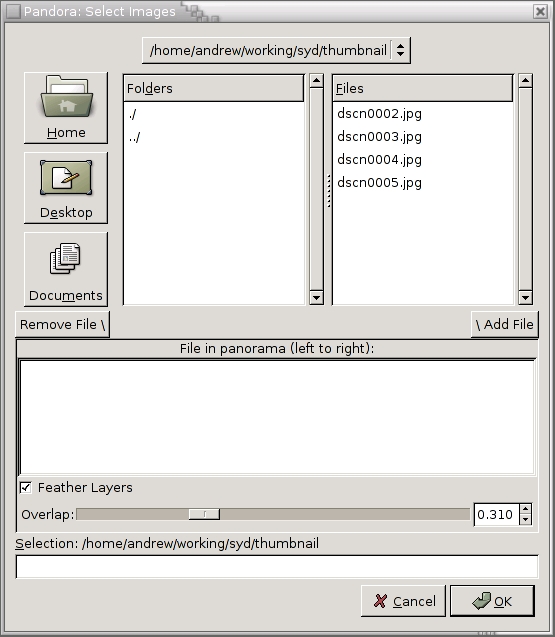
Figure 2. Selecting the Images to Be Incorporated in the Panorama
Pandora can be set with some options before it does its work. The option to feather the layers creates a fade toward the edge of the photos, where the photo becomes slightly translucent. Keep it toggled to create a semi-transparent fade at the sides of each photo, making them easier to line up.
Related to feathering is overlap. Often, photos have minor differences in sky colour; overlap helps to blend the difference so it isn't noticeable. The higher the overlap, the further in from the edge of the photo the feathering takes effect.
Once you're happy with your choices, click OK and Pandora starts to perform its magic.
When the processing has finished, you are presented with a set of layers, one for each original photo. The layers, represented with a dotted line at the edge, should be lined up roughly to what Pandora thinks are the common portions of each picture. Because Pandora is mostly a means of automating the layer creation and feathering, your panorama likely may require a bit more work before you can start impressing your friends.
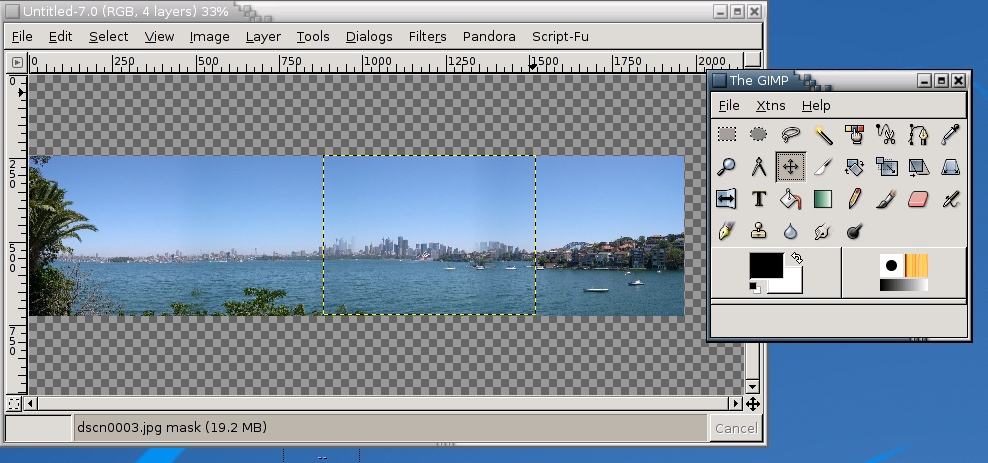
Figure 3. The selected layer is highlighted, and we can move it using the Move layers tool (selected).
Using the Move layers and selections tool (represented by the four-directional arrow), you can select a layer and move it, by holding the left mouse button down while moving the mouse. The easiest way to line the images up is to find a common landmark at the edge of each photo—mountains or trees are ideal—and use these as the anchor around which the images are aligned.
Once the layers are lined up to your satisfaction, you may notice that the pictures have moved out of their perfect vertical alignment, resulting in a jagged top and bottom edge.
Right-click in the image window, and choose Layers→Flatten Image. This merges the layers into one. If you haven't finished lining up the edges, you can undo this last action. Now, using the Select rectangular regions tool, select a region from the bottom left corner to the top right, ignoring all white space caused by the jagged edges mentioned earlier. Copy into a new image, save and you're done.
Obviously, Pandora can't cope well in every circumstance. Different amounts of light between photos, particularly when your photos include sky or water, make it difficult to create a consistent picture. This is most notable when shooting toward the sun. Moving subjects, such as cars or people, can result in the occurrence of ghosted images. Cityscapes containing a lot of right angles can emerge imperfectly when the angle of each photo is not perfect. Finally, if the source photos are not ideal, your results won't be either. A fixed tripod or at least holding the camera close to you with your elbows against your body gives a standard height and angle that can make your photos much easier to line up. The better your source photos, the less effort you need to use in making your panoramas fantastic.
As with most things, you can find tutorials and hints on creating panoramas on the Net. By using Pandora, it's possible for a rank amateur to come up with some great results, even with a limited knowledge of The GIMP and layers. The picture in Figure 4 shows a successful scene, where the sky and water tones are consistent and the edges are lined up.
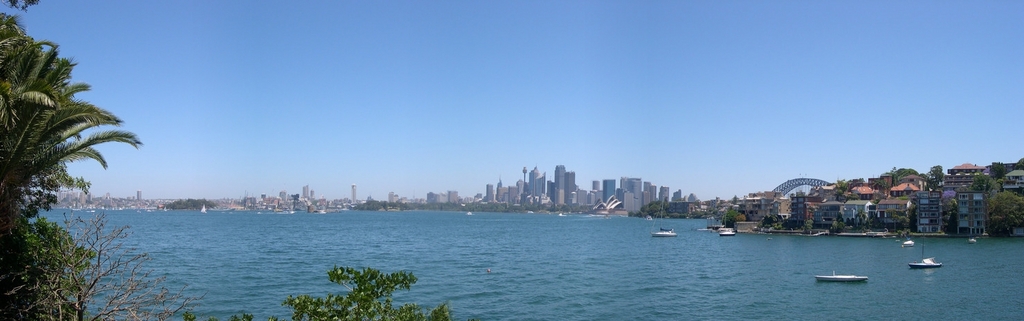
Figure 4. Sydney from Cremorne Point—water and buildings are difficult, but the rewards are worth it.
Resources
Pandora is a small download from the Shallow Sky Web site: www.shallowsky.com/software/pandora.
Panoguide is the definitive resource for panoramic photos: www.panoguide.com.
Red Skies at Night (previously mentioned in LJ, April 2003) has some great GIMP tutorials for digital photography enthusiasts: cs.uhh.hawaii.edu/~jeschke/photography/articles/gimp/tutorials.shtml.
Andrew Burton (adb@iinet.net.au) lives in Sydney, Australia, where there is plenty of inspiration for taking panoramic photos.
