
OOo Off the Wall: Setting Up Page Styles in OOo Writer
Page styles are one of OpenOffice.org's strongest innovations. Together with text frames and integration with Draw, these features nudge OOo Writer out of the word processor category and into the lower reaches of desktop publishing.
Unfortunately, page styles also are one of the hardest features for new users to master. Users of other word processors may be familiar with paragraph and character styles but probably do not know page styles. If they are used to master pages in FrameMaker or PageMaker, users are only slightly better off, because page styles take a different approach to layout than do master pages. And, to make matters worse, OpenOffice.org's version 1.1 on-line help barely goes beyond a description of the fields in the Page Style window.
To use page styles effectively, users need a specific combination of knowledge. To start with, they need a basic knowledge of design elements. Equally important, however, they need to know where the tools are located throughout Writer that let users apply this knowledge.
What follows is a summary of the design elements in Writer and the tools to apply them. It explains the planning you need to do beforehand and how to design the general page and individual elements, such as headers, footers, footnotes and reoccurring graphics. Finally, it explains how to automate the application of page styles for greater convenience as you write.
Before you build styles, ask yourself what styles you are going to need. Many of the pages you need may already exist in OpenOffice.org.
In typography, the basic page is the right one, because when a book is bound, the first page you see after the inside cover is a right-hand page. If you are planning a simple document, modify the Right Page style for your purposes.
If you are designing a document that will be bound, however, or if you simply are a fan of traditional design, you probably want to use the Left Page style as well. Generally, the left page mirrors the right page, so refer to File→Page Preview frequently to check that you are keeping the two pages symmetrical.
Left and right pages are mirror images for at least two good reasons. First, when a book is bound, the margin closest to the center of the book needs to be wider than the outside margin to accommodate the stitches or the glue. This is the right margin on the left page, and the left margin on the right page. Second, regardless of whether the page number is in the header or footer, designers usually prefer to put it on the outside margin of the page to make it easier to read.
For a letter with its sender's address and mailing address, or for a chapter of a longer work, you should design the First Page style so readers can distinguish it at a glance. The first page usually is a modified right page. Its modifications can include a large chapter number, a graphic, a start farther down the page, a drop capital for the first letter or word and a different header.
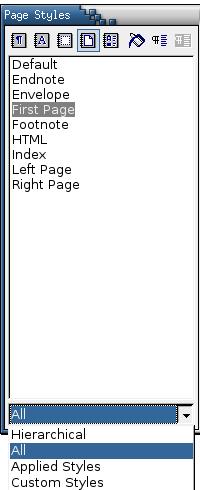
Figure 1. Designing the First Page
Other page styles depend on your needs. A two-column Index page style can save space, and you may want to create an Index First Page for it. If you need the occasional landscape page for diagrams, you also may want to create that style. Other page styles depend on your needs. If you plan all of your page styles at the same time, though, you can ensure that they look the same and are not a jumble of improvisations.
Creating a new page style is a simple process. Begin by activating the Stylist floating palette by pressing the F11 key. Then, select the fourth icon from the left on the top of the Stylist. Right-click an entry in the Stylist and select New or Modify. If you select New, the new style is based automatically on the existing style that you click.
Start with the basic formatting listed in Table 1; we revisit other selections later.
Table 1. Basic Formatting for Page Styles
| Field | Suggested Settings |
|---|---|
| Page→Format | Letter in North America, A4 anywhere else. The most common reason for a different size is using envelops of varying sizes. |
| Orientation | Portrait for most text-based documents, landscape for diagrams. |
| Margins | Usually .7 to 1.0 inches. Don't be afraid to be generous with the margins; narrow margins make the entire page cramped. In traditional design for bound books, make the side closest to the center of the book at least .25 inches wider than the outside margin to allow room for binding. |
| Page→Page Layout | Sets up mirrored pages for styles other than Left Page and Right Page. |
| Background | For most purposes, leave the background white. If you do use color, test that the text is readable against the background. The heyday of Wired is long past. |
| Borders | For most purposes, none. Borders around text often are a sign of design insecurity. At times, though, a border may help to group text or contribute to a complex design. |
| Columns | For most purposes, use one column. If you select landscape for a text document, plan on at least two columns or the lines will be too long for easy reading. Too short of a column for the font size may result in too many hyphens. |

Figure 2. Changing the Background and Borders
Aside from their positions, headers and footers are the same thing: text frames repeated on every page of a particular style. They carry general information about the document, such as the page number, the writer's name or the chapter's title. They also can be used to insert a reoccurring graphic. If not much information is needed, then only one of the two frames may be used.
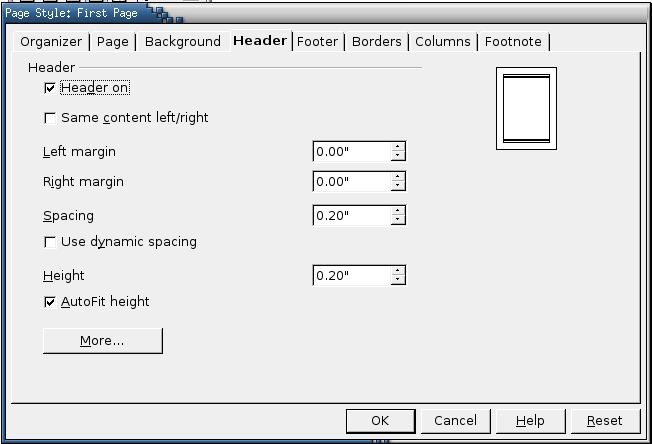
Figure 3. Adding a Header
To set up the basic behavior of a header or footer, go to the appropriate tab in the Page Style window. The Advanced button opens additional settings should you need them. Table 2 indicates the fields with which you should be most concerned.
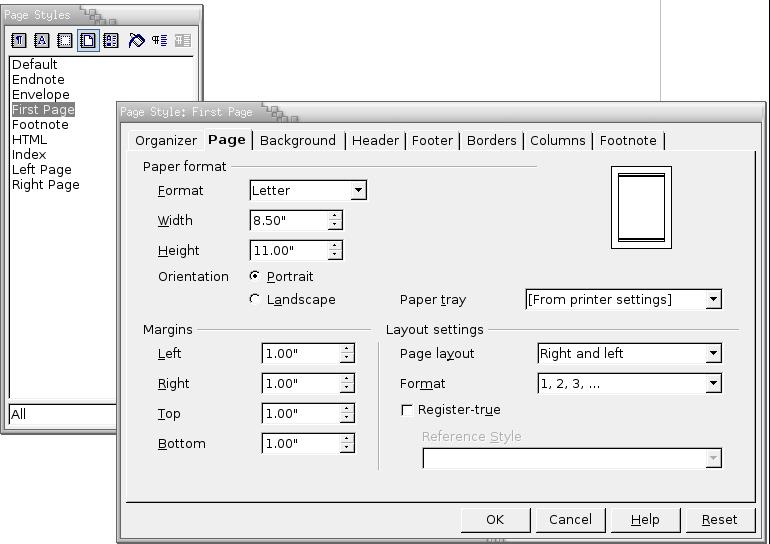
Figure 4. Creating the Page Design
Table 2. Designing Headers and Footers
| Field | What It Does |
|---|---|
| Header On & Footer On | Creates the header or footer. |
| Same Content Left/Right | Duplicates content on left and right pages. When you're using the Left Page and Right Page styles, this field is unnecessary, so it's turned off. |
| Left Margin & Right Margin | The distance from the edges of the page. Header and footer margins are separate from those of the main text frame on the page. In most cases, however, you want the margins to have the same settings. |
| Spacing | The amount of space between the footer and the bottom of the page or the header and the top of the page. |
| Using Dynamic Spacing | Automatically adjusts the spacing as you add content. This setting can be useful if you add a graphic or are unsure of your present needs. |
| Height | The vertical dimension for the header or footer. |
| Autofit Height | Automatically adjusts the height of the header or footer to the content. This setting can be useful if you add a graphic or are unsure of your present needs. |
| Line Arrangement | Adds a line to the border of the header or footer frame. Click on the side of the border where you want the line (generally, the bottom of the header and the top of the footer). |
| Linestyle | Sets the thickness design and color of the line. A common beginner's mistake is to use too thick of a line. Try to coordinate the color with the page background and the color of headings or any nearby graphics. |
| Spacing to Contents | Sets the spacing between the header or footer and other content. |
| Spacing to Contents→Synchronize | Places an equal amount of space between the header or footer and other content on all sides. |
| Shadow Style | Sets the position and color of a shadow, as well as its distance from the header or footer. This effect is easy to overdo, so use it sparingly. |
Once you have the look of your headers and footers defined, you can add content. You can add what you want manually, or by using fields, you can have headers and footers update automatically when the content changes. Table 3 shows some of the ways you can automate content.
Table 3. Adding Contents to Headers and Footers
| Field | What It Does | Where to Find It |
|---|---|---|
| Page Number | Adds the page number | Insert→Fields→Page Number |
| Page Count | Inserts the total number of pages in the document. | Insert→Fields→Page Count; you can combine this field with the page number and the typing of two characters to produce: <page number> of <page count>) |
| Chapter | Adds the text of the last Heading paragraph style to the header or footer | Insert→Fields→Other→Document→Chapter Automatically; this adds the last heading style used to the header or footer. Use the Layer field to set which level of heading is used in the field. For example, on the First Page, you could set the Layer to 1 to put the Title in the footer, and on other pages you could set the Layer to 2 to put the subheadings in the footer to help readers scan for content. |
| Chapter Number | Adds the number of the last Heading paragraph style to the header or footer when Outline numbering is used. | Outline Numbering must be set up for headings in Tools→Outline Numbering. Then select Insert→Fields→Other→Document→Chapter Number. |
Many page designs do not require footnotes. For those that do, OOo Writer offers the design choices listed in Table 4.
Table 4. Footnote Settings
| Field | What It Does |
|---|---|
| FootNote Area | Not larger than page area. |
| Maximum Footnote Height | Sets the maximum space given to footnotes. |
| Space to Text | The space between the footnote and the main text frame. |
| Separator Line→Position, Weight, Length | The line that divides the footnotes from the rest of the page. |
| Spacing to Footnote Contents | The space between the separator line and the footnote text. |
Unfortunately, version 1.1 of OpenOffice.org has no way of setting a text frame to appear every time a specific page style is used. You can work around this limitation in several ways:
Place the reoccurring elements in the header or the footer. Headers and footers are the only types of frame that allow you to place the same content on different pages. If necessary, you can expand the size of the header or footer. However, this method can disrupt the page style, so it is a limited solution at best.
Add a graphic using the Background tab of the Page Style window. If you set the As field to Graphic, you can browse for the graphic and select Type→Position to place it in one of nine pre-set positions. The limitation of this method is that eight of these positions are around the edge of the text frame, and the ninth is in the middle. In most instances, these probably are not the places where you want the reoccurring element to go. You can compensate by adding a background that is the same color as the paper you'll be using to offset the location of the graphic; this solution may take some trial and error to get right.
Create a graphic in OOo Draw that is the size of the main text frame—that is, the page size minus the margins. On standard letter-size paper with margins of one inch on all sides, this would be 6.5" × 9". The background of the graphic should be the color of the paper on which you plan to print. Add the reoccurring element where you want it and position it in the center of the page as a background. Create one or more paragraph styles that can flow around the reoccurring element, and you're done.
Clearly, none of these solutions is ideal. OOo Writer would greatly enhance its desktop publishing ability if there were a simpler solution, and perhaps it will offer one in future releases. Meanwhile, these workarounds are a way to dodge the limitation.
Once you have designed the page styles, you're ready to use them. The simplest way to apply a page style is in the same way as you would any other style: place the mouse cursor where you want to apply it, press F11 to open the Stylist (if it isn't already open) and select from the list of available page styles. You can get much the same result by selecting Insert→Manual →Page Break and making a selection from the drop-down list in the Styles field. For rarely used page styles, these methods of manual application are good enough.

Figure 5. Choosing a New Page Style
However, for the frequently used page styles, it's more convenient to automate them. There are two ways of automating the application of page styles.
The first way is to use the Next Style field on the Organizer tab of the Page Style Window. For example, if you have three page styles, First, Left Page and Right Page, you can set the Next Style field as shown in Table 5.
Table 5. Setting Up Automatic Page Styles Using the Next Style Field
| Page Style | Next Page Entry |
|---|---|
| First Page | Left Page |
| Left Page | Right Page |
| Right Page | Left Page |
The first page, remember, is a right-hand page, so it is followed by a left page. If you save the document as a template, the documents that use the template automatically start with the first page style and apply the basic page styles without you ever needing to think about them. Any unusual pages can be added manually.
Another method is to create a page style that always starts on a new page. For instance, if you were a teacher, you might want to design a document in which each left page has questions and exercises and each right page has answers and teaching notes. If you created a paragraph style called Questions, you could set up a page style for it on the Text Flow tab of the Paragraph Style window. Table 6 shows the settings used to associate a paragraph style with a page style (in this case, the Left Page style).
Table 6. Associating a Page Style with a Paragraph Style
| Selection | What It Does | Setting to Apply |
|---|---|---|
| Enable | Enables the page break. | — |
| Position field | Sets where the paragraph style is used in relation to the new page. | Before |
| With Page Styles | Enables a page style to be linked to the break. | — |
| Style | Sets the style connected to the break. | Left Page |
The page number field is not used here, although it could be if for some reason you continually wanted to reset the Questions page to 1. Create another paragraph style called Answers that is assigned to the Right Page. Afterwards, selecting one of the two paragraph styles automatically adds the page style you want as well.
Although most people rarely notice it, design can be a lifelong study and at least rates as a craft, if not an art. Adding design concerns to a description of how to use a program with as many features as OpenOffice.org Writer only adds to the complexity. But it does provide a starting point for understanding what you can do with design in general and with Writer page styles specifically. The rest—including when you should ignore the suggestions I've made—is practice.
Resources
Robert Bringhurst, The Elements of Typographic Style, 2nd Edition. Hartley and Marks, Vancouver, Canada, 1996. One of the bibles of modern typography.
Robin Williams, The Non-Designer's Design Book, 2nd Edition. Peachpit Press, Berkley, California, 2003. A quick and entertaining introduction to design and layout.
Bruce Byfield was product manager at Stormix Technologies and marketing and communications director at Progeny Linux System. He also was a contributing editor at Maximum Linux and the original writer of the Desktop Debian manual. Away from his computer, he listens to punk-folk music, raises parrots and runs long, painful distances of his own free will.
