
Renaissance—A Cross-Platform Development Tool for Linux and Mac OS X
Renaissance is a free development framework, licensed under the terms of the GNU LGPL, used for easily creating portable user interfaces. It allows the developer to create rich user interfaces by using an open, simple and standard format, XML.
When not using Renaissance, Objective-C software developers face the endless task of maintaining the views of their applications for GNUstep with Gorm and for Mac OS X with Interface Builder. As the application evolves and translations are put into place, this can become a major burden, slowing the application development.
Luckily, the Renaissance framework innovates by introducing many new concepts to help developers create portable applications efficiently. Among the innovations, are:
Portability: the user interface can be reused entirely on platforms where Renaissance has been ported. At this time, it can be reused on top of GNUstep and Apple Cocoa.
Localization: there is no need to duplicate the interface files under both GNUstep and Mac OS X. Renaissance integrates perfectly with Localizable.strings files.
Intelligent autolayout mechanisms: each user interface component contains intelligence to automate alignments and autoresizing. These are essential especially when working with localizations.
Unobtrusive integration: Renaissance integrates easily with current application code bases, as it uses the same paradigm of outlets and connections traditionally used by NIB files.
Unfortunately, Renaissance also has some drawbacks. For example, sharing a common user interface on both GNUstep and Mac OS X can lead to human interface guidelines (HIG) violations on both platforms. Moreover, it currently is not possible to use Cocoa-specific classes such as NSDrawer and NSToolbar with Renaissance.
In this article, we use the source code of the TIFF image viewer that was created for my previous article “Programming under GNUstep—An Introduction” [LJ, April 2003, /article/6418]. We replace the view, previously created with Gorm and Interface Builder, with one created in the Renaissance framework. You can download the source code of the application from the SSC FTP site [ftp.linuxjournal.com/pub/lj/listings/issue119/7102.tgz].
In order to compile and install Renaissance under Linux, we first need to make sure GNUstep is installed properly. Using the latest stable release of GNUstep is highly recommended. At the time of this writing, these include GNUstep make 1.9.0, GNUstep base 1.9.0, GNUstep GUI 0.9.1 and GNUstep back 0.9.1. For detailed instructions on installing GNUstep, refer to the GNUstep Build Guide for UNIX Systems (see Resources).
Once GNUstep is compiled and installed, you must load the proper set of environment variables by executing a shell script. Bash users would use:
. /usr/GNUstep/System/Makefiles/GNUstep.sh
and C shell users would do:
. /usr/GNUstep/System/Makefiles/GNUstep.csh
Finally, to compile and install Renaissance, simply uncompress the Renaissance archive file and type (as root):
# cd Renaissance-0.8.0
# make
# make install
Under Apple Mac OS X, you either can install Renaissance from the source or use a precompiled version. To install it from the source, you first must install GNUstep make and then follow the same installation procedure as if you were installing it under GNUstep. Alternatively, you can download the binary version from Renaissance's Web site, uncompress the file and move the resulting Renaissance.framework folder to your /Library/Frameworks/ folder. I personally recommend the latter option.
In the April 2003 GNUstep article, we developed a simple TIFF image viewer. For this application, we had to use Gorm under GNUstep and Interface Builder under OS X to build the user interface. Luckily, Renaissance's portability strengths can help us solve this burden. As our previous application uses the Model-View-Controller (MVC) design pattern, we easily can redo the view using Renaissance, as it already is well separated from the model and the controller.
The first step in redoing the view for our small application is to create the main gsmarkup file. A gsmarkup (short for GNUstep Renaissance Markup Language) file is a simple XML representation of how user interface elements should be created and how they should be placed on screen and connected with one another or other objects in the main application. For our application, the main gsmarkup file represents the view to be shared on both GNUstep and Mac OS X. To create it, open your favorite editor and create the TiffViewer.gsmarkup file containing the content shown in Listing 1.
Listing 1. TiffViewer.gsmarkup
<?xml version="1.0"?>
<!DOCTYPE gsmarkup>
<gsmarkup>
   <objects>
     <window id="window"
             title="Tiff Viewer"
             closable="yes">
       <hbox>
        <image id="imageView"
               scaling="toFit"
               hasFrame="yes"
               width="300" height="300"
               valign="expand" halign="expand"/>
       </hbox>
     </window>
  </objects>
  <connectors>
    <outlet source="#NSOwner"
            target="#window"
            key="window"/>
    <outlet source="#NSOwner"
            target="#imageView"
            key="imageView"/>
  </connectors>
</gsmarkup>
In Listing 1, we tell Renaissance to create a closable window with the ID window. Then, we place an image view inside this window with such initial properties as the width and height of 300 points. We also specify that we want this image view to be resizable horizontally and vertically. Renaissance understands this and propagates the information up to the window to make it automatically resizable. We then define the connections for those two UI elements. We connect the window with our window outlet and the imageView with our imageView outlet. Those two outlets previously were defined in the file AppController.h.
Once the creation of the main gsmarkup file has been finished, we create the gsmarkup file (Listing 2) to hold the application menu used under GNUstep. In Listing 2, we define three menu items: Load Image, Hide and Quit. Each of them has an associated action that is invoked if the menu item is clicked on.
Listing 2. GNUstep-Menu.gsmarkup
<?xml version="1.0"?>
<!DOCTYPE gsmarkup>
<gsmarkup>
  <objects>
    <menu type="main">
      <menuItem title="Load Image"
                   action="loadImage:"/>
      <menuItem title="Hide"
                   key="h"
                   action="hide:"/>
      <menuItem title="Quit"
                   key="q"
                   action="terminate:"/>
    </menu>
  </objects>
</gsmarkup>
Once those two files have been created, we modify our initial GNUmakefile and replace the reference to the Gorm files with our two newly created gsmarkup files. We also add the Renaissance framework in our list of linked frameworks. The GNUmakefile now should look like Listing 3.
Listing 3. GNUmakefile
include $(GNUSTEP_MAKEFILES)/common.make

APP_NAME = TiffViewer

TiffViewer_OBJC_FILES = AppController.m ImageModel.m
TiffViewer_RESOURCE_FILES = TiffViewer.gsmarkup \
        GNUstep-Menu.gsmarkup
ADDITIONAL_GUI_LIBS += -lRenaissance
ADDITIONAL_OBJCFLAGS = -Wall -Wno-import

include $(GNUSTEP_MAKEFILES)/application.make
Then, we modify our initial TiffViewerInfo.plist to remove the reference to MainMenu.nib. The file now should contain the content shown in Listing 4.
Listing 4. TiffViewerInfo.plist
{
  ApplicationName = "Tiff Viewer";
  ApplicationDescription = "A small image viewer.";
}
The last step we must take before compiling the application is to implement two delegate methods in our application's controller. Those methods are responsible for loading the main gsmarkup file (TiffViewer.gsmarkup) and the one used for the application menu (GNUstep-Menu.gsmarkup). They need to be invoked automatically upon the application's startup on both GNUstep and Mac OS X. To do so, use an editor to open the AppController.m file and modify it so it has the content shown in Listing 5.
Listing 5. AppController.m
#import "AppController.h"

#import <Renaissance/Renaissance.h>

@implementation AppController
...
- (void) dealloc
{
  [model release];
  [super dealloc];
}

- (void) applicationDidFinishLaunching:
  (NSNotification *) theNotification
{
  [NSBundle loadGSMarkupNamed: @"TiffViewer"
            owner: self];
}

- (void) applicationWillFinishLaunching:
  (NSNotification *) theNotification
{
#ifdef GNUSTEP
  [NSBundle loadGSMarkupNamed: @"GNUstep-Menu"
            owner: self];
#else
  [NSBundle loadGSMarkupNamed: @"Cocoa-Menu"
            owner: self];
#endif
}

- (void) loadImage: (id)sender
{
  NSOpenPanel *oPanel;
  int result;

  oPanel = [NSOpenPanel openPanel];
...
Here, only two methods were added, -applicationDidFinishLaunching: and -applicationWillFinishLaunching:. This shows yet another strength of Renaissance—unobtrusive integration with current code bases.
Finally, compile and start the small application:
# make
# openapp TiffViewer.app
Once the application starts, click on the Load Image menu item and select a TIFF file. It should display the image properly in the window, as shown in Figure 1.
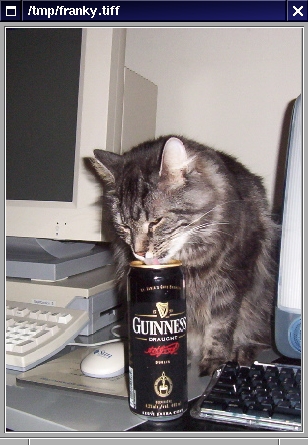
Figure 1. The Image Viewing Application on GNUstep for Linux
Under Mac OS X, we are sharing the main gsmarkup file with the GNUstep version of our application, so we now have to create the gsmarkup file used for our sample application menu, for Mac OS X. Doing so allows us to have a different menu for Mac OS X, which is required because the layout of menus under GNUstep (vertical) is different from the one on Mac OS X (horizontal). Create the file Cocoa-Menu.gsmarkup with the content shown in Listing 6.
Listing 6. Cocoa-Menu.gsmarkup
<gsmarkup>
  <objects>
    <menu type="main">
      <menu title="TiffViewer" type="apple">
        <menuItem title="Hide TiffViewer"
                     key="h"
                     action="hide:"/>
        <menuItem title="Quit TiffViewer"
                     key="q"
                     action="terminate:"/>
      </menu>
      <menu title="File">
        <menuItem title="Load Image"
                     action="loadImage:"/>
      </menu>
    </menu>
  </objects>
</gsmarkup>
In Listing 6, we also define three menu items: Hide TiffViewer, Quit TiffViewer and Load Image. Contrary to GNUstep, we create the first two under the TiffViewer menu, to be displayed in bold (notice the type="apple") and the latter under the File menu. We do this because the menu disposition on Mac OS X is different from GNUstep, and we want to follow the HIG at least with regard to the menus.
Once the file has been created, we need to create the Mac OS X project file and build the application. To do so, start the Project Builder application and proceed with the following steps:
From the File menu, choose the New Project... menu item and select Cocoa Application. Click on the Next button.
Specify the project name (TiffViewer) and the project directory, then click on the Finish button.
Select the Classes node in the Groups & Files panel and then click on the Add Files... menu item from the Project menu. Add the AppController.m and ImageModel.m files. Those are the same files used under GNUstep.
Expand the Other Sources node and delete the main.m file. We don't need this file.
Expand the Resources node and double-click on MainMenu.nib. This launches Interface Builder. From Interface Builder's MainMenu.nib window, delete MainMenu and Window by clicking on the corresponding icons and choosing Delete from the Edit menu. Save everything and then quit Interface Builder. We need to do so because Renaissance can provide the application menu using our gsmarkup file.
Select the Resources node and add the Cocoa-Menu.gsmarkup and TiffViewer.gsmarkup files, as you did in Step 3.
Expand the Frameworks and Linked Frameworks nodes and click on the Add Frameworks... menu item from the Project menu. Add the Renaissance.framework located in the /Library/Frameworks directory.
Finally, from the Build menu in Project Builder, choose Build and Run. This compiles and launches the application.
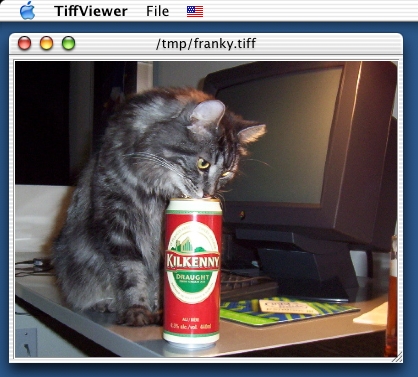
Figure 2. The Image Viewing Application on Mac OS X
As you have seen in this section, porting the application from GNUstep to Mac OS X is rather trivial. No code changes were required. As under GNUstep, you can load a TIFF file in the application and try to resize the window. You should see the image view automatically resizing both horizontally and vertically, as specified in the main gsmarkup file. You also should notice the Apple-style horizontal disposition of the application menu, as shown in Figure 2.
As said before, Renaissance eases localization. In order to show how, let's translate our simple TIFF viewer to the French language. Renaissance automatically knows what to translate and what to maintain. In our menu gsmarkup files, each of the menu items had a title. Renaissance automatically uses the title of UI elements as a key in the Localizable.strings files to get the right translated string. In order to translate our sample application, create a French.lproj directory inside the project's root directory. In that newly created directory, create the Localizable.strings file with the content shown in Listing 7.
Listing 7. French.lproj/Localizable.strings
"File" = "Fichier";
"Hide" = "Cacher";
"Hide TiffViewer" = "Cacher TiffViewer";
"Load Image" = "Charger l'image";
"Quit" = "Quitter";
"Quit TiffViewer" = "Quitter TiffViewer";
We use the same file for both GNUstep and Mac OS X. Under GNUstep, modify the GNUmakefile to add instructions so that our translation resource gets installed. The following two lines need to be added to the GNUmakefile: TiffViewer_LOCALIZED_RESOURCE_FILES = ... and TiffViewer_LANGUAGES = ....
Listing 8. GNUmakefile Changes Required to Support Localization
...
TiffViewer_RESOURCE_FILES = TiffViewer.gsmarkup \
        GNUstep-Menu.gsmarkup

TiffViewer_LOCALIZED_RESOURCE_FILES = \
        Localizable.strings
TiffViewer_LANGUAGES = French

ADDITIONAL_GUI_LIBS += -lRenaissance
...
Finally, under GNUstep, recompile the application in order to copy the resource file properly and launch it using its French translation, like this:
# make
# openapp TiffViewer.app -NSLanguages '(French)'
On Mac OS X, you also have to create the French.lproj directory and the Localizable.strings file (or reuse the ones created for GNUstep) with the content shown in Listing 5. Once they have been created, follow these steps to activate the French localization in Project Builder:
Select the Resources node and from the Project menu, choose Add Files... and add the French.lproj/Localizable.strings file.
From the Build menu, click on Build.
To run the application in French under Mac OS X, from the System Preferences, click on the International icon. Then, drag Français before English and quit the application. From Project Builder's Debug menu, click on Run Executable. The application should start in French.
The Renaissance framework provides valuable innovations to help develop truly portable applications. Eventually, Renaissance will have a complete graphical editor, allowing you to create gsmarkup files graphically, as you can do now with Gorm, the Graphical Object Relationship Modeler for GNUstep, or with Interface Builder under Mac OS X.
In a future GNUstep article, we will enhance our simple TIFF viewer application to work with the GNUstep Database Library (GDL), an excellent free implementation of the NeXT's Enterprise Objects Framework (EOF).
Resources
GNUstep Build Guide for UNIX Systems: documents.made-it.com/GNUstep/Build
Objective-C Programming Language: developer.apple.com/techpubs/macosx/Cocoa/ObjectiveC
“Programming under GNUstep—An Introduction” by Ludovic Marcotte: /article/6418
Renaissance: www.gnustep.it/Renaissance/index.html
Source code of the application from the previous article: ftp.linuxjournal.com/pub/lj/listings/issue108/6418.tgz
Ludovic Marcotte (ludovic@inverse.ca) holds a Bachelor's degree in Computer Science from the University of Montréal. He is currently a software architect for Inverse, Inc., a small IT consulting company located in downtown Montréal.
