
Using the Hammerfall HDSP on Linux
RME's Hammerfall HDSP sound card is a powerful, professional-level sound card used in sound studios worldwide. It also works under Linux using the ALSA Project drivers. Your average consumer sound card, for instance, a Sound Blaster Live!, is designed around outputting sounds to a single set of speakers, be it a stereo setup or surround sound. Sound input, such as from a microphone, is an unconnected function done by the rare program that needs it. The HDSP on the other hand is designed as a sound I/O device. It has inputs and outputs, and you can route sound between them arbitrarily. It's like the difference between a NIC and a router. Sure a NIC is useful, but if you want to run a network, or sound studio, you need a full-fledged router.
So what exactly makes the HDSP special? First of all, it actually comes in two pieces, a PCI or PCMCIA host card and an external sound I/O module. The card and module are connected by a 10-foot Firewire cable, though the protocol used isn't actually Firewire. Two types of sound modules are available, the Multiface and the Digiface. The Multiface offers eight channels of analog I/O and digital SPDIF, as well as ADAT in and out for a total of 20 channels of 24bit/96kHz audio. The Digiface offers three ADAT in and outs and SPDIF for a total of 26 channels. With this separated design you can buy, for instance, a single Multiface and share it between your desktop and a laptop. One example of where this is useful is in live DJing. You don't have to buy two complete sound cards, which saves you money, and you also can test software on your desktop knowing that the environment is the same as it will be on your laptop.
This article focuses on using the Multiface module with the PCI host card. If you have different hardware, most of this article should still be applicable, and wherever possible, I've included information on the differences.
Figure 1 shows how sound is routed inside the HDSP. At the top are the inputs, Analog, ADAT and so on, with the channel numbers below. At the bottom are the outputs, again with channel numbers. In between is the Matrix Mixer, which does the actual sound routing. In the Matrix Mixer, any input channel can be routed to any number of output channels, each having a selectable gain. All routing is performed internally in HDSP with zero host CPU load. This gives you total flexibility in how your sound is routed, for instance, allowing you even to have an analog input go directly to a digital SPDIF output with no software in between and no load on the host CPU.

Figure 1. Routing Sound within the Hammerfall HDSP
The Playback box at the top actually refers to applications playing sound. Say you want to play a simple stereo MP3 with xmms. The first two playback channels would be used for left and right. These channels are mapped to channel numbers 26 and 27 and then are treated like any other input. What's interesting about this approach is that playback channels have the same flexibility as any other input channel. You can, for instance, send a playback channel to multiple hardware outputs at the same time and even mix a playback channel with a hardware input to produce an output. Unlike all other input channels, the playback channels have a master gain control for each channel.
Finally, due to various implementation details, the HDSP works a little differently with sample rates above 48kHz. Because the ADAT has eight channels with a sample rate less than or equal to 48kHz and only four channels for a sample rate greater than 48kHz, the card uses two modes to distinguish between them, SingleSpeed and DoubleSpeed mode. In SingleSpeed mode, on the Multiface there are 18 channels, input and output. In DoubleSpeed mode this is reduced to 14. This means that the channel numbers used by the application change. In SingleSpeed mode, SPDIF is on channels 16 and 17, and in DoubleSpeed this changes to 12 and 13. Unfortunately, ALSA has no way of informing applications that the number of channels is being reduced, so you must close all applications using the HDSP before switching between the two modes. However, the matrix mixer channel numbers do not change.
Download and install the latest stable release of the ALSA drivers from www.alsa-project.org. You need to compile and install the HDSP module and the hdsploader program in alsa-tools. It's a good idea to make sure the snd-hdsp module is loaded first at boot time, because it needs to reserve a few chunks of contiguous memory for DMA transfers. If it can't reserve this memory, the card won't work. Loading the HDSP module first, however, makes it the default sound device in ALSA. If you intend to use another card for general sound I/O, which is highly recommended, use the index parameter when you load the module. For instance, my modules.conf has these two lines at the top to load my HDSP first and then my Sound Blaster Live!:
snd-hdsp index=1
snd-emu10k1 index=0
All the command-line examples using amixer in this article assume you have your HDSP at index 1. Once that is finished run the hdsploader program to load the correct firmware into the Multiface or Digiface. It's best to make sure this is done every time the drivers are loaded, so add it to your bootup scripts. If you unplug your Multiface or Digiface, you also need to reload the snd-hdsp module and run hdsploader again when you plug it back in.
Finally, you should add a few lines to your .asoundrc file in /etc/asound.conf or your home directory. The HDSP operates in non-interleaved mode, which many applications can't use. You also usually want to work only on a subset of the many input and output channels available. With asoundrc you can attach labels to different sets of channels. So instead of referring to channels 16 and 17, you could refer to hdsp_spdif. An in-depth look at asoundrc configuration is beyond the scope of this article, but the following should be a good start for using the Multiface. If you have a Digiface the labels will be wrong; hdsp_analog will correspond to your first ADAT connector, hdsp_adat to your second and hdsp_spdif will be wrong. See the asoundrc documentation for details on configuring asoundrc properly in this case.
pcm.hdsp {
        type hw
        card 1
}

ctl.hdsp {
        type hw
        card 1
}

pcm.hdsp_analog {
        type plug
        ttable.0.0 1
        ttable.1.1 1
        ttable.2.2 1
        ttable.3.3 1
        ttable.4.4 1
        ttable.5.5 1
        ttable.6.6 1
        ttable.7.7 1
        slave.pcm hdsp
}

pcm.hdsp_adat {
        type plug
        ttable.0.8  1
        ttable.1.9  1
        ttable.2.10 1
        ttable.3.11 1
        ttable.4.12 1
        ttable.5.13 1
        ttable.6.14 1
        ttable.7.15 1
        slave.pcm hdsp
}

pcm.hdsp_spdif {
    type plug
    ttable.0.16 1
    ttable.1.17 1
    slave.pcm hdsp
}
Now that the modules are loaded, and hdsploader has been run we can try to play a sound using aplay. Like any other ALSA driver, the HDSP driver mutes all channels at startup, so first you need to set the gain control, or volume, properly for your playback channels. One way to do this is to simply run alsamixer -c 1. When the bars are at 50% the channel is output with approximately 0dB gain. A more precise way is using amixer directly. The gain is as follows:
    0 = -inf dB
32768 =    0 dB
65535 =   +6 dB
A simple way to set all channels to 0dB gain is to use the following script:
#!/bin/bash
for i in $(seq 1 18);do
	amixer -c 1 cset name=Chn,index=$i 32768
done
Now that you've done that, hook up your speakers to the first two analog outputs, and try the following:
aplay -D hdsp_analog some_stereo_file.wav
If all goes well you should see something like this:
Playing WAVE 'some_stereo_file.wav' : Signed 16 bit
    Little Endian, Rate 48000 Hz, Stereo
By default, playback channels are connected to their respective hardware outputs; if this isn't true in your setup, you won't hear anything. If this is the case, read the following section on configuring the matrix mixer.
You also can change the -D option to send audio to different channels. For instance, using hdsp_adat would send the audio to the first two adat channels; hdsp_spdif would go to the spdif outputs. All of this is controlled by asoundrc.
If playing a sound worked, try recording a sound with arecord. This time, hook up a sound source to your first two analog channels, and run the following:
arecord -D hdsp_analog -f dat recording.wav
Press Crtl-C to halt recording. If everything worked, recording.wav should be a stereo file at 48kHz. In this case, the matrix mixer has no effect on what's recorded; the first channel recorded always corresponds to the first hardware input and so on.
As mentioned above, all software using the HDSP must be closed before switching between SingleSpeed and DoubleSpeed mode. But normally, software sets the sample rate. So what now? Well, there is a setting related to the AutoSync functionality (more on that later) that can do the job, Sample Clock Source. I won't explain exactly how it works just yet, but basically, by setting the internal clock to different frequencies, the card automatically switches modes. For instance, to switch to DoubleSpeed mode run:
amixer -c 1 cset numid=11 6
To switch back to SingleSpeed mode run:
amixer -c 1 cset numid=11 3
In both cases, don't forget to make sure that no application currently is using the sound card.
Sound routing is the most powerful feature the HDSP has to offer. Unfortunately, because it is not a feature found on many sound cards, the interface used to control it is not an ALSA standard. As of ALSA version 0.9.3, the matrix mixer interface is somewhat of a hack and is subject to change. It's possible to write values to it but not to read them back. In any case, the syntax used is source,destination,gain, where gain is as explained above, and source and destination are as follows:
For the Multiface:
input: 0-7 (analog), 16-23 (adat),
      24-25 (spdif), 26-43 (playback)
output: 0-7 (analog), 16-23 (adat)
        24-25 (spdif), 26-27 (line out)
For the Digiface:
input_source : 0-25  (physical channels),
               26-51 (playback)
output_source : 0-25 (physical channels),
               26-27 (line out)
The routing for the Multiface is also shown in Figure 1. By default, the playback channels are routed to the hardware output channels in order. All other possible connections are muted (0 or -inf dB gain).
To change an entry, use the following command:
amixer -c 1 cset numid=5 src,dest,gain
For instance, you could direct the SPDIF input to analog out with the following:
amixer -c 1 cset numid=5 24,0,32768
amixer -c 1 cset numid=5 25,1,32768
When you're finished, run the commands again, but with 0 as the gain instead of 32768. Don't forget that you can have multiple channels going to a single output or multiple outputs from a single input. Any combination is possible—use your imagination.
SPDIF on the HDSP Multiface is pretty straightforward; however, because ADAT and optical SPDIF share the same optical connectors you need to tweak a few mixer controls. The Digiface uses a similar setup as well, though not having access to one, I do not know the exact details. To enable optical input for the SPDIF, change the IEC958 Input Connector setting:
numid=6,iface=PCM,name='IEC958 Input Connector'
; type=ENUMERATED,access=rw---,values=1,items=3
; Item #0 'ADAT1'
; Item #1 'Coaxial'
; Item #2 'Internal'
: values=2
On later versions of the driver, setting the value to Internal seems to autoselect between optical (ADAT1) and coaxial, on others it does nothing. I don't know what the behavior will be with your driver, so you should check yourself.
Optical output is similar. By default, SPDIF output goes only to the coaxial connectors, but when the IEC958 Output (also on ADAT1, numid 7) is enabled, output goes to the optical connector as well.
Like all digital audio devices, the HDSP needs a clock source to function. This can be from either the internal clock generator or an external digital source, such as the ADAT or SPDIF inputs or the Word Clock. This is important when recording from external digital sources; if the clock is not synchronized properly, dropouts and clicks can result. When the clock is coming from an internal source, the HDSP is said to be operating in Master mode, and if the clock is from an external source, Slave mode. As shown in Figure 2, the various clock sources go into the AutoSync system, which then sends a single clock signal to the clock users.
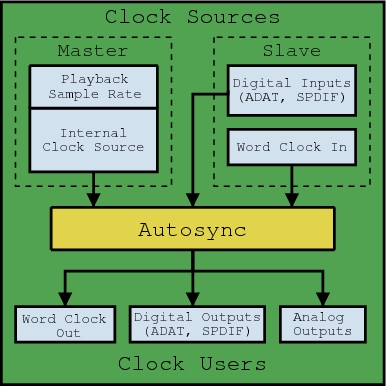
Figure 2. The AutoSync system decides which clock signal to use.
AutoSync decides which clock signal to use. This is controlled by the Sample Clock Source setting and the Preferred Sync Reference setting. The former, Sample Clock Source, determines if the HDSP operates in Master or Slave mode. Its possible settings are as follows:
numid=11,iface=PCM,name='Sample Clock Source'
; type=ENUMERATED,access=rw---,values=1,items=7
; Item #0 'AutoSync'
; Item #1 'Internal 32.0 kHz'
; Item #2 'Internal 44.1 kHz'
; Item #3 'Internal 48.0 kHz'
; Item #4 'Internal 64.0 kHz'
; Item #5 'Internal 88.2 kHz'
; Item #6 'Internal 96.0 kHz'
: values=0
If you specify AutoSync, 0, the HDSP operates in slave mode and follows an external clock source. In this mode, playing a sound works only if the sample rate matches the external sample rate; otherwise, you receive an error message. Also, if there isn't a valid external clock available, the driver will not let you switch to AutoSync mode. Any other setting will set the Internal Clock Source sample rate to the specified frequency. Once the card is not in AutoSync mode, playing a sound at a different sample rate to the current one changes the current sample rate.
The other setting, Preferred Sync Reference, is useful when you have multiple possible clock sources connected but need to specify which one to use as the clock source. Suppose you had a consumer CD player connected with SPDIF and an eight-track tape recorder connected with ADAT to your HDSP. Almost no consumer CD players can operate in slave mode and receive a clock signal. So the CD player will have to be the master device. However, AutoSync normally tries to sync to the ADAT first. What now? Well, by setting Preferred Sync Reference to IEC958 (SPDIF), AutoSync will synchronize the clock to the CD player. The tape recorder then can be synchronized though other means. The possible settings of Preferred Sync Reference on the Multiface are as follows:
numid=13,iface=HWDEP,name='Preferred Sync Reference'
; type=ENUMERATED,access=rw---,values=1,items=4
; Item #0 'Word'
; Item #1 'ADAT Sync'
; Item #2 'IEC958'
; Item #3 'ADAT1'
: values=2
ADAT Sync and ADAT1 are different things. ADAT1 refers to the optical ADAT connection, and ADAT Sync refers to the D-sub 9-pin ADAT Sync connector. There are also a bunch of read-only mixer items that show various aspects of synchronization, type amixer -c 1 contents to see them all.
The most common Linux sound complaint is, “I'm getting clicks and dropouts in my sound!” This could be caused by a number of factors, such as PCI bus bandwidth, nonconforming PCI cards, too-small block sizes or latency. If possible, install the low-latency kernel patches or the 2.6 kernel if it's available by the time this article is published, and make sure your audio program is set to use real-time scheduling. You also can try increasing the block size your program uses. For hardware difficulties various PCI cards, such as some 3Com network cards and RAID controllers, have been known not to follow the PCI bus specification and use more bandwidth then they should, starving the HDSP of bandwidth. You also might need to change the PCI latency timer settings; for information on this see www-106.ibm.com/developerworks/library/l-hw2.html. Some motherboards also are known to have poorly performing PCI buses. RME's Web site is quite informative when it comes to hardware incompatibility. I recommend looking at the support section, both after and before buying a Hammerfall.
Hopefully, this article has helped you use your Hammerfall and has saved you some time and trouble figuring out how it works. At this point, you might be wondering “What now?” If so, try out some of the following open-source software with your HDSP:
Ardour (ardour.sf.net): a multichannel hard disk recorder (HDR) and digital audio workstation (DAW).
Jack (jackit.sf.net): a low-latency audio server for connecting audio applications together.
Ardour (ardour.sf.net): a multichannel hard disk recorder (HDR) and digital audio workstation (DAW).
Pd (www-crca.ucsd.edu/~msp/software.html): a real-time graphical programming environment for audio and graphical processing.
Peter Todd has been using Linux since he was 14. He has a part-time job as the head techie of a small Linux-based sound studio and is greatly indebted to his boss for giving him the time and equipment to write this article. When he's not working he attends Wexford Collegiate where he currently is studying ceramics and graphics design.
