
Take Control of TCPA
The Trusted Computing Platform Alliance (TCPA, www.trustedcomputing.org) has published open specifications for a security chip and related software interfaces. The TCPA chip is designed to provide client machines with a minimal but essential hardware base for client-side security. It provides two important security functions: secure storage of signature and encryption keys and system software integrity measurement. TCPA's secure storage can be used to protect an individual's RSA authentication private key or a loopback filesystem's master key from theft or disclosure. TCPA's integrity measurement can be used to detect software compromise, such as a rooted kernel, and to lock down use of protected keys and data if a compromise is found.
IBM is now shipping models of ThinkPad and desktop machines with TCPA chips. IBM has published a set of open-source tutorial code for TCPA, available at www.research.ibm.com/gsal/tcpa. This tutorial package is intended to help teach people about TCPA and to introduce programming of the TCPA chip under Linux.
In this article, we try to help you better understand the TCPA specification and tutorial package by introducing the fundamentals of TCPA, describing the IBM open-source TCPA tutorial package for Linux and explaining how you can use TCPA to sign documents and store the key for an encrypted loopback filesystem.
A TCPA security subsystem includes both hardware and software components. Functions provided by hardware are called TPM (trusted platform module) functions; those provided by software are TSS (trusted support services). From a programmer's perspective, the IBM version of the TPM (or TCPA chip) looks like Figure 1.
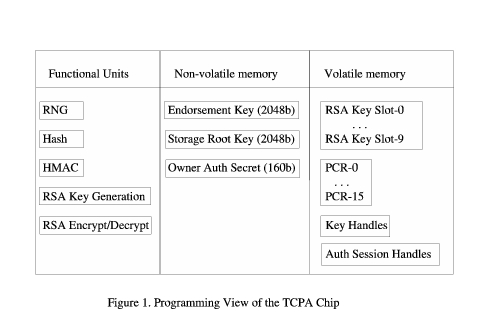
The TPM includes five cryptographic functional units. It has a hardware random number generator (RNG), which provides a source of high-quality random numbers for on-chip key generation, as well as for application use. It has a hash unit (SHA-1) and an associated hashing for message authentication calculator (HMAC). It also has the ability to generate RSA keys of up to 2,048 bits on the chip, based on random numbers supplied by the RNG. Finally, it has an RSA engine that can perform signatures, encryption and decryption. The TPM does not do signature verification, as this is not a sensitive operation and can be done more easily and quickly with software.
The TPM stores three important keys in non-volatile memory. The endorsement key is a 2,048-bit RSA public and private key pair, which is created randomly on the chip at manufacture time and cannot be changed. The private key never leaves the chip, while the public key is used for attestation and for encryption of sensitive data sent to the chip, as occurs during the TPM_TakeOwnership command. Because this key is sensitive from a privacy perspective, its use can be disabled completely by the TPM owner.
The storage root key (SRK) is a 2,048-bit RSA key pair. It is initially empty and is created as part of the TPM_TakeOwnership command. This key never leaves the chip. It is used to encrypt (wrap) private keys for storage outside the TPM and to decrypt them when they are loaded back into the TPM. The SRK can be cleared by the system owner.
The Owner Authorization secret key is a 160-bit secret shared with the owner of the TPM. The owner loads it into the TPM as part of the TPM_TakeOwnership command. This secret key is used to authorize sensitive owner command requests.
The volatile memory section contains ten slots for temporary storage of RSA key pairs. Any number of wrapped keys can be stored externally and loaded as needed into these slots for use. Although loaded keys are considered volatile and are not guaranteed to persist across power down, in the case of the IBM chip version, keys normally do persist and may need to be evicted to make room for the loading of new ones.
The volatile memory section also contains 15 platform configuration registers (PCRs). These registers contain 160-bit measurements (hashes) of software integrity. During system boot, measurements are taken of the BIOS, extension BIOSes, MBR, GRUB bootstrap stages and any designated files, such as the kernel. These measurements are added to various PCRs. The BIOS actively resets all PCR values at boot time power-on. When a system resumes from a suspended state, the BIOS tries to start the TPM in a mode that restores saved PCR values. For this to work, the TPM device driver must have issued a TPM_SaveState command right before the chip was suspended.
Volatile memory also is used to store two types of handles. Key handles are used to give temporary names to loaded keys, so subsequent commands can indicate which key should be used, if multiple keys are loaded. Key handles are cleared when the respective key is evicted. Authorization session handles are used to identify authorization state data across multiple commands. Authorization handles are created by TPM_OSAP and TPM_OIAP authorization commands, and they must be cleared with a TPM_Terminate_Handle command when no longer needed.
Before looking at these specific TPM commands, we should cover one of the more mystifying aspects of the TPM—how to get it started. Fortunately, the BIOS is responsible for starting up and clearing the TPM, so this really is not as complex as it looks to be in the TPM specification. At power-on, the TPM is activated but not started. The BIOS then must issue a TPM_Startup command. This command can do one of three things: deactivate the TPM, start up the TPM with a reset of the PCR registers or start up the TPM with a restore of PCR values from their saved states (as with a resume). If the BIOS deactivates the TPM, it remains deactivated until the next power cycle; no software command can reactivate it. A startup with clearing of the PCRs is done at boot time, so all PCR values are calculated correctly during boot. The TPM device driver is responsible for making a TPM_SaveState request at suspend time to ensure that valid PCR values are available at resume time.
The BIOS also is responsible for performing a TPM_ForceClear if desired. The clear command is a complete reset of the TPM, and it unloads all keys and handles and clears the SRK and owner authorization secret. TPM_ForceClear requires proof of physical presence, which normally is given by holding down the Fn key (blue key at the bottom left) when powering on the system.
The control of TPM deactivation and clearing by the BIOS is set in the BIOS setup mode. To get started with the TPM, then, hold down the Fn key and press the Power-On button. When the BIOS screen appears, release Fn, and press F1 to enter BIOS setup mode. Next, select Config→Security System, then select Enable and Clear entries. These steps enable operation of the TPM and clear the chip, so it is ready for us to take ownership.
The TPM device driver, tpm.o, is a loadable kernel module that provides a character device interface to the TPM chip. It is registered officially as Linux major number 10, minor number 224. Applications normally access it through the special file /dev/tpm.
To send a command to the TPM, /dev/tpm is opened for read/write, a command packet is written and the response packet is read. The TPM can process only one command at a time, so the entire request must be sent and the entire response must be read before another request can be made.
All command packets have a common structure:
| 16-bit unsigned TAG | type of packet |
| 32-bit unsigned Length | length of total packet |
| 32-bit unsigned Ordinal | TPM command number |
| variable | command data |
All response packets have a similar structure:
| 16-bit unsigned TAG | type of packet |
| 32-bit unsigned Length | length of total packet |
| 32-bit unsigned Return | return code |
| variable | returned data |
All 16- and 32-bit values are in network byte order (big endian) and must be converted to and from host byte order. On writes to the TPM, write exactly the number of bytes in the packet, as indicated in the packet's total length field. When reading the response, you should attempt to read 4,096 bytes (the defined maximum TPM packet size), and the return value of the read indicates how many bytes are in the returned packet. This should match the returned packet's length field exactly. The return code is zero for a successful command, and a positive value is a specific error code.
A function for sending/receiving TPM packets can look something like the following (error handling omitted for clarity):
uint32_t TPM_Transmit(unsigned char *blob)
{
    int tpmfp, len;
    uint32_t size;

    tpmfp = open("/dev/tpm", O_RDWR);
    size = ntohl(*(uint32_t *)&blob[2]);
    len = write(tpmfp, blob, size);
    len = read(tpmfp, blob, 4096);
    return(ntohl(*(uint32_t *)&blob[6]));
}
Once the TPM is enabled and cleared through the BIOS setup and the TPM device driver is loaded, we can try some simple TPM commands. The TCPA main specification details some 73 TPM commands. Fortunately, we can demonstrate the desired signing and sealing functionality in this tutorial with only 14 of these commands.
The simplest command is TPM_Reset, a request to flush any existing authorization handles. TPM_Reset is a nice command to test a driver and library, as it is short, fixed and should always succeed, returning a result code of zero. Here is the example code for TPM_Reset:
uint32_t TPM_Reset()
{
    unsigned char blob[4096] = {
        0,193,     /*TPM_TAG_RQU_COMMAND*/
        0,0,0,10,  /* blob length, bytes */
        0,0,0,90}; /*TPM_ORD_Reset */
    return(TPM_Transmit(blob));
}
It is important to size blob[] to allow the returned TPM data to be up to the maximum allowed packet size of 4,096 bytes.
The TPM_GetCapability command is another simple function that can return several items of information about a given TPM. It can return the version of the current TPM, the total number of key slots in the TPM (typically ten), the number of loaded keys and their handles and the number of PCR registers (typically 16). Here is the example code for using TPM_GetCapability to read the TPM version:
uint32_t TPM_GetCapability_Version()
{
    unsigned char blob[4096] = {
        0,193,     /* TPM_TAG_RQU_COMMAND */
        0,0,0,18,  /* blob length, bytes */
        0,0,0,101, /* TPM_ORD_GetCapability */
        0,0,0,6,   /* TCPA_CAP_VERSION */
        0,0,0,0};  /* no sub capability */
    return(TPM_Transmit(blob));
}
TPM_PcrRead returns the 20 bytes (160 bits) of a specified PCR register. It is useful to check that any desired TPM measurements are being made by the modified GRUB loader.
TPM_ReadPubek is used to read the TPM's fixed public endorsement key (Pubek). Pubek initially must be read so it can be used by the owner to encrypt sensitive data in the TPM_TakeOwnership command. Once ownership is established, the owner typically disables reading of the Pubek for privacy reasons; after that, then this command fails.
Some TPM commands require authorization. Owner-related commands normally require authorization based on knowledge of the owner authorization 160-bit secret. Similarly, the use of keys may require authorization based on the key's authorization secret. Normally, this is done in the form of a hash of password, or PIN, applied to the key when it is created.
The TPM supports two protocols for this authorization: Object Independent Authorization Protocol (OIAP) and Object Specific Authorization Protocol (OSAP). Both protocols are similar in that they create an authorization context with a handle returned to the user, and they both use rolling nonces. The main difference is OIAP creates a long-term session with a new session secret key, and it can be used across multiple objects within a session. OSAP relates to a single object, such as a given key. In the case of TPM_TakeOwnership, OIAP must be used because the objects and secrets have not yet been established. In most other cases, either authorization protocol may be used.
TPM_OIAP and TPM_OSAP both create authorization handles that should be terminated (freed) when finished. This is done with the TPM_Terminate_Handle command.
We are ready to perform the essential TPM_TakeOwnership. This command executes four critical functions: it installs the owner-supplied owner authorization secret, creates the SRK, applies the owner-supplied SRK authorization secret and, optionally, returns the Public SRK portion to the owner. With the SRK available, we now have a functional TPM and are able to create and use signature and encryption keys.
TPM_CreateWrapKey generates a new RSA key on the chip, using the hardware RNG. A key must be typed as being either for signing or for encryption/decryption. The TPM does not allow a signature key to encrypt or an encryption key to sign, as this can lead to attacks. A key optionally may be given a secret that it is required to produce to use the key in the future. In addition, keys can be wrapped to specified PCR values. If this is done, both the authorization data and specified PCR data must match to use the key. All keys must have a parent key—it may be the SRK—that is used to encrypt the private part of the key, before the key structure is returned to the user. The returned key data must be stored by the user for future loading.
TPM_LoadKey is used to load a key into one of the volatile key storage slots in the TPM. This command requires the authorization password for the parent key; once loaded, the TPM uses the parent key to decrypt the loaded key's private data for use. If the key has an authorization secret, it is not needed to load the key, but it is required for any subsequent command that tries to use the key for encryption or signing.
Because a limited number of key slots are available in the TPM, when a key is no longer needed, it must be evicted to make the slot available for other keys.
The TPM_Sign command uses a loaded key to sign presented data, normally the hash of the actual data. TPM_Seal is used to perform RSA encryption of data; it requires a loaded encryption key and any authorization secret for that key. TPM_Seal also may specify PCR values to be used in the seal. If a future unseal is attempted without matching PCR values, the unseal fails. TPM_Seal also applies a used supplied data authorization value (password) to the sealed data. Thus, to unseal the data, the user may require the password for the sealing key and for the data, and the PCR values may have to match. TPM_Unseal performs the corresponding unseal operation.
The IBM TCPA tutorial package provides source code for five major components: device driver, libtcpa, examples, GRUB patch and loopback patch.
The device driver code allows you to compile a tpm.o loadable module for your kernel. The libtcpa code provides easy-to-use C interfaces for the application level TPM commands discussed in this article. The example programs demonstrate how to use libtcpa to do common actions, including taking ownership, creating keys, loading keys, signing, sealing and unsealing. The GRUB patch is a source code patch to the GRUB bootloader. It adds support for PCR measurement of grub itself and of any designated files, such as the kernel. The loopback patch is a source code patch to the loopback driver and associated utilities. This patch allows the loopback encryption key to be stored in TPM sealed form and releases it only if presented with the corresponding password and only if the PCR values match. With this patch installed, loopback mounting appears normal; it asks for a password, but this password is used to authorize only the unsealing of the actual loopback key data.
So, what does the use of the TCPA chip for signing and sealing/unsealing do for us? Our private keys are created on the chip, and they never leave the chip unless encrypted under a protected public key. The use of the PCRs also can protect our keys by refusing to authorize their use if the system has not been booted in the proper way, or if the integrity of measured files has been compromised. Sealing a loopback key similarly can protect against alternative booting and compromised software.
The IBM TCPA tutorial package is not a complete TSS implementation, as it was mainly intended to make TCPA easier to understand. It does not do TPM resource management for handles and loaded keys nor does it give access to the TPM's key backup and migration facilities. These are topics for future development and articles.
David Safford is a researcher at IBM's T. J. Watson Research Center where he leads a security analysis group and gets to play with fun things like TCPA, Linux and wireless security. He can be contacted at safford@watson.ibm.com.
Jeff Kravitz works in IBM's T. J. Watson Research Center where he has worked on various projects, including communications gateways, multitasking operating systems for embedded systems and software for controllers of gigabit optical networks. Jeff currently works on the uses of public key cryptography.
Leendert van Doorn is a researcher at IBM's T. J. Watson Research Center where he runs the secure embedded systems group. He has actively hacked on many versions of UNIX (starting with V6), Amoeba, Paramecium and Linux. He even has been known, but strongly denies, to have written Windows drivers. His current interests include operating systems, security, secure coprocessors, simulators and hypervisors. He can be contacted at leendert@watson.ibm.com.
