
Using Firewall Builder, Part I
Linux 2.4's Netfilter firewall code and its front end, iptables, deserve the praise and popularity they've garnered. They've brought Linux firewalls to the same level as commercial stateful packet-filtering firewalls, from the standpoints of functionality, intelligence and security.
Only one thing has been lacking from the Netfilter experience: user-friendliness. A good firewall GUI isn't merely a crutch to be used by nontechnical people. Even the most pointy-headed of us tend to work faster and make fewer mistakes in our firewall policies if we can construct rules with the aid of visual cues and reminders. There's little value in focusing on iptables' command syntax at the expense of the actual security policy your firewall needs to enforce.
Firewall Builder (Figure 1) is a good firewall GUI indeed. It lets you define host, network and service objects that can be used and reused in as many different firewall rulesets as you like; it displays your rules in an instinctive and clear way; and because it's intentionally OS-agnostic, you can use Firewall Builder to generate rulesets not only for Netfilter/iptables, but also for FreeBSD's ipfilter, OpenBSD's pf and even Cisco PIX firewalls.

Figure 1. Firewall Builder in Action
This issue and next I'll show you how to obtain and install Firewall Builder, and then I'll explain how to use it to build iptables policies of your own easily and instinctively. To begin, we focus on installing Firewall Builder and on populating its Objects database; next month we'll cover policy construction in-depth.
First, a few words on where to install and run Firewall Builder. I don't think it's a good idea to run Firewall Builder on an actual firewall or on any other hardened, publicly accessible host, called a bastion host. In short, I don't think you should run the X Window System on such hosts.
Instead, you should run Firewall Builder on your normal day-to-day workstation. Then, copy the firewall scripts you build to the host you actually wish to configure, using scp or some other secure means. Firewall Builder is designed to be used in this way.
On the other hand, if you intend to use Firewall Builder to create Netfilter scripts for local protection of one particular host, such as a Linux 2.4-based web server, perhaps it's okay to run Firewall Builder directly on the host on which its scripts will be installed. But, make sure X11 is installed on the host and the host itself is behind a proper firewall.
The important point is you don't need to run Firewall Builder on each host you want configured. Therefore, you shouldn't run it on any host on which you wouldn't otherwise run the X Window System. A single host running Firewall Builder can generate scripts for as many different hosts as you like. We'll see how this is possible shortly.
Naturally, the Firewall Builder Project has its own home page, where you can obtain the latest software releases and documents: www.fwbuilder.org. If anything I say here is different from something you read there, I defer to that site. Firewall Builder's on-line installation instructions are clear and accurate, and they may change between the time I wrote this article and the time it actually is printed.
I'll start with the easiest case. If you run Debian 3.0, you can install Firewall Builder directly from your Debian installation source; Debian has its own officially supported deb package, called fwbuilder. Among other things, this package depends on the Debian packages libfwbuilder0, fwbuilder-iptables, libgtk1.2, libgtkmm1.2, libxslt1, libxml2 and libsnmp4.2.
I'll skip the complete list of dependencies, though. If you use apt-get to install fwbuilder, apt-get will identify and install all required packages for you. I also recommend installing Debian's fwbuilder-doc package; it is optional (and therefore won't be installed automatically by apt-get in order to satisfy any dependencies) but contains comprehensive and useful documentation.
As of Red Hat 8.0 (the latest Red Hat release at the time of this writing), Firewall Builder isn't yet an official part of Red Hat Linux. However, the Firewall Builder team provides RPM files for several Red Hat releases; see the Firewall Builder download site at sourceforge.net/project/showfiles.php?group_id=5314.
You'll need the fwbuilder and libfwbuilder packages, plus at least one of fwbuilder-ipt, fwbuilder-ipf or fwbuilder-pf, depending on whether you create rulesets for Linux Netfilter/iptables, FreeBSD ipfilter or OpenBSD pf, respectively. You can install more than one of these last three if you wish. Because Firewall Builder's ultimate output is an ASCII script, using a Linux system to generate firewall rules for other platforms is not a problem.
Before installing the Firewall Builder packages, the following standard Red Hat packages must be present: bind-utils, gdk-pixbuf, glib, glibc, gtk+, gtkmm, libfwbuilder, libsigc++, libstdc++, libxml2, libxslt, openssl-0.9.6b, ucd-snmp and XFree86-libs.
In addition, you'll need gtkmm (the GIMP Tool Kit Minus Minus), which contains the C++ bindings for GTK+. This package is part of Ximian GNOME, but you also can download it from www.freshrpms.net.
Like Red Hat, SuSE has not yet incorporated Firewall Builder into its official release. SuSE 8.1 RPMs (albeit unofficial contributed ones) are available from the Firewall Builder download page (sourceforge.net/project/showfiles.php?group_id=5314).
You'll need the fwbuilder and libfwbuilder packages, plus one or more of fwbuilder-ipt, fwbuilder-ipf or fwbuilder-pf. You'll also need to have installed these standard SuSE packages: gcc, gdk_pixbuf, glib, glibc-2.2.4, gtk, gtkmm, libsigc++, libstdc++, libxml2, libxslt, libz, openssl-0.9.6b, ucdsnmp and xshared.
Once its packages are installed, you're ready to run Firewall Builder. There's only one command to remember: fwbuilder. You must have the X Window System running to run this command. You don't need to be root, though; in fact, I recommend against it, because you always should avoid needlessly doing things as root.
Once the fwbuilder window is up, you can start defining objects (Figure 2). The whole point of Firewall Builder is to be able to write rules using reusable, drag-and-drop objects, so obviously, objects must exist before rules may be written. Even Firewall Builder's automatic-policy-generating druids require that objects already exist.
You can use objects to represent hosts, networks (identified by IP address and subnet mask), address ranges, TCP/IP services, firewalls (both multi-homed firewalls proper and bastion hosts), time-ranges and groups of other objects. You may define as many or as few objects as you think you'll use in your rulesets. At a minimum, you'll need a firewall object and at least one network or host object. Predefined service objects are provided for many popular TCP/IP services.
Objects are created from the dialogs in Firewall Builder's Insert menu. Figure 2 shows the Insert host dialog for creating a host object. A host object's defining characteristic for rule-creating purposes is its IP address. If you wish to write rules that match hosts by MAC/Ethernet address, you can define that too. As you can see, you may enter the IP address manually or by DNS lookup. The latter feature is handy, but it works only for hosts whose names are resolvable by the system on which Firewall Builder is running.
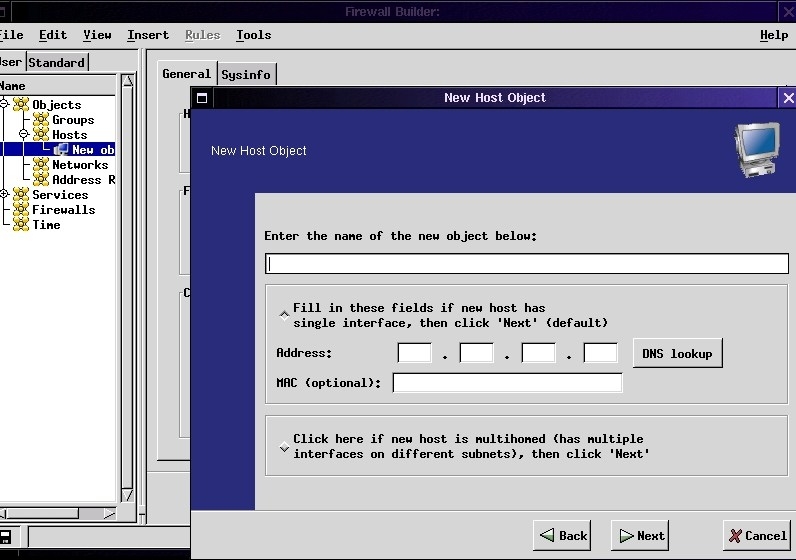
Figure 2. Insert Host Dialog
Figure 3 shows the Insert network dialog. Unlike Insert host, which pops up a separate window, Insert network simply opens a blank New object form in the right-hand portion of the main window. This dialog actually is simpler than the Insert host dialog; all you need to enter are the network's IP address and subnet mask, a name for the network object and, optionally, a comment.

Figure 3. Insert Network Dialog
The most complicated object by far is the firewall object. Initial setup isn't too hairy in itself; simply define the firewall's interface or interfaces by IP address and subnet mask. But once the firewall object has been added, and it appears in the list of user-defined objects on the left-hand side of the main fwbuilder window, click on its icon. Five pages (tabs) of information should appear on the right-hand side of the window (Figure 4).
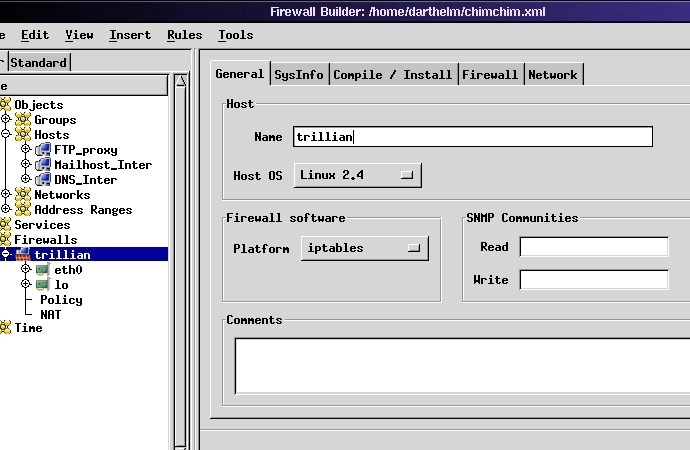
Figure 4. Firewall Properties
On the General screen, we see the hostname entered in when the firewall object was created. It's important, though, to select appropriate Host OS and Platform options, so Firewall Builder will know which of its compiler engines to use when converting policies to firewall scripts for this firewall.
The SysInfo screen applies only to SNMP data (see Sidebar). The Compile/Install screen is where you can set up automatic installation of your firewall policies. If you intend to install them manually, you can leave this screen alone. Someday, hopefully soon, Firewall Builder will support the automatic transfer and installation of firewall scripts using SSL. As of this writing, however, the fwbd dæmon that must run on a target firewall for this method to work has not been released.
If you leave the Compile/Install screen's Installer option at its default of fwbd, even though this feature isn't yet supported, nothing bad will happen; compiled firewall rules still are saved to your home directory. The Install option in the Rules menu will be grayed out, though. If, on the other hand, you set Installer to Install Script, you then can specify the path to a custom script in the Policy Install Script field, with optional command-line parameters below. The custom script will be executed when you select Rules®Install after compiling a policy.
This method is a handy way to script, for example, an scp command that securely copies your policies to their target firewalls. Sample installation scripts, notably fwb_install, are available under contrib at the Firewall Builder download site (sourceforge.net/project/showfiles.php?group_id=5314).
Regardless of what you set Installer to, Firewall Builder writes the script it compiles for this firewall to a local ASCII file with the same name as the firewall object and a suffix of .fw. For example, scripts generated for the firewall Trillian in Figure 4 are named trillian.fw.
Continuing with Firewall's object properties, the Firewall tab is used to configure options specific to the platform you selected in the General screen, in our case Netfilter/iptables-specific options (Figure 5). The defaults here work fine for many if not most users, but a couple of the options are worth discussing.
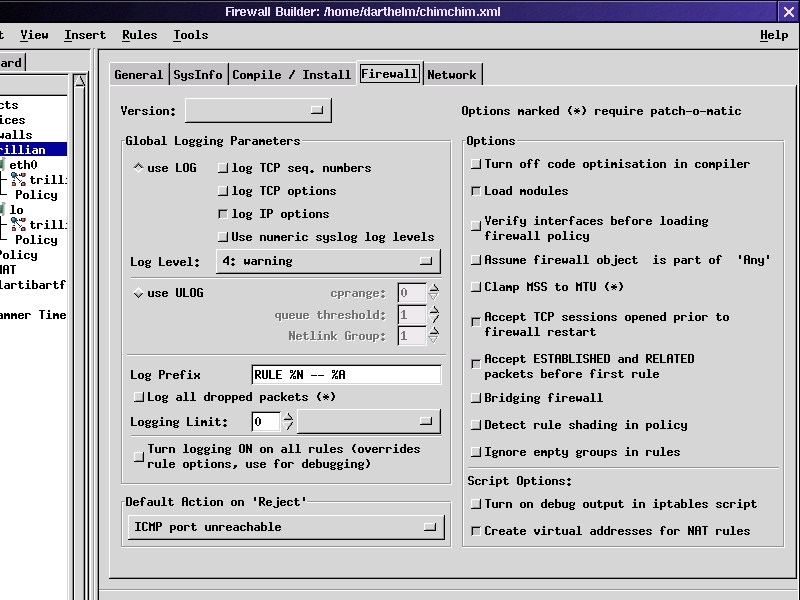
Figure 5. Platform-Specific Firewall Properties
In the Global Logging Parameters section you can control how Firewall Builder writes log entries. The default Log Level of 6: Info is okay. Personally, I log only dropped and rejected packets, so I like to bump this up to 4: Warning.
In the Options section of the Firewall screen you may wish to select Assume firewall object is part of Any. The default is for the built-in Source/Destination object Any to be interpreted as “Any host except the firewall”. This is not atypical in firewall policy builders, but it can cause some surprising behaviors.
For example, if the last rule in your policy is a cleanup rule that sets source=any, destination=any, service=any, action=drop and logging=on, you'd expect any attempted connections to the firewall not matching previous rules to be logged and dropped, right? Indeed, they will be dropped, but not because of this rule. They'll be dropped by the INPUT chain's default policy, which Firewall Builder always sets to DROP. This example cleanup rule is triggered only by attempted connections through the firewall. As the firewall itself is not assumed to be part of Any, your cleanup rule is implemented only in the FORWARD chain, not in the INPUT or OUTPUT chains.
Selecting Assume firewall object as part of Any reverses this behavior, and it causes such a cleanup rule to behave the way you'd expect. However, it may complicate other things, such as anti-spoofing rules specific to firewall interfaces. In short, it's a trade-off. My own preference is to leave this option deselected. Then, I either tweak my Firewall Builder scripts to include the log and drop lines to at least the INPUT chain, or I add an extra Firewall input log and drop rule to my policy.
If in doubt, test and tinker with this setting. You can use the Log all dropped packets in the Global Logging Parameters section, but it requires your firewall to have had Netfilter compiled with the Patch-O-Matic Dropped Table patch. This may not be the case if you installed a kernel provided with your Linux distribution.
The last screen of Firewall object properties is Network. This contains settings specific to the Host OS you specified in the General screen. These options directly alter your kernel's behavior; if that frightens you, ignore this screen. But if your firewall is a full-blown, entire-network-protecting firewall rather than simply a hardened host, make sure you set Packet Forwarding to On.
Believe it or not, even after all this work we're not done configuring the firewall object. In Figure 4 you may have noticed that in the hierarchical view of objects on the left-hand side of the window, the firewall Trillian has two interfaces, eth0 and lo. The eth0 subsection was created automatically when I ran the Insert firewall dialog. lo, which represents Trillian's loopback interface, had to be created manually. It's a little odd that its creation doesn't happen automatically. Every firewall, whether a multihomed host or a bastion host, needs rules that allow its loopback interfaces free rein (so local processes aren't interrupted).
To add a loopback interface manually, select your firewall object's icon in the object list, pull down the Insert menu above and select Interface. The Interface option is grayed-out unless you've selected a Host or Firewall object. A new interface icon appears below your firewall object, and the new interface's properties are displayed on the right. Enter the interface's name into Name (for example, lo), and deselect This Interface is External (insecure). The latter option should be checked only for your external interface and DMZ interface objects.
Next, while the new interface's object is still selected, pull down the Insert menu again and select Address. Now an address sub-object appears below your new interface, and its properties are displayed on the right (Figure 6). Enter a name, an IP address of 127.0.0.1 and a netmask of 255.0.0.0 (the latter will be filled in automatically, actually). In some circumstances, systems have more than one loopback interface, in which case the address may vary (127.0.0.2, etc.). Chances are, though, you have only one and its IP is 127.0.0.1. When in doubt, do an ifconfig -a on your firewall.
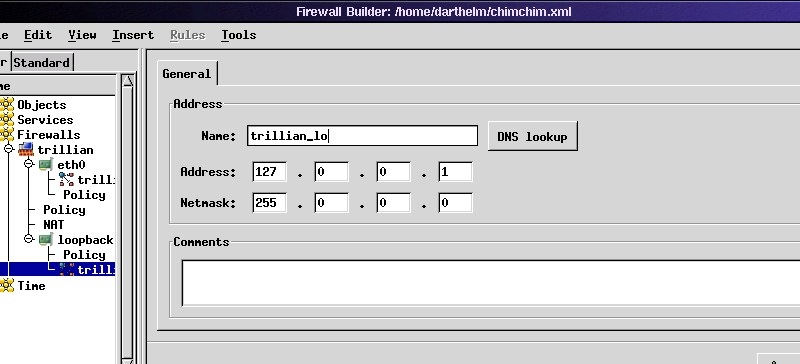
Figure 6. Adding a Loopback Interface's Address
Once you've defined all your objects, or at least enough to start writing rules, save them by pulling down the File menu and selecting Save. You'll be prompted to provide a filename with a suffix of .xml in your home directory. Some scripts expect objects to be named objects.xml and to be stored in ~, but this is user-configurable. In other words, name your objects file whatever you like and put it wherever you want. Remember what and where these are if you need to tweak fwb_install or another policy installation script.
I'll leave it to you to create additional Host, Network and Firewall objects pertinent to your environment. Also, I've skipped Network Range and Time objects, both of which are easy to understand and use—you can figure these out by playing with them or by referring to the documentation at www.fwbuilder.org. Next month, we'll use all these objects to build some policies. In the meantime, I hope you've learned enough to get started and to start exploring Firewall Builder on your own. Have fun!


