
An Introduction to FreeS/WAN, Part I
Over the past five years or so, IPSec has emerged as the leading standard for building encrypted virtual private network (VPN) connections. FreeS/WAN (www.freeswan.org), the free secure wide area network, is the most popular and one of the most mature free implementations of IPSec, and it runs exclusively on Linux systems. This month and next we're going to discuss why and how to use FreeS/WAN for secure network communications, starting with secure wireless networking.
Until recently the two most common uses for VPNs were network-to-network (site-to-site) connections and remote-access solutions. In site-to-site connections (Figure 1), each network/site has a VPN gateway, a VPN server that communicates to other VPN gateways via IPSec (or other VPN protocol) tunnels. It also acts as a router for hosts on its local network that need to send packets to other connected VPN sites. In other words, in a site-to-site VPN, multiple users or hosts share a single tunnel to communicate to multiple hosts on a remote network.
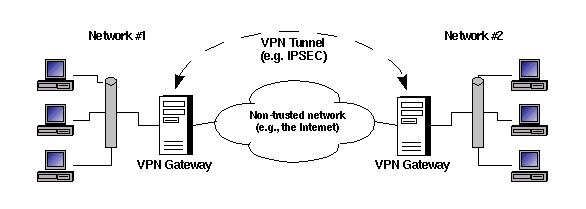
Figure 1. Site-to-Site VPN
Remote-access VPNs, including the kind used over wireless LANs, are slightly different. Rather than connecting an entire network to some other network, a remote-access VPN tunnel connects a single user or computer to a remote network (Figure 2). Typically, the user's local VPN gateway is simply a software application running on her local system (the remote VPN gateway is usually a firewall or dedicated VPN device on the home network).

Figure 2. Wireless (Remote-Access) VPN
Wireless local area network (LAN) VPNs are an important subcategory of remote-access VPNs. Wireless networks are increasingly popular due to their convenience and low cost. However, by definition they broadcast all packets over radio waves, so it's easy to eavesdrop on them. Network vendors made a feeble attempt to provide wired equivalent privacy by creating the wireless encryption standard of the same name (WEP), but weaknesses in WEP's cryptographic implementations have rendered it prematurely obsolete. Therefore, many organizations that use wireless LANs leave WEP turned off. Instead they use VPN tunnels to encrypt wireless links.
Returning to Figure 2, note that a single system can serve as a combined VPN/wireless gateway. Figure 3 shows an equally valid topology: the wireless and VPN gateways are separate devices.
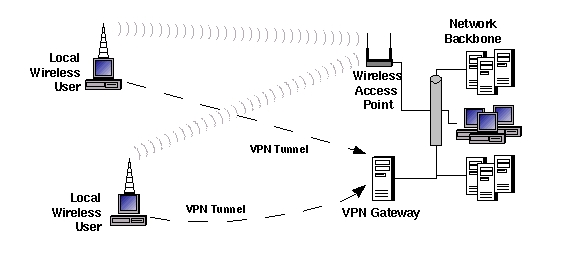
Figure 3. Another Wireless LAN VPN Topology
As I stated earlier, IPSec is the most popular VPN protocol. Because it's an extension of the IP protocol, it's the “official” VPN protocol of the Internet. For almost as long as IPSec has existed, John Gilmore and the FreeS/WAN Project team have been doing their best to promote IPSec's widespread adoption by developing and giving away the FreeS/WAN package for Linux. For definitive information about and the latest version of FreeS/WAN, see their home page at www.freeswan.org. Suffice it to say, FreeS/WAN is mature, well documented and well supported. If you run Linux, FreeS/WAN is the choice for your VPN needs.
Like Netfilter, FreeS/WAN consists of a kernel module that does the actual work and user interfaces that are used to configure it. Unlike Netfilter, FreeS/WAN is not included in standard Linux kernel sources and therefore is not part of the stock kernels in most Linux distributions. This is due to many countries' crypto export restrictions.
Retrofitting and even recompiling your kernel might sound like an unwieldy way to install FreeS/WAN. However, a number of Linux distributions, including SuSE, Debian and Mandrake, have FreeS/WAN packages that work with those distributions' stock kernels. For users of Red Hat 7.3, RPM packages of IPSec-enabled kernels (both binary and source) and the FreeS/WAN setup tools can be downloaded from Steamballoon at rpms.steamballoon.com/freeswan.
Because I personally run SuSE and Red Hat the most, I'll describe how to obtain and install FreeS/WAN for them. See the documentation at www.freeswan.org/doc.html if your needs are more complex. Depending on your kernel and distribution, you may have to compile FreeS/WAN from source, but this is well documented on the web site.
If you run SuSE with a stock kernel, simply install the package freeswan.rpm from the sec series. Make sure the kernel version of the ipsec.o module matches that of the SuSE kernel you run. The quick way to double-check your system's kernel version is with the command uname -av. To see the kernel version of your not-yet-installed freeswan.rpm package, use this command:
rpm -ql -p ./freeswan.rpm |grep ipsec.o
The kernel version will be indicated by the pathname to this file, e.g., /usr/lib/modules/2.2.18/ipv4/ipsec.o.
If the kernel versions match up, install the package with rpm, like this:
rpm -Uvh ./freeswan.rpm
Next, enable IPSec by opening /etc/rc.config and setting the variable START_IPSEC to “yes”.
Now it's time to replace the sample host key (RSA signing key pair) that was probably installed on your system by the FreeS/WAN RPMs. (If the creation date of /etc/ipsec.secrets is earlier than today's date, you need new keys.) The commands to do this for FreeS/WAN versions 1.92 and higher are:
mv /etc/ipsec.secrets /etc/ipsec.secrets.test
ipsec newhostkey --hostname
--output /etc/ipsec.secrets --bits 2192
You will, of course, replace my.host.FQDN with your host's fully qualified domain name, e.g., george.wiremonkeys.org.
For earlier versions of FreeS/WAN, use:
ipsec rsasigkey --hostname my.host.FQDN 2192 \
> /etc/ipsec.newkey
If you use the ipsec rsasigkey command, you'll also have to open /etc/ipsec.secrets with a text editor and replace everything between the curly brackets ({}) with the contents of ipsec.newkey (or whatever file to which you cat'd the new key).
Even though you haven't configured it yet, you may now test FreeS/WAN by starting and querying it:
/etc/init.d/ipsec start
ipsec whack --status
If the second command (ipsec whack --status) returns 000, your FreeS/WAN installation is working properly.
If you run Red Hat 7.3 with its stock kernel (version 2.4.18 as of this writing), download the appropriate IPSec-enabled kernel package from rpms.steamballoon.com/freeswan. You should grab the binary or source package for freeswan. Install the kernel package first.
If you've already got a stock kernel package installed (and it's almost certain that you do) you'll need to use the --force option, because Steamballoon's FreeS/WAN kernel package's base name (simply, kernel) is the same as that of the official Red Hat stock kernel. On my Celeron-based Red Hat 7.3 system, I installed the Steamballoon kernel package like this (all version numbers in examples are probably obsolete already):
rpm --force -i ./kernel-2.4.18-3ipsec.i686.rpm
Don't worry about forcing the install; the names of the new kernel's image file and module directory are unique and will not overwrite your old kernel. For example, on my Red Hat 7.3 system, the new image file and module directory are named /boot/vmlinuz-2.4.18-3ipsec and /lib/modules/2.4.18-3ipsec, respectively. Steamballon's RPM post-installation script overwrote the boot menu entry in /boot/grub/grub.conf for my old kernel with one for the new IPSec kernel (i.e., it removed the old kernel from the boot menu). But after I re-added a menu entry for the old kernel, I could choose either entry at boot time with no problem.
After you've installed the kernel package, install the user-space tools. On my system the command was:
rpm -i freeswan-1.97-0.i386.rpm
This RPM installs a startup script, /etc/init.d/ipsec, but does not enable it. You can do so like this:
chkconfig --add ipsecNext, generate a new RSA signing key pair as described in the previous section. You can then start and test your FreeS/WAN installation, also described in the previous section.
This month, I have enough space to cover only one common FreeS/WAN scenario: wireless LAN tunneling, as illustrated in Figure 2. Figure 4 shows part of the network from Figure 2, this time with IP addresses. In this example, the wireless client system is dynamically IP addressed. As we'll see shortly, you don't need to know the IP addresses of all potential clients.
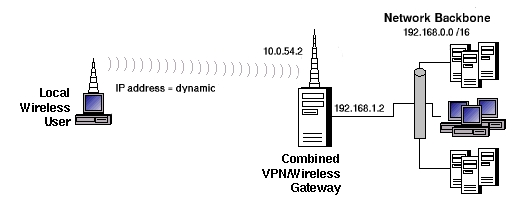
Figure 4. Wireless VPN with IP Addresses
The rest of this article depends on several important assumptions: 1) basic network connectivity is already in place, so wireless clients can connect to the Linux server; 2) basic packet forwarding works—the wireless clients can reach hosts on the other side of the wireless gateway; and 3) the gateway is not yet acting as a firewall.
I make the third assumption strictly for expediency's sake. Good security comes in layers, and it costs you nothing (other than a little setup time) to restrict where incoming VPN traffic may and may not go. Unfortunately, I can't go into much depth here; see the “FreeS/WAN quick start on firewalling” HOWTO at www.freeswan.org/doc.html for more information.
FreeS/WAN is configured via two files: /etc/ipsec.conf is its main configuration file, and /etc/ipsec.secrets is its key repository. Both files should have restrictive permissions; 0600 is a safe choice. /etc/ipsec.secrets, in particular, must be carefully protected. If you need to copy any data out of this file, say, your host's public RSA key, copy out only the data you need into a separate file. Never allow ipsec.secrets itself to leave your system. We'll discuss this file in greater depth next month.
Listing 1 shows the ipsec.conf file from an example wireless VPN client. /etc/ipsec.conf consists of three parts: basic setup parameters (config setup); default tunnel parameters (conn %default); and tunnel definitions (conn george-gracie in Listing 1, where george-gracie is the name I chose for this tunnel).
Listing 1. /etc/ipsec.conf on a Wireless Client
The default settings for the config setup section can be safely left alone on single-interfaced systems. The most important parameter there is interfaces. This tells FreeS/WAN which interface to use as the local end point of IPSec tunnels. Its default, the magic string %defaultroute, expands to ipsec0=[interface] (where [interface] is the network interface name indicated in the system's default route, e.g., eth0). Similarly, the default tunnel settings usually can be left alone.
This brings us to the heart of ipsec.conf: the tunnel definition. In the tunnel george-gracie from Listing 1, we begin by setting authby, which determines how the IPSec hosts authenticate themselves to each other. The default is “secret”, which is short for preshared secret. This setting allows you to define a secret string used in a transparent challenge-response authentication transaction. The secret itself never traverses the network, so this isn't as sloppy an authentication method as you might think.
But that doesn't matter right now, because in Listing 1 authby is set to rsasig, so that RSA authentication is used instead. RSA authentication isn't necessarily that much more secure, but it's more convenient. Whereas a shared secret must be exchanged beforehand via some secure means such as PGP e-mail or SSH, the public keys used in RSA authentication may be exchanged openly (or even published on a web page).
The idea of left and right is important in FreeS/WAN configuration; they are used in parameters and commands to designate the end points of an IPSec tunnel. Which side is which doesn't matter, so long as you're consistent. The same host should be right on both systems' tunnel definition, and one system should not reverse the right/left designations defined on the other.
For sanity's sake, whenever one host acts as a server to another, you're encouraged to designate that host as left. In our example, George is acting as a server for wireless clients, so George is left, and Gracie, a client system, is right.
The tunnel-configuration parameter left indicates the IP address of the tunnel's left end point, George, whose IP address is 10.0.54.2. Right, of course, specifies the right end point's IP address. In our scenario, however, Gracie and other wireless clients have dynamic IP addresses. Instead of specifying an IP, then, we'll use the magic string %defaultroute, which expands to the IP address of the interface specified in the host's default route.
The tunnel parameter leftid may seem redundant, as we just identified the left IP address with left, but it's slightly different. leftid and rightid specify each tunnel end point's authentication ID. This can be an IP address, or it can be an FQDN preceded by an @ sign. Because Gracie's IP address is dynamic, @gracie.wiremonkeys.org is the only viable value for leftid. But in this example, @george.wiremonkeys.org and 10.0.54.2 are interchangeable values for rightid.
The next tunnel parameter in Listing 1 to consider is leftsubnet. This defines which destination IPs can receive packets from the right side, and therefore for which destinations the right-hand end point will use the tunnel. Because Gracie and other wireless clients will use George as their sole gateway to the corporate LAN and to the world at large, we've set this to 0.0.0.0/0, which signifies all destinations. (There's also a rightsubnet parameter, but you need to set both subnet parameters only in site-to-site scenarios. In remote-access and other client/server setups, only one or the other is needed.)
leftrsasigkey and rightrsasigkey both are required when you've specified RSA authentication for a tunnel. The values for these are stored in each host's ipsec.secrets file, in the line beginning #pubkey=. Alternatively, you can use these commands:
ipsec showhostkey --left
or
ipsec showhostkey --leftThe --left and --right options (which work on FreeS/WAN versions 1.9 and later) are optional but convenient. They cause the output to take the form of a leftrsasigkey or rsasigkey statement (respectively) that can be copied and pasted verbatim into ipsec.conf. For example, running ipsec showhostkey --left on George would return the leftrsasigkey statement in Listing 1. Running ipsec showhostkey --right on Gracie would return the rightrsasigkey statement. Note that although RSA keys are long, each must occupy a single line, that is, without line breaks.
The last parameter in Listing 1's tunnel statement is auto, which tells FreeS/WAN what, if anything, to do about the tunnel when IPSec is started. A value of start causes the tunnel to be initialized and started automatically. “add” causes it to be added to the IPSec dæmon's (called pluto) connection specification, and “ignore” causes the tunnel to be ignored. In Listing 1, auto is set to start. Therefore, whenever IPSec is started on Gracie, we want the tunnel to George to be brought up immediately. The config setup parameters plutoload and plutostart must be defined properly for auto to have any relevance—see the ipsec.conf(5) man page for more information.
Okay, that's it for the client-side ipsec.conf. But what about George? As it happens, in this scenario the configuration is nearly the same on both sides. Listing 2 shows most of George's /etc/ipsec.conf file.
Listing 2. /etc/ipsec.conf on Gateway
The first difference is that unlike Gracie, George has multiple interfaces, so it's necessary to give an explicit value to the interfaces parameter. The interface in George's default route faces the corporate LAN, not the wireless LAN, so a value of %defaultroute won't work. Next, we have a new config setup parameter, forwardcontrol. When set to yes, it tells IPSec to turn on IP forwarding when needed and to turn it off when IPSec is shut down.
Next, in the tunnel section itself, right is now set to %any rather than %defaultroute (because %defaultroute would return George's local IP, not Gracie/right's). And, auto is set to add rather than start, because George is acting as a server; it only needs to be ready for Gracie to start the tunnel.
And now the moment of truth! First on George and then on Gracie, we enter the command:
ipsec setup restart
George will read /etc/ipsec.conf, load the george-gracie tunnel definition into its connection setup database and wait for connections. Gracie will do the same thing and then bring up the tunnel. Startup messages will be logged to /var/log/messages or /var/log/secure. If on the client system the output from ipsec setup restart ends with an “IPsec SA established” message, your tunnel is up! Try pinging or otherwise connecting to hosts on the remote network; the connection should behave no differently from before when you brought the tunnel up. In fact, you may want to run tcpdump on your tunnel-bound Ethernet interface to make sure that only ESP (Encapsulating Security Payload) packets (i.e., encrypted tunnel packets and not actual Ping, FTP packets, etc.) are being sent out.
Next month we'll look at another VPN scenario or two and delve deeper into the splendors of FreeS/WAN. Hopefully this was enough to get you started down the path to secure wireless networking!
Mick Bauer (mick@visi.com) is a network security consultant for Upstream Solutions, Inc., based in Minneapolis, Minnesota. He is the author of the upcoming O'Reilly book Building Secure Servers with Linux, composer of the “Network Engineering Polka” and a proud parent (of children).

