
Network Simulator 2: a Simulation Tool for Linux
The ARIES (Advanced Research on Internet E-Servers) Project started in 2000 as part of the Open Systems Lab research activities at the Ericsson Corporate Unit of Research. Initially, the project aimed to find and prototype the necessary technology to prove the feasibility of an internet server that had the guaranteed availability, response time and scalability using Linux and open-source software. The project was successful, and it continued in 2001 to focus on enhancing the clustering capabilities of Linux to be the operating system of choice for the Mobile Internet servers. Many enhancements were added in the areas of load balancing, traffic distribution and security, in addition to IPv6 support.
One interesting question that came up was what is the impact of supporting IPv6 on other protocols used by different applications on our Linux clusters? To answer this question, we started a study investigating the effects of IPv6 support on other protocols, such as SCTP. Part of the study is to test applications in SCTP over IPv6. However, we did not have the time and resources to set up a lab with multiple nodes and applications that use SCTP over IPv6. Instead, we chose the next best solution, network simulation.
There is a growing recognition within different internet communities of the importance of simulation tools that help design and test new internet protocols. New services and protocols present challenges for testing. For instance, quality of service and multicast delivery require large and complex environments. Protocol designers recognize the advantages of simulation when computing resources are not available or are too expensive to duplicate a real lab setup. With simulation, you can do large-scale tests that are controlled and reproducible. This was exactly what we needed to build our case scenarios; the search started primarily for an open-source tool because most of our work targets the deployment of open-source software based on Linux.
Our target application is a real-time network simulation tool that we can use to define the different scenarios. A very interesting open-source tool we came across was Network Simulator 2 (NS2), which was developed by the Information Sciences Institute at the University of Southern California.
In this article, we summarize how to install and configure NS2 and look at two different simulation scenarios. The first scenario involves monitoring SCTP traffic between two nodes, and the second scenario looks at the behavior of web traffic and web applications over TCP over a six-node network.
NS2 is an open-source simulation tool that runs on Linux. It is a discreet event simulator targeted at networking research and provides substantial support for simulation of routing, multicast protocols and IP protocols, such as UDP, TCP, RTP and SRM over wired and wireless (local and satellite) networks. It has many advantages that make it a useful tool, such as support for multiple protocols and the capability of graphically detailing network traffic. Additionally, NS2 supports several algorithms in routing and queuing. LAN routing and broadcasts are part of routing algorithms. Queuing algorithms include fair queuing, deficit round-robin and FIFO.
NS2 started as a variant of the REAL network simulator in 1989 (see Resources). REAL is a network simulator originally intended for studying the dynamic behavior of flow and congestion control schemes in packet-switched data networks.
Currently NS2 development by VINT group is supported through Defense Advanced Research Projects Agency (DARPA) with SAMAN and through NSF with CONSER, both in collaboration with other researchers including ACIRI (see Resources). NS2 is available on several platforms such as FreeBSD, Linux, SunOS and Solaris. NS2 also builds and runs under Windows.
Simple scenarios should run on any reasonable machine; however, very large scenarios benefit from large amounts of memory. Additionally, NS2 requires the following packages to run: Tcl release 8.3.2, Tk release 8.3.2, OTcl release 1.0a7 and TclCL release 1.0b11.
The process of installing NS2 is straightforward yet lengthy. At the time of writing, the most recent version was 2.1b8. We are interested in the "all-in-one" package because it includes the source code that we want to patch in SCTP support.
You can download the all-in-one package from the NS2 home page (see Resources) into /usr/src and extract it as follows:
cd /usr/src
tar xzvf ns-allinone-2.1b8.tar.gz
cd ns-allinone-2.1b8
Because we want to examine a case scenario involving SCTP, we need to apply the SCTP patch to NS2 from the University of Delaware. The patch is available for the NS2 all-in-one 2.1b8 version and can be downloaded from the Protocol Engineering Lab home page (see Resources). With the Linux patch utility, you can update the NS2 source code to include support for SCTP by applying the patch:
patch -p0 < ns-allinone-2.1b8.sctp-rel2.2_patch_orig
In the same directory, there is a script named install that will configure, compile and install the required and optional NS2 components. There is no interaction with the user while installing; the script is completely automated. You must execute the script as superuser so that installation of binaries will be completed:
./install
When the installation process is complete, the following message will appear on your shell
Please put
$CUR_PATH/bin:$CUR_PATH/tcl$TCLVER/unix:$CUR_PATH/
tk$TKVER/unix into your PATH environment; so that
you'll be able to run itm/tclsh/wish/xgraph.
IMPORTANT NOTICES: [...]
Carefully follow all instructions given in the notices. The above-mentioned variables can be updated either by editing /etc/profile or changing environment variables directly. In case you updated /etc/profile, you need to source your new environment for the changes to take effect (i.e., source /etc/profile).
The NS2 validation suite will verify that all protocols are functional. This will fail if the install process was not completed; however, running validation is optional, and it consumes twice as much time as the compilation and installation process.
To run the validation suite:
cd ./ns-2.1b8
./validate
SCTP is a transmission protocol that was introduced by the IETF workgroup SIGTRAN in October 2000 (RFC 2960) to allow SS7 traffic over IP. However, since then it has adopted many more uses because of its versatility as it also supports multihoming, network congestion control, error-free sequenced delivery and many other options.
After applying the SCTP patch to NS2 package, a README file is created: /usr/src/ns-allinone-2.1b8/ns-2.1b8/sctp.README. At the end of the sctp.README file, there is an example script for an SCTP interaction. In the simulation generated by this Tcl script, you will observe SCTP's four-way handshake as described in RFC 2960, as well as congestion control. This scenario examines FTP traffic over SCTP between two nodes: node 0 is FTP client and node 1 is FTP server.
The original script is hard coded for version 2.1b7a. You need to update few lines to reflect your own setup. Listing 1 has been updated assuming that NS2 version 2.1b8 was installed.
Listing 1. SCTP Simulation Script
The changes that were applied to the original script are basically setting the paths depending on the specific environment. Once you update the paths of all used tools, you are ready to start NS2 for a network simulation of SCTP. To start the simulation, follow these steps:
cd /usr/src/ns-allinone-2.1b8
ns ./sctp.tcl
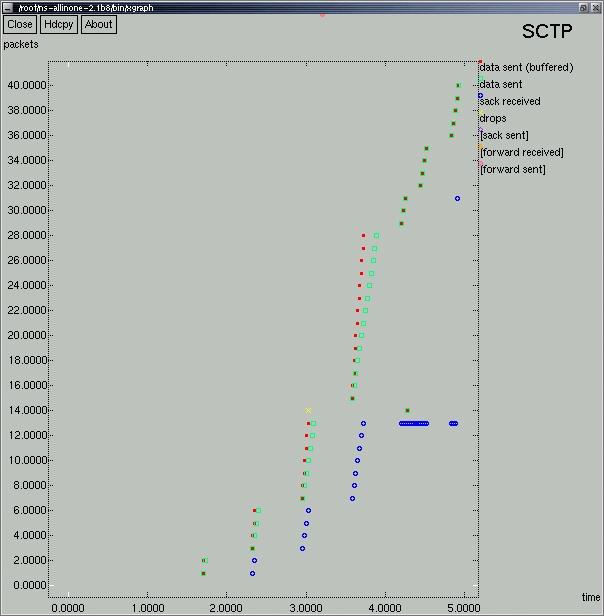
Figure 1. SCTP Data Profile

Figure 2. Simulation Window
On execution, three windows will appear. The first window is represented by Figure 1 showing a graph with packet traffic. The second window shows the simulation window as seen in Figure 2. The third window is the control window of the network animator (NAM).
It is interesting to see the graph generated by NS2 (Figure 1). The yellow x represents a dropped packet and horizontally to the right is the retransmission. This dropped packet occurred because of an error loss model that was introduced into the script that simply drops the specified packets between nodes given. SCTP manages retransmission similarly to TCP, supporting fast retransmit.
set err [new ErrorModel/List]
$err droplist {15}
$ns lossmodel $err $n0 $n1
In the simulation window (Figure 2), right click on the link between both nodes and select graph --> graph bandwidth, and then click on Link 0-->1; you will obtain a bar graph representing bandwidth going from node 0 to node 1. You can repeat this process for reverse traffic bandwidth to monitor traffic going from node 1 to node 0. Now, you should see traffic bandwidth graphs below node display (Figure 3).

Figure 3. Traffic Bandwidth Utility Graphs
Before we start the scenario, we will take a brief look at some important lines in the script and explain what they do:
[...]                     // After initializing trace
                          // files and simulation windows
set n0 [$ns node]         // two nodes are created
set n1 [$ns node]         // (n0 and n1)
$ns duplex-link $n0 $n1 .5Mb 300ms DropTail
                          // then they are linked
                          // together
$ns duplex-link-op $n0 $n1 orient right
[...]
set sctp0 [new Agent/SCTP]
$ns attach-agent $n0 $sctp0
[...]
set sctp1 [new Agent/SCTP]
$ns attach-agent $n1 $sctp1
Then we define the protocol (SCTP) that will be used for destination and return traffic. An agent, defining what protocol to use, is similar to a carrier for packets. Each agent must be attached to a specific node:
$ns connect $sctp0 $sctp1      // connect both agents
                               // together to set up
                               // a communications
                               // channel, or a stream
[...]
set ftp0 [new Application/FTP] // define the type of
                               // application that
                               // will use the
                               // stream, FTP
$ftp0 attach-agent $sctp0
To start real-time simulation, press the play forward button. The first event to notice is the four packets that initiate the FTP connection. This corresponds to the stream initiation behavior specified in RFC 2960. The other event to observe is congestion control. SCTP will send few packets at a time and steadily increase until it reaches a maximum throughput but will not flood the network. Although we do not alter our network's bandwidth, the FTP connection between nodes 0 and 1 shows some basic congestion control. The beginning and end of the FTP connection are defined on these lines:
$ns at 0.5 "$ftp0 start"
$ns at 4.5 "$ftp0 stop"
Notice how the packets are being sent in an increasing fashion, or visually, in longer formats. Actually, the packets are always the same length; however, the number of packets received by the server is increased as can be seen by the number of SACKS received by client (Figure 4). SACKS are sent to acknowledge each packet received to ensure packet validation and reliability.
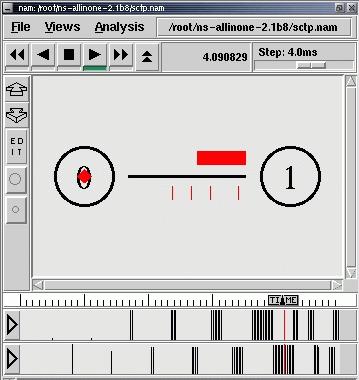
Figure 4. SACKS for Every SCTP Packet Sent
The University of Delaware did not implement multihoming in their SCTP patch to NS2. This means that SCTP behaves similarly to TCP when it comes to streams. Otherwise, packets could be seen traveling both along the primary path and along another routing path to the server's second, third or other IP address. A similar behavior is dynamic rerouting, which is a secondary function of SCTP's primary path monitoring.
This scenario examines web traffic over a TCP network. To simulate this case, we defined six nodes:
node 0 is the client that will request a web page from the web server.
node 1 is the client's router.
node 2 is the web cache's primary router.
node 3 is the web cache's secondary router.
node 4 is the web cache server.
node 5 is the web server.
The web cache (node 4) is connected to a web server (node 5) through a router (node 3). The web client (node 0) is connected to web cache (node 4) with connection routed through the client's router (node 1). To simulate this case scenario, you need the script shown in Listing 2.
When executing ns ./tcpweb.tcl, you will obtain two windows: the network animator and the simulation window. Figure 5 shows a possible layout of the nodes in simulation window. To get an accurate picture of traffic from client, bandwidth graphs for the link between nodes 1 and 2 are displayed.
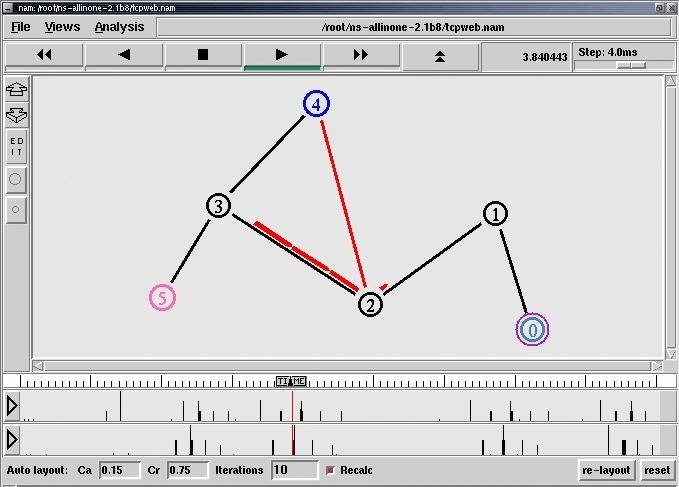
Figure 5. Dynamic Rerouting of Packets
Link failure occurs between nodes 2 and 4 (Figure 5) as defined by the following lines:
$ns rtmodel-at 3 down $lrmon3 $lmcrt1
$ns rtmodel-at 7 up $lrmon3 $lmcrt1
Packets that were on the link are lost and must be retransmitted. After failure, notice the break in packet traffic in the bandwidth graphs. TCP packets are now taking another path from web cache to web client. Yet the connection is not lost because of the failure, since we can see that packets are still being exchanged between client and cache. If the display of nodes is not to your liking, you can change it using the Re-layout function button in the simulator window. While playing the simulation, you can change the step using the slider bar. This will be especially useful during the link failure between three and seven seconds to see dropped packets.
Another interesting aspect of this scenario is the visual server-cache and client-cache interaction. You can see a model of real-time common interactions on the Internet. Of course, bear in mind that this is a generalized simulation.
If you prefer a graphical interface to setup network simulations, NAM supports a drag-and-drop user interface. You can place network nodes, link them together and define user agents and their associated application or traffic generator. SCTP is not included in this interface because the patch was specific to NS2 source code, not NAM. NAM is useful for quickly building a network topology. However, we experienced multiple segmentation faults during editing (back up your files often).
The following example explains how to use basic NAM features. The first step is to start an instance of NAM by executing ./nam. Selecting New in the file menu, you will see the editor window appear. For this example, we are trying to build the topology seen in Figure 6.
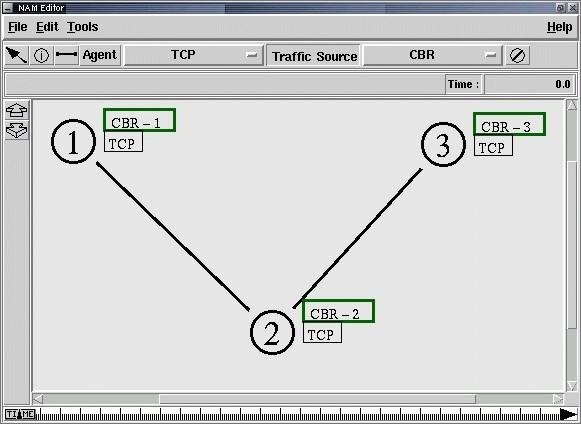
Figure 6. NAM Editor
On the toolbar, click on the Add node button and place three nodes in editor window by right clicking at the correct positions. To link nodes, click on Add link. Select one node and drag-click to the next node to create link. Next, choose which agents you want to use on network in agent drop-down menu. To add an agent, click on the appropriate node. Lastly, you choose what applications you want to simulate: either FTP or CBR source. To add an application, click on the chosen agent. At this point, you can right click on different elements in your topology and edit their properties such as color or start and end time for applications. If you get a dialog saying that you must connect your agents, use Add link and connect different agents to simulate your scenario. In case of a blunder, there is a delete button on the toolbar. Note that editor and simulation windows are both part of NAM, but simulation must first be interpreted by NS2 so that NAM can replay the log of simulation.
We decided to test NS2 because of its support of SCTP (which is a requirement for us), graphical representations, multiple protocols and many other reasons. However, you need to patch the source code in case the protocol you want to simulate is not supported and live with low-quality graphics tool.
NS2 is a tool that helps you better understand certain mechanisms in protocol definitions, such as congestion control, that are difficult to see in live testing. It provides good documentation and support for different add-ons. We recommend NS2 as a tool to help understand how protocols work and interact with different network topologies.
We would like to enforce the need for such tools to be open source and targeted toward supporting Linux. With the emergence of new protocols, such as IPv6 and SCTP, NS2 can be very useful for the Open Source community.
The Open Systems Lab at Ericsson Research for supporting our work with Linux and open-source software.
Application and Protocol Testing through Network Emulation
Macroscopic Internet Data Measurement and Analysis
Stream Control Transmission Protocol
University of Essen and Siemens, SCTP Implementation
David Gordon (davidgordonca@hotmail.com) is finishing his Bachelor's degree in Computer Science at Sherbrooke University in Quebec, Canada. He is currently an intern in the Open Systems Lab at Ericsson Research and a member of the IPv6 research group. His interests include internet protocols, networking, cryptography and network security.
Ibrahim F. Haddad (Ibrahim.Haddad@Ericsson.com) is a researcher at the Ericsson Corporate Unit of Research in Montreal, Canada, where he is involved in researching carrier-class server nodes for real-time all-IP networks. He is mainly responsible of the security and IPv6 research activities at the Open Systems Lab.
email: Ibrahim.Haddad@Ericsson.com
email: Ibrahim.Haddad@Ericsson.com
