
Linux and Samba in a Federal Lab
Linux and Samba recently answered the needs of the Army Research Lab (ARL) at Adelphi, Maryland. Our branch does state-of-the-art research into a specific type of lasers and amasses large amounts of data during the performance testing of these devices. We were able to connect our test equipment over the network to a Samba server. The twist to this approach is that our configuration makes it appear to the users that they access the data through the branch's NT fileserver. I'll explain the setup in detail, but the main trick is creating a network shortcut on the NT box to point to the Samba share while making the Linux box invisible on the network. Figure 1 depicts the setup of the network.
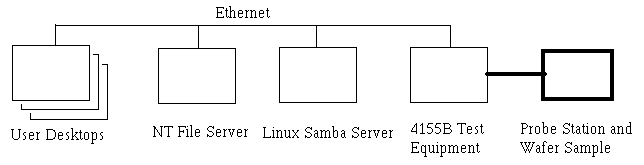
Figure 1. Network Setup
Our branch develops extremely small lasers called VCSELs (vertical-cavity, surface-emitting lasers), which fall under the general category of photonics research. We easily can put over 60 lasers into a square millimeter, and the full wafer containing the lasers can be three inches in diameter. Therefore, we can have thousands of devices on a single wafer. Figure 2 shows a picture of a typical VCSEL. The main tests we run to characterize the performance of each VCSEL are called ILV curves for current, light and voltage. Basically, we see how much light comes out for the power that was put in. Also, most of the analysis software is on the user's desktop machine so they need to be able to access the raw data from there. Users are creatures of habit. Getting data pertinent to the branch has historically meant going to the NT server. Since the users were used to getting data from the NT box, we did not want to make them go somewhere else. We tried to make everything transparent to the user and make it appear as though they were getting the data from the NT server. To force the users to go through the NT box, we make the Linux box invisible to the network. We rely on the security of the NT box to authenticate users accessing the data.

Figure 2. Typical VCSEL: large rectangles are contact pads for the test probes. The actual lasing area is the small gray square at bottom center.
Two pieces of equipment are key to characterizing the VCSELs. First is the probe station that is basically just a microscope with some tiny probes and a light meter. The probes apply the power to the device, and we measure the power produced with the light meter. A 4155B parameter analyzer from Agilent is the second piece of equipment. This analyzer is programmed to sweep the current level and measure the voltage and light. It has two main ways of being controlled: front panel and the GPIB interface. Granted, the GPIB port is a popular scientific interface and allows us to do fancier tests by controlling the test setup with a computer as well as collect the data, but our controlling computer is about five feet down the lab bench and cannot be moved closer. This makes it difficult to start the test when the probes are in place. Fortunately our main test is simple to program through the front panel. Our test routine is to position the probes by looking through the eyepiece of the microscope, reach up carefully and push the test button on the parameter analyzer and then save the data. Figure 3 shows the lab hardware.

Figure 3. Probe Station (bottom center) and 4155B Parameter Analyzer (White Box on top left)
After we get a clean run, we need to save the data. The 4155B has three ways to save the data: GPIB, floppy and TCP/IP. Since we aren't controlling the analyzer with the GPIB, that's not an option. The floppy supports 3.5" disks, but these disks fill up quickly and you have to walk around with them. Since we have several lab areas where we work, it's not unheard of to have to backtrack to recover a temporarily misplaced disk. The answer we put together works because of the TCP/IP support.
The parameter analyzer supports TCP/IP, specifically NFS. You can even ping the analyzer. Since it's registered in the lab's DNS, the ping can be done by way of IP address or name. We were able to put together a Linux box out of obsolete or broken equipment. Literally, we pulled together parts of three computers into one. It didn't cost the government anything, and it fills the need. For the installation, the newest distribution that we had and that the P-133 hardware would support is Red Hat 6.2, so we put that on and hardened it with Bastille and the latest patches. Additionally, all the unnecessary services were turned off and SSH was added. We sliced the hard drive space carefully and ended up with about 1.5GB of space for data. Total time of install and configuration was three hours.
Again, the parameter analyzer talks NFS, so the next step was configuring that. The /etc/exports file needed just one line:
/home/guest/hptestdata 192.168.10.29(rw)
The hptestdata directory was created under guest's home directory, and nfsd was restarted. This line allows only the one IP address to mount the directory. Appropriate information was entered into the parameter analyzer's front panel and the mount button pushed. Of course it didn't work the first time. After just a minute of diagnosis, syncing the ID numbers on the analyzer to the guest account solved the problem. Total time to configure NFS was less than five minutes.
Samba is an amazing product that can do many things. This is a simple application, and the /etc/smb.conf is shown in Listing 1.
Of course, crucial security information like network domain has been changed in this and /etc/exports. The key parts in the file are creating the hptestdata share and making it read-only. The read-only part is to prevent users from accidentally deleting data. We periodically purge, but only after assurances from all the users. The other part of Samba is modifying the boot-up files so nmbd is killed. With the network configuration we are setting up, we don't want to see the machine on the network. Therefore we don't want nmbd to provide name services. See your distribution's documentation for the appropriate file to configure. For Red Hat 6.2, we modified S91smb and commented out the nmbd startup lines by placing a # at the beginning of the appropriate lines. To remind myself of this network configuration, I also changed the echo line in the file to say that smbd was not starting. Normally the script will output that nmbd is starting. Access is restricted to our domain only so outside access is prevented. Total time to configure was several hours of tweaking.
The final configuration step was on the NT box. We haven't seen this trick anywhere else so we think it's pretty neat. We created a data share for the Linux machine. This is where the users will go for data from their desktops. Then we made a network shortcut using UNC (universal naming convention) and put it into the data share. To be honest, to do this we made the Samba share visible on the network for just a minute and created a shortcut in the directory. It was easier for us to do that than fight getting the double backslashes correct. When the user accesses the NT server, he or she sees the shared folder. Double-clicking there shows a directory. Double-clicking on the directory brings the user to the Linux box with the test data, without realizing it. This trick is necessary because Windows cannot share out a network drive that it has mounted. My original plan was to have the NT box map the Samba share to a drive and then share that out. Total time to configure was five minutes, after realizing that Windows can't share out a mapped drive and we employed this trick.
Linux and Samba filled a requirement of the lab that couldn't be supported otherwise. The method is transparent to the users because they go to the same central place for data; it's as secure as the branch's NT server, and it was literally built for free since we used 100% scavenged equipment.
This scheme still suffers slightly from security. A savvy computer user could look at the properties of the network shortcut and then use that to make a shortcut directly to the Samba server, bypassing the NT security. An alternative would be to use the Linux box and smbmount to mount a share from the NT server and export that using NFS to the test device. We were able to mount the NT share on the Linux box, export that with NFS and then mount that on the 4155B. The problem still remaining is writing to that share, even using options with smbmount. Hopefully, in the near future we will have some time to tackle this aspect again.


