
Starting Share Files with NFS
If you have two or more machines, you may wish to share disk space or devices, such as a CD drive, between machines. For this there is network filesystem (NFS), the easiest way of sharing files and resources across a network.
NFS is the way of working with files on a remote machine as if they are on your local one. NFS is the standard de facto solution to access the same $HOME directories from any machine on the Net. Using it also is a good way to avoid keeping duplicated information from eating large amounts of disk space.
NFS originally was introduced by engineers at Sun Microsystems in 1985. Quite ancient, but still good, NFS continues to experience improvements. Sun is working on producing an NFS version 4 implementation for Linux that is now in the development stage.
The standard version of NFS for Linux is 3. This article deals with this version. From an ordinary user's point of view, there are only few differences between versions.
Installing NFS both on the client and the server sides is not so hard. We show some basic NFS features and explain their use. Many commands have to be executed as root, so think 37 times before pressing Enter.
But first, how NFS works. NFS is the most-known service using remote procedure call (RPC). As an example, let's say a server machine, named tiger, keeps all $HOME files in the directory /home. From your local machine, named blackcat, you would issue the command:
mount -t nfs tiger:/home /home
According to this command, mount will try to connect to the rpc.mountd dæmon on server tiger via RPC. The server will check if the request is permitted to mount /home from blackcat and return a file handle that in turn may be used to serve all requests to files below /home. If the request is not permitted, we will see the corresponding diagnostic message. Note that the colon in the command indicates the filesystem is remote, so -t nfs may be omitted. Let's imagine the file handle was returned successfully, and we are dealing with a kind tiger.
When a user on blackcat tries to access a file on NFS, the kernel makes an RPC call to the NFS dæmon, usually rpc.nfsd, passing as parameters the name of the file, user and group ID (uid and gid). Thus the server, tiger, can prevent unauthorized access before sending the file handle. The process of mounting is shown in Figure 1.

Figure 1. Mounting Process
If you want to have your Linux machine acting as the NFS server, you have to run the rpc.mountd program there. This program helps the stage of mounting and passes mount-NFS requests to the rpc.nfsd program, which does almost all work and acts as the NFS server. RPC protocol also defines using performance statistics from the kernel on the serving machine, which in turn helps in working with rpc.lockd and rpc.rquotad. Since kernel 2.2.18, rpc.lockd is evoked by rpc.nfsd on request and thus may not be started manually. The rpc.rquotad program has to be started in order for quota service to work on NFS.
As you remember, we mentioned RPC. This means that for NFS to connect we do not need to change /etc/inetd.config for the program that rules the internet super server, inetd. NFS uses another program, portmapper, which shows the way to find all NFS services on the system.
The very first guard to protect your machine from everlasting net requests uses a pair of files, /etc/hosts.allow and /etc/hosts.deny, to allow the requests to be processed or rejected. This guard recognizes two things: the type of request and the host that sends it. Then it has a look at the file hosts.allow to find those parameters. If found, the request will pass. If not, the guard sees /etc/hosts.deny, and the inquiry is rejected if the pair matches. If the pair does not match either /etc/hosts.allow or /etc/hosts.deny, the request will be passed.
If you are setting the server, say, for an educational establishment, you have to pay more attention to security. In any such establishment there is, for instance, “the fifth column”, usually from students: one part is sniffing your passwords and other sensitive information, the second one is sending “I love you” e-mails, the third gifts you with Trojan horses. NFS, especially its old releases, has a set of features with potentially low-security levels. So, better to set up these files correctly.
To find out more about these files, consult hosts_access in man page section five. But, it is usually enough to forbid access to portmapper and other NFS requests for all machines, and allow demands for particular hosts or subnets. So, in the file /etc/hosts.deny you need to put these rows:
portmap:ALL
lockd:ALL
mountd:ALL
rquotad:ALL
statd:ALL
After this action, nobody can access your NFS server, and of course this is not what we need, so let us also change the /etc/hosts.allow file. The common format for the lines in the file look like this:
daemon list : ... user pattern@host patternFor example, in order to allow using NFS for machines blackcat and tomcat with IP addresses 192.168.16.13 and 192.168.16.24, respectively, we have to add the corresponding lines in /etc/hosts.allow file for all services that we disabled:
portmap : 192.168.16.13  192.168.16.24
lockd   : 192.168.16.13  192.168.16.24
mountd  : 192.168.16.13  192.168.16.24
rquotad : 192.168.16.13  192.168.16.24
statd   : 192.168.16.13  192.168.16.24
If you are using an NFS connection with a set of clients that usually occupies a continuing subnet and so have the corresponding addresses in the range, the row with allowed hosts may be too long. To simplify, there is another way of pointing to such a set of clients: in this case address/netmask is used, for it makes the files shorter and more readable. For example, 192.168.16.0/255.255.255 matches all IP addresses in the range 192.168.16.0 to 192.168.16.255.
To this point, we mentioned only common features that apply to many net services. The config file for NFS service, /etc/exports, is more specific. On those two machines of the cat family, blackcat and tomcat, mount /home and /usr/doc directories via NFS:
/home    192.168.16.11(rw,root squash)
192.168.16.24(rw)
/usr/doc 192.168.16.11(ro,root squash)
192.168.16.24(ro)
The format is clean; in the left field we put the name of the directory to export and then enumerate pairs host(permissions). Note: there is no space after the IP address. In the example above we may write and read in /home, and only read /usr/doc and subdirectories. The parameter root_squash is needed to protect files from client root access. This means that a user (say, a student), after having successfully cracked the client root password, may become root but still cannot access or change files that only root on the server can. This is good, and the option is set by default. The word squash means that the root user will have the same access as user nobody.
If we look at the situation with root carefully, we also will deduce that we should do something with user and group identification numbers: uid and gid. If a user has different uid and gid on a client and on the server, the user may not access fully his or her own files, but may access files belonging to another user.
To avoid this situation, you may set the file to indicate static mapping for uid/gid. In the example below, the option points to the file /etc/nfs/home_map.cats and may look like this:
map_static=/etc/nfs/home map.cats
The file for mapping, home_map.cats may look like this:
# Mapping for cat's machines:
#    server    client
uid   0-60       -    # switch to nobody
uid   61-80     41    # map 61-80 into 41-60
The process of communication between dæmons both on the server and client is shown in Figure 2.
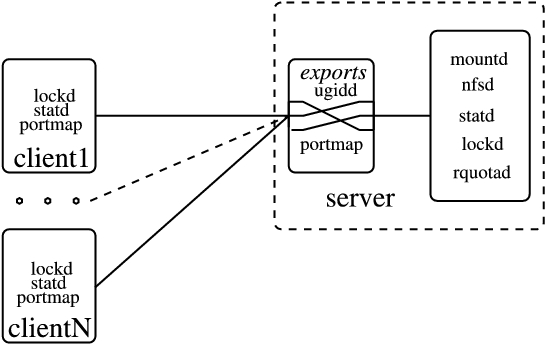
Figure 2. Communication between Dæmons
If you have an NIS system running, the NFS server may use it to consult on uid/gid. In this case you should use another option, map_nis=kingdom.cat. This solution is more clever; the NFS server will obtain the corresponding information from the NIS domain kingdom.cat.
To allow mount process for a group of trusted users described in your NIS system, you may use the parameter @group. If you put, say @catowners, only the host part of all members of the group catowners is extracted to add to the access list.
Having those files correctly installed, you should then start the corresponding programs. Because NFS uses portmapper, portmapper should be run first. In recent distributions of Linux, portmap or rpc.portmap starts while the system is booting. You may check the current status of the program by issuing the following two commands in one line:
ps axu | egrep portmap
If the portmap is running, you will see something like this:
daemon 99    0.0 0.3 1132 500 ?     S Jul11 0:02
/sbin/portmap
tiger  27837 0.0 0.3 1264 492 pts/0 R 17:03 0:00
egrep portmap
The first line here informs that portmap is running. If portmapper is not running, you should try to run it manually. The program usually is located in /sbin, but if not, try /usr/sbin. If the program is not available, you have to install it. The name of the package to install may be something like netbase or nkitb.
Having run the portmapper, you can start the needed dæmons: rpc.mountd, rpc.nfsd, rpc.statd, rpc.lockd and rpc.quotad. These dæmons must be started in exactly this sequence. Modern distributions (we have checked Debian 2.2r3, Red Hat 7.1 and SuSE 7.0) have start/stop scripts for the services. If you have trouble finding such scripts, you may take a ready-made one from a SuSE or Red Hat distribution and correct it by hand, or write your own.
In general, rpc.rquotad is needed only if you use the quota system to limit disk space for the users. In recent versions of the kernel, rpc.lockd is called by rpc.nfsd on request but starting it from the script is okay.
After starting all those programs, execute the command rpcinfo -p. The output of this command shows what programs are running currently, their versions and other useful information. At least portmapper, mountd and nfsd must be running to enable you to use the NFS server. If you have any problems, you can find help in the Linux NFS-HOWTO document.
First, make sure your Linux kernel supports NFS. The status of your system is reflected by proc directory. To look inside the filesystems file, execute the cat command, like this:
tomcat> cat /proc/filesystems
         ext2
nodev    proc
nodev    devpts
         iso9660
nodev    nfs
This file shows you what kind of filesystems you may use with your version of the kernel. If the line nodev nfs is missing, it may mean your NFS filesystem support module is not installed. In this case, try to execute the command modpobe nfs. You must be root to execute it. The output of the command delineates the situation. If module is compiled, the command installs it, and if you repeat the cat command, the clue line will be shown. If your kernel does not support the NFS server, you probably will have to recompile it, but this topic is far beyond the scope of this article.
If you have NFS supported, you can mount files located on the server machine, as we showed in the example. The full format for the mount command is as follows:
mount -t nfs server:exp dir local dir options
Here server is the name of your NFS server, and exp_dir is the full path to the directory to export on the server machine.
Usually this is the end of the story, but to reach maximum productivity for connection via NFS, let's look at options parameters. We will use them later for sure:
rsize=n and wsize=n: specify the size of the datagram sent or accepted by the NFS client while reading and writing requests, respectively. The default value depends on the version of the kernel and may be set in 1,024 bytes. The larger the piece of food your cat can eat at one time, the quicker it finishes eating. So, the bigger the value you hput ecere, the quicker your work with a remote file will be. If you place 4,096 or even 8,192 here, throughput may be improved greatly.
timeo=n and retrans=n: answer for reaction on RPC timeouts. If your pet (take a cat, for example) has eaten a lot, it is able to take a new little piece of food, after a short period of time to be digested a little, and eat a lot again after a long period of time. These time intervals are called minor and major, respectively. Although NFS is not a cat, it also has minor and major time intervals, connected with the reaction of the server. Either the Net or the server, or even both, may be down temporarily or inaccessible. If this occurs, the resending starts after timeo tenths of second. Standard value for this minor timeout is seven. So if there is no reply within 0.7 second, NFS client will repeat the same request and double the timeout (1.4 seconds) by default. If there is still no reply, the procedure will be repeated until a maximum, major timeout of 60 seconds is reached. The quantity of minor timeouts that must occur before a major timeout will be reached, is set by the retrans parameter; its default value is three.
hard and soft: define the reaction if major timeout is reached. In the first case, if default value hard is set, NFS client reports the error “server not responding, still trying” on the console and continues to try to connect. So when the NFS server is back on-line, the program will continue to run from where it was. For the opposite, if value soft is set, the NFS client will report an I/O error to the process accessing a file on an NFS-mounted filesystem, and some files may be corrupted by losing data, so use the soft option with care.
intr: allows for interrupting an NFS call and is useful for canceling the job if the server doesn't respond after a long time.
The recommended options are intr and hard, and since the latter is the default, intr is enough. With these parameters, we are able to try to increase performance of the NFS connection.
Often we want to do the process of mounting in a hidden way (transparently), perhaps while booting the system. In this case we have to create the corresponding line in the file named /etc/fstab that the system reads while booting. Any line in that file has as a minimum four fields, usually six. Here's an example:
1)device 2)mnt point 3)fs type 4)options
5)dump 6)check order
tiger:/nfs1/home /home nfs rw,hard,intr 0 2
The first parameter describes the device to be mounted. In this example, the NFS server tiger exports /nfs1/home filesystem as the home directory. Field number four points to this filesystem as nfs. The last parameters mean the filesystem should not be dumped and checked in the second order. You can find more details in section five of the man pages. It also is a good idea to start rpc.lockd and rpc.statd. These programs usually initialize from scripts. Once you've done those things, you should have the NFS client running.
What kind of data can we keep on NFS? The simplest answer is any kind, including the whole root system for diskless machines. In order to plan your system, you have to take into account that all files can be divided into two categories: shareable and unshareable data. The latter must be kept on a particular machine. For instance, device (and lock) files are not shareable. The size of some directories is stable for some and unstable for others.
Assuming we have a small system, we show /home as typical shareable data that should be located on the server host. On medium and large systems, it is useful to subdivide user home directories by using such names as /home/students, etc. The size of the $HOME directory is not static, of course, but to limit disk space for many people, you may set up a quota system on the servers.
What about another directories? Some of them have a static size, some change permanently. Shareable static directories include /usr and /opt, while unshareable static directories include /etc and /boot. Static variable directories include /var/mail and /var/spool/news, whereas unshareable variable directories include /var/run and /var/lock.
Many people do not put /usr/bin and /bin files on NFS because of speed, but this is not very critical. We believe an ordinary user does not notice any difference in calling a program from an NFS directory vs. from a local one. Therefore, if disk space is critical, you may mount mostly everything via NFS, importing files from the server machine while keeping space on client machines for other files, such as MP3s or two OSes.
Although you may keep everything on the server, the standard solution is to keep only the $HOME directories and documentations there, including man pages and other documentation. Sharing by means of NFS software that is used rarely and located typically under /opt and /usr/local, is also a very good idea. Two subdirectories should be shared via NFS: /usr/doc and /usr/share.
Now, how do we use the mount parameters in these cases? As discussed previously, the recommended options for $HOME are intr and hard. In this case, you can be sure the data will not be lost. For /usr/doc and similar subdirectories, however, this may not be the optimal choice. If you access man pages while the Net is overloaded, or even if the NFS server is down, your machine will wait until it is able to re-establish contact with your NFS server. In this case, using the soft option is better; the disconnect message will appear on the screen and the operation will be canceled. This option may be useful for noncritical data of any kind, including news and FTP directories. However, the standard choice is not to access /var/mail and /var/news via NFS; use special protocols such as imap, pop and nntp.
If you are concerned about the speed of the NFS connection, you also can play with the rsize and wsize options. The default size is set by the kernel and may or may not fit. For instance, either your Ethernet card or the kernel is not able to handle large blocks, something that usually happens with old hardware and old kernels. If you have a newer card, a larger size might help you reach better performance. In some cases you can increase the speed by five or more times, but you have to do some experiments with your network.
The easiest way of calculating the speed is to create a file located on NFS volume and find the time of creating. This is just an experimental file that may hold any kind of data, including zero sequence, so we will create it by means of the dd command, using /dev/zero as the source file. Command time calculates time of creating.
How large should the temporary file be? The rule is to have two or three times the size of the memory on the server machine. If you have 2MB of RAM there, the file should be 4MB. Sometimes it is hard to find a place for a such file, but in many cases 256MB on your NFS disk machine should be fine. To calculate the free area on your disk, use the command df. Then, assuming you are working on a client machine, unmount it and mount again, put the magic value 1,024 for rsize and wsize parameters. Then execute the dd command with time:
time dd if=/dev/zero of=/home/tempo bs=16k count=16384
We use /dev/zero as the source for /home/tempo in order to avoid calculating the time of reading the source. This command sends 16,384 16KB blocks of null bytes, creating a file with a total size of 16,000 bytes × 16,384/1024 kilobytes = 256 kilobytes or 256MB. Write the time down. Then calculate the time of reading, sending the file to /dev/null:
time dd if=/home/tempo of=/dev/null bs=16kRecord the time of reading, and then delete the temporary file:
rm /home/tempo verbatimRepeat the describing procedure at least three times and calculate the average reading/writing time. Unmount your client host:
umount /home verbatimMake sure you have NFS unmounted; it complains if there are errors and keeps silent if not. Then mount it again, using the new value 2,048 for rsize and wsize, and repeat the procedure above, again and again, up to 32,768.
Observe the result. The faster the transferring, the shorter the time. Find your optimal value and put it into /ets/fstab. Keep the paper with the calculations in a safe place.
There are also a few tips to help you make this list shorter. If you have a new network card and are sure your NFS server runs version 3, you may start from the value 32,768 and go down. This value should not be tested with NFS server version 2, however, since it only works with older kernels and some Solaris and SunOS machines.
We found the best result for kernel 2.2.19 to be value 4,096, so you may start from it and try the nearest, 2,048 and 8,192. For the new kernel, this value (in our case) was 8,192, but very often kernel 2.2.19 worked better in comparison with 2.4.6. It strongly depends on your hardware, so be very careful if you want to switch your NFS server into new kernel release.
The optimal value for client machines that use NFS over TCP/IP is 1,024 or less. This value also works if you have a router between a client and the NFS server.
While the mount command for the NFS filesystem is working, the version of the protocol is being recognized and a warning message may appear on the screen. Usually it says the NFS version of the server is older than the kernel mechanism.
The idea of sharing files through the Net is as old as the Net itself, so there are concurrent solutions lists. To improve NFS try version 4, or NFSv4 for short, which was introduced in the year 2000. The inventor of NFS, Sun Microsystems, is a sponsor for the Linux NFSv4 Project. It has, of course, all the features of previous releases but supports security by extending the basic RPC security mechanism, so the weakest point of the previous version has been solved. The other weak point, lack of internationalization, does not exist anymore. Speed of transferring has improved due to caching. We also can avoid those procedures of calculating the optimal parameters because the new mechanisms of improving access are supported. Putting this version into practice means going without dust and noise—nowadays the Linux NFSv3 server supports file locking—an NFSv4 feature.
So, don't forget about the old vine on the Net, NFS. It is still not the vinegar of history.


