
System Administration
RAID stands for “Redundant Array of Inexpensive Disks”. It is meant to speed up and secure disk access at the same time. RAID, though, is not new. It was invented in 1987 at the University of California, Berkeley. Before Linux, it was available only in the form of special hardware that was quite expensive. Of course, it could be used only in high-end computing centers.
During the last decades, performance of processing units has increased by five to ten times each year, depending on which statistic you believe. In the same period, disk capacity has doubled or tripled while prices were halved every one to two years. Used electronics don't reflect the current processor speed. This results in I/O being the current bottleneck of modern computers. Just try to compile our famous XFree86 source on a dumb PII-233 with regular SCSI disk layout.
By the time people at Berkeley realized this, they were able to foresee that no new epoch-making technology for hard disks would be forthcoming in the near future. Since magnetic- and mechanic-oriented disks were kept and laws of physics permit only slight improvements, other solutions needed to be found.
This resulted in the definition of several RAID levels. Nowadays they are used not only in high-level computer rooms, but also by the so-called middle-end sector. Since some fellow kernel hackers decided to implement RAID for the Linux kernel, this technique can be used by low-end PCs, and regular people can be satisfied by the improved performance and data security.

Figure 1. Operation of RAID-5
RAID levels share the following properties:
Several different physical disks are combined and accessed as a compound element. Under Linux, this is done by the driver for multiple devices, also known as /dev/md*.
The stored data is distributed over all disks in a well-defined way.
The data is stored in a redundant way over the disks, so in case of failure, data is recoverable.
By dividing data into equal chunks and distributing them over all affected disks, one gets higher I/O performance than by using only one fast disk. The reason for this is due to ability to request data from the disks in a parallel fashion. The easiest way to do this is called striping mode or RAID level 0, but it doesn't contain any redundancy.
Redundancy is achieved in different ways. The simplest is to store the data on two equal disks. This is defined in RAID-1, also known as mirroring. Of course, one gets performance increase only when at least four disks are used.
More efficient redundancy is obtained when instead of duplicating all the data, a unique checksum is generated and stored with regular data. If a single disk should fail, one is able to reconstruct its data by using all data chunks of that stripe together with the calculated checksum. The easiest way to calculate a checksum is to XOR all data chunks in a stripe. This is defined in RAID levels 4 and 5. The unofficial level 6 uses another chunk for a different checksum algorithm, resulting in two redundant disks, and even better breakdown avoidance.
Using file systems with RAID has many advantages. First is speed. RAID combines several disks and reads/writes chunks from the disks in sequence. Second, you can get bigger file systems than your largest disk (useful for /var/spool/news/, /pub/, etc.). Third, having achieved redundancy means a disk failure won't end up in data loss. For technical information on RAID, please refer to ftp://ftp.infodrom.north.de/pub/doc/tech/raid/.
To use RAID with Linux, you need a kernel with appropriate support. First of all, this refers to support for the “multiple devices driver” (CONFIG_BLK_MD_DEV). Linux 2.0.x supports linear and striping modes (the latter is also known as RAID 0). Linux kernel 2.1.63 also supports RAID levels 1, 4 and 5. If you want to use these levels for 2.0.x, you'll have to install the kernel patch mentioned at the end of this article.
To use either, you must activate the appropriate driver in the kernel. (I'd suggest compiling a kernel of your own anyway.) Additionally, you need to have special tools installed. For linear mode and RAID level 0, you need the mdutils package that should be included in your distribution. To use RAID level 1, 4 or 5, you need to have the raidtools package installed, which supersedes the mdutils package.
Striping works most efficiently if you use partitions of exactly the same size. Linux's RAID driver will work with different sizes, too, but is less efficient. In that case, the driver doesn't use all disks for striping after a certain amount of disk space is used. The maximum number of disks will be used at any time.
After setting up RAID and combining several disks to a compound device, you don't access the disks directly using /dev/sd*. Instead, you make use of the multiple devices driver that provides /dev/md*. These devices are block devices just like normal disks, so you simply create a file system on them and mount.
The default setup of the Linux kernel provides up to four such compound devices. Each MD can contain up to eight physical disks (block devices). If your setup requires either more combined devices or more compound devices, you have to edit include/linux/md.h within the Linux kernel source tree, especially MAX_REAL and MAX_MD_DEV. For testing purposes, you can use some loopback devices instead of physical disks.
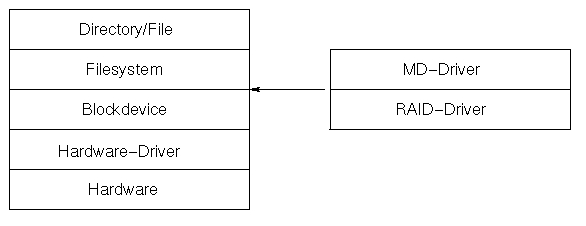
Figure 2. Position of RAID within the Linux Kernel
The Linux kernel includes native support for distributing swap space over several disks. Instead of setting up a RAID-0 device and directing swap to it, you simply add all swap partitions to /etc/fstab and use the swapon -a to activate them all. The kernel uses striping (RAID-0) for them. Here's a sample setup:
/dev/sda3  none  swap  sw
/dev/sdb3  none  swap  sw
/dev/sdc3  none  swap  sw
Setting up RAID for normal file systems such as /var, /home or /usr is quite simple. After you have partitioned your disks, instruct the RAID subsystem on how to organize the partitions. This information is copied to /etc/mdtab for later activation. It can be done by issuing the following command:
mdcreate -c4k raid0 /dev/md0 /dev/sda1 /dev/sdb1\
   /dev/sdc1
If you want to use RAID level 1, 4 or 5, you have to use an additional configuration file that reflects the disk setup as shown in Listing 1. These levels are more complicated and need a special signature on top of the compound device. This signature is generated by the mkraid command. The remaining setup looks like this:
mkraid /etc/raid/raid5.conf
mdcreate raid5 /dev/md1 /dev/sdd1 /dev/sde1\
   /dev/sdf1 /dev/sdg1 /dev/sdh1
Now two RAIDs have been created; the first consisting of three partitions, while the second uses five of them. Depending on the data to be stored on them, different chunk sizes have been selected. The next step is to activate these devices with the command:
mdadd -arFrom now on, you may refer to /dev/md0 and /dev/md1 as block devices that may contain your file systems. In order to use these devices, issue this command during the boot sequence. Please check out the startup sequence of your distribution. Some of them (e.g., Debian) have already included this line.
After the kernel knows how disks are organized, you can create your file system on the new devices and add them to /etc/fstab as usual.
The use of RAID for the root file system is a bit tricky. The problem is LILO can't read and boot the kernel if it is not in a linear fashion on the disk (as it is on EXT2 or MSDOS file systems). The solution is to put the kernel on a different partition with a normal file system and activate RAID after the kernel is booted.
This way, LILO would boot the kernel, but the kernel itself would be unable to mount the root file system because its RAID subsystem isn't initialized yet. Now you're in trouble, right? No.
For late 2.1.x kernels, a kernel parameter can be used to load the kernel from a RAID.
md=<
   <fault level>,dev0,dev1,...,devn
This needs to be added to LILO using the append= option or directly at the LILO prompt during boot stage. You'll find more information in Documention/md.txt in the Linux source tree.
For stable kernels (2.0.x) and “not so late” development kernels (2.1.x), you need a mechanism to call some programs after the kernel is loaded but before it tries to mount the root file system. This refers at least to mdadd.
The only way to achieve this is to use the initial RAM disk, also known as initrd. General information about initrd may be found in Documentation/initrc.txt inside the kernel source tree.
You will most likely have to compile your own kernel, although you can try the one included with your distribution if it contains all facilities. You'll need to add modules support to the described solution. However, additional kernel compilation options are needed for the described setup and are shown in Listing 2. Additionally, you have to include support for your SCSI card, etc. If you're uncertain about the options, refer to the Kernel-HOWTO and use ? to display a description of the referenced driver.
If the Linux kernel uses initrd, it mounts the given RAM disk as root file system and executes /linuxrc if found. Then the kernel continues its boot process and mounts the real root file system. The old initrd root will be moved to /initrd if that directory is available or will be unmounted if not. If it is only moved, the RAM disk remains in memory. So on systems with little memory, you should get the kernel to remove it entirely when it is no longer needed.
The initrd file is a “simple” root disk, containing all the files needed for executing the /linuxrc file. If it is a shell script, it includes a working shell and all tools used in this script. In order to execute programs, it also includes a working libc with ld.so and tools. Alternatively, you can link the included programs statically and don't need a shared libc. Since this doesn't save any space, it is not necessary.
After RAID has been initialized from /linuxrc, you must tell the kernel where its new root file system resides. At that time, it may be configured to use initrd as the root file system. Fortunately, our fellow kernel hackers have designed another easy interface to set the root file system.
This facility makes use of the /proc file system. The device number of the new root file system must be sent (use echo) to /proc/sys/kernel/real-root-dev, and the kernel continues with that setting after /linuxrc completes.
As LILO normally isn't able to boot from a non-linear block device (such as RAID), you must reserve a small partition with the kernel and initial RAM disk on it. I've decided to use a 10MB partition as /boot. Binaries can be stored in this partition and it can be accessed from a rescue floppy. I wonder why one should use this since Linux is so stable, but for the sake of security it may be a good idea.
10MB is plenty of space for one kernel and a RAM disk of approximately 1MB in size. Currently, my system uses only 2.5MB of this space, so plenty of playing room is available. Due to the fact that /boot uses the normal file system (e.g., EXT2), you can use /etc/lilo.conf to point to /boot/vmlinuz in your setup.
Now you need to decide what to do in your /linuxrc script. Basically, activate RAID and tell the kernel where your root file system resides. Listing 3 shows an example /linuxrc program.
Any block device can be used as the root file system. In the given example, 0x900 is used. This stands for major number 9 and minor number 0, which is the encoding for /dev/md0.
Next, make a list of binaries and additional files needed, including some device files in /dev. To get the /linuxrc script working, you need /dev/tty1. Other necessary devices depend on your /etc/mdtab file. You will need at least /dev/md0.
The above example uses these binaries: ash, mount, umount and mdadd. These files are also needed: mdtab, fstab, mtab and passwd.
The mdtab file I use is shown in Listing 4. For my file, these block devices must be created on the initial RAM disk: /dev/hda2, /dev/hda4, /dev/hdb2, /dev/hdb4, /dev/md0, /dev/md1, /dev/md2 and /dev/md3. Use the mknod command to create these device files. You'll find their major and minor numbers by investigating your /dev directory or by reading Documentation/devices.txt from the kernel's source directory. The following commands create tty1 and md0:
mknod dev/tty1 c 4 1
mknod dev/md0 b 9 0
The best way to create the initial RAM disk is to create the directory /tmp/initrd and install everything you need in it. Once you have done that, determine the used disk space (du -s), then create the initrd file. The following commands will create an initial RAM disk 1MB in size. To use it, your kernel must include support for the loopback device.
dd if=/dev/zero of=/tmp/initrd.bin bs=1024k\
   count=1
mke2fs /tmp/initrd.bin
mount -o loop /mnt /tmp/initrd.bin
Since dynamically linked binaries are used, the Linker and the dynamic libraries must also be installed, at least /lib/libc*.so, /lib/ld-linux.so.2, /lib/ld-2.0.*.so and an appropriate /etc/ld.so.config file—appropriate means that /lib should be the only line in the file. Create a new library cache /etc/ld.so.cache file with the command
ldconfig<\!s>-r<\!s>/tmp/initrdand install the needed binaries in appropriate directories: /sbin or /bin.
Don't forget to create the /proc directory, or the mount will fail. The fstab and mtab files can be empty and read-only, but must exist on the initial RAM disk. No program will attempt to write to these two files. For the /etc/passwd file, it's sufficient to include only the root user.
After you have copied everything from /tmp/initrd to the RAM disk mounted at /mnt (see above), unmount it (e.g., with the command umount /mnt) and move the file to /boot/initrd.bin. Now tell LILO to load the kernel and the RAM disk, using a record in /etc/lilo.conf similar to the one shown in Listing 5.
Issue the lilo command, and you are almost done. Since the RAID subsystem is now configured at boot stage before any /etc/init.d scripts are issued, you should disable the mdadd call in the /etc/init.d scripts.
This setup implies you have a running Linux system installed on some non-RAID disk. At least install a small base system on your swap partitions, compile the kernel on a different machine, set up RAID on the appropriate machine, move the files and continue installation afterwards.


