
XBanner: Making XDM More Attractive
XBanner was invented and designed from the beginning to serve one purpose—to beautify the login screen XDM usually generates. This beautification is accomplished by drawing a piece of text in a very large font, then rendering some graphic effect on the text and/or the screen background.
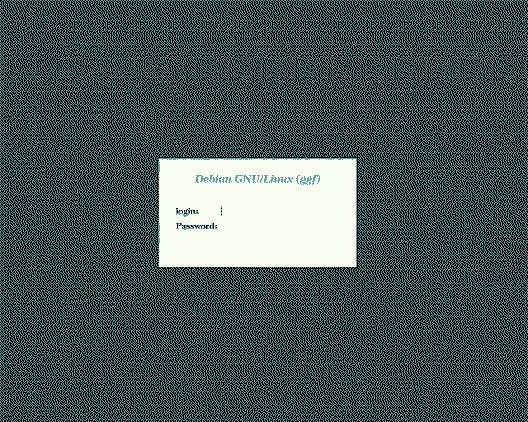
Figure 1. Standard XDM Login Screen
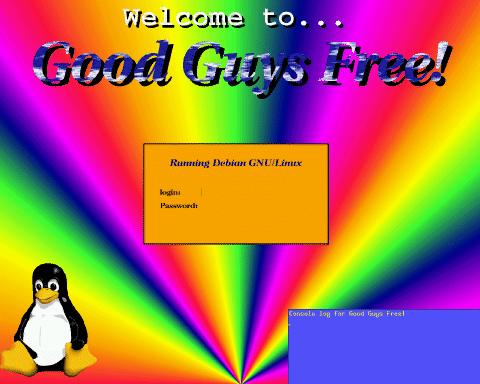
Figure 1 shows a plain login screen as displayed by XDM “straight out of the box”. Linux, which uses plain XDM, has a similar if not identical login screen. Commercial companies, like HP and DEC, supply custom XDMs that generate a nice login screen with the company logo, a background, etc. Figure 2 shows how my home system greets me when I turn it on. Using XBanner, any system can look as special as mine with minimal work on your part.
The text graphic rendering effects available in XBanner include many interesting things. In this article, I describe a few:
StandOut: This effect, combined with a proper selection of colors, gives the text a look resembling that of Motif or MS Windows buttons. Motif adds a few pixels on the left and top of the button in a lighter color than the button and a darker shade to the right and bottom of the button to create a 3D effect. StandOut uses a similar technique on the entire text. Each letter and symbol appears to be three-dimensional like the Motif buttons. The thickness of the letters can be selected.
Backlight: This effect draws 1-pixel thick lines around the text, giving it many outlines. If you choose a dark foreground for the text, then have XBanner generate a color gradient for the outlines going from a bright color near the letters to the same color as the background of the screen, the text looks as if it is being illuminated from behind.
FatText: With the proper selection of parameters this effect makes your text look fat rather than flat. Some color combinations can actually make the text look as if it has round edges rather than sharp. Also, the FatText color gradient can be instructed to use more than two colors to get other interesting results.
FgPlasma: XBanner draws a field of Plasma Clouds, cuts from it a template in the shape of selected text and places it on the screen. In Figure 2, the title “Good Guys Free!” is an example of the FgPlasma rendering effect.
FgGrad: This draws a color gradient on the text itself. Instead of a plain vertical bar with serifs, the letter “I” would be striped in different colors.
Drawing the text is only the first of the two prime jobs XBanner was designed to do; it can also render a nice background. Apart from the simple fill-style background, XBanner can generate color gradients on the background using many different patterns. Here are some examples:
Fan: This effect draws a nice fan, centered at the middle of the bottom line of the screen. The selected color gradient determines the colors of the fan. See the background of Figure 2 for a sample of the fan effect.
TopDown / LeftRight: These create a color gradient going from one side of the screen to the other.
BgPix: XBanner has the ability to tile the whole screen with a pixmap (.XPM file) before it draws the selected text.
Plasma: PlasmaClouds fill the entire screen. Selecting such colors as White and DeepSkyBlue produces a wonderful sky-like image with genuine-looking white clouds.
Ripples: This background style has the appearance of ripples in a pond. This background style, a result of color-cycling (explained below), produces beautiful effects.
Almost any object involving a color-gradient in XBanner can be color-cycled, generating a sense of motion. If you cycle the colors of a Fan background style, the entire fan appears to rotate in one direction. The color gradient of the FgGrad effect can also be cycled, giving a sense of motion to the text. Cycling the PlasmaCloud effects is also a nice idea. You can cycle the background Plasma, the foreground Plasma, or even both! I use color-cycling for my home system login screen, shown in Figure 2. Unfortunately, color-cycling is not available for hard-copy.
The Ripples background style was specifically designed for color-cycling. The ripples' wave-fronts move at different speeds, producing a more realistic look.
Another neat feature of XBanner is the ability to draw a star on the corners of the text, creating a “glinting” effect that appears at random locations at random intervals. You can also place a pixmap or set of pixmaps on the screen, underline any text or effect, and select many other options.
After working with X on Linux for a while, I realized I always start X, and I usually do it shortly after logging in. Therefore, I decided to run XDM, which gives me a login box already in X. XDM installed and ran out-of-the-box with no problems, no hassle.
After just a few days, I found I hated the way it looked. XDM's default is a dull, boring gray screen with a simple text box and nothing else. Compared with some commercial versions of Unix, it was definitely lacking. Since I wanted Linux to look cool, too, I decided to write XBanner.
XBanner was written primarily for Linux, but it is not Linux-specific. It can be compiled and run in any environment supporting X11 release 4 and up. I have tested XBanner on Linux, Ultrix, Digital Unix, Solaris, SGI IRIX, AIX and even VMS.
I have had a report that XBanner does not work with X Inside's Accelerated X server. I tried to contact X Inside about this issue, twice. I have been completely ignored—pity.
The XBanner home page, sponsored by the Physics department of California State University, Fullerton can be found at:
http://physics.fullerton.edu/XBanner/
And the FTP locations are:
ftp://physics.fullerton.edu/pub/Linux/XBanner/<\n> ftp://sunsite.unc.edu/pub/Linux/X11/xutils/ftp://vvtp.tn.tudelft.nl/pub/XBanner/
I expect new mirrors will become available by publication time. At the time of writing, the latest version is in XBanner1.3.tar.gz.
Most Linux distributions (Debian, Slackware, et al.) include a package that sets up XDM and its configuration files. In case your distribution doesn't include XDM, it can be found at sunsite.unc.edu, the “home” of Linux software on the Internet—ftp://sunsite.unc.edu/pub/Linux/X11/xutils/xdm.tar.gz.
Compilation and installation is easy. XDM comes with an Imakefile. If your system has X11 installed properly, type xmkmf -a in the directory of the XDM source, then type make. If you have problems, consult the FAQs. Setting up the X11 environment and using imake are beyond the scope of this article.
After the installation is complete, create a directory /usr/lib/X11/xdm/ and copy the files from the config/ directory in the XDM source tree into it. Note that /usr/lib/X11/ should be synonymous to /usr/X11R6/lib/ on Linux.
XDM reads the file /usr/lib/X11/xdm/xdm-config (see Listing 1 for the default contents), and extracts from it the location of the rest of the configuration files. Nearly all XDM configuration files are defined in xdm-config.
Listing 1. xdm-config Notice the files with the _0 suffix refer to :0--the local display. XDM runs Xsetup_0 to initialize the display, then pops up its login box and asks the user for a username and password. When the user has finished typing this information, XDM checks the password database. If the user is authenticated, XDM runs a few things including the Xsession script that sets up the user's environment and loads the window-manager.
These two files, Xsession and Xsetup_0 are the files to which lines are added in order to run XBanner and Freetemp. This is discussed more completely later in this article.
After downloading the XBanner source archive, unpack it using:
gzip -dc XBanner1.3.tar.gz | tar xvf-
Change directories to XBanner1.3/ and enter make. On Linux systems, this should proceed with no problems at all. After compilation is done you will have four executables:
xbanner - the main XBanner program
freetemp - utility to free X11 resources taken by XBanner
xb_check - checks resource files for validity
random_effect - executes the xbanner binary with a random resource file
Typing make install will install the executables to the directory /usr/local/bin/X11/ (not including the random_effect utility), and set proper permissions. You can change the destination directory by editing the Makefile.
If your system does not have the XPM library, the compiler might complain that it cannot find libXpm.a or -lXpm. In this case, edit the Makefile; it contains instructions on disabling XPM support.
Now, to set up a good default resources file, go to the XBanner1.3/ directory and issue the command:
cp samples/XBanner.ad \
/usr/lib/X11/app-defaults/XBanner
Next, tell XDM to run XBanner by adding a line to XDM's Xsetup_0 script. This script runs before the login box pops up. Adding this will ensure that XBanner is run each time XDM wants to display the login box. The Xsetup_0 script is straightforward. Just add to the bottom of the file a line like this one:
/usr/local/bin/X11/xbanner -file \
/usr/local/etc/login_screen.res
Where login_screen.res (see Listing 2) contains the resources that generate the desired screen layout.
Listing 2. login_screen.res After XBanner draws its graphics, some server-side resources are left allocated (colormap entries) in order to ensure that programs running after XBanner can't alter the colors, and thereby make XBanner's graphics look a mess. The freetemp utility is the program that tells the X server to release the colormap entries. Also, it should be noted that some of the nicer features of XBanner, such as color-cycling and glittering stars, are done by leaving a process running, which must then be stopped before logging in. The freetemp utility does all the work of stopping lingering processes and releasing the colormap entries.
The best place to run freetemp is from the Xsession file. This file is run for each logged-in user. Place the freetemp line as close to the top of the file as possible, and make sure it is not within the context of an if statement or some other script element which might prevent it from running. As a safety measure, you can add a call to freetemp right before the call to xbanner in the Xsetup_0 script. This call is done just as a precautionary measure; it might save you in case something unexpected happened when the previous user logged out.
The simplest way to start is to check out the many examples included in the installation. I have included samples of everything I could think of: color-cycling, multiple lines, glinting stars, different backgrounds, pixmaps, etc. The files in the samples/Demo/ directory are provided to serve as a template. Simply pick one and start modifying it. Experiment with the options until you find a look that pleases you.
The XBanner documentation is made up of two main files and some supplementary files. The file XBanner_Users_Guide.html contains, among other things, a hands-on structured guide to building a resource file from scratch. Follow the steps, and each click will bring you to the related resources and the available possibilities.
The file Resource_Reference.html contains a complete reference of all the resources XBanner recognizes. Each resource is given with its class name, an extensive explanation of what this resource does, what values it accepts and the command-line equivalent. The file also contains a description of the different types of resources XBanner uses, and some ideas.
This should be all you need to create a resource file. But of course, you can send me e-mail for suggestions and ideas. Many of the features of XBanner were implemented as a result of such questions.
In order to run the demo properly—and in fact in order to use XBanner—you must have scalable fonts. These are fonts that can be scaled to any size without losing quality. XFree86 comes with a package of scalable fonts, and the XBanner documentation contains a special chapter about finding scalable fonts and installing them. You do not need XDM at all to be able to see the demo.
It is advisable that you close all applications before running the demo, to allow XBanner to allocate the necessary colors for the demo. Also, the best way to view the demo is with an empty screen with only a single small xterm located close to the bottom of the screen from which to run the demo.
After compilation, go to the directory samples/Demo/ and enter ./Demo or ./Demo.bash (if your system does not have csh).
I'd like to thank Oren Tirosh (orenti@hiker.org.il) for many hours of help, support, ideas, algorithms and more. Thanks also to Rich McClelan of Fullerton University for all the help he's given me in setting up the web pages, and getting me the space.
Thanks to Ben Spade (spade@spade.com) and Chris Yeo (Chris.Yeo@usask.ca) for their help with the documentation of XBanner 1.3, and other stuff.
Thanks also to the hundreds of people who have notified me about bugs, offered ideas, requested features, or sent me a pat on the back by e-mail.
Amit Margalit works for Digital in Israel in X11/Motif programming support. He started using Linux back in the happy days of Linux 0.99.12 and is preaching for the migration to Linux at every opportunity. He may be reached at amitm@doronx.iso.dec.com and amitm@netvision.net.il.

