
Breaking Free the Gumstix DSP
For a senior design project, I was part of a team that needed to process Fast Fourier Transforms on an embedded computer. Specifically, I chose to use the Gumstix Overo Fire because of the integrated Digital Signal Processor (DSP), which has Fast Fourier Transforms as part of the Texas Instruments API. While researching this project, I found the activation of the DSP on the Gumstix to be a relatively unexplored area. So using a combination of methods from the DSPBridge on the BeagleBoard, the Gumstix Developer and the PIXHAWK Project Web sites, I arrived at this method for compiling the Linux-2.6.33 kernel for the Gumstix Overo Fire with DSP support.
The Overo Fire comes with three processors: an ARM Cortex-A8 CPU, POWERVR SGX and C64x+ Digital Signal Processor core. While the ARM provides for the general-purpose processing, the Digital Signal Processor can be used to perform more mathematically intensive calculations. For this reason, the purpose of this article is to describe how to compile a Linux 2.6.33 kernel for the Gumstix Overo Fire to leverage the extra processing power of the DSP for future projects.
Go to the DSPBridge Project Wiki (www.omappedia.org/wiki/DSPBridge_Project), and follow the instructions for retrieving both the kernel-dspbridge and the userspace-dspbridge packages from the DSPbridge git repository, but do not issue any make command as mentioned in the tutorial on the Web page.
Download and install the Code Sourcery tool suite (specifically CodeSourcery G++ Lite 2008q3-72) and both bios_setuplinux_5_33_04.bin and ti_cgt_c6000_6.0.7_setup_linux_x86.bin packages from the Texas Instruments Web site. The Texas Instruments tools require a Texas Instruments user account in order to download. Installing both of the Texas Instrument Tools in the same directory will help with configuring the $DEPOT variable later.
An additional tool needed for compiling the DSP image for the Gumstix is u-boot from Steve's Beagles U-boot git repository. Use the following commands:
git clone git://gitorious.org/u-boot-omap3/mainline.git u-boot-omap3
cd u-boot-omap3
git checkout --track -b omap3-dev origin/omap3-dev
Or, go to www.sakoman.com/cgi-bin/gitweb.cgi?p=u-boot.git;a=summary and download the packages there.
Next, change into the newly installed u-boot directory and issue the make tools command in order to compile mkimage, which later will be used to create a uImage. Ensure that the OpenEmbedded and bitbake programming suites are installed for the Overo Gumstix profile. Use the default config for the Linux 2.6.33 kernel as the starting config of the new DSP-enabled kernel. Installation instructions for OpenEmbedded and bitbake can be found at www.gumstix.org/software-development/open-embedded/61-using-the-open-embedded-build-system.html.
Finally, create an SDRAM card with a bootable Gumstix image. Instructions for creating a bootable SDRAM card can be found at www.gumstix.org/create-a-bootable-microsd-card.html.
To set up the compilation environment, point the CROSS_COMPILE variable at the Code Sourcery tool suite using the command:
export CROSS_COMPILE= <path to tool suite>/CodeSourcery/
↪Sourcery_G++_Lite/bin/arm-none-linux-gnueabi-
and the DEPOT variable with the command:
export DEPOT=<path to TI tools>/
Additionally, set the architecture of the device to ARM using the command export ARCH=arm, and add the u-boot directory and cross compilers to the path using the commands:
PATH=<path to u-boot directory>/u-boot-omap3/
↪tools:<path to tool suite>/CodeSourcery/
Sourcery_G++_Lite/bin:$PATH
Before compiling the kernel, reset the git repository from the current branch to the Linux 2.6.33 kernel to make it compatible with the Gumstix configuration file. (At the time of this writing, the default DSPbridge is set to Linux 2.6.37.) First, issue the git branch command and check out the current DSPbridge branch. Now, issue:
git reset - -hard 85343cd5491260881b34ab7bb7cdc8fdeef078e4
After the branch is reset, check the Makefile for the proper Linux information at the top. In order to keep the kernel size to a minimum, build the kernel in an output directory, which will be referred to as the production directory for the remainder of this article. Now, copy the default config for the Gumstix from OpenEmbedded into the production directory as the .config file. The purpose of this is to configure the basic structure of the Gumstix before adding the DSPbridge libraries. The command should look something like this:
cp <path to openembedded>/org.openembedded.dev/recipes/
↪linux/linux-omap3-2.6.33/Overo/defconfig
<path to "production" directory>/.config
Next, issue the make oldconfig command, which is used to update the current .config file with new options. Generally, the default responses to the questions are acceptable, except in the highlighted cases shown in Figure 1.

Figure 1. Changes Made during make oldconfig
Note that the ellipses in Figure 1 are used to indicate breaks in the output for display purposes. Now, issue the make menuconfig command, which will launch a configuration interface in the terminal, such as the one shown in Figure 2.
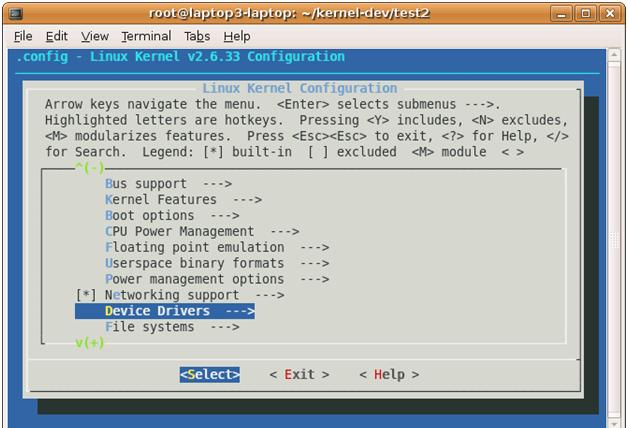
Figure 2. Navigating to Device Drivers
Navigate to the device drivers option (also shown in Figure 2), press Enter, and navigate to the Graphics Support option (Figure 3), and press Enter.

Figure 3. Navigating to Graphics Support
Now, deselect all the options in Graphics support by highlighting the option and pressing the N key. (The Backlight and LCD Driver support cannot be disabled, but all other options can be, as shown in Figure 4.)
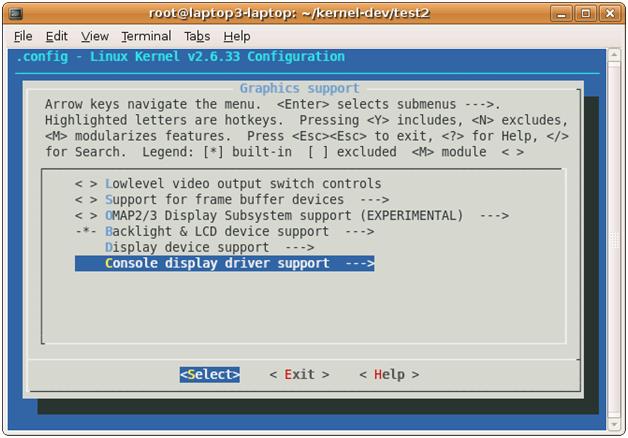
Figure 4. Deselecting the Graphics Support Options
These drivers, if left selected, will cause a compilation error while making the uImage in the core directory of the kernel. By disabling them, the kernel should compile.
Next, issue the make uImage command and wait for the end of the compilation. This compiles a specially wrapped zImage that is used by u-boot during the booting processes for the Gumstix.
Then, issue the make modules command to compile all the kernel modules. This completes the compilation of all the necessary libraries to activate the DSP on the kernel side.
Now, compress the production directory with the compiled uImage and the kernel modules in order to deploy on the Gumstix. A recursive copy will not work, because it will break several links inside the newly compiled uImage and modules. The preferred method is to tarball the directory using tar cvjf <production directory>.tar.bz2 <production directory>.
Following the instructions on the DSPBridge Project (located at www.omappedia.org/wiki/DSPBridge_Project) for compiling the userspace files will work as long as the $DEPOT, $CROSS_COMPILE and the modified $PATH variables are set in the terminal as mentioned previously. Issue the make all command to get the full DSPBridge project samples, MPU API and DSPBridge library.
The Gumstix bootable SDRAM card should be split into two partitions: one containing the MLO, U-BOOT.bin and uImage, and the other containing the root filesystem (rootfs).
Using a bootable SDRAM card configured for the Gumstix Overo Fire, reformat the section with the current rootfs. Next, go to cumulus.gumstix.org/images/angstrom/factory/ and download the rootfs-booted-Overo-201004270808.tar.bz2 package for the Gumstix from the factory images. Now, uncompress rootfs-booted-Overo-201004270808.tar.bz2 into the rootfs partition on the SDRAM card.
After the rootfs-booted-Overo-201004270808.tar.bz2 package has been fully uncompressed, uncompress the production directory into the rootfs partition. If uncompressing the production directory into the partition created a new directory, move all the files out of the new directory into the same directory as the files with rootfs-booted-Overo-201004270808.tar.bz2. This should leave two directories inside the production directory: the usr and lib directories. Recursively copy the contents of these directories into the usr and lib directory of the uncompressed rootfs-booted-Overo-201004270808.tar.bz2. Now remove the uImage-2.6.33 in the boot/ directory of rootfs-booted-Overo-201004270808.tar.bz2 and copy the new uImage from the arch/arm/boot directory. Finally, change directory into the SDRAM card's bootable partition. Following the Gumstix site tutorial, this directory should be named FAT. Remove the uImage and copy the new uImage from the arch/arm/boot directory. Now unmount the SDRAM card and place it in the Gumstix and boot from the SDRAM card.
Once the new kernel has completed the boot sequence, add a password to the root user and secure copy the contents of the target/ directory of the userspace DSPBridge directories to the Gumstix. (The directories should be dspbridge/ and lib/.) Next, recursively copy the contents of the lib/ directory to the root /lib/ directory of the Gumstix and reboot the Gumstix. After the Gumstix reboots, enter the dspbridge/ directory and issue the ./ping.out command to receive the error shown in Figure 5.
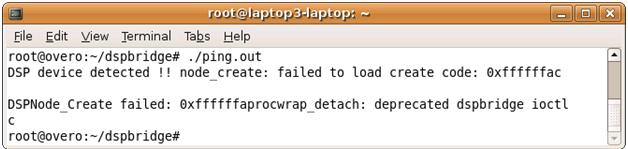
Figure 5. DSP Error Message
This means the libraries have installed properly and the DSP device is detected. Now, load the base image for the DSP by issuing the ./cexec.out ddspbase_tiomap3430.dof64P and the ./cexec.out dynbase_tiomap3430.dof64P command. (To learn the difference, read the description at the bottom of the DSPBridge Project Wiki.)
Next, register the base image with ./dynreg.out -r <sample>dyn_3430.dll64P for the test you want to run. For example, register the ping sample DSP program using the ./dynreg.out -r pingdyn_3430.dll64P command, and execute it with ./ping.out. The output should look like Figure 6.

Figure 6. Results of ping.out
This output proves the kernel has been compiled successfully with userspace files for the Gumstix Overo Fire and that the libraries have been integrated into the rootfs. Finally, this proves that the DSP is operational because of the response from the DSP to the ping program. The Gumstix with the newly compiled kernel now can be used as a test bed for projects involving the DSP. I hope this tutorial has helped in understanding and implementing the compilation of the Gumstix Overo Fire's Linux 2.6.33 with support for the DSP.
Resources
BeagleBoard/DSP Howto: elinux.org/BeagleBoard/DSP_Howto
Gumstix Developer Center: gumstix.org
DSPBridge Project: www.omappedia.org/wiki/DSPBridge_Project
ETH PIXHAWK: MAV Computer Vision Wiki Tutorials: pixhawk.ethz.ch/wiki/tutorials/start
James McColl is a Cadet majoring in Computer Science at the United States Military Academy at West Point, which was the best decision he made in college, and he's never looked back. Please direct comments to jim.mccoll.11@gmail.com.

