
Augmented Reality with HTML5
In a previous Linux Journal article (“Developing Portable Mobile Web Applications”, September 2010, www.linuxjournal.com/article/10789), I looked at HTML5 and how it could be used to write applications for mobile phones. The techniques presented in that article work well for applications that use text, buttons, images, audio and even video, but what about cutting-edge applications that stretch the envelope of what mobile phones can do? In an effort to find out, I decided to implement a rather simple mobile augmented reality application, doing as much as I could in HTML5. This article explores the techniques for extending JavaScript capabilities to write applications that do more than is possible with standard HTML5.
Augmented reality (AR) is the name given to a class of applications that combines the unique capabilities of mobile phones to extend users' perceptions of their environments. Layar (www.layar.com) was one of the first AR applications, and it's still one of the more creative. Augmented reality overlays the current camera preview screen with additional information—you can see examples in this YouTube video: (www.youtube.com/watch?v=A6Le50-QN3o&feature=player_embedded). Figure 1 shows what Layar looks like when the “Starbucks” layer is loaded and the camera is pointed at a mall where there is a Starbucks coffee shop.

Figure 1. Layar with the “Starbucks” Layer
This application makes use of a number of mobile phone features:
Camera preview.
Compass (direction the camera is pointed).
Location.
2-D graphics (for the overlay).
Database capabilities.
Layar is a very advanced application, with many options to make it easy to use. Again, the essential nature of AR is that the user sees additional information superimposed on a camera preview.
How would you implement this kind of application using HTML5? For the sake of creating an example application, let's reduce AR to a simple case: show the current camera preview on the user's screen and superimpose the current compass direction on top of the preview. Let's also animate the compass card so it moves as the phone's camera pans around. In principle, the overlay could be anything, but a compass card is a start.
HTML5 has greatly extended the capabilities of HTML applications, but some things still are missing for this application:
HTML5 doesn't include a compass API. You need a way to access the mobile phone's current compass direction and receive periodic updates as the direction changes. You could use the API in one of the Web app toolkits (such as PhoneGap or Titanium) for this, but let's create our own interface and demonstrate how you can access just about any Object from JavaScript.
You need a live camera preview on the screen, and there isn't a camera API in HTML5. Extensions to HTML5, such as WAC (Wholesale Applications Community, public.wholesaleappcommunity.com), are defining APIs for camera preview, but there are no WAC mobile phones yet.
In order to add your own HTML5 extensions to a mobile platform, you have to do some platform-specific code. That means you have to give up some portability, but let's accept the trade-off and focus on one platform, Android. Let's create the needed Dalvik/Java code to implement this simple AR application and take a look at how JavaScript can call Dalvik methods and vice versa.
The application will be a hybrid Dalvik/HTML5 application. The HTML5 part will run in a browser. Android applications create an Internet browser view in one of two ways:
Issue an Intent with the URL to open, and Android will resolve that Intent by opening the browser application and passing it the URL. When you exit the browser, control is returned to the calling application. This approach works fine for regular HTML5 applications, but it doesn't provide a way to add new interfaces to JavaScript.
Inflate a WebView and pass it the URL. There is a lot more flexibility in the WebView compared to the browser application, including a public method, addJavascriptInterface (Object obj, String InterfaceName). This method lets you create your own JavaScript APIs for the scripts run by a WebView. Note that there is a bit of a security hole here—anything you make visible to JavaScript can be accessed by any JavaScript script run by this WebView, whether or not you wrote the script. You want to be sure the user can't navigate to random Web sites that might misuse your interface. In this case, let's include the HTML and JavaScript files in the application and not provide the user any chance to navigate away.
Let's write a Dalvik application that shows the camera preview screen and overlays that with a WebView that will draw and animate the compass card. Of course, you'll also need the compass information passed from Android back to the HTML5 code, so it can animate the card properly.
Assuming you've already loaded the Android SDK (from developer.android.com), you can follow along by downloading the ARCompass.prj project file and the HTML and JavaScript files from ftp.linuxjournal.com/pub/lj/listings/issue203/10920.tgz.
Before diving into the Dalvik part of the application, let's take a look at the HTML5 part, which draws a compass card and rotates the card to show the current direction the phone is pointed. The .html, .js and .png files used here are stored in the Dalvik application's assets folder, which is created automatically when Eclipse creates an Android project.
Listing 1. arcompass.html
<!DOCTYPE HTML PUBLIC>
 <head>
  <title>AR Compass</title>
   <script type="text/javascript"
     src="arcompass.js">
   </script>
 </head>
 <body>
   <div id="extra">
    <button type="button"
     onclick="window.direction.turnOnCompass()">
      Start</button>
   </div>
   <div id="overlay" style="position: absolute;
     left:280; top:60; z-index:500;
     background-color:#0000" >
    <canvas id="e" width="200" height="200">
    </canvas>
    <script>
     drawCompass();
    </script>
   </div>
 </body>
</html>
Listing 2. arcompass.js
var currDir;
var canvas;
var context;
var card;
function drawCompass() {
 currDir = 0;
 canvas = document.getElementById("e");
 context = canvas.getContext("2d");
 card = new Image();
 card.src = "CompassCard.png";
 card.onload = function() {
  context.translate(100,100);
  context.globalAlpha = 0.5;
  context.drawImage(card, -100, -100, 200, 200);
  }
}

function updateView(dir) {
 context.rotate(currDir*2*Math.PI/360);
 context.rotate(-dir*2*Math.PI/360);
 context.drawImage(card, -100,-100,200,200);
 currDir = dir;
 }
The header of the HTML file declares a title and references the JavaScript file. The body consists of two <div>s: one with a button and one with a <canvas>. You don't really need the button for the application, but I wanted to show how you call Dalvik routines from JavaScript/HTML. Notice that the onclick attribute for the button is set to window.direction.turnOnCompass(). You'll see later how that API is declared in Dalvik and how it is wired to start the compass sensor sending direction updates.
The second <div> is the canvas where you draw the compass card. Let's assume a landscape orientation for the application and position the canvas on the right side of the screen. In a real application, you'd take account of the specific screen geometry of the device you're running on. For simplicity here, I've hard-coded some pixel values. A short embedded script then asks the drawCompass() function to draw the initial compass card image.
The JavaScript file declares some variables and defines two functions:
drawCompass() draws the initial compass card, with north pointing up.
updateView(dir) will be called whenever you get an updated compass direction from the compass sensor (I explain how later). It rotates the drawing context appropriately and redraws the compass card.
Let's turn our attention to the Dalvik part of the application. You need manifest and layout files (Listings 3 and 4).
Listing 3. AndroidManifest.xml
<?xml version="1.0" encoding="utf-8"?>
<manifest
xmlns:android=
"http://schemas.android.com/apk/res/android"
 package="com.lj.ARCompass"
 android:versionCode="1"
 android:versionName="1.0">
  <application android:icon="@drawable/icon"
   android:label="@string/app_name"
   android:debuggable="true">
   <activity android:name=".ARCompass"
     android:label="@string/app_name">
    <intent-filter>
     <action android:name="android.intent.action.MAIN" />
     <category android:name="android.intent.category.LAUNCHER" />
    </intent-filter>
   </activity>
</application>
<uses-permission
 android:name="android.permission.CAMERA">
</uses-permission>
<uses-permission
 android:name="android.permission.INTERNET">
</uses-permission>

<uses-permission
 android:name="android.permission.SET_DEBUG_APP">
</uses-permission>
</manifest>
Listing 4. main.xml
<?xml version="1.0" encoding="utf-8"?>
<RelativeLayout
xmlns:android=
"http://schemas.android.com/apk/res/android"
  android:orientation="horizontal"
  android:layout_width="fill_parent"
  android:layout_height="fill_parent"
  >
<SurfaceView
  android:id="@+id/preview"
  android:layout_width="fill_parent"
  android:layout_height="fill_parent"
  android:layout_weight="1"
  />
<WebView
  android:layout_width="fill_parent"
  android:layout_height="wrap_content"
  android:id="@+id/webView0"
  android:layout_alignTop="@id/preview"
  android:layout_alignBottom="@id/preview"
  />
</RelativeLayout>
The manifest says the application consists of only one screen (the ARCompass activity) and that it needs the user's permission to access the camera and Internet. It also asked for SET_DEBUG_AP permission, which allows you to run the app on a real device while using the Eclipse debugger.
The layout file says the activity contains two views, a WebView cleverly named webView0 and a SurfaceView named preview. I'm using a Relative Layout so you can position the views on top of each other using the layout_align_top and layout_align_bottom attributes for webView0. I'll handle any other needed layout in the HTML that I'll ask WebView to render.
The Dalvik part of the application is more complicated, but not so bad if you break it down into sections:
package com.lj.ARCompass;

import java.io.IOException;

import android.app.Activity;
import android.app.AlertDialog;
import android.content.Context;
import android.content.DialogInterface;
import android.hardware.Camera;
import android.hardware.Sensor;
import android.hardware.SensorEvent;
import android.hardware.SensorEventListener;
import android.hardware.SensorManager;
import android.os.Bundle;
import android.util.Log;
import android.view.SurfaceHolder;
import android.view.SurfaceView;
import android.view.Window;
import android.webkit.WebChromeClient;
import android.webkit.WebSettings;
import android.webkit.WebView;
import android.widget.Toast;

public class ARCompass extends Activity
  implements SurfaceHolder.Callback {

 private WebView mWebView;
 private SensorManager mSensorManager;
 private float[] mValues;
 private boolean compassOn = false;

 private static final String TAG = "ARCompass";
 final Context mContext = this;

 private Camera mCamera;
 private SurfaceView mSurfaceView;
 private SurfaceHolder mSurfaceHolder;
 private boolean mPreviewRunning;
These first lines import all the libraries you need, declare some needed variables, and declare the only Activity, ARCompass. Note that I've said ARCompass will implement the SurfaceHolder.Callback interface—this is needed for the camera preview.
The next block of code declares a SensorEventListener:
 private final SensorEventListener mListener =
   new SensorEventListener() {
  @Override
  public void onAccuracyChanged
   (Sensor sensor, int accuracy) {
  }
  @Override
  public void onSensorChanged(SensorEvent event) {
   mValues = event.values;
   Log.d(TAG,"Compass update: " + mValues[0]);
   String url =
    "javascript:updateView(" + mValues[0] + ");";
   mWebView.loadUrl(url);
  }
 };
Later on, I'm going to wire this listener up to the update events that I'll get from the compass sensor. For now, notice in the onSensorChanged() method that the ultimate result is to load a URL into the WebView (also created later). The URL is of the form javascript:updateView(direction), because the first value passed to you in the array event.values[] is, in fact, the current compass direction. Loading the URL into the WebView has the effect of calling the updateView() function just defined in arcompass.js.
The next section of code gets into the onCreate() method, called when the activity is first created:
 /** Called when the activity is first created. */
 @Override
 public void onCreate(Bundle savedInstanceState) {
  super.onCreate(savedInstanceState);
  Log.d(TAG, "onCreate");
  // Get rid of title
  requestWindowFeature(Window.FEATURE_NO_TITLE);

  setContentView(R.layout.main);

  // Initialize the surface for camera preview
  mSurfaceView =
   (SurfaceView)findViewById(R.id.preview);
  mSurfaceHolder = mSurfaceView.getHolder();
  mSurfaceHolder.addCallback(this);
  mSurfaceHolder.setType
   (SurfaceHolder.SURFACE_TYPE_PUSH_BUFFERS);
  Log.d(TAG, "SurfaceView initialized");

  // Initialize the WebView
  mWebView = (WebView) findViewById(R.id.webView0);
  WebSettings webSettings = mWebView.getSettings();
  webSettings.setSavePassword(false);
  webSettings.setSaveFormData(false);
  webSettings.setJavaScriptEnabled(true);
  webSettings.setSupportZoom(false);
  mWebView.setBackgroundColor(0);

  mWebView.addJavascriptInterface
   (new CompassJavaScriptInterface(), "direction");
  Log.d(TAG, "JavaScript interface added");

  /* Set WebChromeClient before calling loadUrl! */
  mWebView.setWebChromeClient
   (new WebChromeClient() {
   @Override
   public boolean onJsAlert(
    WebView view, String url, String message,
    final android.webkit.JsResult result){
    new AlertDialog.Builder(mContext)
    .setTitle("javaScript dialog")
    .setMessage(message)
    .setPositiveButton(android.R.string.ok,
    new AlertDialog.OnClickListener() {
     public void onClick(
      DialogInterface dialog, int which) {
      result.confirm();
     }
    })
    .setCancelable(false)
    .create()
    .show();
    return true;
   };
  });

  mWebView.loadUrl(
   "file:///android_asset/arcompass.html");
 }
After calling the superclass routine and setting a TAG to be used with log messages, I request the FEATURE_NO_TITLE for the window, because I don't want or need the usual Android title bar. Then, I connect with the main.xml layout file I looked at earlier.
The next block of code initializes the SurfaceView that you're going to use for the camera preview, and the next block of code initializes the WebView. I'll leave most of the details to the reader (the Android SDK help files are excellent), but note one line in particular:
webSettings.setJavaScriptEnabled(true);
By default, WebViews don't execute JavaScript. This setting turns on that ability.
The line after the WebView settings invokes addJavascriptInterface() to add a new API that can be called from scripts run by the WebView. I define the CompassJavaScriptInterface class later, including the method turnOnCompass(), but this is where I defined the “direction” part of the function call I made back in arcompass.html (window.direction.turnOnCompass()).
The next 20 lines or so define a WebChromClient, so you can issue alert() function calls from JavaScript, and those will be converted into Android alert boxes. This is useful for debugging, but not absolutely needed unless your JavaScript uses alerts.
The last line in this section loads the arcompass.html file into the WebView. Note the syntax of the file reference. Again, the file is in the assets folder of the application project, and the SDK includes that folder in the .apk package that is downloaded when installing the application. The next section of code connects the compass sensor to the application:
 final class CompassJavaScriptInterface {
  /* Note this runs in a separate thread */

  CompassJavaScriptInterface() {
  }
  public void turnOnCompass() {
   Log.d(TAG, "turnOnCompass");
   mSensorManager = (SensorManager)
     getSystemService(Context.SENSOR_SERVICE);
   Sensor mSensor =
     mSensorManager.getDefaultSensor
       (Sensor.TYPE_ORIENTATION);

   if(mSensor != null){
    mSensorManager.registerListener(mListener,
     mSensor, SensorManager.SENSOR_DELAY_NORMAL);
    compassOn = true;
    Log.d(TAG, "Compass started");
   }
   else{
    Toast.makeText(mContext,
      "No ORIENTATION Sensor",
      Toast.LENGTH_LONG).show();
    compassOn = false;
    finish();
   }

  }
 }

 @Override
 protected void onDestroy() {
 super.onDestroy();
  if(compassOn){
  mSensorManager.unregisterListener(mListener);
  }
 finish();
 }
First, I declare the class that I referred to back in addJavascriptInterface(). When you make a call this way from JavaScript, it can be important to know that this code is going to run in a thread separate from the one where it was invoked above. In particular, if the called routine needs to manipulate the user interface, it will not be running in the UI thread, so it needs to post a runnable for that thread to pick up. In this case, I'm just working with the Sensor interface, so running in a separate thread is not an issue.
The only method I define is turnOnCompass(), but I could define others. If I defined another method blatz(), I could call it from JavaScript as window.direction.blatz(). The turnOnCompass() method invokes the SensorManager and asks for a handle to the default orientation sensor. If there is a default orientation sensor, it registers the SensorEventListener I defined at the beginning, sets a housekeeping boolean and returns. If there isn't an orientation sensor, it tells the user with a Toast, and exits.
The final block of code in this section makes sure that you de-register the listener when the application exits. If you happen to be the only registered listener for orientation, this would give Android the opportunity to power down that service, and even that sensor.
The last section of Dalvik code deals with the camera preview:
 // Create camera preview.
 public void surfaceCreated(SurfaceHolder holder){
  mCamera = Camera.open();
  try {
   mCamera.setPreviewDisplay(holder);
  } catch (IOException exception) {
   mCamera.release();
   mCamera = null;
  }
 }

 // Change preview's properties
 public void surfaceChanged(SurfaceHolder holder,
   int format, int w, int h){
  mCamera.startPreview();
  mPreviewRunning = true;
 }

 // Stop the preview.
 public void surfaceDestroyed
   (SurfaceHolder holder){
  mCamera.stopPreview();
  mPreviewRunning = false;
  mCamera.release();
 }
}
Again, the details of the camera preview implementation are best left to the Android SDK documentation. The three methods—surfaceCreated(), surfaceChanged() and surfaceDestroyed()—are the methods of the Surface.Callback interface that I said this activity would implement, and they are called for you at each of those events. When the surface is created, you connect the camera preview to the SurfaceHolder. When the surface is destroyed, you stop the camera preview and release the camera. The surfaceChanged method is called only once, after surfaceCreated, and you actually start the preview there.
When you build and run this program on a mobile phone, you get something like the picture shown in Figure 2. This is an HTC EVO screenshot. I haven't done a lot to account for screen geometry differences, so your phone may look a bit different.
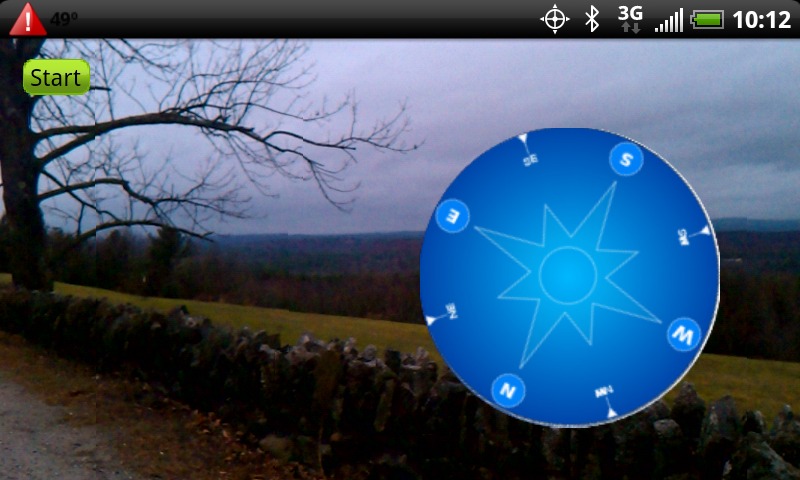
Figure 2. ARCompass Running on an HTC EVO
The user sees a Start button and a compass card superimposed on the current camera preview. The Start button isn't really needed, but I included it so I could show how JavaScript/HTML can call a Dalvik method.
When you tap the Start button, the HTML part of the application calls window.direction.turnOnCompass(), which is implemented in Dalvik. The method asks the orientation sensor to start sending compass readings to mListener. Every time mListener gets a new compass reading, it calls the JavaScript routine updateView() to repaint the compass card on the screen.
I've shown how to write hybrid applications with HTML5 and Dalvik. It's relatively easy to set things up so JavaScript can call Dalvik methods, and Dalvik can call JavaScript methods. I've shown that you can create rather advanced applications that composite the Dalvik and HTML5 user interfaces so they look like one to the user.
But you could just as easily have written the whole application in Dalvik, so what is the advantage of writing part in HTML5? Here are the advantages:
If you were writing a real application, the HTML5 part would be (relatively) portable to other platforms. You wouldn't have to rewrite it to port to, say, the iPhone. In the example, the HTML5 part is pretty small, but in principle, it could be much larger.
You could have kept the HTML5 part of the application on a remote HTTP server, to be updated whenever the app is run, without requiring the user to download an update.
If your application displayed information from the Web, it could be argued that HTML5 is a more natural place for Web interaction than Dalvik.
Hybrid applications, such as the example here, can be a valid way to create mobile applications that combine the power of HTML5 and the native platform. As long as the platform gives you a way to interact between JavaScript and the native application environment, there really doesn't seem to be any barrier to the kinds of applications you can write.
Compass card graphics adapted from commons.wikimedia.org/wiki/File:Compass.svg.
Rick Rogers has been a professional embedded developer for more than 30 years. Now specializing in mobile application software, when Rick isn't writing software for a living, he's writing books and magazine articles like this one. He welcomes feedback on the article at portmobileapps@gmail.com.

