
Paranoid Penguin - Building a Transparent Firewall with Linux, Part II
Last month, I kicked off a series of articles on transparent firewalls, beginning with a brief essay on why firewalls are still relevant in an age of Web applications and tunneled traffic. I also explained the difference between a standard, routing firewall and a transparent, bridging firewall.
This month, I begin discussing actually building a transparent firewall. Making a firewall invisible to the network is cool already, but to spice things up even further, I'm going to show how to build a transparent firewall using OpenWrt running on a cheap broadband router. Let's get started!
I want to dive right into it, so I'm not going to review very much from last time. Suffice it to say for now that whereas a normal “routing” firewall acts as an IP gateway between the networks it interconnects, a “bridging” firewall acts more like a switch—nothing on either side of the firewall needs to define the firewall explicitly as a route to whatever's on the other side.
One important ramification of this is that with a routing firewall, the networks connected to each firewall interface need to be on different IP subnets. This means if you insert a firewall between different networks, those networks must usually at least be re-subnetted, if not re-IP-addressed altogether.
In contrast, the bridging firewall we're going to build in this series of articles won't require anything on your network to be reconfigured. At worst, you'll need to re-cable things to place the firewall in a “choke point” between the parts of your network you want to isolate from each other.
Suppose you want to use the transparent firewall on a home network to protect it from Internet-based attackers. In that case, you may want only two firewall zones, such as “outside” (the Internet) and “inside” (your home network). Most home users, it's safe to say, connect everything in their network directly to their DSL or cable modem via some flavor of 802.11 Wireless LAN (WLAN), with maybe one or two things connected to Ethernet interfaces on the same modem. Figure 1 shows a typical home network of that type.
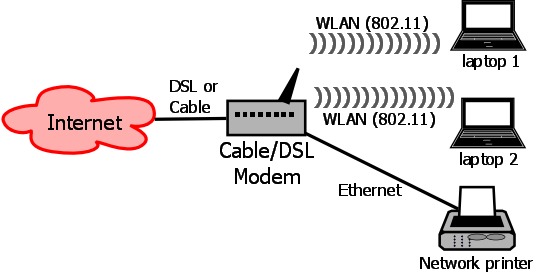
Figure 1. Typical Home Network
If you're such a user, the first step in deploying a transparent firewall is to move everything off the DSL/cable modem (except, of course, the actual DSL or cable connection) and onto either the transparent firewall (if it has enough interfaces), an Ethernet switch (if you don't need WLAN), a “broadband router” (a WLAN access point with built-in Ethernet switch), or onto some combination of those things.
Step two, of course, is placing the transparent firewall between the DSL/cable modem and whatever device (or devices) to which you connected the rest of your network. Despite the list of options in the previous paragraph, there really are only two approaches to this: connecting all the devices in your network to the transparent firewall, which may be perfectly feasible if your firewall has enough interfaces and your network is small enough, or collapsing them back to one or more other network devices that are, in turn, connected to the firewall.
Figure 2 shows the latter approach. In Figure 2, the two wireless laptops and the wired network printer connect to a broadband router, whose “Internet” Ethernet interface is cabled to the “inside” interface of a transparent firewall. The firewall's “outside” interface is cabled to the Ethernet interface of a DSL or cable modem.

Figure 2. Home Network, Re-Cabled with Firewall
(If I was writing this in the 1990s, at this point, I would have to explain crossover cables. But in the modern era, in which pretty much all Ethernet hardware automatically detects “crossed-over” versus “straight-through” connections, all you should need are ordinary patch cables. If you did need crossover cables, however, they would be the two cables in Figure 2 connected to the firewall.)
Even though I'm about to explain why and how I'm using a Linksys WRT54GL broadband router as my transparent firewall platform, which boasts five Ethernet ports plus 802.11g WLAN, for simplicity's sake, I'm going to assume you're using a separate network device like the broadband router in Figure 2, at least for the time being. Although I reserve the right to cover other topologies in later installments of this series, the immediate task will be to build a simple two-interface firewall. (Why? Mainly because it will take too much space to explain how to set up wireless networking on the firewall.)
So, what will our two-port transparent firewall do? Mainly, it will protect the internal network from arbitrary connections from the outside world. In our test scenario of “basic home user”, there are no Web servers, SMTP relays or other “bastion hosts”. (As with WLAN-on-the-firewall, I may cover adding an “Internet DMZ” zone later on in this series.) The firewall will allow most transactions originating from the internal network, with a few exceptions.
First and arguably most important, we're going to configure the firewall to know the IP addresses of our ISP's DNS servers and allow only outbound DNS queries to them. This will protect us against “DNS redirect” attacks (though not highly localized attacks that redirect DNS to some other internal system, such as one where a WLAN-connected attacker's evil DNS server is sitting next to the attacker in a van outside your house).
Second, we'll enforce the use of a local Web proxy, such as the one I walked through building in my four-part series “Building a Secure Squid Web Proxy” in the April, May, July and August 2009 issues of Linux Journal (see Resources). In other words, our firewall policy will allow Web transactions to the outside world only if they originate from the IP address of our Web proxy. This will allow us to enforce blacklists against prohibited or known dangerous sites, and also to block the activity of any non-proxy-aware malware that may end up infiltrating our internal network.
Finally, we'll restrict outbound SMTP e-mail traffic to our ISP's SMTP servers, blocking any SMTP destined elsewhere. This also will provide a small hedge against malware activity.
Why not, you may wonder, allow all internally originated traffic through for simplicity's sake? That is a valid option and a fairly popular one at that. But, it contradicts Ranum's dictum: that which has not been expressly permitted is denied. Put another way, assume that the unexpected is also undesirable.
There's some simple math behind this dictum. Bad traffic can take an infinite range of different forms. “Known-good” traffic, for most organizations, tends to constitute a manageably short list. If you allow only the transactions you expect, and if you've done your homework on identifying and predicting everything you should expect, then other transactions are unnecessary, evil or both.
And, what on the inside, which is supposedly “trusted”, could cause unexpected transactions? Statistically speaking, probably malware—worms, trojans and viruses. Worms propagate themselves across networks, so by definition, they create lots of traffic. Trojans and viruses don't propagate themselves, but after they make landfall on a victim system (typically from an e-mail attachment, hostile Web site or by being hidden in some other application the user's been tricked into installing), they typically “phone home” in order to allow the malware's author to control the infected system from afar.
Traditionally, botnet agents used for spam propagation and Distributed Denial of Service (DDoS) attacks use the IRC protocol for command and control functions. That alone is a good reason to block all outbound IRC, but because IRC can use practically any TCP or UDP port, it isn't good enough to block TCP/UDP ports 194, 529 and 994 (its “assigned” ports). Besides, the malware could just as easily use some non-IRC protocol, again over completely arbitrary ports.
What if malware authors are clever enough to anticipate possible firewall restrictions, such that their code checks infected systems' local SMTP and Web-proxy settings? You still could block that malware if it tries to initiate Web transactions with some “known-evil” site on your Web proxy's blacklist. Regardless, security is never absolute. Good security involves taking reasonable measures to maximize the amount of effort attackers have to expend in order to succeed. Sadly, attackers will always succeed with enough effort, inside information and luck. (The good news is most attackers are opportunistic and lazy!)
Our firewall, therefore, won't allow us to be lazy about keeping our internal systems fully patched, educating our users against installing software from untrusted sources or visiting potentially nasty Web sites and so forth. But it will provide an important layer in our “security onion” that will make our network a less obvious target to attackers doing mass port scans against our ISP, and it will make it harder for any weirdness that does slip through to connect back out.
The last thing I'm going to say for now about our firewall design is that we won't have to worry about Network Address Translation (NAT) or DHCP. This, in fact, is one of the benefits of a transparent firewall! Whatever was providing NAT and DHCP services before (probably the DSL or cable modem, in our home-use scenario) can continue to do so, and if we place our firewall correctly, NAT and DHCP should continue working exactly the same as before.
Now that you understand how this setup will look, before and after firewalling, let's talk about firewall hardware. This article series isn't the first time I've tinkered with transparent Linux firewalls. Years ago when I started researching passive network monitoring, I set up several “white-box” PCs that each had multiple network interfaces and could monitor and restrict network traffic transparently.
When I began researching this new series, my first thought was to resuscitate one of those old systems or build a new one. That seemed like a waste of electricity, however. Why deal with case and CPU fans, hard drives and so forth, for something usually handled by optimized network appliances?
This line of thinking brought me to the idea of industrial/embedded platforms—small, diskless computers running an Atom or ARM processor. But the cost of these, especially models with multiple network interfaces, is similar to that of PCs, and I wanted to spend as little as possible.
Then it dawned on me that this is exactly what OpenWrt was designed for! In case you're unfamiliar with it, OpenWrt is a free Linux distribution designed to run on commodity WLAN gateways and broadband routers, such as Linksys' venerable WRT54G series. On the one hand, I'm not much interested in covering WLAN firewalling in this series (although once it's configured properly, a firewall with a WLAN interface can treat it just the same as any other network interface). But on the other hand, the WRT54G is basically a small computer with five network interfaces plus WLAN. Small memory and slow CPU aside, it should make an ideal Linux firewall platform.
This is how I settled on the Linksys WRT54GL wireless-G broadband router, which cost me only $58, as the test platform for my transparent Linux firewall experiments. How well does it perform and scale, and how stable is it? Time will tell. I would guess the short answer is “good enough for home use, but not quite Fortune-500-ready”. Besides, it's bright blue, cheap and cool.
If this sort of hardware hacking isn't quite your cup of tea, I hope you'll stay with me through the series anyhow, because most of the real iptables magic we'll be working in building our transparent firewalling examples is applicable to any Linux system with multiple network interfaces.
One last note on hardware selection. As a Linux firewall platform, a laptop computer makes a nice middle ground between broadband routers and desktop PCs with respect to cost and power consumption, and you easily can add network interfaces to one via USB. Although even a used laptop will cost more than an OpenWrt-compatible broadband router, it will be able to run practically any mainstream Linux distribution, giving you access to a much wider range of software than you can run on OpenWrt.
If you opt for the laptop approach, be sure to select USB Ethernet interfaces that support USB 2.0 (which is necessary for anything approaching acceptable performance—USB 2.0 operates at 480Mbps, but USB 1.1 is only 12Mbps, and 1.0 is a tiny 1.5Mbps!) and, of course, that are Linux-compatible!
I've had good luck with the D-Link DUB-E100, a USB 2.0, Fast Ethernet (100Mbps) interface. It's supported under Linux by the usbnet and asix kernel modules. (My Ubuntu system automatically detects my DUB-E100 interfaces and loads both modules.)
Back to my OpenWrt adventure, indulge me for a few more paragraphs (plus a few more next month) before we tackle firewall configuration proper. The first step in choosing hardware to use with OpenWrt is consulting the OpenWrt Web site to see what's supported by current versions of OpenWrt (see Resources).
If you choose a Linksys device, which probably is a good choice given that the OpenWrt Project began around the Linksys WRT54G product line, be sure to choose a model whose number ends in L, which indicates “Linux-compatible”. As I mentioned earlier, I chose the Linksys WRT54GL, still available at the time of this writing from various on-line retailers.
The OpenWrt Table of Hardware provides links to other OpenWrt pages giving detailed instructions on installing and configuring OpenWrt on each supported device. In the case of my Linksys WRT54GL, I followed these steps to install OpenWrt:
1. I downloaded the image file openwrt-wrt54g-squashfs.bin from the OpenWrt Web site (downloads.openwrt.org/kamikaze/8.09.2/brcm-2.4).
2. I powered on the WRT54GL with its factory-installed firmware.
3. I connected to the WRT54GL by typing the URL http://192.168.1.1/Upgrade.asp in the browser of a laptop connected to one of the WRT54GL's Ethernet ports, not its “Internet” port. Note that my laptop's network interface was configured to use DHCP and actually pulled its IP address via DHCP from the WRT54GL. Hence, it was assigned an IP in the subnet 192.168.1.0/24, which the WRT54GL uses by default.
4. I “upgraded” the WRT54GL's firmware with the file openwrt-54g-squashfs.bin and waited a few minutes for the upload to complete and for the WRT54GL to reboot with the new firmware.
5. Finally, from my laptop, I ran the command telnet 192.168.1.1 to connect to the WRT54GL, and I was greeted with this message and prompt:
=== IMPORTANT ============================
 Use 'passwd' to set your login password
 this will disable telnet and enable SSH
------------------------------------------


BusyBox v1.11.2 (2009-12-02 06:19:32 UTC) built-in shell (ash)
Enter 'help' for a list of built-in commands.

  _______                     ________        __
 |       |.-----.-----.-----.|  |  |  |.----.|  |_
 |   -   ||  _  |  -__|     ||  |  |  ||   _||   _|
 |_______||   __|_____|__|__||________||__|  |____|
          |__| W I R E L E S S   F R E E D O M
 KAMIKAZE (8.09.2, r18961) -------------------------
  * 10 oz Vodka       Shake well with ice and strain
  * 10 oz Triple sec  mixture into 10 shot glasses.
  * 10 oz lime juice  Salute!
 ---------------------------------------------------
root@OpenWrt:/#
Success! Not only had I successfully turned my inexpensive broadband router into a five-Ethernet-interfaced Linux computer, I'd also learned the recipe for a refreshing cocktail, the Kamikaze. Looking around, I was pleased to discover a fairly ordinary Linux environment.
The only thing missing was a Linux 2.6 kernel. I had one more task before proceeding to turning this blue beastie into a firewall—upgrading its kernel. According to the OpenWrt Wiki, you can do so only after first installing a 2.4 kernel (which I'd just done) and changing some NVRAM settings like so via telnet:
root@OpenWrt:/# nvram set boot_wait=on
root@OpenWrt:/# nvram set boot_time=10
root@OpenWrt:/# nvram commit && reboot
This done, on my laptop, I downloaded the latest Backfire version of OpenWrt (v. 10.03 at the time of this writing) from downloads.openwrt.org/backfire/10.03/brcm47xx. The file I downloaded for my WRT54GL was openwrt-wrt54g-squashfs.bin.
To flash it to my WRT54GL, I opened a command window on my Windows laptop, navigated to the directory to which I'd just downloaded my new firmware image, and without pressing Enter just yet, typed the following command:
tftp -i 192.168.1.1 PUT openwrt-wrt54g-squashfs.bin
Before pressing Enter, I unplugged my WRT54GL, waited a few seconds, plugged it back in, and immediately pressed Enter in my Windows laptop's command window to execute that tftp command. After a few seconds, I got a “Transfer successful” message. The router decompressed the new firmware image, and it rebooted itself to Backfire. When I telneted back in to the router, I was greeted with a new banner:
BusyBox v1.15.3 (2010-04-06 04:08:20 CEST) built-in shell (ash)
Enter 'help' for a list of built-in commands.

  _______                     ________        __
 |       |.-----.-----.-----.|  |  |  |.----.|  |_
 |   -   ||  _  |  -__|     ||  |  |  ||   _||   _|
 |_______||   __|_____|__|__||________||__|  |____|
          |__| W I R E L E S S   F R E E D O M
 Backfire (10.03, r20728) --------------------------
  * 1/3 shot Kahlua    In a shot glass, layer Kahlua
  * 1/3 shot Bailey's  on the bottom, then Bailey's,
  * 1/3 shot Vodka     then Vodka.
 ---------------------------------------------------
root@OpenWrt:/# which tftp
Again, success! Now, not only is my WRT54GL broadband router running Linux, it's also running a reasonably current 2.6 kernel. I'm definitely ready to start configuring this machine for its new stealth firewall duties.
But, this is as far as I can take you this month. Next time, I'll begin showing how to configure networking, bridging and, of course, iptables on our transparent firewall.
If you can't wait until then, see the OpenWrt home page for more information, or if you're really adventurous, search the Web for other tutorials on creating transparent firewalls with OpenWrt. But, if I say so myself, we're off to a good start!
Resources
Home Page for the OpenWrt Project: www.openwrt.org
OpenWrt's Table of (Supported) Hardware: oldwiki.openwrt.org/TableOfHardware.html
Mick Bauer's “Building a Secure Squid Web Proxy, Part I”, LJ, April 2009: www.linuxjournal.com/article/10407
Mick Bauer's “Building a Secure Squid Web Proxy, Part II”, LJ, May 2009: www.linuxjournal.com/article/10433
Mick Bauer's “Building a Secure Squid Web Proxy, Part III”, LJ, July 2009: www.linuxjournal.com/article/10488
Mick Bauer's “Building a Secure Squid Web Proxy, Part IV”, LJ, August 2009: www.linuxjournal.com/article/10513
Mick Bauer (darth.elmo@wiremonkeys.org) is Network Security Architect for one of the US's largest banks. He is the author of the O'Reilly book Linux Server Security, 2nd edition (formerly called Building Secure Servers With Linux), an occasional presenter at information security conferences and composer of the “Network Engineering Polka”.
