
Getting Started with PiTiVi
Video editing on Linux has had a long and complicated history. Although Linux has long-bathed in image editing, music production and other creativity-enabling applications, the platform traditionally has struggled with video production. In the early days, the problem was pinned on the complexities of supporting different video codecs, but as codec support continued to improve, the spotlight instead was shone on video editors.
Unfortunately, video editors were largely divided into two camps: hugely complex, resource-hungry behemoths, such as Cinelerra, or over-simple, limited offerings such as Kino. Across the world Linux, users craved a middle ground, desperately hoping for a simple, usability-orientated editor that supports a wide variety of media formats fused with the ability to be used on real-world projects.
Three years ago at the GNOME developer conference, Edward Hervey, a French developer living in Barcelona, presented the first cut of his video editor project, PiTiVi. With it, Edward made a series of firm decisions. First, it was based on the GStreamer multimedia framework—arguably the most popular and recommended way to handle low-level multimedia operations and content. Second, he focused his project firmly on usability and ease of use. Edward never set out to produce a super-complex professional editing tool, but rather a tool focused on simple real-world projects, such as editing your honeymoon video and putting it on YouTube. Finally, Edward was willing to delay the development of PiTiVi to “do things right”.
The latter was particularly apt. It took him three years to get PiTiVi in a shape where it could be used for the “real” projects he targeted. Much of the reason for this was that as Edward hacked on PiTiVi, he would find bugs and missing features in GStreamer, so he would step away from the PiTiVi coal-face to fix the GStreamer bug or feature before returning back to PiTiVi. Although it was a frustrating and time-consuming process, Edward's work paid off. GStreamer is an incredibly powerful and stable framework for building applications, so much so that I myself created a music multitracker project with it called Jokosher. Edward's work not only generated a better GStreamer, but also a more powerful and mature PiTiVi.
PiTiVi is available for all major Linux distributions and is now bundled by default with Ubuntu 10.04 Lucid Lynx. You can find packages for these different distributions in most distribution archives, so use apt-get, yum or emerge to grab PiTiVi for your system. When you have installed it, you can click Applications→Sound & Video→PiTiVi to load it. If all else fails, you can download PiTiVi from its Web site at www.pitivi.org.
With PiTiVi ready to roll, you also need to ensure you have the right video codecs installed for the video formats you want to edit. This is as simple as ensuring you have the gstreamer-good package installed. If you want more codecs, but ones that are legally restricted in terms of redistribution, install the gstreamer-ugly package. Finally, there is another package with a set of work-in-progress codecs called gstreamer-bad, which you can try. Personally, I install them all so I have the widest codec coverage.
Start PiTiVi by clicking Applications→Sound & Video→PiTiVi. First, let's take a look at the PiTiVi (Figure 1).
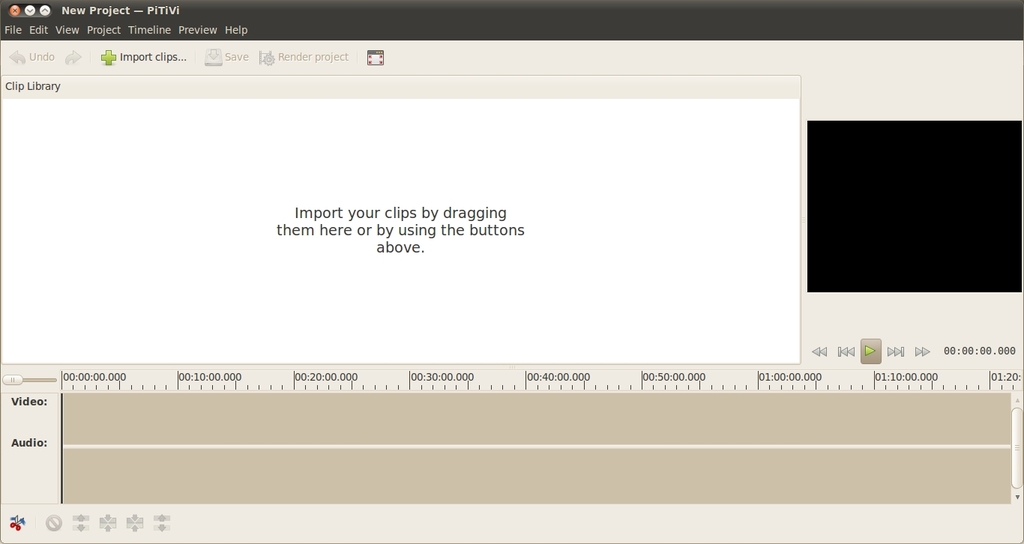
Figure 1. The Main PiTiVi Interface
The interface consists of four main areas: the source list, previewer, timeline and toolbar.
The source list is the main white area on the left part of the window. This is where you can import the different video clips, photos and sound files that will be used in your project. You can either drag the files onto this white area or click the Import clips... button to load them. Whichever approach you use, each clip will appear in the source list area ready for use in your project. Test this by either dragging a video onto the source list or importing it with the Import clips... button and selecting a video. If for some reason PiTiVi can't load your file (most likely due to it being an unsupported format), an error appears at the bottom of the source list.
The previewer is to the right of the source list and provides a place to view the video in your project. The black box is where you will see your video, and the buttons underneath are standard transport buttons to control playback. The previewer is used not only for playing back your edited project, but also for previewing clips in the source list. Test this by dragging the video you imported into the source list and dropping it on the black box in the previewer. Now, use the transport controls to play it, and you should see the video play back. Click the different transport buttons to fiddle with the playback.
The timeline is the long area underneath the source view and previewer. This area is where you perform the editing on your project. The concept is simple: the timeline provides a literal timeline of your project with the far left being the very beginning of your video project and time increasing to the right. In the timeline, you can drop clips, cut them into pieces and arrange them in your desired order. The timeline also can be used to adjust volume, add pictures and overlay music over different parts. Test the timeline by dragging the video from the source list and dropping it on the timeline; the clip appears in the timeline, similar to Figure 2.
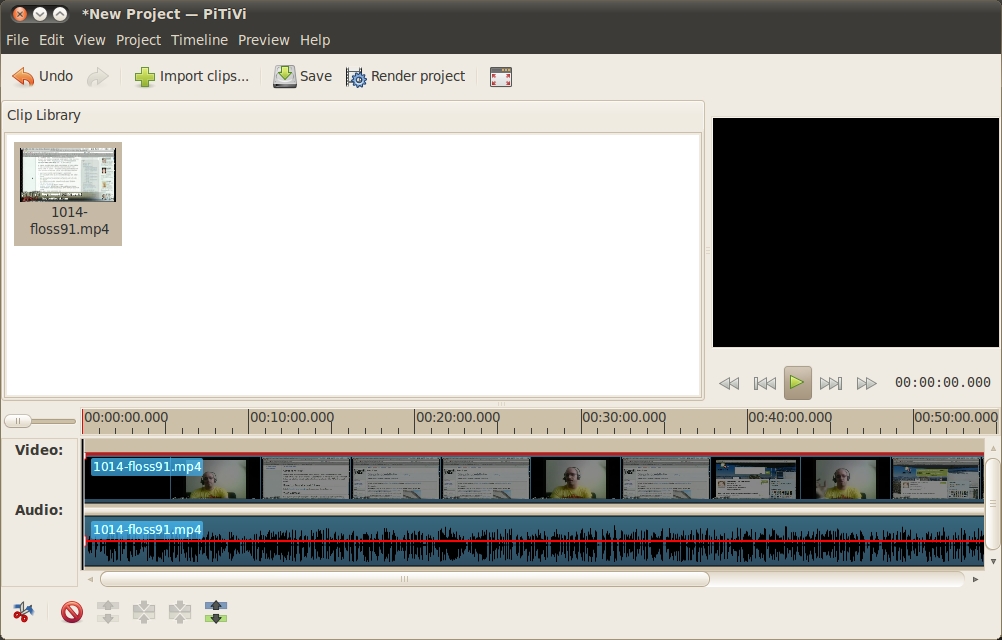
Figure 2. A Video Loaded into the Timeline
When a clip is loaded, there are two bars: the Video and Audio tracks. If you see only the second bar, you may need to click the clip in the timeline and drag it up to the video track to see both. Each bar represents exactly what it says—the different video frames and the audio content. This content is displayed separately, so you can remove one and not the other if you like. This is common for removing audio and replacing it with something else, such as a soundtrack.
Before moving on, the timeline has two additional special features: the ruler and the zoom. The ruler is the gray part with the numbers at the top of the timeline. If you click any part of the ruler, you can skip to a different part of the timeline, and that part of the project is shown in the previewer. When you click on the ruler, you can see the current position in the video by the red line that is drawn vertically on the timeline (this is called the playhead). To the left of the ruler is the zoom. This little slider can be used to adjust the scale of the timeline. This is useful for zooming out on the project to see it as a whole or zooming in closely to specific parts of a clip to cut a specific scene at just the right point.
The final area to look at is the toolbar, which is below the timeline. This line of buttons provides a simple palette of tools that you can use to edit content on the timeline. Let's explore some of these tools now.
All editing in PiTiVi takes place in the timeline. Fortunately, editing in PiTiVi is incredibly simple, and you really need to know how to use only one main tool: the cutter.
Video editing is all about cutting video into different pieces and putting them next to each other to tell a story. To perform a cut in PiTiVi, place the playhead where you want the cut to happen (by clicking on the ruler), and click the scissors icon on the toolbar. The clip splits in half, and you can click on each clip to move it around. Now, if you move your mouse to the edge of one of the clips, the cursor changes, and you can shorten and lengthen the clip to taste. To get your cut at just the right place, you may want to use the ruler to zoom in and out of the timeline and resize until the clip is just right. If you get tired of constantly toggling the play button in the previewer to start and stop playback, use the spacebar as a shortcut for toggling playback.
One of the wonderful aspects of video editing is that it is so simple to perform, but the impact that is delivered lies in how you organize the clips, the timing between cuts, how those cuts line up with music and more. Each of these skills fundamentally boils down to cutting, trimming, moving and viewing the results in the previewer.
While editing, you may want to get rid of some of the audio and replace it with other audio, such as if you want a series of fast cuts to music. You do this by splitting the audio from the video in a given clip and deleting the audio part. By default, your two clips are two different units and when you drag them, the video and audio are stuck together in each clip. To split the audio from the video in a given clip, first click on the clip on the timeline (it will turn a little darker to indicate that you selected it), and then click the far-right button on the toolbar (the button has an icon with two blocks and an up-and-down arrow). Clicking this icon unsticks the video and audio from the selected clip. Now, click the audio clip and only that will be selected. Delete this by clicking the red circle icon on the toolbar and only the audio clip will vanish, leaving the video present. If you now play back the video at that point in the timeline, you will hear no audio but see the video.
Now, import an audio file into the source list, and drag that to the timeline where the audio you just deleted was. You now have video over an entirely different audio track. Play with cutting the video into lots of different pieces, resizing them and placing them next to each other over the audio. Before you know it, you will have lots of fast-changing clips with your new audio soundtrack.
When you add any clip to the timeline, a horizontal red line is drawn over the duration of the clip. This is the fade line. With it, you can control where audio fades (on the audio track) or video fades (on the video track). An audio fade is where you smoothly adjust the volume of the clip from one level to another. As an example, at the end of a video you may want to fade your audio to silence. On the video track, the fade line lets you control how you fade from video to black. In the same example, at the end of a project, you could use this line to fade the video to black slowly.
Using the fade line is simple. Double-click at the point you want a fade to happen, and a small handle appears on the fade line. Now, click the handle and move it to adjust the fade. On the volume track, the higher the red line the louder the volume, and on the video track, the higher the red line the more video is visible instead of black. Next, click another part of a fade line and the red line connects the dots. This is how you do fades: add two points on a line and adjust their settings, and PiTiVi performs the fade for you. As an example, add a fade handle a little bit before the end of a video and one right at the end. Move the far-right handle to the bottom and the far-left one to the top, and the clip will fade out at the end.
One final note about fades is that they are tied to a clip and not part of the wider timeline. As such, if you add a fade to a clip and then move the clip around, the fade moves too. This makes it really simple to perform fades and then reorganize the clips in your project later.
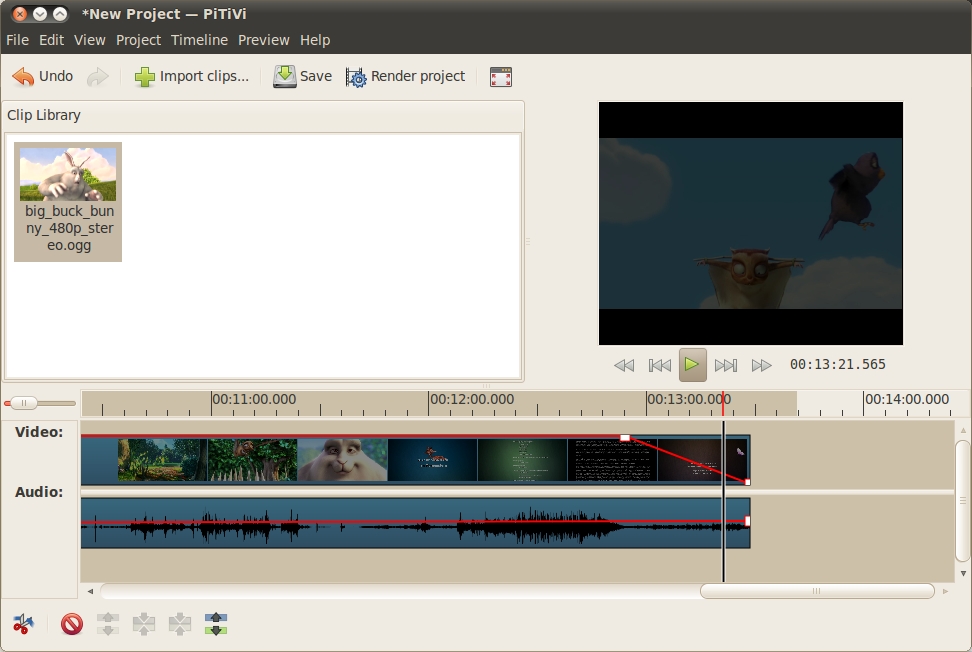
Figure 3. Performing fades is simple in PiTiVi.
When you have finished editing your project, the final step is to combine all of your edits into a final video that you can share with others. This process is known as rendering your video. Fortunately, like everything else in PiTiVi, this is simple.
Click the Render project button and a dialog box appears. Click the Choose File button and select where you want your rendered file to be saved. You now can click the Render button, and your video will be rendered by default as an Ogg Theora video.
If you want to control what kind of video format and size is rendered, click the Modify button.
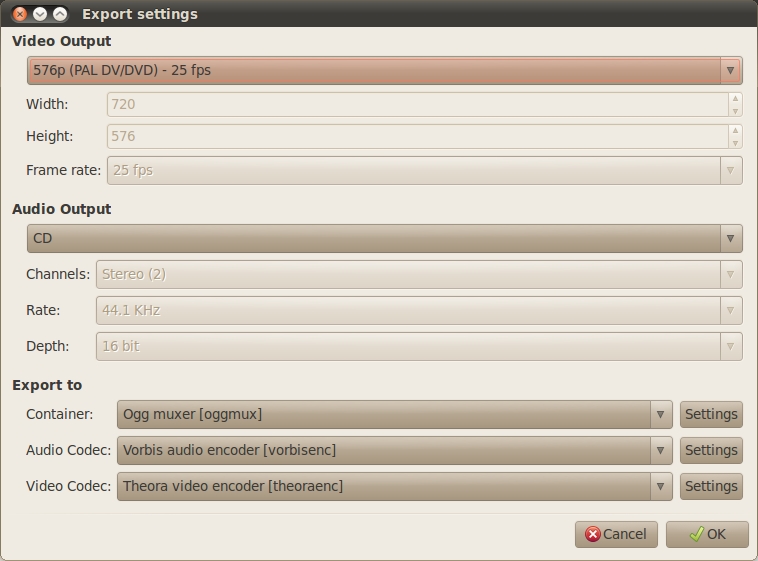
Figure 4. PiTiVi supports a wide variety of output formats.
In this dialog box, set the visible size of the video in the Video Output section. There are a variety of defaults here, but you can select Custom if you want to specify your own size. In the Audio Output section, you can specify the audio quality of your video. Finally, in the Export to section, you can choose which codecs are used in your project. An important note here is that the Container file type can often contain a different type of codec. As an example, the .avi container can have many different types of video codecs inside.
When you are happy with the settings, click the OK button to accept the settings, and then click the Render button in the render project dialog box to start rendering the video. Rendering can take a while, so go grab a cup of coffee. Afterward, you will have your fully edited video ready to view and show others. Congratulations!
In this article, I've explained how to get started with PiTiVi and how its simple and usability-oriented design and toolset can be used to create a range of different types of videos. Although simplicity sometimes can be confused for lack of capability, PiTiVi certainly can meet the needs of many home videos for sharing with friends and family.
Although PiTiVi is simple and flexible, the project is by no means standing still. The team already is working on transitions and titles for videos as we speak. PiTiVi has a rosy future, and so, therefore, does video on Linux. Be sure to let Linux Journal know what kind of videos you are making with it. Good luck!
Jono Bacon is the Ubuntu Community Manager at Canonical, author of The Art Of Community published by O'Reilly, founder of the Community Leadership Summit and co-presenter on Shot Of Jaq and FLOSSWeekly.

