
How to Fake a UFO Landing
A flying saucer descends onto an open field and lands, kicking up dust all around it. If this happened in a remake of The Day the Earth Stood Still nobody would blink. But imagine that instead of a big beautiful image executed with the precision and care of a big-budget feature, what you're watching looks like it fell on the cutting-room floor of The Blair Witch Project. You're not seeing this in a comfortable screening room at your local cinema, where the picture is clean, sharp and bigger than life, but rather you're standing gathered around a booth at your local science-fiction convention. The guy playing the video isn't a producer. He isn't even an independent filmmaker. He's a guy who's genuinely convinced that this video can't be faked. If it were, he says, the seams would show, and whoever gave this to him really did record evidence of alien visitation that the government is covering up, and that by showing this publicly, he's taking a terrible risk. But, he feels he must expose the fraud that governments and aliens perpetrate on unsuspecting citizens!
This scenario may sound like it clawed its way out of the X-Files' wastebasket, but as VisualFX technology gets ever cheaper and more ubiquitous, faking a video like this becomes no problem. Of course, it takes a lot of expertise and dedication to get the colors, shadows and reflections to match convincingly. One would think that getting the movement to match as the camera person runs and zooms with a handheld shot would be the most difficult part of the equation. Once upon a time, this was true.
It used to be that the only way you could achieve the movement precision necessary to sell an effect like this was to put your camera on a motion control rig and have a computer record the movements in the field and then reproduce them exactly (though to a smaller scale) in the post house where the artificial elements (in our case, the flying saucer and the dust) were photographed. Aside from being very cumbersome and expensive, this approach sharply limited the kinds of shots that an FX artist could do to those that could be reproduced by an electric gimbal and a prime lens.
No longer. The late 1990s saw a great flowering of research and development into the area of computerized match moving—matching the movement of different visual elements so that they appeared to exist organically in the same scene. Putting the computer in the mix both at the match moving and at the compositing stage gives a lot more control and freedom than previously.
Human visual acuity isn't the best on the planet, but it is startlingly good. With a little practice, an ordinary fellow sitting in the audience for The Matrix can spot the grain mismatch in shots that were too hastily done. Our visual cortex does the differential calculus to tell us “this doesn't belong here”. It follows that this same mental apparatus could be employed to create the trickery in the first place. With most VisualFX work, there are complicated tools, and then there is doing it by hand. Like most other fields of human endeavor, the better an artist is, the fewer training wheels he or she generally will rely on. So, why not do match moving by hand?
The short answer is that many artists do, under some circumstances. Other times, there is an interaction between the artist and the match-moving software, with the artist choosing points for the software to track, either because the tool doesn't detect the right points, latches on to points that aren't appropriate or doesn't do point detection at all.
However, the art of motion tracking is nontrivial. Although our visual cortexes are excellent at detecting error, they are somewhat less excellent at projecting perfection outward. We do not create grand, realistic paintings naturally—indeed, we have to be taught to see light, shadow, form and so on in a certain way in order ponder even attempting to work like a Bouguereau or a Leonardo. Similarly, our ability actually to distinguish motion that doesn't fit is quite keen, although our ability to create a perfect motion path is coarse by comparison—something we don't notice until after we play it back and see the drift creeping in even with the most careful hand-tracks.
Of course, a match-moving program won't always get a perfect track, but the interaction of a good artist with a good program delivers top-notch results.
Aside from the fact that it's free, why use Voodoo for this project?
The truth is that Voodoo isn't going to solve every match-moving problem, even leaving out the ultra-delicate moves that the higher-end match movers handle better. The field of match moving is basically divided in two: 2-D motion tracking and 3-D camera tracking.
2-D motion tracking is the technology used in compositors to affix a new element to a specific point in the frame. A user generally will select one or two feature points, and the computer then will follow the points around the frame as the objects move within it. When the tracker slides off the selected point, the artist gently will correct it to keep the track from drifting. Two commonplace examples of this process can be seen in blurring suspects' faces on Cops! and in placing virtual advertisements on infield walls at baseball games. 2-D tracking tracks only the position of an object within the frame, which gives it a double-barreled Achilles' heel: parallax and perspective.
Parallax is the phenomenon whereby foreground objects seem to move faster than do background objects. As your point of view moves, the angle at which you perceive objects changes subtly, which is why you see a parallax driving down the road. With 2-D tracking, your track marks are pretty much all you get. This can be a problem if, for instance, you're moving over a greenscreen and the digital set is supposed to extend for quite a ways down in depth. As soon as you add depth to lateral movement, particularly when your track marks are close to the camera, you need to work in 3-D, or you have to fake parallax by hand—a dubious and difficult undertaking that easily shatters the illusion you're trying to create. A really good artist can pull it off, but it takes a lot of practice.
Perspective is the other wild card in the equation. Lenses do not see the world as it is. Instead, every lens distorts the world in certain mathematically predictable ways. This distortion is closely related to focal length and aperture, and measuring the distortion accurately is essential to tracking elements properly in the shot. This wild card gets even wilder with zoom (extending the lens to get a closer shot) and dolly-in (moving the camera toward a subject) movements, which involve constantly changing perspective in one fashion or another along the z axis, which is the axis that 2-D motion tracking can't cope with. Perspective changes also can be faked, but it's far more difficult than faking parallax and far more time consuming.
This is where 3-D camera tracking comes in. Instead of simply tracking the location of certain user-selected features to create a good 2-D track, the computer attempts to guess the position and motion of the camera based on the footage. Pitch, yaw, roll and lens length are all calculated based solely on the finished video (though any information you have and can input manually will make it work faster). The ability to reconstruct all these parameters accurately means that the problems of parallax and perspective are solved, even during dolly and zoom moves. Needless to say, this is a mathematically complex process designed to test the minds of even the most ardent effects artist who wasn't also a comp-sci or optics major at a university. Nonetheless, the algorithms for pulling this off are well known and included in most camera-tracking packages.
Although most 2-D motion trackers are built in to existing compositing systems (such as After Effects), 3-D camera trackers operate on a standalone basis and export their data—camera settings and movement, as well as the “point cloud”—to various 3-D programs, and it is in the 3-D program where the magic happens. The 3-D program also gives an extra measure of control and refinement beyond what the tracker itself allows, as you can tweak the camera animation curves.
I said earlier that the 1990s saw a lot of funding into creating software like this. Well, as every tech-junkie knows, where thy research funding is, there thy grad students also will be. Thanks to a team of particularly dedicated grad students in Hannover, Germany, the technology to match camera movement in three dimensions is available to Linux and Windows users for free—a very good deal, considering that comparable commercial packages run upward of several thousand dollars a seat. For the savings, you do sacrifice some sophistication in the ability to fine-tune your shot, but for most applications, Voodoo does very well.
So, grab a copy of it, and let's get you ready for your appearance on the Art Bell show, peddling your newest Genuine UFO Video (tm)!
First, head over to www.digilab.uni-hannover.de/download.html, and download a package appropriate to your system. Note that there are no source packages—Voodoo may be freeware, but it is not, and probably never will be, open source. So, grab the binary that is convenient for you. Note that there are no x86_64 binaries available. If you have a 64-bit system, just grab the x86 package—it doesn't depend on any 32-bit libs to work, and it won't choke on execution.
Pop open a command window, and use tar -xvzf to open the archive. Next, move into the resulting voodoo-versionnumber directory, then a further level deep into the /bin directory, and run ./voodoo.
Anyone familiar with old Roger Corman movies will realize that bloodletting is an essential step in working good voodoo. In this case, it's your video that needs to be bashed into tiny bits. Voodoo will not chew through video, it works only on still image sequences.
A quick ffmpeg call will give you the image sequence you require:
ffmpeg -i videofilename.avi -f image2 %03d.png
Once done, run Voodoo.
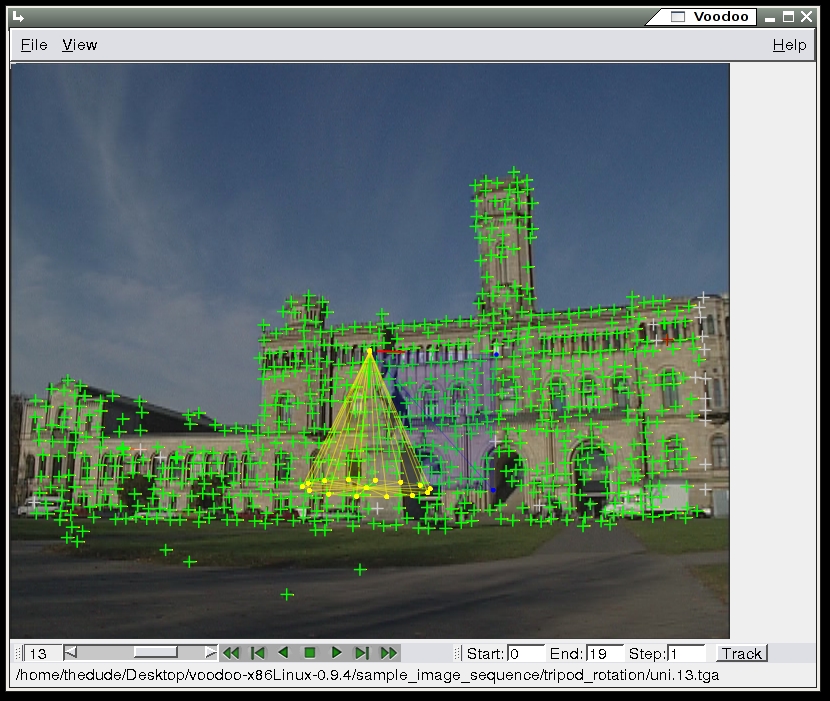
Figure 1. Voodoo Interface
The interface, at first glance, is simple—two pull-down menus and a flipbook player. That simplicity proves quite illusory as you begin to delve into it. Camera tracking is complex, and the toolbox here is extensive, but the nature of the task means that you can learn gradually, and very little work will get you a good initial track.
To start, go to the File menu and select load→image sequence, and load up the image sequence you just created. Be sure to set movement type and interlace settings, or your track will not come out properly. Play the clip through once with the flipbook to make sure there aren't any obvious errors.
Now, you need to load camera settings (File→load→initial camera). This is vital if you want the track to work properly, but it's also very difficult to get right if you weren't keeping notes on the set for focal length, aspect ratio, film back and (less important) skew angles. If you didn't keep proper notes, enter your best guess and go from there, you always can tweak it later.
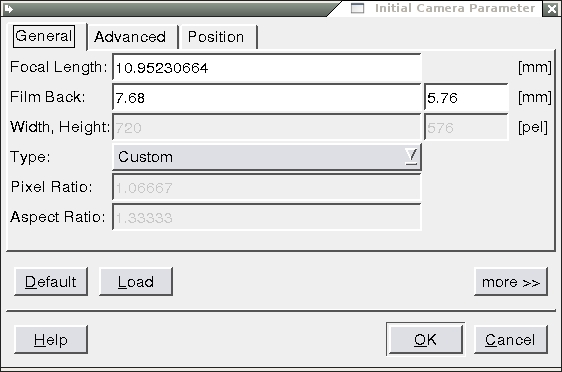
Figure 2. Camera Settings Window
The work flow from here is pretty simple. Play through the clip to make sure the whole sequence loaded properly, then press track. The computer will select a few dozen track points and follow them through the duration of the clip. Depending on the complexity and length of the clip, this process can run anywhere from a few seconds to a few hours.
Once the track is done, play it through again, watching particularly the motion path of the different points. If you can't see any drift, you're golden—you can skip ahead to the export step. If the track is lacking, there are a number of ways to tweak it. You can refine by adjusting the tracking algorithms in the View→Controls menu, and rerun the track, selecting refine instead of discard in the dialog that presents itself to augment the track you've already created. You can do much the same through adjusting the camera settings, although if you do this, you'll be better off running the track from scratch.
A number of other refinement tools are also available. You can pull up the modeling box (View→Modeling Tools) and use it to add track masks and 3-D primitives to help you spot drift, and it (along with the Fpoint track editor) lets you delete, change or add new track points manually, so you can direct the tracker to watch the right things and make it ignore the wrong ones, such as people or cars in the foreground. Once done, run the track again, again selecting refine rather than discard.
You can watch the reconstructed camera motion, and manipulate it to a certain extent, in the 3-D viewer window, available through the View menu.
When you have a track you find satisfactory, go to File→Save, and pick your export format. Be sure to export all the Fpoints—having them helps if you're going to need to do any complex interaction, as they will help you guide where you put alpha masks and such—like if you chose to do some of your masking in your 3-D program.
In Blender, importing your track data will give you something like what is shown in Figure 3.
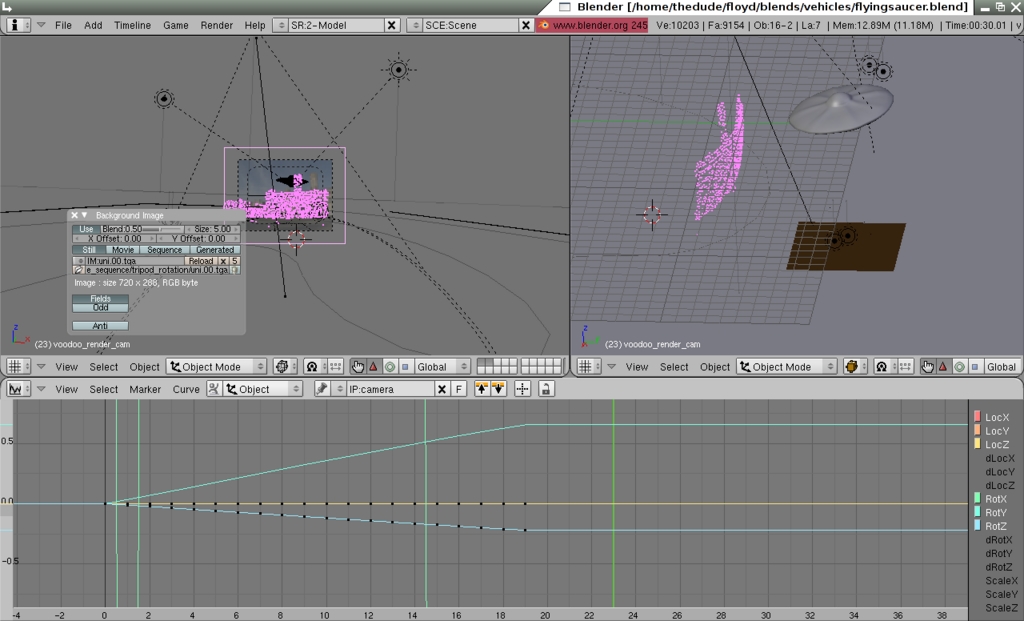
Figure 3. Blender File with Voodoo Track Imported and Point Cloud Showing
The point cloud is a representation in 3-D space of the track points from Voodoo, and the camera has applied to it all the animation data (pitch, yaw, roll, position and lens length) to re-create the movement that the original camera engaged in. It is possible that upon import you will need to re-orient parts of your scene, but if you've done your job properly all that needs to be done now is to finish your 3-D UFO (texturing, animation and so on), and create your dust cloud with your particle engine. Marrying these elements together with the tracked footage is a job for your compositor—Blender has a quite capable one built in, which I covered in depth in the October 2007 issue of Linux Journal.
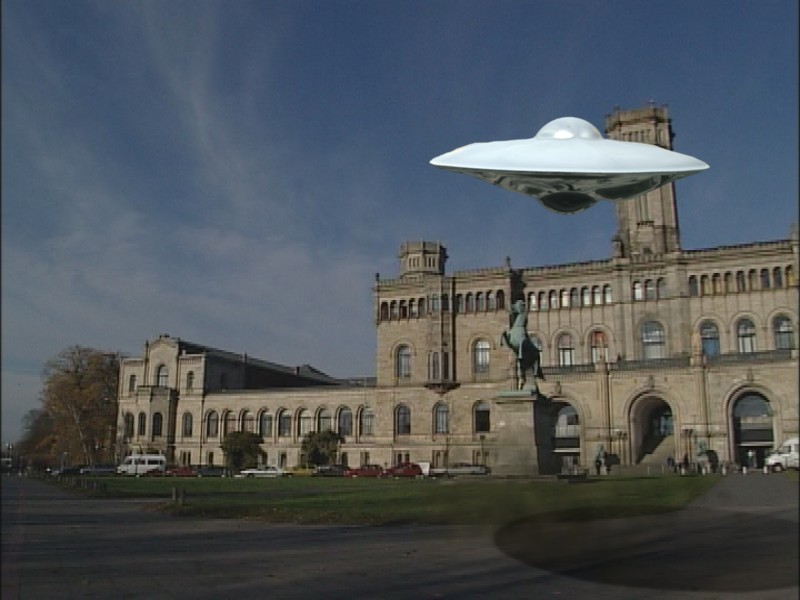
Figure 4. Finished Shot
With a bit of practice, you'll have your own fake UFO video suitable for posting on YouTube or fooling media pundits. Like anything, camera tracking takes practice to get right, but the toolset provided by Voodoo puts this technique well within the reach of any hobbyists willing to learn a bit about optics and spend some time training their eyes. Refer often to the on-line help—Voodoo is one of those rare freeware products with excellent documentation built right in.
Until an open-source camera tracker of equal sophistication presents itself, Voodoo likely will remain the only free camera tracker for Linux—at least in a price range that end users can afford. All hail the grad students and their advisors at the University of Hannover, Germany. Let's hope their excellent work remains free to use for the foreseeable future!
Dan Sawyer is the founder of ArtisticWhispers Productions (www.artisticwhispers.com), a small audio/video studio in the San Francisco Bay Area. He has been an enthusiastic advocate for free and open-source software since the late 1990s, when he founded the Blenderwars filmmaking community (www.blenderwars.com). He currently is the host of “The Polyschizmatic Reprobates Hour”, a cultural commentary podcast, and “Sculpting God”, a science-fiction anthology podcast. Author contact information is available at www.jdsawyer.net.

