
Use SSH to Cross a Suspect Host Securely
Recently at our local (Phoenix) Free Software Stammtisch, we were talking about security. I was surprised to find that no one else realized you can ssh safely across a compromised host to another machine behind it. A common example of “crossing” a host to get to another machine is accessing a machine on a private network protected by a firewall. The firewall is on the edge of the private network and provides the only means to get to the private network. So, you have to pass through the firewall to get to the private network.
But, what happens if the firewall has (or you believe it has) been compromised? How do you get to the private network without more security problems? It turns out that the answer is the same. You go through the firewall, but you do it in such a way that your connection remains secure even when the firewall itself may no longer be. The connection to the machine on the private network still can be made securely, even if you know the host you're passing through has been compromised and some rogue element has taken control of it.
As an example, let's say you need to connect from your Netbook to a server on your work's network. Let's also say the only way to get to your server is via a connection to your work's SSH/VPN gateway, but you think someone has broken into the gateway (yes, yes, get it off-line as soon as possible, but let's do that, and continue to be able to work and recover the gateway).
Now, let's consider an example scenario with three machines, named corresponding to what they are: Netbook, Gateway and Server. If you already understand SSH tunneling and want the short story, see the Short Story sidebar.
Short Story
The short description is that you initiate a connection to Gateway. With that connection, you create a tunnel to port 22 on Server using the -L option to ssh:
-L $local_port:Server:22
You then can connect to a local port on Netbook that is the entry point for a tunnel that comes out at port 22 of the destination machine, which is Server. The tunneled connection is never decrypted on Gateway, so it stays secure.
For the long story, let's start with a description of some simple tunneling. The -L option on the command line allows you to create a tunnel:
ssh -N -f -L 2222:localhost:22 Gateway
The -L option allows you to specify the entry and exit points for a secure tunnel created by SSH. In the examples used in this article, it gets an argument that has three fields. The fields are separated by colons. The first field is the local port to bind (the local port to listen on). The next field is the host to connect to. This field is interpreted by the remote machine in the SSH connection, not by the local machine. The computer initiating the SSH connection doesn't need to know how to get to it. The third field is the port to connect to on the far end of the tunnel.
If you run this first command from Netbook, the command creates an SSH connection to Gateway and builds a tunnel that forwards port 2222 on Netbook to port 22 (the standard SSH port) on Gateway. The local port, 2222, can be almost any value as long as it's not already in use, although it must be above 1023 if you're not connecting as root. Now you can connect to SSH on Gateway by using that tunnel. Again, it's important to note that the tunnel destination hostname (the second field) is interpreted by Gateway, so “localhost” is instructing Gateway to connect to itself. localhost is not Netbook; it's Gateway. For more examples of using -L to create tunnels, see the SSH -L Examples sidebar.
The -N and -f options are useful when just creating a tunnel and not needing a remote shell. The -N option tells SSH not to run a remote command. The -f option puts the ssh command in the background, so you can regain control of the shell that ran the ssh command.
SSH -L Examples
The following command connects to remote_host and builds a tunnel from port 8888 of your desktop to port 80 of my Web server. You then can point a Web browser at http://localhost:8888/ to read my home page:
ssh -L 8888:www.LuftHans.com:80 remote_host
The following command connects to remote_host and builds a tunnel from port 9993 of your desktop to port 993 of mail_server's IMAP over SSL server. You then can configure your mail client to connect to port 9993 on your local system to read your mail:
ssh -L 9993:mail_server:993 remote_host
In both cases, the remote servers see the connection coming from remote_host, and in both cases, it doesn't matter whether your desktop can talk directly to the server at the far end of the tunnel.
Now, run the following command on Netbook:
ssh -p 2222 localhost
This second command creates an SSH connection to port 22 on Gateway by using the tunnel created in the first command. In the second command, localhost is the destination machine, so it's interpreted by the SSH client on Netbook, which means the ssh command running on Netbook connects to Netbook but on a nonstandard port. The tunnel is entered at port 2222 on Netbook and comes out at port 22 on Gateway. Because sshd is listening on port 22, the tunnel connects to the SSH dæmon on Gateway.
Presuming Gateway can connect to Server even though Netbook can't (remember Server is “firewalled” behind Gateway), it's also possible to create a tunnel to Server using a command such as:
ssh -a -N -f -L 3333:Server:22 Gateway
In this case, the tunnel from port 3333 on Netbook doesn't connect to Gateway, rather it connects to port 22 on Server. Gateway is essentially forwarding packets from Netbook to Server. Like the first command, the tunnel destination (the second field, Server) is interpreted by Gateway, so this tunnel connects to Server. Netbook doesn't need to know how to get to Server; Gateway handles the routing.
The -a option here makes sure authentication agent connections are not forwarded to Gateway. If you are concerned that Gateway is compromised, you don't want the attacker to gain control of your authentication agent connections. For more, see the Authentication Agents sidebar.
Authentication Agents
An authentication agent holds authentication credentials and allows other processes to use it for authenticating with SSH servers. It can be used for an X session allowing various commands and shells to authenticate automagically when logging in to remote services.
Authentication agents also can pass credentials on to remote servers allowing the remote shell to use it. The following command will connect to hostB and forward the authentication agent connection if you have one established:
ssh -A hostB
If hostC allows authentication with the same key, you then can ssh from hostB to hostC without having to authenticate manually.
A couple risks are involved in this type of authentication agent forwarding. In the example in the article, the risk is that if you forward the authentication agent connection to Gateway from Netbook, the attacker also could gain access to that authentication agent connection. If Server accepts the same key, the attacker could use your authentication agent connection to establish a connection to Server.
Another issue is that the authentication agent will forward all keys that it has. If you use one key for customerA and another key for customerB, you don't want the agent to forward the key for customerA to customerB's machine.
Figure 1 displays the example graphically. The initial ssh command builds the SSH connection for the tunnel, the tunneled connection and the forwarded connection. The second ssh command initiates a new connection through the tunnel and forwards the connection directly to the machine you are trying to reach. The forwarded connection is in red to show that it is unencrypted, but the blue SSH connection going through it is secure.
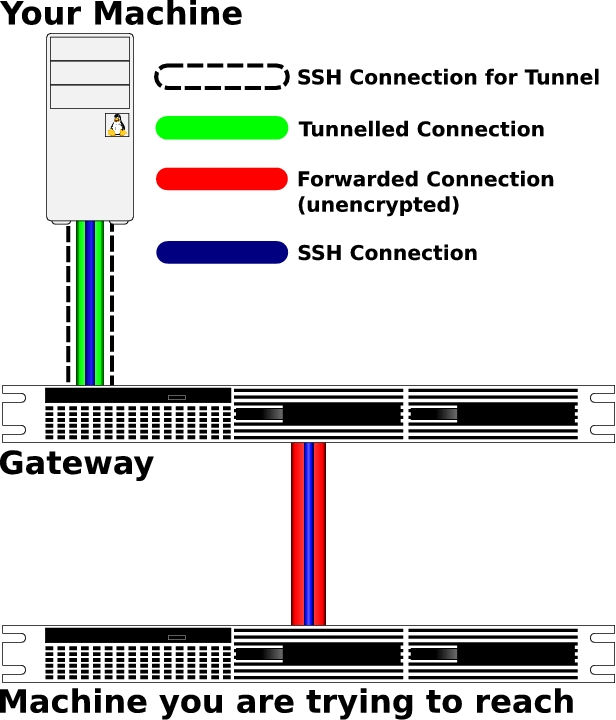
Figure 1. Tunneling across a Compromised Host (Brian Cluff, LJ2009@Macrosift.com, created the image for this article.)
This tunnel could work for any TCP protocol, but the packets from Gateway to Server and back to Gateway are unencrypted. That means unencrypted services would not be secure between Gateway and Server, even though you're using an SSH tunnel. You may want to review the -L option section of the SSH man page and consider this a bit to convince yourself that the Server/Gateway connection (the red part in Figure 1) is unencrypted. Anything that isn't secure or that gets decrypted on Gateway can be read by the attacker if the attacker has root access on Gateway. The attacker also can read much of that simply by having access to your account on Gateway even without root access on Gateway.
Before connecting to the tunnel, you need to make sure you have Server's host public key registered as a key for localhost. If you tried to pull the public key out of Gateway's known_hosts file, the attacker can give you a bogus key, so you need to get the key another way.
Therefore, it's best to have Server's public key already. If you don't already have the public key, make sure to acquire it or the fingerprint for the key from a secure, trusted source. For instance, you could list the SSH key fingerprints for all of your servers on a secure Web page.
I suggest registering Server's public key in your known_hosts file under the real server name as well as under localhost. By registering under the real server name, you can figure out to which server a key belongs with the ssh-keygen command.
The following command checks your $HOME/.ssh/known_hosts file for a public key for Server. The command also reports the line number for the entry:
ssh-keygen -F Server
The entry then can be copied. By replacing the hostname portion of the copied entry with localhost, you create an entry for that key on localhost. See the Obtaining the Public Key sidebar for information on how to obtain a server's public key securely.
Obtaining the Public Key
The public key for a host is usually in either /etc/ssh/ssh_host_rsa_key.pub or /etc/ssh/ssh_host_dsa_key.pub, depending on the type of key the host uses. You also can get the public key out of the known_hosts file of a computer you can trust. For instance, if you normally connect to the server from your work desktop, you could copy the entry for server out of your work desktop's known_hosts file.
Your site also might publish SSH public keys or public key fingerprints via a secure Web page or via DNS entries.
If your known_hosts file has hostnames that look like the keys, you have hashed hostnames. Use the -H option to ssh-keygen to hash your new localhost entry. The following command translates plain-text hostnames in your known_hosts file to hashed hostname entries:
ssh-keygen -H
Now with the tunnel set up, you can connect to SSH on Server, and because it's an SSH connection, it's encrypted:
ssh -p 3333 localhost
Again, localhost here is from Netbook's perspective, so that command connects to port 3333 on Netbook. The last SSH “tunnel” command created a tunnel from that port over to the SSH port on Server via Gateway—meaning that this command uses the tunnel to connect to Server's SSH server via port 3333 on Netbook.
Even though the tunnel passes through Gateway, it is unreadable by Gateway. Just as SSH connections normally travel across untrustable routers, yet are secure, the connection through Gateway to Server is secure. The SSH connection via the tunnel is never unencrypted on Gateway, so the attacker can't compromise it. But again, remember to have verified the host key for Server already, or the attacker can compromise the connection with a man-in-the-middle attack.
With the connection to Server, you now could set up a SOCKS proxy to allow applications running on Netbook to be effectively on your work's network. See the SOCKS Proxy sidebar for more information.
SOCKS Proxy
OpenSSH can set up a SOCKS tunnel when called with the -D option to contact services on Server.
One example would be to use the FoxyProxy add-on for Firefox to direct requests for Intranet servers to use the SOCKS tunnel. The http requests then would be sent from Server and would be able to contact Web servers on the Intranet. One such server could be a trouble-ticketing system to allow you to report that Gateway has been compromised.
The following command, when given on Netbook, would use the tunnel to Server by connecting to port 3333 on localhost and then create a SOCKS proxy on port 1080 of Netbook:
ssh -p 3333 -D 1080 localhost
FoxyProxy then could be configured to proxy Intranet requests via port 1080 on localhost.
If Netbook has a public IP, you also can set up a reverse tunnel from Server to Netbook. The reverse tunnel allows you to connect to Netbook from Server and then connect back to Server via the reverse tunnel. If the reverse tunnel doesn't need to go through Gateway, you then could take Gateway down for investigation and repair while still being connected to the internal network. See the Reverse SSH Tunnel sidebar for more information about reverse tunnels.
Reverse SSH Tunnel
A reverse tunnel is just like the tunnel we set up with -L, except it allows the destination machine to connect to the client machine.
In the example from this article, you can create a reverse tunnel from Server to Netbook allowing Netbook to reconnect to Server. The following command, when run from Server, connects to Netbook and creates a tunnel from port 4444 on Netbook to the SSH dæmon on Server. Any shell on Netbook then can connect to Server via port 4444:
ssh -R 4444:localhost:22 Netbook
The following command, when run from Netbook, would connect to Server via the reverse tunnel:
ssh -p 4444 localhost
If the outbound connections from Server don't go out via Gateway, the reverse tunnel can be used even after Gateway is shut down.
I suggest running the SSH command from within a screen session on Server to make sure the controlling shell doesn't exit.
Connect to your possibly compromised machine, Gateway, and create a tunnel to the machine you ultimately want to reach, Server. Once the tunnel is up, use it to connect to SSH on Server:
ssh -a -N -f -L 3333:Server:22 Gateway
ssh -P 3333 localhost
Reminders:
Don't forget to block authentication agent forwarding.
Don't forget to specify remote user names if you need them.
Use a port above 1023 if you're not connecting as root.
Make sure to have confirmed SSH host keys previously.
Add the host key to your known_hosts file as an entry for localhost, because SSH will see the connection as being to localhost.
Use -D to create a SOCKS proxy.
None of the commands in this article require root access. All would work from your own account.
The attacker can block the connection and can control the connection to Gateway, but the attacker can't compromise the connection to Server.
Any SSH connection across the Internet is crossing questionable hosts/routers. If those were safe, you wouldn't need a secured connection. The tunnel is the same scenario, because it's just enabling a normal SSH connection.
Resources
OpenSSH: www.OpenSSH.org
OpenSSH Manual Pages: www.OpenSSH.com/manual.html
Free Software Stammtisch: www.LuftHans.com/Free_Software_Stammtisch
FoxyProxy: https://addons.mozilla.org/de/firefox/addon/15023?src=api
der.hans is Vice President of Engineering at a startup in stealth-mode, cofounder of TwoGeekTechs, founder of the Free Software Stammtisch, an adjunct instructor at a local community college, Chairman of the Phoenix Linux Users Group, strategic advisor to TEDxPhoenix and founding member of League of Professional System Administrators (LOPSA). In his free time, he likes to go camping, annually not set himself on fire and brag about his grandma's cheesecakes and Spätzle. He can be reached via Commerz+LJ@LuftHans.com.

