
Testing the Locks: Validating Security in a Linux Environment
Many of you think you have a secure environment. You follow best practices. You check your logs regularly. Then, something gets through and although it may not wreak havoc, you wonder how it happened. A lot of shops practice passive security by putting security measures in place and assuming they work based on logs, dashboards or other output. This practice is inadequate for today's security landscape. Administrators must take an active approach to security to combat threats effectively. Active security can be as simple as verifying a password policy or as complex as running a full-blown penetration test. Whatever approach you choose, it always is a good idea to test the locks periodically with a security assessment to make sure they work. The locks are items such as the operating systems, network, applications and most important, security policies that exist in your environment. With regular security assessments, you can gain confidence that your security measures are keeping the bad guys out.
This article covers a security assessment in four parts. The sections are organized in reverse order of what an actual attack might look like. By the fourth section, I bring everything together and explain how such an attack might occur. I recommended that before proceeding with any of the following tests, you get the approval of upper management or the owner of the network and/or systems you will be testing. To minimize further any risk to a production network/system, the following tests should be performed after production hours if possible.
To assist in this assessment, I use a prebuilt VMware virtual machine (VM) with the BackTrack distribution on it (available from remote-exploit.org). BackTrack is a comprehensive security auditing and testing platform with many tools preconfigured and ready to use upon the first boot. All the scripts and applications presented here should be run as root. Only the custom script in the first section should be run locally on a target machine. All other tools should be run from the BackTrack VM.
Let's begin by checking the locks at the local level. The included script (Listing 1) profiles basic settings to identify and weed out common misconfigurations. It is by no means a catchall to validate all of your security measures. The script has been tested on Red Hat- and Debian-based systems, and as such, output may vary from system to system. You also may need to customize the script for your own systems to ensure functionality. All output is placed in the /tmp/seccheck/hostname directory, where hostname is your locally defined hostname.
Listing 1. This script checks some common misconfigurations.
#!/bin/bash

mycompname=$(hostname)
mydir=/tmp/seccheck/$mycompname
myoutput=$mydir/secoutput.txt
mkdir -p $mydir

sl()
{
  SECTION=$1
  echo >> $myoutput
  echo **********$SECTION********** >> $myoutput
  echo >> $myoutput
}

echo ^^^^^^^^^^ START OF OUTPUT ^^^^^^^^^^ > $myoutput

echo -n Is this a Red Hat \(r\) or a Debian based system \(d\)?
read REPLY

case "$REPLY" in
  'r')
    yum list updates > $mydir/patchcheck.txt
    sl "Service Runlevels";chkconfig --list >> $myoutput
    sl "Auth Messages";cat /var/log/secure|grep failure >> $myoutput
    ;;
  'd')
    apt-get update
    apt-get -qs upgrade > $mydir/patchcheck.txt
    sl "Startup Services";ls -l /etc/rc2.d >> $myoutput
    sl "Auth Messages";cat /var/log/auth.log|grep failure >> $myoutput
    ;;
esac

sl "lastb Results";lastb >> $myoutput
sl "inetd check"; file -f /etc/inetd.conf && \
    echo "Are you using inetd? You should be using xinetd instead." \
        >> $myoutput
sl "xinetd Services";ls -l /etc/xinetd.d >> $myoutput
sl "hosts.allow";cat /etc/hosts.allow |grep -v "#" >> $myoutput
sl "hosts.deny";cat /etc/hosts.deny |grep -v "#"  >> $myoutput
sl "iptables output";iptables --list >> $myoutput
sl "SUID Files";find / -perm -4000 -print >> $myoutput
sl "SGID Folders";find / -perm -2000 -print >> $myoutput
sl "SUDoers";cat /etc/sudoers|grep "="|grep -v "#" >> $myoutput

echo -n "Do you want to capture Password Files"
echo -n " for an offline Password Check (y or n?)"?
read REPLY2

if [ $REPLY2 = "y" ]; then
     cp /etc/passwd /tmp/seccheck/$mycompname
     cp /etc/shadow /tmp/seccheck/$mycompname
     echo Your Password and Shadow folders have been copied to
/tmp/secheck/$mycompname
else exit
fi

echo vvvvvvvvvv END OF OUTPUT vvvvvvvvvv >> $myoutput
Rather than go line by line, let's look at the output of the script. The first prompt identifies the base distribution and checks for needed patches and then outputs this information to /tmp/seccheck/hostname/patchcheck.txt. After patch-checking, the main output file is created as /tmp/seccheck/hostname/secoutput.txt. The first section of this file lists the local services that run at startup. With this information, you can view and disable any unnecessary services. This section is followed by a listing of failed authentication messages along with the results of the lastb command (Figure 1). From these two sections, you quickly can determine whether the machine has been accessed by an unauthorized user.
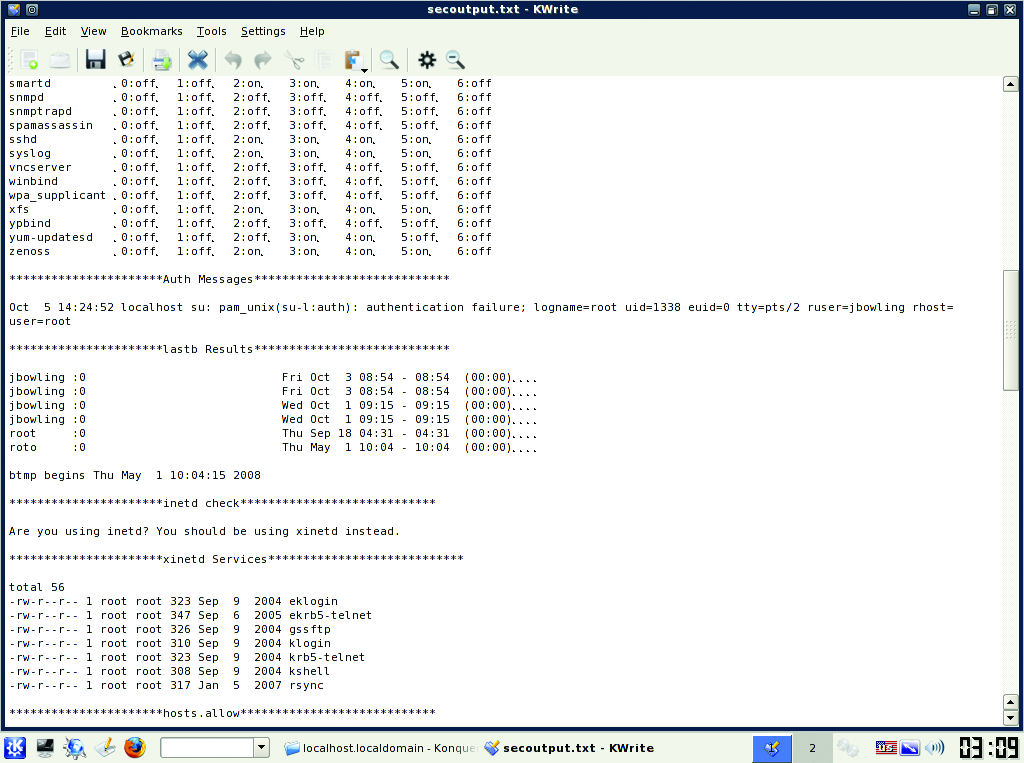
Figure 1. Some Output from the Local Script
Next, the script checks whether the inetd dæmon is in use. Most modern distributions no longer use the inetd super server, but some legacy systems still do. If possible, you should convert those servers/services to xinetd. xinetd-enabled services are listed in the section that follows. Both super-servers can provide host-based access control to specific services using TCP Wrappers. The access controls for TCP Wrappers are stored in the hosts.allow and hosts.deny files. The contents of these files are output after the xinetd section. If you use TCP Wrappers, there should be an entry in your hosts.deny that reads ALL:ALL to deny hosts that aren't allowed access explicitly. Local firewall (if used) rules are listed next.
Next, the script lists any SUID/SGID files and directories found on the machine. These files should be identified and their access verified, as they often are taken advantage of by rootkits. After that, the script concatenates a listing of the /etc/sudoers file. Users and groups found in the sudoers file can run as a super user (root) or any other user defined in the file. You should take stock of these users and verify they need sudo access.
Other good utilities/commands that could be added to this script, but have been omitted due to space considerations, are ps, top, mount, route, history, find / -perm 777 and testparm (Samba). If you use SELinux, you can run the getsebool -a command for confirmation of policy enforcement.
At the end of the script, you are prompted to copy the machine's local password and shadow files to the /tmp/seccheck directory, so you can transport them to the VM and perform a brute-force crack using John the Ripper later. After the script has completed, copy or burn the /tmp/seccheck directory to removable media for analysis on the BackTrack VM. Boot the VM, and log in with root and use “toor” as the password. After logging in, type startx to launch KDE. Copy the seccheck folder containing the password and shadow files from the removable media to the VM.
With the files local to the VM, let's run a brute-force password crack to test our password policies. Brute-forcing can be time consuming. You can speed the operation with the use of word lists, some of which are available from the john Web site. To start the crack with a basic brute-force, open a terminal on the VM and run the following command:
/usr/local/john/unshadow /pathtopasswdfile/passwd
 ↪/pathtoshadowfile/shadow > password.txt
This command combines the two files into the password.txt into a traditional UNIX-style password file. Next, run the following command from the terminal in your VM:
john password.txt
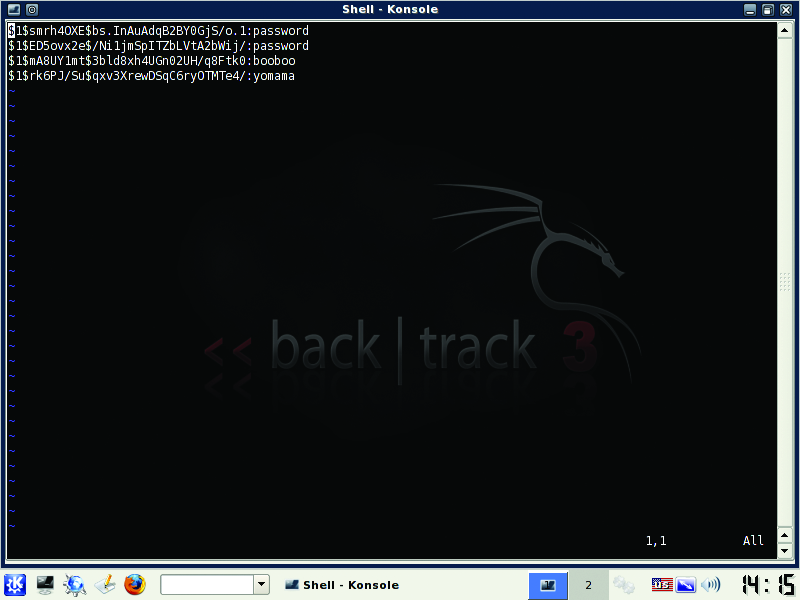
Figure 2. Hashes and Their Plain-Text Passwords Cracked by john on BackTrack
john will output its results to the terminal and also write to /usr/local/john/john.pot (Figure 2). One really nice feature of john is the ability to restart a terminated crack. If you need to terminate john for any reason, use Ctrl-C to end it. To resume it, type:
john --restore
Within a few minutes, you should see any simple passwords displayed. More complex passwords will take longer, based on various factors, such as complexity, system performance and the use of word lists.
Regardless of when you run john, you should review the secoutput.txt file thoroughly, document its findings and remedy any that fall short of our defined security policies.
The second set of locks to validate is on your network. Any comprehensive security assessment must include validation of your network's correct operation. There is no better way to validate this than by simple observation. The first tool to use for this is the Wireshark network protocol analyzer. Wireshark puts your network card in promiscuous mode and captures any traffic broadcast on your local network segment. It may be necessary to take samples on different parts of your network or use span ports to get a good representation of normal traffic.
To start the program, open a terminal inside the VM and type wireshark. Once open, click on the Capture menu and then on Interfaces. On the Interface options window, click Start next to eth0 to start the capture (Figure 3). If you use something other than the BackTrack VM to run Wireshark, you might select a different interface. Click on the Capture menu again, and then click Stop to end the capture. When finished, save the capture to a file. I recommend that you take captures of no less than five minutes at random times during the day. The capture files will be big (longer capture = bigger file) if you have a busy network, but in my experience, five minutes is enough for most small-to-medium networks. Scan the capture files to identify unusual traffic, and validate any network-level policies you may have in place. For example, many networked printers, by default, broadcast NetBIOS for discovery on Windows networks, but you may not allow NetBIOS traffic on your network. Captures also can help find rogue-user PCs or VMs running without approval. Many people are surprised the first time they run a capture. The shortcoming of captures is the time required to analyze them. That is where our second network tool, Snort, comes in.
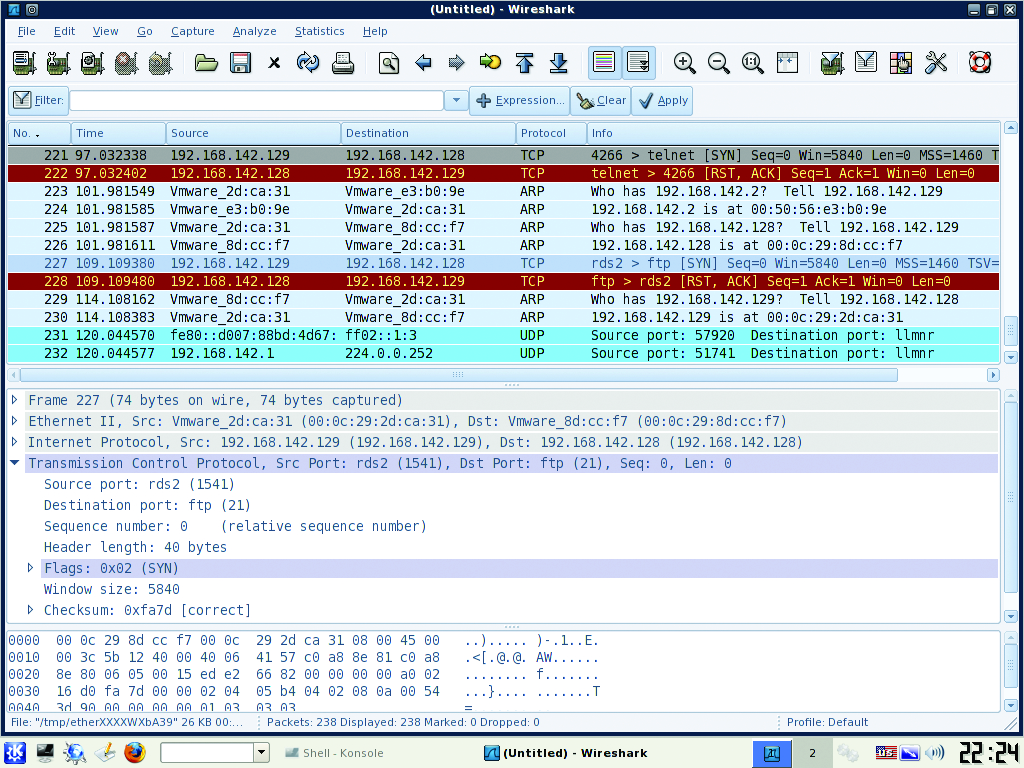
Figure 3. Wireshark analyzes all the way to the packet level.
Snort is many things, but traditionally it's used as an intrusion-detection system (IDS). An IDS patterns network traffic against a database of known attack signatures to alert administrators to potential intrusions. Unlike Wireshark, Snort aggregates and analyzes the data it collects providing a thousand-foot view of the network. When using Snort, you should be aware of two things: IDSes are sensitive to false positives, and they do not alert on normal traffic. Snort is useful as an assessment tool, because it can tell you whether there are any major problems on your network in a short amount of time.
The BackTrack team conveniently has packaged Snort with the BASE Web front end in the distribution. From the KDE menu, select Services→Snort→Setup and Initialize Snort. You will be prompted by the setup script to enter root and Snort user passwords for MySQL in order to create the needed tables. At the end of the script, open a Web browser and enter http://youripaddress/base/base_db_setup.ph, and on the page that loads, click on the Create Base AG button. Now, click on the Main Page link (Figure 4) to access alert information. Unlike Wireshark, Snort should be run over a longer period of time (more than 24 hours in most cases) to provide a good sampling of network data.
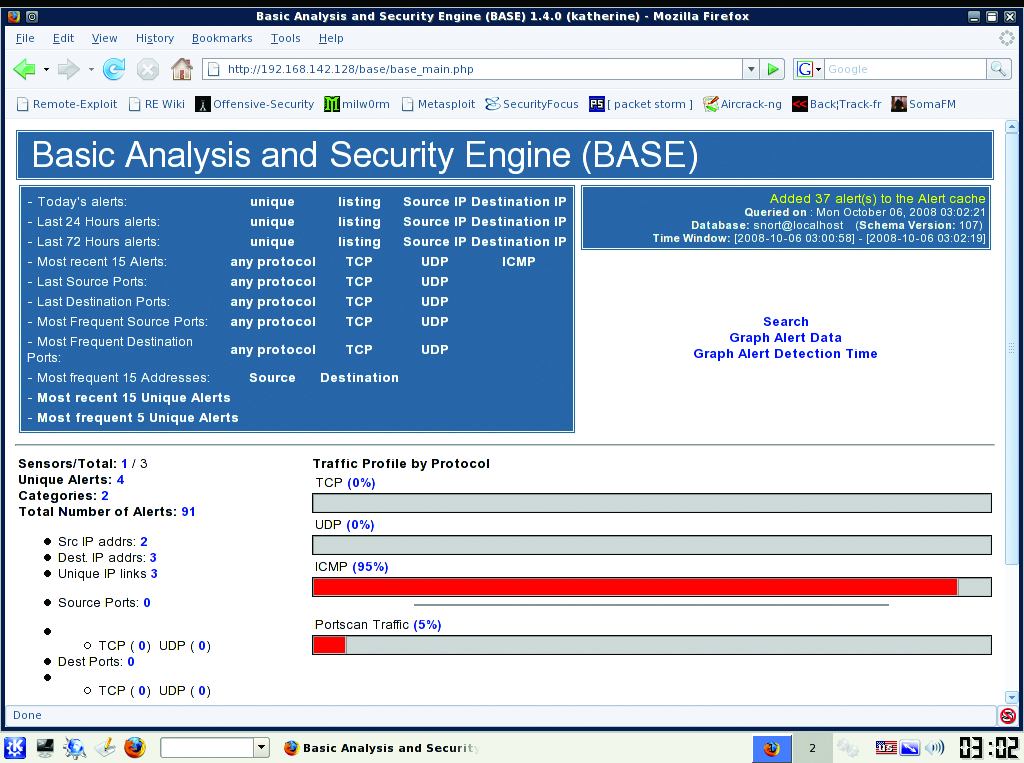
Figure 4. BASE makes Snort so much easier.
The third set of locks to test is found in the operating systems and applications on your network or, more specifically, in the vulnerabilities that exist on them. A reasonable approach to finding these vulnerabilities is to perform one or more broad vulnerability scans across the network, followed by any application-specific scans for our critical apps. Let's use the Security Administrator's Integrated Network Tool (SAINT) as our primary scanner.
SAINT normally allows only two IP addresses for scanning for 15 days, but BackTrack users can use up to ten IP addresses for up to a year by using the registration page found under the KDE menu: BackTrack→Vulnerability Identification→SAINT Exploit→SAINT Exploit License. From this Web page, click the Get License button at the bottom of the page and provide the necessary information on the registration page. Proceed with registration, and generate a key for use with the scanner. Once the key has been entered on the VM, launch SAINT from the same KDE folder as the License link, but click on the SAINT link instead. This launches the Web front end. Click the Scan Set-Up tab. Enter the IP addresses or range you want to scan (Figure 5). Under the Scanning Level section, check off Exhaustive and Full Port Scan. In the Firewall section, select No Firewall Support. You can play with any of these options to tailor the scans to your needs. Click Scan Now at the bottom of the page when finished. The results are displayed when the scan is finished (Figure 6). You should review and document the scan results, and wherever possible, remediate discovered vulnerabilities.
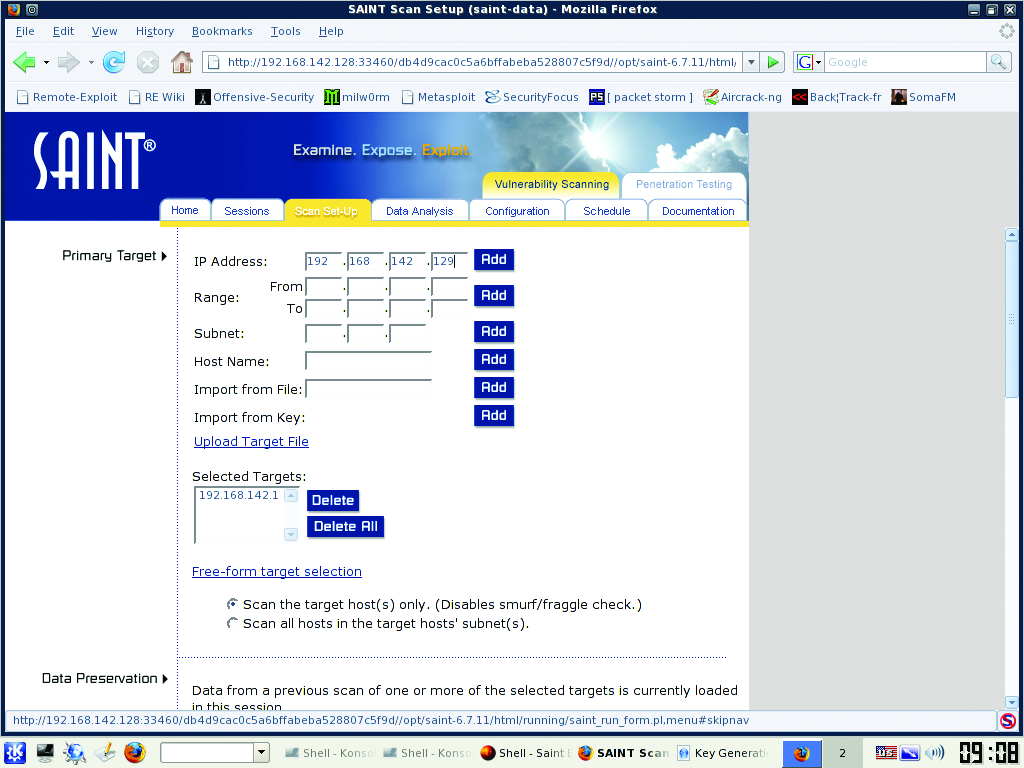
Figure 5. Adding Hosts into SAINT
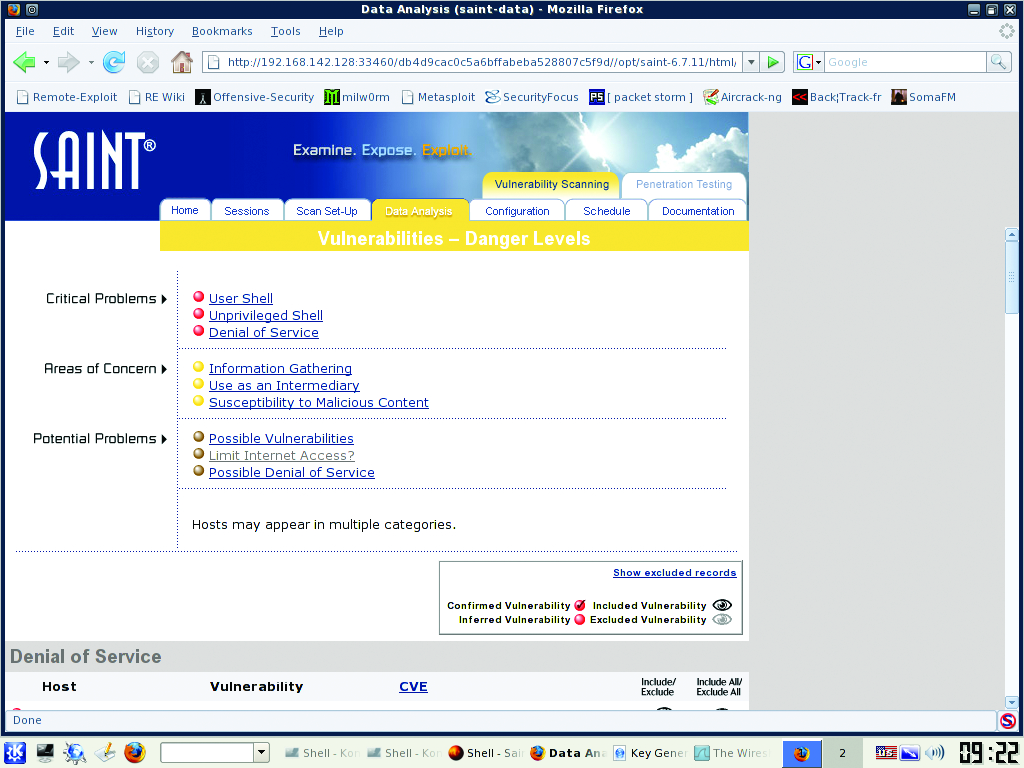
Figure 6. Results from a SAINT Scan
This broad scan with SAINT should be followed up with more specific scans against your most valuable (and therefore juicier targets) machines. As an example, let's scan a Web server using another tool found on BackTrack, Nikto. Nikto is a mature, simple scanning tool and an excellent resource for locking down a Web server. Assuming you have a Web server in your environment, launch a Nikto shell from the VM under the KDE menu BackTrack→Penetration→All→Nikto2, and from the resulting shell, type:
nikto.pl -h yourwebserveripaddresshere
As you can see, the output is straightforward and can be redirected to a file easily for later analysis (Figure 7). As with SAINT, you should follow up this scan by documenting the results and fixing any discovered issues.
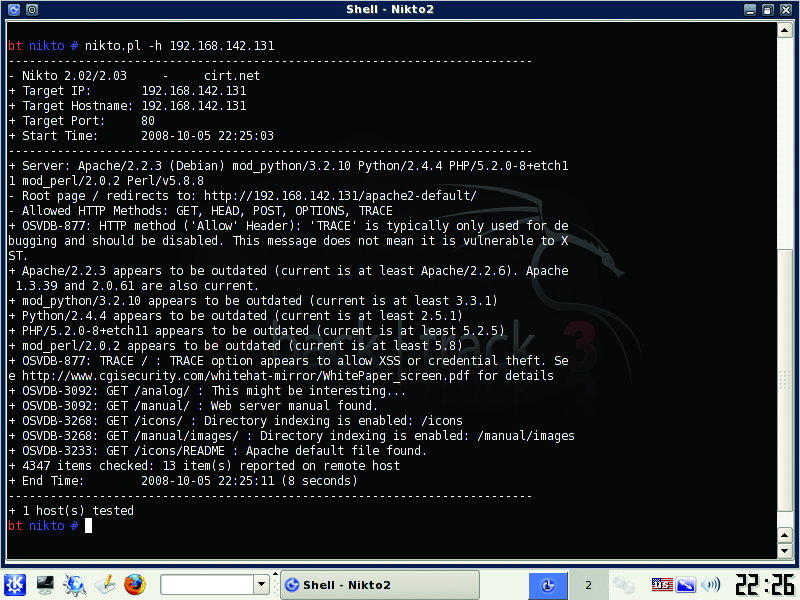
Figure 7. Nikto Scanning a Web Server
The last lock to test is, in many cases, the first entrance into your network, the perimeter. Let's test it by placing our VM outside the network and then performing a network map against our publicly facing IP address(es) to verify that only allowed services are allowed in or out of the network. We use the time-tested Nmap application for this role.
Although Nmap is on the BackTrack VM, you need to update to the latest version to use the handy new topology tab of the zenmap front-end GUI. Download Nmap from the project's site, and install on the VM with the usual ./configure, make, make install sequence. Type the command zenmap from a terminal to bring up the GUI. Enter a host, host range or network as the target, select Regular Scan from the Profile drop-down list and click on Scan. This performs a cursory scan of the host/networks and identifies open ports and other available information about the host, such as OS and app versions (Figures 8 and 9). Be patient; this process may take a while. Use Nmap's results to verify that only allowed hosts and services are accessible from the outside.
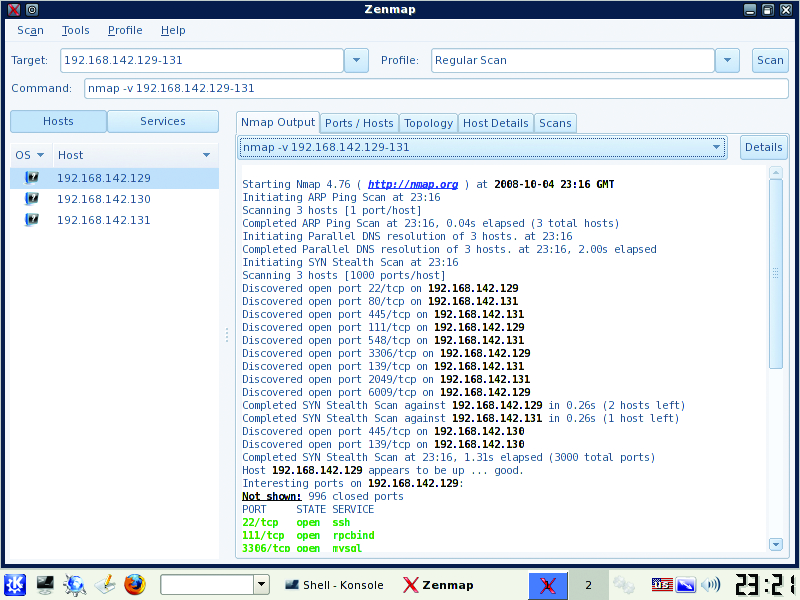
Figure 8. Nmap Results from a Regular Scan
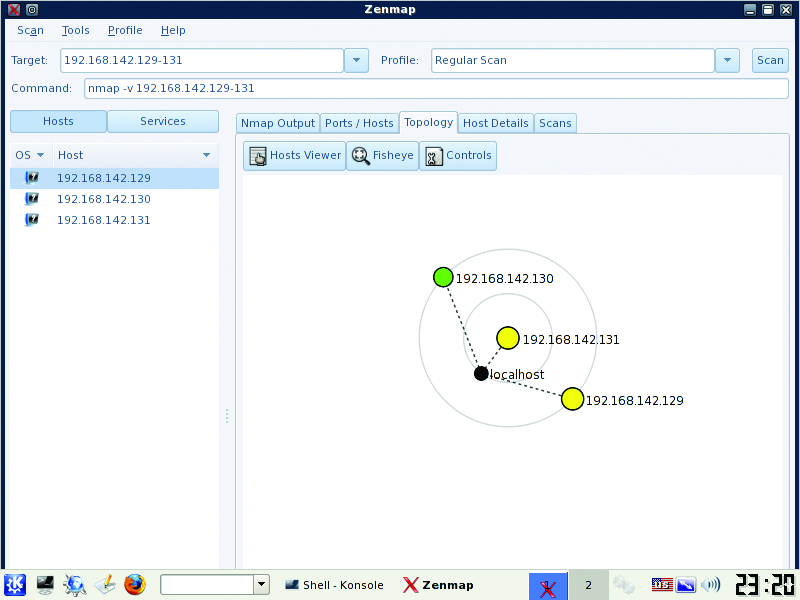
Figure 9. The Topology Tab of zenmap Visualizes a Map
After running Nmap, we can start to envision how an attack against our network might take place. Assume we can glean our network's external IPs from public DNS or whois records. With this information, we run a network map against those IP addresses and identify host OS and application versions. With map results in hand, we scan said hosts for vulnerabilities as discussed in section 3 of this article. If we are lucky, we find one and run an exploit against it to take control of the box. If all we wanted was to own the box, mission accomplished. But, if we wanted to own other hosts or the network, we might begin a new map from the inside or sniff with a tool like Wireshark from the owned box. If we passively sniff traffic instead of map, we are less likely to set off any IDS alarms. At that point, we notice SSH traffic to a particular machine, so we attempt to gain a remote shell against it. Hopefully, there aren't any glaring openings in our local configuration, as we checked for in section 1, or we might lose another box or boxes.
Although this is not a standard blueprint for attack by any means, it is a possible avenue for attack. There are too many methods, techniques, hacks, cracks and attacks to document at length here. By performing regular assessments like the one shown in this article, we can lower the risk of attack, but not eliminate it. Unfortunately, it is a lot harder to play defense than offense. The bad guys do not focus on one aspect of security (or insecurity), and all they need is a single opening in the network, the OS or the application to be successful. Hopefully, after sampling the tools here, you can test your own locks and get the peace of mind that your network, your systems and your security measures work.
Resources
BackTrack: www.remote-exploit.org/backtrack.html
John the Ripper and Word Lists: www.openwall.com/john and www.openwall.com/wordlists
Wireshark: www.wireshark.org
Snort: www.snort.org
SAINT: www.saintcorporation.com/products/vulnerability_scan/saint/saint_scanner.html
Nikto: www.cirt.net/nikto2
Nmap: nmap.org
Jeramiah Bowling has been a systems administrator and network engineer for more than ten years. He works for a regional accounting and auditing firm in Hunt Valley, Maryland, and holds numerous industry certifications including the CISSP. Your comments are welcome at jb50c@yahoo.com.

