
Puppy Linux
It would be fair to say that the Linux landscape is somewhat cluttered with distributions, each offering a slight value delta to consider. So, I didn't expect to be evaluating yet another distro any time soon. Recently, however, I went hunting for an embedded Linux solution for small devices, and along the way, I stumbled on something that offers much more general value than what I was looking for—a Linux distribution called Puppy Linux (hereafter referred to as PL).
PL is getting a lot of attention and steadily gaining popularity, and it seemed worthy of further examination. At first glance, PL is a distribution praised for being small, fast and stunningly complete for its size—just as complete and secure as most desktop distributions. It also has the relatively unique distinction of being usable from live bootable removable media—CD/DVD or even a USB Flash device.
PL was developed and organized by Barry Kauler in 2003 as a fresh-start Linux Distribution Project—that is, it did not grow out of an existing distribution. Its goal and identifying characteristics have been consistent—offer a small, efficient distribution that doesn't sacrifice on user features or ease of use. PL's lightweight footprint makes it practical to use directly from a portable bootable image rather than needing to install it onto a fixed internal disk. In fact, PL can be booted and used effectively from any medium, ranging from a floppy disk to a network server.
To try PL, you need access to a CD/DVD R/W drive and disk writer software capable of burning ISO images and a host PC/laptop with the following:
Pentium II-class processor.
Removable media (CD/DVD or USB device).
BIOS that will allow the computer to boot from CD or USB—this device needs to appear before internal drives or other active boot options.
RAM: 128MB–256MB (at minimum).
Internet connection.
The machine I primarily used for testing is now a dedicated PL host. On the surface, this machine was ready for the scrap heap—a vintage Pentium III, 600MHz processor with 384MB of RAM. The PL community has suggested that a 100MHz-class machine with a minimum of 64MB of RAM will support PL. That may be, but I would expect it to be very tight and recommend more memory and a faster processor.
So what does the PL distribution contain? Given the size of the bootable image—the latest 3.0.1 release is smaller than 100MB—you might be surprised to see the completeness of PL. PL includes utilities and applications for anything a desktop user typically expects and needs to do—browse and communicate on the Web, view and manipulate digital photos and other media files, create documents, play games and so on. Specifically, the default core distribution includes the following:
Desktop control, filesystem browser and command-line console.
Choice of two X servers and the JWM (Joe's Window Manager).
Language interpreters: Perl, TCL/TK and the bash-compatible shell.
An assortment of media players and burners.
Office applications: word processor, spreadsheet and PDF writer.
Internet client tools: base Mozilla browser (Seamonkey), chat, FTP, e-mail, secure shell/Telnet, a wiki and a Web-authoring tool.
Network services, including an FTP server and firewall.
System administration utilities to manage and monitor disks/filesystems, job scheduling, printers, processes and memory usage.
Drawing/graphics applications.
A handful of games and dozens of utilities for managing PL's activities, life cycle and appearance.
Additionally available packages include:
Web server.
Gaim chat client.
GIMP photo editor and other image manipulation and viewing tools.
Additional development tools, including additional TCL/TK tools/libraries, Python and full bash 3.1 interpreters.
Additional media applications.
C/C++ compilers and libraries.
And, too many more applications to list here.
Not bad! And, you don't need to start with the standard core set of applications. Through a process documented under “Puppy Linux Unleashed” (www.puppyos.com/puppy-unleashed.htm), you can create a customized distribution from more than 500 packages designed to run under PL. The PL community puts the total number of available applications at more than 1,000.
Not just making a “puppy” quip here—if PL was able to configure your audio device during the boot process, you'll hear the sound of a gentle dog bark, “woof, woof”. If not, a sound wizard can be launched from Menu→Setup→Wizard Wizard to attempt a manual sound card setup.
The two most impressive things I discovered about PL was how quickly I able to have a functioning PL desktop and how well it performed. GUI applications launched instantaneously and seemingly without stepping on each other. For now, let's concentrate on getting PL running on the closest laptop or workstation.
Obtain a PL ISO image by downloading it from the Web or purchasing CD media. As it's smaller than 100MB, you can download it quickly over a broadband Internet connection. Or, you can purchase bootable media for a few dollars at www.linuxonline.biz/index.php?cPath=137_149.
The complete set of live ISOs and other PL artifacts are available at ibiblio.org/pub/linux/distributions/puppylinux. Higher-level information about PL offerings is available at puppylinux.net/download/downpage.htm. I strongly suggest using the latest release—3.0.1, at the time of this writing. It's a stable, much-improved release compared to 2.x: ibiblio.org/pub/linux/distributions/puppylinux/puppy-3.01-seamonkey.iso.
Now, write the ISO to a CD/DVD disk using an application that can deal with ISO images, such as K3b on Linux or Roxio on Windows. The primary files on the ISO needed to boot and host PL are the following:
vmlinuz—the kernel.
initrd.gz—a compressed RAM disk image used during the boot process.
pup_300.sfs—contains other system files packaged outside the RAM disk image (the largest file by far).
zdrv_300.sfs—contains a complete set of drivers and firmware.
I attempted to boot the PL media from every PC I could access—five laptops and three workstations. I didn't need to do anything special in any of these instances. Assuming the ISO image is burned correctly and your system is set up to boot from CD, you're ready to start your PL experience. If not, check the contents of the ISO through an explorer, and make sure the system's BIOS boot sequence includes the CD/DVD drive before other bootable drives. A desired BIOS boot sequence will be something like this:
USB—if available. An older system with USB interfaces may still not offer USB as a boot option. In that case, if you're interested in configuring a USB resident PL boot image, you might be able to resolve this by updating the BIOS.
CD/DVD.
Floppy.
Internal disk.
Network boot.
During the first boot process, PL automatically determines a lot about the underlying hardware, but it prompts the user for additional guidance. Once the X server and window manager are functioning, you'll see an initial desktop that looks something like what's shown in Figure 1.
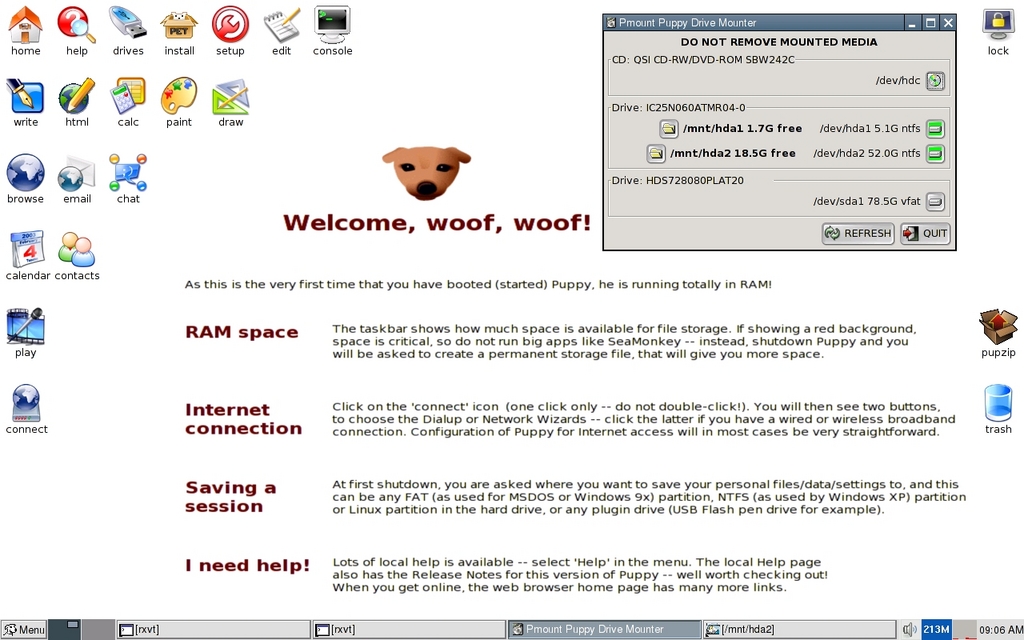
Figure 1. The Initial Puppy Boot Desktop—Complete with Coaching Text
PL now is ready to be used. Some devices need to be configured manually (through GUI utilities), and users likely will want to apply customizations, create data files and perhaps install additional packages. At the first graceful reboot or power cycle, users are asked where such data should be persisted between sessions, so subsequent reboots are typically non-interactive.
During the first PL boot, users are prompted as follows:
Screen 1: select keyboard layout locale (US is generally the default).
Screen 2: the Puppy Video Wizard prompts for two preferences:
Step 1: X Window System server choice, select X server. X.org is heavier-weight but more capable, and may not work well with older, more obscure video devices. This is usually the better choice. Xvesa is lighter-weight, has a fixed refresh rate and supports a narrower set of input devices. If X.org proves problematic, try Xversa.
Step 2: select screen resolution. Driven by the perceived capabilities of the discovered graphics card/monitor, a set of resolution choices will be presented, usually between 860 and 1,400+.
What's on the desktop? By default, the desktop launch icons for the commonly accessed applications are organized as follows:
Row 1: system setup and administration utilities.
Row 2: office-related applications, such as a word processor.
Row 3: network client applications, such as a browser and chat tool.
Row 4 (and below): personal tools, such as a calendar, contact organizers and multimedia tools.
Access to the complete set of applications is provided through the lower-left menu button. Here's an overview of its organization:
Desktop: basic desktop settings, window manager control, set time/date.
System: printer management, system monitoring, boot manager configuration.
Setup: application installation, network tools, remaster live PL media.
Utility: shell prompt, backup.
FileSystem: file browsing/searching, disk mounter.
Graphic: paint, graphics editing, screen capture.
Document: dictionary, word processor, Web authoring.
Calculate: calculators, personal finance.
Personal: Wiki, address book, password setting.
Network: firewall and other network services.
Internet: browser and all other network clients.
Multimedia: CD creation, photo, video and sound view and editing.
Fun: games.
Help: help topics and system documentation.
Shutdown: session control and restarting fundamental desktop services like the X Window System and the window manager.
The first thing you'll likely want to do after booting is launch the Puppy Disk Mounter. Refer to the upper-right section of Figure 1. It can be launched through the top-row drives icon. Notice that drive partitions hda1 and hda2 are mounted under the /mnt directory. The output of the df -h command shows the following:
Filesystem      Size      Used Available Use% Mounted on
tmpfs         219.9M      6.9M    213.0M   3% /initrd/pup_rw
tmpfs          77.9M     77.0M    916.0k  99% /initrd/mnt/tmpfs
/dev/loop0     77.0M     77.0M         0 100% /initrd/pup_ro2
unionfs       219.9M      6.9M    213.0M   3% /
shmfs          87.0M         0     87.0M   0% /dev/shm
/dev/hda1       5.0G      3.3G      1.7G  66% /mnt/hda1
/dev/hda2      50.9G     32.3G     18.5G  64% /mnt/hda2
Apart from the RAM Disk and shared memory entries, notice the two drive partitions under /mnt. The very next thing you'll want to launch is the Internet Connection Wizard through the Connect Globe desktop icon (lower-left section of Figure 1) or the Menu→Setup→Network Wizard. This lets you configure and set up a cabled or wireless network interface. For example, you'll probably configure the eth0 interface to obtain an address automatically through a DHCP server. You need to do this only once—network settings can persist across sessions (Figure 2).
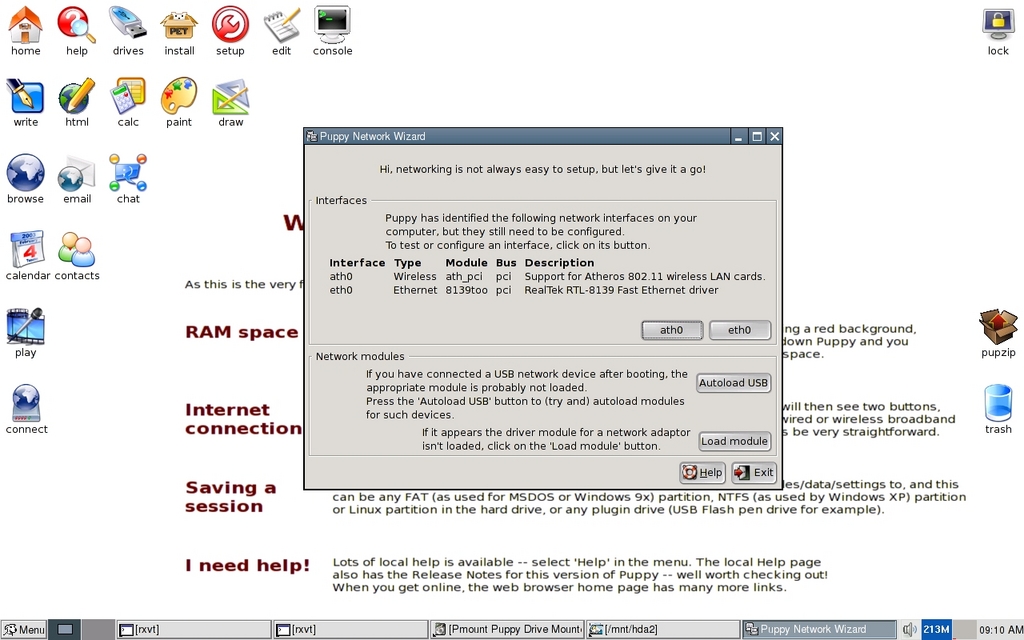
Figure 2. Network configuration made easy.
If you select a wireless interface (such as ath0), use the Scan button in the next dialog box to locate your network. Again, you'll probably want to select Auto DHCP. Once a network interface has been configured, you can test basic network access by launching the browser, chat client or other network application. Then, you can choose to install any additional packages to suit your needs. The launched PETget Package Manager is shown in Figure 3.

Figure 3. Managing Applications with PETget
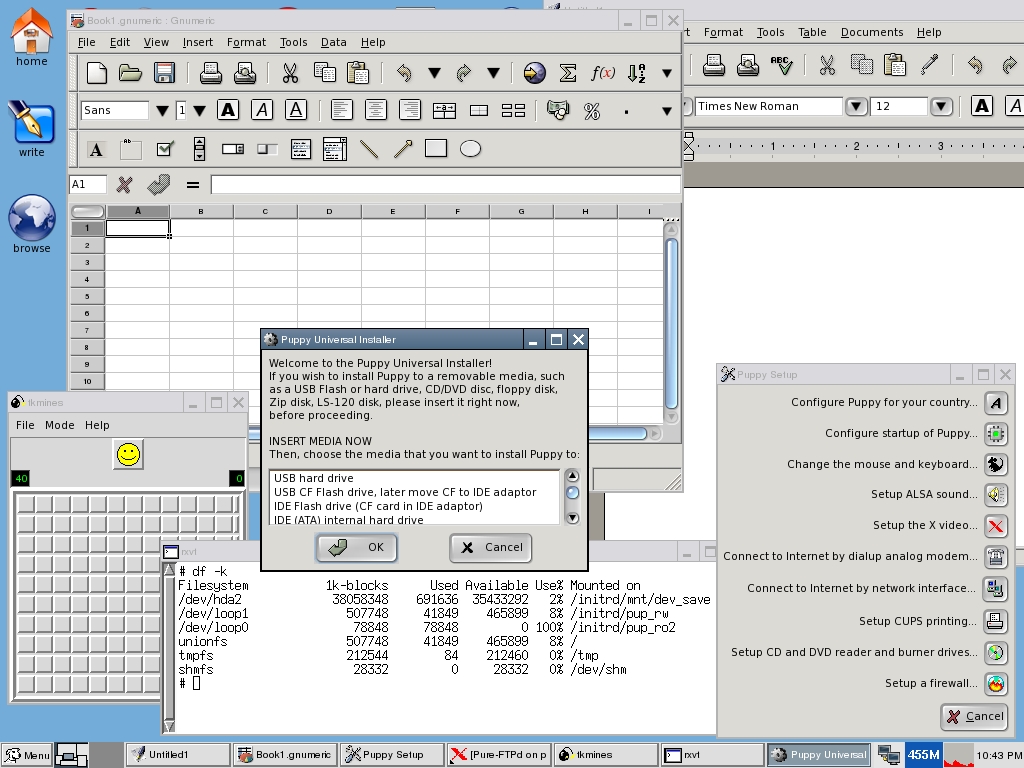
Figure 4. Puppy Linux at Work
PETget is very straightforward to work with. Typically, it's used to download updates and additions from the network (using wget), and it finds and resolves dependencies fairly seamlessly. The PETget operations can be very interactive, and the dialogs present a lot of information. Be sure you understand what's being installed or updated, and that you'll need to restart the window manager (Menu→Shutdown→restart-JWM) before new applications are added to the Menu button structure. Also, depending on what's been installed, because so much of the runtime is maintained on the RAM disk for efficiency, the system may need to be rebooted. So, take time to read the PETget dialogs.
Just as noteworthy as the first boot is the first terminated session. Here's some detail on a sample interaction the first time the system is rebooted or powered down:
Screen 1: save changes to file: Yes/No. Specify yes if you want the changes you've applied to be carried to subsequent sessions.
Screen 2: if you've decided to save your changes, you'll be asked for a target—what mounted filesystem or removable media?
Screen 3: by default, your working session data is saved to a standalone ext2 filesystem file called pup_save.2fs. You'll be given an opportunity to override this name.
Screen 4: apply encryption—choices are none, weak or strong. If you're saving data you care about on removable media, it might make sense to select an encryption level, allowing you to assign a password, which you'll need to provide at subsequent boots.
Screen 5: specify an initial size for the standalone ext2 filesystem file that will contain PL customization data; 512MB is the default and recommended size, but larger is better.
Screen 6: if you're saving the session data on faster media than the boot CD/DVD (such as an internal IDE drive), you will be given the option of saving some PL runtime files to speed up the boot process going forward.
Screen 7: review/confirmation—opportunity to change details or cancel.
On subsequent PL boots, you'll notice a few differences. (You need to attach removable media if that's where your customizations have been saved.) You'll find that PL has maintained its network configuration (assuming it was saved), the initial desktop (Welcome, woof, woof!) has been replaced with a plain-color backdrop, the applications you've installed are now accessible through the Menu structure, and an additional filesystem has been mounted under /initrd/mnt/dev_save. As before, all mounted devices appear under /mnt. See the updated output of df -h below:
Filesystem      Size      Used Available Use% Mounted on
/dev/hda2      50.9G     32.9G     17.9G  65% /initrd/mnt/dev_save
/dev/loop1    495.8M     73.3M    422.5M  15% /initrd/pup_rw
tmpfs          77.9M     77.0M    916.0k  99% /initrd/mnt/tmpfs
/dev/loop0     77.0M     77.0M         0 100% /initrd/pup_ro2
unionfs       495.8M     73.3M    422.5M  15% /
tmpfs          55.0M     96.0k     54.9M   0% /tmp
shmfs          46.1M         0     46.1M   0% /dev/shm
For convenience, a symbolic link to /initrd/mnt/dev_save has been created at /mnt/home. This is the where all system changes and other PL-specific data have been persisted as per your first reboot. On my dedicated PL host, the contents of /mnt/home appear as follows—it's basically the entire contents of my hard drive:
Downloads RJE  junk  lost+found   notes zdrv_300.sfs   LJ
pup_300.sfs  pup_save.2fs
PL depends on the following files to persist user data across sessions and perform better:
pup_save.2fs: the standalone ext2 filesystem containing all session data—that is, cumulative changes applied to the base system.
zdrv_300.sfs and pup_300.sfs: the embedded 300 refers to the release. These two files were copied to the hard drive at the end of the first session. They also reside on the PL-bootable ISO image, but having them here allows the system to start and operate more efficiently.
PL will never access or modify any file other than the PL-specific files on its own.
Given its basic features and content, several potential niches immediately come to mind, even without exploring beyond the surface material covered here.
PL can be used as a portable computing environment. There's something very intriguing about carrying a computing desktop around on a key chain in a shirt pocket. PL's Universal Installer can remaster a current system snapshot on a USB drive (providing it's large enough), and that carry-along drive can be used to boot your customized PL and user data onto any PC that's capable of booting from a USB device. An overview of the USB setup process is available at www.pendrivelinux.com/2006/03/25/puppy-linux-on-usb.
If Windows or some other installed OS becomes inoperable, that could present an untimely dilemma—making your basic desktop services unavailable and blocking access to the data residing on the system drives. Booting PL from removable media and gaining access to those drives provide the core of a data recovery tool and a temporary (at the very least), usable desktop environment. Even if you're not dealing with an emergency now, it's a good idea to obtain and test a bootable PL image just to make sure you can boot it and see your system devices—your internal disks, the network and removable media devices. You'll be that much closer to data recovery and/or a functioning desktop platform should an emergency arise.
PL would be an excellent framework for any academic coursework that revolves around software development, system internals or small device control and the like. Advanced PL customization topics are well documented at puppylinux.net/puppy-unleashed.htm. A base PL image can be assembled from scratch and can be as inclusive or limited as your requirements dictate. Meanwhile, for those assignments that call for digging deeper into PL, kernel configuration/build-related topics are available at puppylinux.net/development/compilekernel.htm.
As I mentioned previously, my dedicated PL host was a proverbial paperweight. What modern OS could I practically operate on a Pentium III-class machine with “matching” resources? PL provides an excellent vehicle for getting these vintage platforms working again. Thinking more globally, this inexpensive platform (PL plus older generation hardware) can put a lot of computing power in the hands of people who might otherwise have none. Considering that this rich, but free, OS can operate reasonably well on seven- or eight-year-old hardware, PL presents some interesting opportunities. There are efforts abound to address the so-called digital divide, and PL can be a facilitator both locally and worldwide. Nonprofit organizations, less-affluent educational institutions and all individuals sensitive to technology costs would be excellent PL candidates.
I haven't noticed anything that would necessarily make PL a bad choice for general-purpose desktop needs—providing you feel comfortable with a few manual configuration steps (which is often the case with most distributions anyway) and installing a few desired packages that might be excluded in the default distribution.
I see some potential here, and I would wager that PL continues to gain more attention and popularity. PL's agility and surprising completeness make it far from a one-trick puppy (okay, that'll be the last silly puppy quip). Given what PL offers, the ease of getting started and the almost stunning performance on vintage hardware, there is something here worth watching. A common experience in a desktop upgrade path is obtaining more powerful hardware, only to experience the same or slightly better performance. Imagine going the other way—regressing several generations of hardware and realizing better performance.
Who should test-drive PL? If you were interested enough to read through this material, you're a good candidate. It requires a small investment of your time and none of your money. And, its usefulness as a data/system-rescue utility is something every desktop user should keep in mind.
This article represents information that I was able to glean after kicking the tires for 40 odd hours—taking PL in directions that interested me. For completeness, I'll offer a bit of subjective criticism. PL is not a flawless desktop. I thought a few utilities could use a face-lift as they presented screens that looked a bit toyish—long on text and short on intuitive functionality. Because of that, there were a couple instances when I felt I either experienced a minor bug or committed a pilot error—couldn't really be sure. That's forgivable, because overwhelmingly, things worked as expected and as documented on the first attempt. I'm sure noticeable kinks will be addressed over time. For now, PL may very well stand alone within its sweet spot.
Resources
Puppy Linux: www.puppylinux.com
PL Distribution Home Page: www.puppylinux.org
PL FAQ: puppylinux.com/faq.htm
PL User Manuals: puppylinux.com/manuals.htm
PL Discussion Forums: www.murga-linux.com/puppy
PL for Developers: puppylinux.com/development/developer.htm
PL News: www.puppylinux.org/wikka/LatestNews
PL Video Tutorials: rhinoweb.us
PL Media Purchase: www.linuxonline.biz/index.php?cPath=137_149
Louis J. Iacona has been designing and developing software since 1982, mainly on UNIX/Linux platforms. Most recently, his efforts have focused on Java/J2EE-implemented solutions for enterprise-scoped applications and leveraging virtualization techniques. Louis is currently on assignment at HP Software in Paramus, New Jersey, and can be reached at louis.iacona@verizon.net.

