
Playing with the Player Project
We've all heard that PC-based computers have increased in power and decreased in size, power consumption and cost. These improvements mean more people have access to them, but also that PCs are becoming more suited to being the brains of a mobile robot. It brings to robots a number of advantages, such as USB connectivity, greater memory capacity, more powerful processors and even allows for plugging in a mouse, keyboard and monitor to debug your robot on your robot. The largest cost associated with the choice of a PC-based robot, besides the dollar cost, is power consumption.
Programming your PC-based robot can be a little different from programming a robot that uses a smaller, embedded processor. As you would expect, PC-based robots can take advantage of programming features, such as threads, using multiple languages and leveraging third-party libraries to perform complex tasks.
One such third-party library is the Player Project. The Player Project is a framework for building robot-control software. It provides a wide-reaching infrastructure that gives you a network protocol, data serialization support, a message loop and supports a large number of common off-the-shelf components, such as Webcams, laser range finders, RFID, GPS devices and interface boards. It even supports a large number of commercially available robots, and some robot manufacturers, such as CoroWare, provide Player drivers for their robots. And, of course, it's open source.
The newest version of Player runs on the majority of Linux distributions with little effort. It is also cross-platform, with version 3.0 supporting Microsoft Windows and even Cygwin under Microsoft Windows. It has low memory requirements and is pretty easy on your CPU. Although it's not completely cross-language, it does offer native support for C and C++, and has nice Python and Ruby interfaces.
You don't really need a real robot to work with Player. If you have a few sensors and actuators that you can connect to your laptop or desktop computer, you still can run the Player server and control those disembodied devices—think of it as a way to accomplish home automation. Player also can be used with some of its close cousins: Stage (a 2-D simulation system that integrates with Player) and Gazebo (a 3-D simulation system that also integrates with Player). In this way, you can simulate a full robot, or even a fleet of robots, without any special hardware.
Several layers of the infrastructure are diagrammed in Figure 1, which should be familiar if you have written code that interacts with hardware devices.

Figure 1. The relationship between Webcam hardware, the driver that interfaces with it, the device created by the driver and the interface that it exposes.
At the lowest level, we have the hardware layer. This corresponds to the hardware that embodies the sensor, actuator or any other physical component of the robot. The driver level sits on top of the hardware level. This is one layer where a programmer writes code. For example, a driver that interacts with a USB Webcam will provide whatever code is necessary to make a connection with the camera, read the sensor's output, package it up neatly and make it available to the rest of the system. A lot of drivers of this type are provided with Player as static drivers. This means you won't have to provide any special shared object libraries to use them, just the usual Player libraries. You also can write your own drivers, called plugins. The code for these drivers lives in a shared object library (.so file).
You can create multiple instantiations of a single driver. When you do this, you need a way to refer to a specific instance. For example, if your robot has two cameras, one facing forward and one facing backward, you will need to tell them apart to know in which direction you are driving. In order to do this, Player gives you the concept of a device. Each time you instantiate a driver, you assign it a device name and number. For example, in your robot, camera:0 might refer to the forward-facing camera, and camera:1 might refer to the backward-facing camera.
Finally, we arrive at the concept of an interface. The interface is just like the API for a software package; it defines the software interfaces for getting data out of and putting data into the device. In our example, the camera interface defines a set of messages to get images out of the camera, and a set of messages to set up the camera and capture images.
Drivers don't have to exist solely for communicating with a piece of hardware. Player supports a number of algorithmic drivers, such as blob-finders or wavefront planners, or even camera image compressors. These operate just like normal drivers, consuming and producing data and exposing interfaces.
Now that we have dealt with the vocabulary, we can get down to business. Let's say you've just acquired a CoroWare CoroBot robot (Figure 2). You've installed Player, and you want to make the robot do something interesting. You can type player corobot.cfg to run the Player drivers on the robot. This loads a configuration file that describes all the drivers Player must load to make your robot work. Here's an excerpt of a configuration file for the CoroBot:
driver
(
  name       "corobot"
  plugin     "libcorobotdriver"
  provides   ["position2d:0" "power:0" "ir:0"
              "limb:0" "gripper:0" "ptz:0"]
  requires   ["aio:0"]
  ssc32port  "/dev/ttyS1"
  ptzport    "/dev/video0"
)

Figure 2. CoroWare Robot
We start off by telling Player that we are constructing a driver. The first two lines in the driver description tell Player where it can find the relevant code: the name line indicates the name of the driver in the code (a single library can supply multiple drivers), and the plugin line indicates the name of the shared object library that contains the code for this driver. In this case, it is stored in libcorobotdriver.so, in the same directory as the configuration file. The provides line specifies the devices that this driver makes available—in this case, the CoroBot driver exposes six devices. The requires line specifies the devices that this driver will consume. If any devices here are not present on the system when Player tries to instantiate the driver, Player will abort.
The last two lines in the driver description are not standard. Any driver is free to parse its driver description and make use of special identifiers. The CoroBot driver uses two of these: ssc32port specifies the Linux device (a serial port) through which it will communicate with its servo controller and a video device that controls its pan-tilt camera.
Player provides a number of tools to make working with Player easier. For example, you can use the playercam program to view the image provided by a Webcam. Let's say you have Player installed on your computer and a simple configuration file that brings up a camera driver:
driver
(
    name     "camerauvc"
    provides ["camera:0"]
    port     "/dev/video0"
    size     [640 480]
)
You can run Player with this configuration file with player camera.cfg, and then run playercam to see the camera image in real time (Figure 3). If your Webcam is on another computer—for example, on a PC-based robot—and connected by a network, you can just as easily see the Webcam output by running:
playercam -h hostname -p port
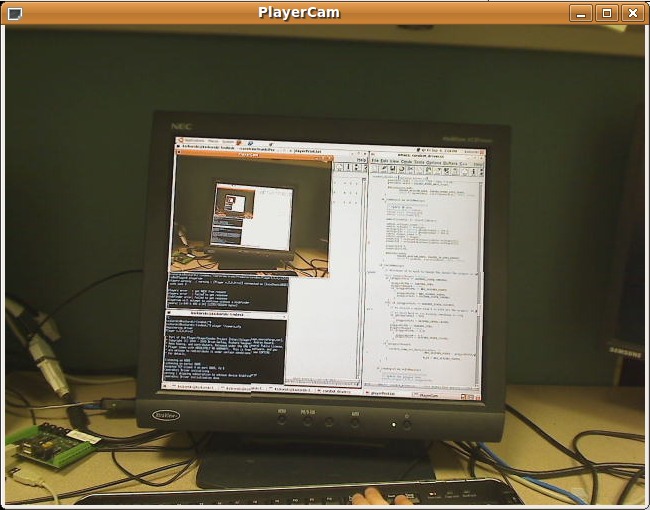
Figure 3. Player's playercam Tool, with the Webcam Pointed at the Computer Monitor
playerprint is a tool that works much like playercam, displaying the output of a device to the user. But, playerprint does this textually and can support a large number of interfaces, while playercam can support only the camera and blob-finder interfaces. For example, if we have a CoroBot running its Player drivers, we can display its infrared sensor readings with:
playerprint ir -h hostname -p port
Listing 1. Player's playerprint Tool Inspecting a GPS Device
#GPS (13:0)
#lat|long|alt|utm_e|
utm_n|err_horz|err_vert|num_sats|quality
47.6470103 -122.1414822  112.3      564477
5277425.1      0      0   6   1

#GPS (13:0)
#lat|long|alt|utm_e|
utm_n|err_horz|err_vert|num_sats|quality
47.6470107 -122.1414812 112.28   564477.07
5277425.14      0      0   6   1

#GPS (13:0)
#lat|long|alt|utm_e|
utm_n|err_horz|err_vert|num_sats|quality
47.6470113 -122.1414807 112.28   564477.11
5277425.21      0      0   6   1
Player also lets you control your robot, not just inspect it. playerv is a utility that also knows how to interact with many interfaces. Once you have started the Player server on your robot, you can run it with playerv (if you are on the same machine) or playerv -h hostname -p port (if you are on another computer). playerv will show a graphical display of the world around your robot, but it does not automatically connect with any devices. You will have to go to the Devices menu, and subscribe to the devices that you are interested in playerv plotting. In order to drive your robot around, you'll want to subscribe to the position2d device and select the option to “command” the interface. Then, you will be able to drag a small targeting reticle around the window to drive the robot (Figure 4).

Figure 4. Player's playerv tool running on a CoroBot after subscribing to the IR and position2d devices. The large triangles are the cones shown to be obstacle-free by the infrared sensors.
So far, our robot is awake, alert and ready to be told to do something interesting. Let's give it something to do. The CoroBot robot comes with a number of sensors and actuators—probably the easiest of which to interface with are the front- and rear-facing infrared ranging sensors and the mobility base's drive motors. Thus, we can write a small C program to talk to the Player server, read the IR sensors and drive the robot until it is 10cm away from an obstacle in front of the robot.
The first thing we have to do to interface with the Player server is open up a connection to it. For the sake of brevity, we will skip a lot of error checking, but you can download the full version of the code from the LJ FTP server (see Resources).
This code defines the variables we will use to talk to the Player server and the device interfaces in which we are interested:
#include "libplayerc/playerc.h"
static playerc_client_t*      clientHandle;
static playerc_position2d_t*  positionProxy;
static playerc_ir_t*          irProxy;
The clientHandle is used for talking to the Player server itself. The second position2d interface talks to the position2d interface, providing us with encoder information about how the wheels are moving and allowing us to send motor commands to the robot. We'll ignore the encoder information for this example. Lastly, the IR interface gives us information about the distances that the robot's IR sensors are reporting.
The next code snippet uses these proxies to interface with the server and these devices:
playerc_client_connect(clientHandle);

// convert our interface to a PULL interface,
// only updates when we read
playerc_client_datamode(clientHandle, PLAYER_DATAMODE_PULL);

// tell the robot to drop older messages
playerc_client_set_replace_rule(
       clientHandle, -1, -1, PLAYER_MSGTYPE_DATA, -1, 1);

// create the position proxy (controls the motors)
positionProxy = playerc_position2d_create(clientHandle, 0);
playerc_position2d_subscribe(positionProxy, PLAYER_OPEN_MODE);

// create the IR proxy (controls the IRs)
irProxy = playerc_ir_create(clientHandle, 0);
playerc_ir_subscribe(irProxy, PLAYER_OPEN_MODE);
We start off by connecting to the Player server and configuring our connection. We want to get new messages from the server only when we are ready for them, so we configure the connection for a pull-type arrangement. And, because we want only the most recent information (we don't care what the IR sensors were indicating a second ago, we care about what they are saying right now), we tell the server to report only the most recent data. If we really wanted, we could let Player ensure that every IR message was delivered, but that might result in getting less-than-fresh data and possibly driving into a wall.
After our connection is configured, we open up the position2d interface on the Player server and subscribe to it. Then, we do the same with the IR interface. So far, so good. Now we need to get the state of the IRs from the robot and tell it how to move the motors:
while (!timeToQuit) {
  // attempt to read from the client
  if (playerc_client_read(clientHandle) == 0)
    continue;      // nothing to read, try again.

  // read the IR distances and verify we have good data
  if (irProxy->data.ranges_count == 2) {
    frontIr = irProxy->data.ranges[0];
    rearIr  = irProxy->data.ranges[1];
  }

  // figure out how to drive
  runController(frontIr, rearIr,
                &desiredTranslation,&desiredRotation);

  playerc_position2d_set_cmd_vel(
      positionProxy, desiredTranslation,
      0, desiredRotation, 1);
}
Each time through the loop, we try to read the newest data from the robot. After a little sanity checking, we take the ranges reported by the IR sensors and feed them into a controller function. This controller does some magic processing (we'll talk about that later) and returns information on how we should drive the robot. Finally, we pass these driving commands back to the Player server and start it all over again.
All that's left now is to provide a runController function that maps from IR sensor readings to drive commands. The CoroBot driver accepts numbers in the range of –1.0 to +1.0 to tell how to drive the robot forward and backward: +1.0 means 100% power forward, –1.0 means 100% power in reverse, and 0.0 means stop. It accepts the same range for telling the robot how to turn: –1.0 means turn full power left, +1.0 means turn full power right, and 0.0 means drive straight ahead. Noting that the IR readings are provided in meters, we can use the following P-controller to drive our robot forward until we are 10cm away from a front obstacle. We even get a bonus for free—if we are closer than 10cm away, the robot will back up a bit until it is at the proper distance:
void runController(double frontIr, double rearIr,
                   double *translation,double *rotation)
{
  // convert our IR readings into drive commands
  *translation = (frontIr-0.1) * 3.0;
  *translation = *translation > 0.9? 0.9: *translation;
  *rotation    = 0.0;
}
And finally, good programmers always shut down their server connections when they are done:
void shutDownProxies()
{
  // close down proxies we have opened
  playerc_ir_unsubscribe(irProxy);
  playerc_ir_destroy(irProxy);
  playerc_position2d_unsubscribe(positionProxy);
  playerc_position2d_destroy(positionProxy);
  playerc_client_disconnect(clientHandle);
  playerc_client_destroy(clientHandle);
}
Building on the design we showed earlier, we can see how our drive-by-IR program interacts with the Player infrastructure. The CoroBot configuration file loads the phidgetIFK driver, which exposes an aio:0 device. This device allows the CoroBot driver to read the robot's onboard infrared sensors. The CoroBot driver also exposes the position2d and IR interfaces, which the drive-by-IR program reads with the help of the libplayerc library (Figure 5).
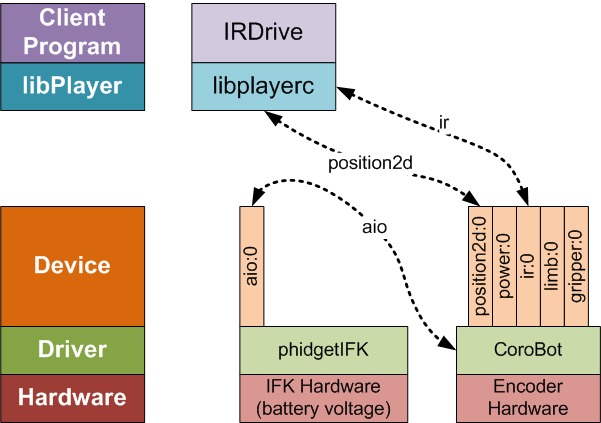
Figure 5. The Relationship between Several Devices and Interfaces When Using the Drive-by-IR Program
The Player Project offers a lot of functionality that there just isn't room to get into in one article. This includes robot simulation, support for numerous commercial robots of many different prices and qualities, and support for a whole slew of readily available devices. Its plugin system even allows you to build your own drivers for new devices, either to support new hardware or to implement new experimental algorithms. Give it a try, and give your computer a chance to stretch its legs.
Resources
The Player Project's Main Web Site: playerstage.sourceforge.net
Full Source Code for the Drive-by-IR Program: ftp.linuxjournal.com/pub/lj/listings/issue188/10566.tgz
CoroWare's CoroBot (a robot that provides drivers for working under the Player system): www.corobot.net
A List of Institutions That Use Player: playerstage.sourceforge.net/wiki/PlayerUsers
Kevin Sikorski is a Robotics Architect at CoroWare Technologies where he designs, builds and programs mobile robots, and develops simulation software. In his spare time, he enjoys hiking in the Cascades and stargazing with his telescope.


