
Paranoid Penguin - Linux VPNs with OpenVPN, Part II
Last month, I began a new series on how to build a Linux-based Virtual Private Network (VPN) solution using OpenVPN. I described what VPNs are, what they're used for, and I listed some popular ways of building VPNs with Linux. That column ended with some pointers for obtaining and installing OpenVPN.
This month, I continue with detailed instructions on how to build a quick-and-dirty single-user VPN connection that allows you to connect securely from some untrusted remote site, like a coffee shop wireless hotspot, back to your home network.
If you missed last month's column, here's a two-paragraph primer on VPNs. First, they're generally used for two things: connecting different networks together over the Internet and connecting mobile/remote users to some corporate or home network from over the Internet. In the first case, a VPN connection is usually “nailed”—that is, it stays up regardless of whether individual users actually are sending traffic over it. In the latter case, end users each create their own tunnels, bringing them up only as needed.
Several protocols are in common use for VPNs. The two most important of which are probably IPsec and SSL. IPsec is nearly always used to create an “encrypted route” between two networks or between one system and a network. In contrast, SSL, whether in the context of SSL-VPN (which uses a Web browser as client software) or in other SSL-based VPNs (like OpenVPN), can be used either to tunnel specific applications or entire network streams.
IPsec and SSL-VPN are out of the scope of this series of articles, which mainly concern OpenVPN. However, I will cover at least two different remote-access usage scenarios: single-user and multiuser. A later installment in this series may include site-to-site VPNs, which actually are simpler than remote-access solutions and which use a lot of the same building blocks. If I don't cover site-to-site VPNs, or if you need to build one sooner than I get around to it here, you'll have little trouble figuring it out yourself even after just this month's column!
Let's get busy with a simple scenario: setting up a single tunnel to reach your home network from the local coffee shop (Figure 1).
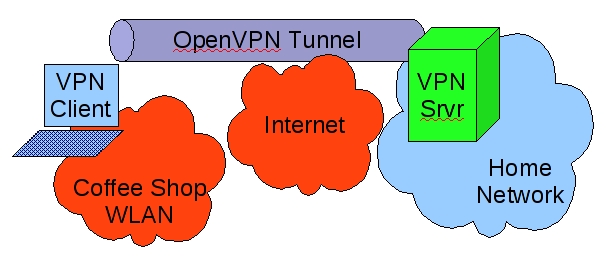
Figure 1. Remote-Access Scenario
In this simple example, a laptop is connected to a wireless hotspot in a coffee shop (Coffee Shop WLAN), which in turn is connected to the Internet. The laptop has an OpenVPN established with a server on the home network; all traffic between the laptop and the home network is sent through the encrypted OpenVPN tunnel.
What, you may wonder, is the difference between the hardware and software comprising the OpenVPN “server” versus that of the “client”? As it happens, the command openvpn can serve as either a server dæmon or client dæmon, depending on how you configure and run it. What hardware you run it on is totally up to you, although obviously if you're going to terminate more than a few tunnels on one server, you'll want an appropriately powerful hardware platform.
In fact, if you need to support a lot of concurrent tunnels, you may want to equip your server with one of the crypto-accelerator hardware cards (“engines”) supported by OpenSSL (on which OpenVPN depends for its cryptographic functions). To see which are supported by your local OpenSSL installation, issue the command openvpn --show-engines. See the documentation at www.openssl.org for more information on its support for crypto engines.
For this simple example scenario, let's assume both client and server systems are generic laptop or desktop PCs running current versions of some flavor of Linux with their respective distributions' standard OpenVPN and OpenSSL packages. The example OpenVPN configurations I'm about to walk through, however, should work with little if any tweaking on any of OpenVPN's supported platforms, including Windows, Mac OS X and so forth.
Although this scenario implies a single user connecting back to the home server, the configurations I'm about to describe can just as easily support many users by changing only one server-side setting (max-clients) and by generating additional client certificates. Have I mentioned certificates yet? You'll need to create a Certificate Authority (CA) key, server certificate and at least one client certificate. But have no fear, OpenVPN includes scripts that make it quick and easy to create a homegrown Public Key Infrastructure.
What about Static Keys?
Conspicuously absent from my OpenVPN examples are static keys (also known as pre-shared secret keys), which provide a method for authenticating OpenVPN tunnels that is, arguably, simpler to use than the RSA certificates described herein. Why?
An OpenVPN shared secret takes the form of a small file containing cryptographically generated random data that is highly, highly infeasible for an external attacker to guess via some sort of dictionary or brute-force attack. However, unlike WPA or IPsec shared secrets, an OpenVPN shared secret is used as a de facto session encryption key for every instance of every tunnel that uses it; it is not used to generate other, temporary, session keys that change over time.
For this reason, if attackers were to collect encrypted OpenVPN packets from, say, four different OpenVPN sessions between the same two endpoints and were to later somehow obtain a copy of that tunnel's shared secret file, they would be able to decrypt all packets from all four captured sessions.
In contrast, if you instead authenticate your OpenVPN tunnel with RSA certificates, OpenVPN uses the certificates dynamically to re-key the tunnel periodically—not just every time the tunnel is established, but even during the course of a single tunnel session. Furthermore, even if attackers somehow obtain both RSA certificates and keys used to key that tunnel, they can't easily decrypt any prior captured OpenVPN session (which would involve reconstructing the entire key negotiation process for every session key used in a given session), although they easily can initiate new sessions themselves.
So in summary, although it is a modest hassle to set up a CA and generate RSA certificates, in my opinion, using RSA certificates provides an increase in security that is much more significant than the simplicity of using shared secrets.
Let's get to work configuring the server. Here, I explain how to create a configuration file that puts OpenVPN into “server” mode, authenticates a single client by checking its RSA certificate for a valid CA signature, transparently generates dynamic session keys, establishes the tunnel, and then pushes settings back to the client that give the client a route back to the home network. And, let's even force the client to use the tunnel (and therefore the home network) as its default route back to the outside world, which is a potent protection against DNS spoofing and other attacks you otherwise might be vulnerable to when using an untrusted network.
Configuring OpenVPN consists of creating a configuration file for each OpenVPN listener you want to run and creating any additional files (certificates and so forth) referenced by that file. Prior to OpenVPN 2.0, you needed one listener per tunnel. If ten people needed to connect to your OpenVPN server concurrently, they'd each connect to a different UDP or TCP port on the server.
OpenVPN as of version 2.0, however, is multithreaded, and running in “server” mode, multiple clients can connect to the same TCP or UDP port using the same tunnel profile (that is, you can't have some users authenticate via TLS certificates and other users authenticate via shared secret on the same port). You still need to designate different ports for different tunnel configurations.
Even though the example scenario involves only one client, which would be amply served by a “peer-to-peer” OpenVPN tunnel, it really isn't any more complicated to use a “server mode” tunnel instead (that, again, you can use to serve multiple clients after changing only one line). As far as I can tell, using server mode for a single user doesn't seem to have any noticeable performance cost either. In my testing, even the relatively computationally intensive RSA public key routines involved in establishing my tunnels completed very rapidly.
Listing 1 shows a tunnel configuration file, server.ovpn, for our home network's OpenVPN server.
Listing 1. Server's server.ovpn File
port 1194
proto udp
dev tun

ca 2.0/keys/ca.crt
cert 2.0/keys/server.crt
key 2.0/keys/server.key  # This file should be kept secret

dh 2.0/keys/dh1024.pem

tls-auth 2.0/keys/ta.key 0

server 10.31.33.0 255.255.255.0
ifconfig-pool-persist ipp.txt

push "redirect-gateway def1 bypass-dhcp"

keepalive 10 120

cipher BF-CBC        # Blowfish (default)

comp-lzo
max-clients 2

user nobody
group nogroup
persist-key
persist-tun

status openvpn-status.log

verb 3
mute 20
Let's walk through Listing 1's settings. port obviously designates this listener's port number. In this case, it's OpenVPN's default of 1194. proto specifies that this tunnel will use fast, connectionless UDP packets rather than slower but more reliable TCP packets (the other allowable value being tcp). Note that OpenVPN uses information in its UDP data payloads to maintain tunnel state. Even though UDP is by definition a “stateless” protocol, the OpenVPN process on either end of an OpenVPN UDP tunnel can detect dropped packets and request the other side to retransmit them.
dev sets the listener to use the Linux kernel's /dev/tun (tun) special device rather than /dev/tap (which would be specified by tap). Whereas the tap device is used to encapsulate entire Ethernet frames, the tun device encapsulates only IPv4 or IPv6 packets. In other words, the tap device tunnels all network traffic regardless of protocol (IPX/SPX, Appletalk, Netbios, IP). For this example, let's stick to the tun device; this will be an IP-only tunnel.
Next, there is the RSA certificate information: ca, cert and key, which specify the respective paths of a CA certificate, the server's certificate and the server's private key. The CA certificate is used to validate client certificates. If the certificate presented by a client contains a valid signature corresponding to the CA certificate, tunnel authentication succeeds. The server key is used during this authentication transaction and also, subsequently, during key negotiation transactions.
Note that certificate files are public information and as such don't need highly restrictive file permissions, but key files must be kept secret and should be root-readable only. Never transmit any key file over any untrusted channel! Note also that all paths in this configuration file are relative to the configuration file itself. If the file resides in /etc/openvpn, then the ca path 2.0/keys/ca.cert actually expands to /etc/openvpn/2.0/keys/ca.cert.
dh specifies a file containing seed data for the Diffie-Hellman session-key negotiation protocol. This data isn't particularly secret. tls-auth, however, specifies the path to a secret key file used by both server and client dæmons to add an extra level of validation to all tunnel packets (technically, “authentication”, as in “message authentication” rather than “user authentication”). Although not necessary for the tunnel to work, I like tls-auth because it helps prevent replay attacks.
Before I go any further explaining Listing 1, let's generate the files I just described. The first three, ca, cert and key, require a PKI, but like I mentioned, OpenVPN includes scripts to simplify PKI tasks. On my Ubuntu systems, these scripts are located in /usr/share/doc/openvpn/examples/easy-rsa/2.0. Step one in creating a PKI is to copy these files to /etc/openvpn, like so:
bash-$ cd /usr/share/doc/openvpn/examples/easy-rsa
bash-$ su
bash-# cp -r 2.0 /etc/openvpn
Notice that contrary to preferred Ubuntu/Debian practice, I “su-ed” to root. This is needed to create a PKI, a necessarily privileged set of tasks.
Step two is to customize the file vars, which specifies CA variables. First, change your working directory to the copy of easy-rsa you just created, and open the file vars in vi:
bash-# cd /etc/openvpn/2.0
bash-# vi vars
Here are the lines I changed in my own vars file:
export KEY_COUNTRY="US"
export KEY_PROVINCE="MN"
export KEY_CITY="Saint Paul"
export KEY_ORG="Wiremonkeys"
export KEY_EMAIL="mick@wiremonkeys.org"
Next, initialize your new PKI environment:
bash-# source ./vars
bash-# ./clean-all
bash-# ./build-dh
And now, finally, you can create some certificates. First, of course, you need the CA certificate and key itself, which will be necessary to sign subsequent keys:
bash-# ./pkitool --initca
The output of that command consists of the files keys/ca.crt and keys/ca.key. By the way, if you want pkitool's output files to be written somewhere besides the local directory keys, you can specify a different directory in the file vars via the variable KEY_DIR.
Next, generate your OpenVPN server certificate:
bash-# ./pkitool --server server
This results in two files: keys/server.crt and keys/server.key. There's nothing magical about the last parameter in the above command, which is simply the name of the server certificate; to name it chuck (resulting in keys/chuck.crt and keys/chuck.key), you'd use ./pkitool --server chuck.
Last comes the client certificate. Unlike the server certificate, whose key may need to be used by some unattended dæmon process, we expect client certificates to be used by human beings. Therefore, let's create a client certificate with a password-protected (encrypted) key file, like so:
bash-# ./pkitool --pass minion
You'll be prompted twice for the key file's passphrase, which will be used to encrypt the file keys/minion.key (keys/minion.crt also will be created by not password-protected). If minion.key falls into the wrong hands, it won't be usable unless the thief also knows its password. However, this also means that every time you use this certificate, you'll be prompted for the key file's password, which I think is a reasonable expectation for VPN clients.
Now that you've got a working PKI set up, all you'll need to do to generate additional client certificates is repeat that last command, but with different certificate names, for example ./pkitool --pass minion102.
Warning: be careful about how you transmit client certificates and keys to end users! Unencrypted e-mail is a poor choice for this task. You should instead use scp, sftp or some other secure file-transfer protocol, or even transport them manually with a USB drive. Once the client certificate and key have been copied where they need to go (for example, /etc/openvpn/keys on the client system), make sure the key file is root-readable only! Erase any temporary copies of this file you may have made in the process of transporting it—for example, on a USB drive.
The OpenVPN server does not need local copies of client certificate or key files, though it may make sense to leave the “original” copies of these in the server's /etc/openvpn/2.0/keys directory (in my examples) in the event of users losing theirs due, for example, to a hard drive crash.
In the interest of full disclosure, I should note that contrary to my examples, it is a PKI best practice not to run a PKI (CA) on any system that actually uses the PKI's certificates. Technically, I should be telling you to use a dedicated, non-networked system for this purpose! Personally, I think if all you use this particular PKI for is OpenVPN RSA certificates, if your OpenVPN server is configured securely overall, and you keep all key files root-readable only, you probably don't need to go that far.
Okay, we've got a working PKI and some certificates. That may have been a lengthy explanation, but in my opinion, the process isn't too difficult or unwieldy. It probably will take you less time to do it than it just took you to read about it.
You've got two more files to generate before continuing working down server.ovpn. To generate your Diffie-Hellman seed file (still working as root within the directory /etc/openvpn/2.0), use this command:
bash-# openssl dhparam -out keys/dh1024.pem 1024
And, last of all the supplemental files, generate that TLS-authentication file, like so:
bash-# openvpn --genkey --secret 2.0/keys/ta.key
At this point, I've got good news and bad news. The good news is, you've made it through the most complicated part of OpenVPN configuration: creating a PKI and generating certificates and related files. The bad news is, you've also reached the end of this month's column!
If you can't wait until next time to use these certificates, to get OpenVPN running, you probably can figure out how to do so yourself. See the openvpn(8) man page and the sample configuration files server.conf.gz and client.conf under /usr/share/doc/openvpn/examples/sample-config-files, upon which my examples are based. Good luck!
Resources
Official OpenVPN Home Page: www.openvpn.net
Ubuntu Community OpenVPN Page: https://help.ubuntu.com/community/OpenVPN
“Linux VPN Technologies” by Mick Bauer, LJ, January 2005: www.linuxjournal.com/article/7881
Charlie Hosner's “SSL VPNs and OpenVPN: A lot of lies and a shred of truth”: www.linux.com/archive/feature/48330
Mick Bauer (darth.elmo@wiremonkeys.org) is Network Security Architect for one of the US's largest banks. He is the author of the O'Reilly book Linux Server Security, 2nd edition (formerly called Building Secure Servers With Linux), an occasional presenter at information security conferences and composer of the “Network Engineering Polka”.

