
Linux KVM as a Learning Tool
Low-level system programming is a difficult task, and acquiring expertise in the areas of interrupt handling and memory segmentation/paging can be a time-consuming and frustrating process if you're working right down on the metal. An alternative choice is to use a virtual machine or the Linux KVM module to create and run your own mini-kernels from scratch quickly.
The KVM (Kernel-based Virtual Machine) module turns a Linux host into a VMM (Virtual Machine Monitor), and it has been included in the mainline Linux kernel since version 2.6.20. A VMM allows multiple operating systems to run concurrently on a computer. These guest operating systems execute on the real (physical) processor, but the VMM (or hypervisor) retains selective control over certain real system resources, such as the physical memory and the I/O capabilities.
When a guest tries to perform an action on a controlled resource, the VMM takes control from the guest and executes the action in a fashion that keeps it from interfering with other guest operating systems. As far as the guest knows, it thinks it is running on a platform with no VMM—that is, it has the illusion of running on a real machine. For example, the guest can do memory paging and segmentation and interrupt manipulation without interfering with the same mechanisms within other guest operating systems or within the VMM itself.
A normal Linux process has two modes of execution: kernel mode and user mode. KVM adds a third one: guest mode (Figure 1). When a guest process is executing non-I/O guest code, it will run in guest mode or perhaps better-named guest-user mode. This is the “user” mode shown inside the “Guest mode” box in Figure 1. In kernel mode (guest-kernel), the process handles exits from guest-user mode due to I/O or other special instructions. This is the “kernel” mode shown inside the “Guest mode” box in Figure 1. In user mode, the process performs I/O on behalf of the guest. This is the “I/O Ops” box shown within the normal “User mode” box in Figure 1. For more on how KVM itself operates, see the KVM Web site and the many on-line articles about it.
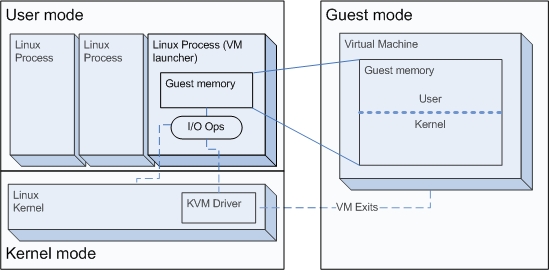
Figure 1. KVM Modes of Execution
The examples presented here require a recent Linux kernel with the KVM module installed and the LibKVM library to interact with the module from userspace. You can install the corresponding package(s) from your favorite distribution or compile the KVM source package (from SourceForge) to create both the module and LibKVM library. Note that the KVM module works only on platforms with hardware support for virtualization; most newer Intel and AMD 64-bit-capable processors have this support.
The rest of this article shows how to build a series of guest-mode programs (kernels) as well as a user-mode program to emulate their I/O (a virtual machine launcher).
The basic components of contemporaneous computer machines are memory, one or more CPUs and one or more I/O devices. Therefore, a virtual computer machine should have these three kinds of components. Linux KVM has the ability to handle the virtual machine's memory and CPUs (with hardware help). The third ingredient, I/O, currently is left to the programmer and has to be handled in a custom way.
For instance, the KVM distribution comes with qemu-kvm, a modified QEMU program that builds virtual machines using LibKVM and emulates various I/O devices, such as a VGA card, PS/2 mouse and keyboard and an IDE disk. We are not going to use qemu-kvm here, but rather we will code a virtual machine launcher from scratch to keep our first examples simple and to learn how a program like qemu-kvm does its work.
The KVM module exposes a character device (/dev/kvm) for interaction with userspace. For simplicity, we won't access this device directly but instead through LibKVM (API defined in libkvm.h). Use the methods shown in Listing 1 to build the virtual machine launcher (code based on Avi Kivity's test driver program included in the KVM sources).
Listing 1. LibKVM Methods Used for Our Launcher
kvm_context_t  kvm_init(struct kvm_callbacks   *callbacks,
                        void                   *opaque);

int            kvm_create(kvm_context_t  kvm,
                          unsigned long  phys_mem_bytes,
                          void           **phys_mem);

int            kvm_create_vcpu(kvm_context_t  kvm,
                               int            slot);

void           *kvm_create_phys_mem(kvm_context_t  kvm,
                                    unsigned long  phys_start,
                                    unsigned long  len,
                                    int            log,
                                    int            writable);

int            kvm_run(kvm_context_t  kvm,
                       int            vcpu);
To start, create a KVM context with kvm_init(). The first argument is a kvm_callbacks structure to specify the handlers to be called when I/O or some system-sensitive instructions are executed inside the virtual machine—for example, when the guest executes something like this:
mov     $0x0a,%al
outb    %al,$0xf1    // output value 0x0a to I/O port 0xf1
the guest will exit from guest mode, and the configured outb() callback function is called in user mode (with values 0xf1 and 0x0a for its second and third parameters, respectively).
Initially, use dummy callbacks. Create and reference them in a variable called my_callbacks, as shown in Listing 2. Most field names are self-explanatory, but for a brief description of each of them, refer to the comments in the structure definition in libkvm.h.
Listing 2. I/O Callbacks (used in launcher.c)
static int my_inb(void *opaque, int16_t addr, uint8_t *data)
                     { puts ("inb"); return 0; }

static int my_inw(void *opaque, uint16_t addr, uint16_t *data)
                     { puts ("inw"); return 0; }

static int my_inl(void *opaque, uint16_t addr, uint32_t *data)
                     { puts ("inl"); return 0; }

static int my_outb(void *opaque, uint16_t addr, uint8_t data)
                     { puts ("outb"); return 0; }

static int my_outw(void *opaque, uint16_t addr, uint16_t data)
                     { puts ("outw"); return 0; }

static int my_outl (void *opaque, uint16_t addr, uint32_t data)
                     { puts ("outl"); return 0; }

static int my_pre_kvm_run(void *opaque, int vcpu)
                     { return 0; }

  ... and similar for my_mmio_read, my_mmio_write,
      my_debug, my_halt, my_shutdown, my_io_window,
      my_try_push_interrupts, my_try_push_nmi,
      my_post_kvm_run, and my_tpr_access

static struct kvm_callbacks my_callbacks = {
    .inb                 = my_inb,
    .inw                 = my_inw,
    .inl                 = my_inl,
    .outb                = my_outb,
    .outw                = my_outw,
    .outl                = my_outl,
    .mmio_read           = my_mmio_read,
    .mmio_write          = my_mmio_write,
    .debug               = my_debug,
    .halt                = my_halt,
    .io_window           = my_io_window,
    .try_push_interrupts = my_try_push_interrupts,
    .try_push_nmi        = my_try_push_nmi,  // added in kvm-77
    .post_kvm_run        = my_post_kvm_run,
    .pre_kvm_run         = my_pre_kvm_run,
    .tpr_access          = my_tpr_access
};
To create the virtual machine itself, use kvm_create(), whose second argument is the amount of RAM in bytes desired for it, and the third argument is the address of a location that will in turn contain the address of the beginning of the memory space reserved for the virtual machine (the “guest memory” box in Figure 1). Note that kvm_create() does not allocate memory for the virtual machine.
To create the first virtual CPU, use kvm_create_vcpu() with a value of 0 for the slot parameter—versions less than 65 create the first virtual CPU during the call to kvm_create().
There are several methods to allocate memory for the virtual machine—for example, kvm_create_phys_mem(). The second argument of kvm_create_phys_mem() is the starting physical address of the requested region in the guest memory (in the pseudo-“physical memory” of the virtual machine, not in the physical memory of the host). The third argument is the length, in bytes, of the region. The fourth indicates whether dirty page logging should be activated in the requested region, and the fifth argument indicates whether the pages may be written. On success, it returns the location of the allocated memory area as an address in the virtual address space of the calling process.
Invoke the functions of Listing 1 within the same KVM context to create your first virtual machine, and execute it with kvm_run(). This function will return only if an I/O handler pointed in my_callbacks returns a nonzero value or an exception occurs that neither the guest OS nor KVM can handle.
Listing 3 contains the code for the launcher, including the load_file() function to copy the guest kernel image from a file to the virtual machine's memory space. Why is this image copied at offset 0xf0000 of the guest's memory space? Because of the way real-mode works, as explained in the next section.
Listing 3. Our First Virtual Machine Launcher (launcher.c)
#include <stdio.h>
#include <stdlib.h>
#include <unistd.h>
#include <sys/types.h>
#include <sys/stat.h>
#include <fcntl.h>
#include <libkvm.h>

/* callback definitions as shown in Listing 2 go here */

void load_file(void *mem, const char *filename)
{
    int  fd;
    int  nr;

    fd = open(filename, O_RDONLY);
    if (fd == -1) {
        fprintf(stderr, "Cannot open %s", filename);
        perror("open");
        exit(1);
    }
    while ((nr = read(fd, mem, 4096)) != -1  &&  nr != 0)
        mem += nr;

    if (nr == -1) {
        perror("read");
        exit(1);
    }
    close(fd);
}

#define MEMORY_SIZE     (0x1000000)     /* 16 Mb */
#define FIRST_VCPU      (0)

int main(int argc, char *argv[])
{
    kvm_context_t  kvm;
    void           *memory_area;

    /* Second argument is an opaque, we don't use it yet */
    kvm = kvm_init(&my_callbacks, NULL);
    if (!kvm) {
        fprintf(stderr, "KVM init failed");
        exit(1);
    }
    if (kvm_create(kvm, MEMORY_SIZE, &memory_area) != 0) {
        fprintf(stderr, "VM creation failed");
        exit(1);
    }
#ifndef KVM_VERSION_LESS_THAN_65
    if (kvm_create_vcpu(kvm, FIRST_VCPU)) {
        fprintf(stderr, "VCPU creation failed");
        exit(1);
    }
#endif
    memory_area = kvm_create_phys_mem(kvm, 0, MEMORY_SIZE, 0, 1);
    load_file(memory_area + 0xf0000, argv[1]);

    kvm_run(kvm, FIRST_VCPU);

    return 0;
}
Processors compatible with the x86 architecture can support different operating modes. Two of them are 16-bit real-address mode. The most frequently used, these days at least, is 32-bit protected mode. The processor starts in real-address mode after a power-up or reset (so platform initialization code has to be written for this mode) and jumps to the instruction at address 0xFFFF0. Usually, the BIOS's initialization routine is located here. The first instruction of our simple kernel will be located there to take control of the platform as soon as it boots. Although with KVM it is possible to start a virtual machine directly in protected mode, our launcher won't do that in order to learn how to manipulate a PC just after power-up.
The 16-bit real-address mode is a legacy mode inherited from the Intel 8086 processor, which is able to address up to 1Mb of memory. 1Mb is 220 bytes, so addresses require 20 bits. Given that the 8086's registers are only 16-bit wide, addresses are built by pairing two values. The first value is used as a selector (stored in a segment register), and the second value is used as an offset. With these, physical addresses are computed by the formula: 16 * selector + offset.
For example, the selector:offset 0xDEAD:0xBEEF represents the physical address 0xEA9BF. To multiply the selector (0xDEAD) by 16, simply add a 0 to the right side of the number (0xDEAD0). The addition then becomes the following:
  0xDEAD0
+ 0x0BEEF
  -------
  0xEA9BF
Note that given a fixed value for the selector, it is possible to reference only 64Kb of memory (the offset's allowed range). Programs bigger than 64Kb must use multi-segment code. We will keep our kernel simple and make it fit into a single 64Kb segment. Our launcher will put the kernel image in the last segment (where the 0xFFFF0 entry point resides). The last segment starts at 0xF0000 as shown by the following calculation:
Start of the last segment
    = (Maximum 8086 Memory) - (Segment Size)
    = 1MB - 64KB
    = 0x100000 - 0x10000 = 0xF0000
A memory map of this is shown in Figure 2.
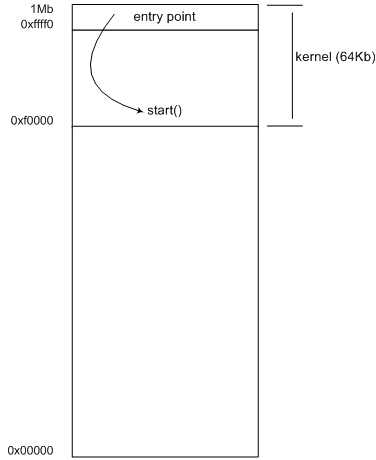
Figure 2. Real-Address Mode Memory Map
We now can write a kernel in assembler with its first instruction at offset 0xFFFF0. Note that unlike many processors, the x86 processor does not have a reset “vector”. It does not use the value at 0xFFFF0 as the location of the reset code; rather, it begins executing the code that is at 0xFFFF0. Therefore, the “normal” code to place at 0xFFFF0 is a jump to the actual reset code.
Our first kernel is shown in Listing 4. It merely sets the AX register to 0 and then loops forever.
Listing 4. kernel1.S
.code16                   // Generate 16-bit code
start:                    // Kernel's main routine
        xor %ax, %ax
1:
        jmp 1b            // Loop forever

. = 0xfff0                // Entry point
        ljmp    $0xf000, $start
In the second to the last line, the dot (.) refers to the current location counter. Therefore, when we write:
. = 0xfff0
we instruct the assembler to set the current location to address 0xFFF0. In real-mode, address 0xFFF0 is relative to the current segment. Where does the segment offset get specified? It comes from the call to load_file() in Listing 3. It loads the kernel at offset 0xF0000. This, combined with the assembler offset, will place the ljmp at address 0xFFFF0, as required.
The kernel binary should be a raw 64Kb 16-bit real-address mode image, and not a normal ELF binary (the standard binary format used by Linux). To do this, we need a special linker script. We use GNU ld for this, of course, which accepts script files to provide explicit control over the linking process.
A linker is a program that combines input binary files into a single output file. Each file is expected to have, among other things, a list of sections, sometimes with an associated block of data. The linker's function is to map input sections into output sections. GNU ld uses, by default, a linker script specific for the host platform, which you can view by using the -verbose flag:
$ gcc -Wl,-verbose hello-world.c
To build our kernel, we don't use the default script but instead the simple script kernel16.lds, shown in Listing 5.
Listing 5. Linker Script kernel16.lds
OUTPUT_FORMAT(binary)

SECTIONS {
        . = 0;
        .text : { *(.init) *(.text) }
        . = ALIGN(4K);
        .data : { *(.data) }
        . = ALIGN(16);
        .bss : { *(.bss) }
        . = ALIGN(4K);
        .edata = .;
}
The SECTIONS command controls how to make the mapping and how to place the output sections in memory. Directives follow the syntax:
.output-section : [optional-args]
                  { input-section, input-section, ... }
The kernel16.lds script sets the current location at offset 0x0. Then, the output .text section will start there and will contain the contents of any .init and .text input sections.
Next, we align the current location to a 4KB boundary and create the .data and .bss output sections. Use kernel16.lds to generate the kernel image as shown in Listing 6.
Listing 6. Building a 16-Bit Kernel Image
$ gcc -nostdlib -Wl,-T,kernel16.lds kernel1.S -o kernel1
$ ls -oh kernel1
-rwxr-xr-x 1 djprotti 64K 2008-10-17 19:09 kernel1
The -nostdlib flag avoids linking the standard system startup files and libraries (these will not be available inside our virtual machines). After this, we have our 64Kb 16-bit real-address kernel image.
The Makefile in Listing 7 contains the commands to build both the kernel and the launcher.
Listing 7. Makefile
# If KVM was compiled from sources and you have errors about
# missing asm/kvm*.h files, copy them from
# kvm-XX/kernel/include/asm/* to {prefix}/include/asm/
CC=gcc
KERNEL16_CFLAGS=-nostdlib -ffreestanding -Wl,-T,kernel16.lds

all:    launcher kernel1

launcher: launcher.o
        $(CC) launcher.o /usr/lib/libkvm.a -o launcher

launcher.o:

kernel1: kernel1.S
        $(CC) $(KERNEL16_CFLAGS) kernel1.S -o kernel1

clean:
        rm *.o launcher kernel1
Launch the virtual machine with kernel1 as guest with the following command:
$ ./launcher kernel1
If everything goes well, you will see no output, and the guest kernel should be consuming all of its available CPU. If you run the top command in another console, and you see output similar to that of Listing 8 (100% CPU usage for the launcher process), you have your kernel running in your first KVM virtual machine!
Listing 8. Output of top While Our Launcher Is Running
 PID USER     S %CPU %MEM    TIME+  COMMAND
8002 djprotti R  100  0.8   1:53.19 launcher
7428 djprotti S    0  0.8   0:04.45 gnome-terminal
8005 djprotti R    0  0.0   0:00.02 top
   1 root     S    0  0.0   0:03.92 init
   2 root     S    0  0.0   0:00.00 kthreadd
   3 root     S    0  0.0   0:00.12 migration/0
   4 root     S    0  0.0   0:02.76 ksoftirqd/0
   5 root     S    0  0.0   0:00.01 watchdog/0
Now, let's build a kernel that communicates with the world. First, choose one of the I/O ports and use it to implement a “serial port”. Name the chosen port as IO_PORT_PSEUDO_SERIAL (as shown in Listing 10), then modify the outb callback in the launcher to interpret bytes sent to this port as characters printed to a serial console, and redirect them to launcher's standard output as shown in Listing 9.
Listing 9. Pseudo-Serial Port Implementation in launcher.c
#include "runtime.h"

static int my_outb (void *opaque, uint16_t addr, uint8_t data)
{
    if (addr == IO_PORT_PSEUDO_SERIAL)
        if (isprint(data) || data == '\n')
            putchar(data);
        else
            putchar('.');
    else
        printf("outb: %x, %d\n", addr, data);
    fflush (NULL);

    return 0;
}
Then, build a second kernel (kernel2) whose only task is to print “Hello\n” to its pseudo-serial port and then halt, as shown in Listing 10.
Listing 10. kernel2.S
#include "runtime.h"

.code16
start:
    mov    $0x48,%al    // H
    outb   %al,$IO_PORT_PSEUDO_SERIAL
    mov    $0x65,%al    // e
    outb   %al,$IO_PORT_PSEUDO_SERIAL
    mov    $0x6c,%al    // l
    outb   %al,$IO_PORT_PSEUDO_SERIAL
    mov    $0x6c,%al    // l
    outb   %al,$IO_PORT_PSEUDO_SERIAL
    mov    $0x6f,%al    // o
    outb   %al,$IO_PORT_PSEUDO_SERIAL
    mov    $0x0a,%al    // new_line
    outb   %al,$IO_PORT_PSEUDO_SERIAL

    hlt                 // halt the processor

. = 0xfff0
    ljmp    $0xf000, $start
Listing 11. runtime.h
#ifndef __RUNTIME_H__
#define __RUNTIME_H__

// port to use for general purpose output
#define IO_PORT_PSEUDO_SERIAL  0xf1

#endif /* __RUNTIME_H_ */
Build both the launcher and kernel2, and run them as usual. The output should be similar to this:
$ ./launcher kernel2
Hello
Now the top command should show 0% CPU usage for the launcher process, because its virtual CPU is halted.
As a last example, an improved kernel is shown in Listing 12, using the OUTSB string output instruction and the REP prefix to repeat it the number of times specified by CX. Interestingly, this code generates only one I/O exit to output the entire string. Compare this against the previous kernel2, which generates one I/O exit for each outb execution, with the associated overhead due to context switches. You can use the kvm_stat Python script from the KVM sources to see this and other behaviours of the virtual machines.
Listing 12. kernel3.S (output using OUTSB)
#include "runtime.h"

.code16
start:
    mov     $(IO_PORT_PSEUDO_SERIAL), %dx
    cs lea  greeting, %si
    mov     $14, %cx
    cs rep/outsb    // kvm_stat reports only
                    // *one* io_exit using this
    hlt

.align 16
greeting:
    .asciz  "Hello, World!\n"

. = 0xfff0
    ljmp    $0xf000, $start
The CS prefix before the LEA and OUTSB instructions are needed to fetch data (greeting string) from the code segment.
At this point, you have the basis to experiment with all kinds of real-mode code. You can extend the examples to set an IDT and handle interrupts or add more I/O devices. A good starting point is interrupts to learn the constraints of interrupt context, and another one is to investigate the rest of LibKVM's methods.
However, real mode is not enough to learn all the things that current kernels do on the x86 platform. For this reason, in a follow-up article, we will extend our launcher a little in order to handle kernels running in 32-bit protected mode. This change will give us the ability to write kernels in the C language, allowing for rapid development of bigger kernels. It also will open the door for experimenting with segmentation, paging, privilege levels (two or more rings) and more.
Remember, low-level system programming is a challenging task, but with Linux KVM, it can be easy. So, go ahead and code, have fun and you will learn a lot about how computer systems work in the process!
Resources
A Good Book on PC Assembly by Dr Paul Carter: drpaulcarter.com/pcasm
KVM Sources: sourceforge.net/projects/kvm
Duilio Javier Protti (duilio.j.protti@intel.com) is a software engineer with Intel Corp., in Cordoba, Argentina. He currently is working on a team specializing in virtualization technology. Before joining Intel, he wrote LibCMT (a library for composable memory transactions), was the maintainer of the Infinity XMMS plugin and contributed to various open-source projects, such as Nmap, Libvisual and others.
