
Improved Scaffolding for Ruby on Rails
In the May 2007 issue of Linux Journal, I described my initial foray into the world of Ruby programming, combining Ruby with CGI and AJAX to produce a Web-based Ethernet Analyzer. Although I had fun putting that particular solution together, my real reason for getting to know Ruby was to allow me to work with Ruby on Rails, the highly regarded Web Application Framework (WAF).
I've looked at a number of WAFs available within the Perl and Python spaces. Way back in the March 2005 issue of Linux Journal, I described Maypole, one of Perl's first WAFs. Since then, I've explored Catalyst (a Maypole fork), Jifty and Gantry. Despite my extensive use of and acknowledged fondness for Perl, Rails had caught my eye, and it was an itch I just had to scratch.
I have one piece of advice for anyone hoping to work with Rails in any meaningful way: get to know Ruby first. I initially had terrible trouble getting my head around what Rails was doing due to my inexperience with Ruby. When I changed my approach and set aside Rails in order to learn Ruby properly, my second pass at Rails made more sense. It was also more productive.
There is little doubt that Rails is a great WAF, worthy of all the praise continually heaped upon it. However, when you first start working with Rails, the default Web pages generated by the framework are anything but impressive. In fact, they are downright ugly, which can be a bit of a disappointment, especially if all you need is a quick Web application mockup. Granted, these default layouts are designed to be replaced by something nicer: professionally designed CSS Web pages. And, to be fair, the Rails folks do go to great lengths to stress this fact. However, if you are in a hurry, stopping to design some customer-friendly Web pages is a drag. What's needed is nice, modern CSS styling for the quick-and-dirty, in-a-hurry types like me. That's where ActiveScaffold comes in.
ActiveScaffold is built on top of the standard Rails environment and is a plugin that, in the words of the project's Web site, “provides you with a wealth of dynamically created goodness”. What this goodness means to Rails developers is that ActiveScaffold provides a nice set of CSS pages and methods for interacting with your database tables. ActiveScaffold initially manages to do this, somewhat remarkably, with only a single, trivial code change to an existing Rails application.
In this article, I redevelop the Web-based soccer club database application that I created with Maypole back in 2005, this time using Rails with ActiveScaffold as the development platform. To add a slight twist to the proceedings, I use PostgreSQL as my database, as I've decided to give PostgreSQL a go having read Reuven Lerner's excellent series of articles comparing PostgreSQL to MySQL (see the April, May and June 2007 issues of LJ).
If you don't have PostgreSQL installed (and you are using Ubuntu or some other Debian-based distro), installation is straightforward:
sudo apt-get install postgresql
If your GNU/Linux distribution does not support apt, use your package manager to download and install PostgreSQL. With PostgreSQL running, become the postgres user on your system and create a new soccer_manager user:
sudo su - postgres
createuser -U postgres soccer_manager
Be sure to answer n (for no) to each of the questions posed by the createuser program, as the soccer_manager needs to be restricted to working solely within the soccer database (which we'll create in just a moment). Selecting n deliberately restricts the privileges awarded at this stage. Next, create a database, called soccer_development:
createdb -U postgres soccer_development
With the database and user created, enter the PostgreSQL interactive terminal (psql), and give the soccer_manager a password as well as user privileges to use the soccer_development database:
psql
postgres=# alter user soccer_manager with
postgres-# password 'soccer_manager_password';
postgres=# grant all privileges on database
postgres-# soccer_development to soccer_manager;
postgres=# \q
Note the use of the quit command, \q, which exits psql. At this point, we are done working directly with PostgreSQL. We could log in to psql as the soccer_manager user and start to create tables within the database using standard SQL, but we'll get Rails to handle these details for us (more on this in a little while).
I'm assuming you already have Ruby installed on your GNU/Linux system. If this is not the case, either install it from source from the Ruby Web site (see Resources) or install the Ruby package from your distribution's package manager (the ruby-full package on Ubuntu should include all you need). To install and use Rails, the RubyGems Package Manager needs to be installed into your Ruby environment. If RubyGems is not available within your distribution's package manager, pop on over to the RubyGems download page on RubyForge (see Resources), select the version of RubyGems that best matches your environment, and download the associated file. Installation is straightforward (note that the version you are working with may differ from that shown here):
tar zxvf rubygems-1.3.0.tgz
cd rubygems-1.3.0
sudo ruby setup.rb
If you are using Ubuntu (or one of its cousins), install the RubyGems package using apt:
sudo apt-get install rubygems
With RubyGems installed, you now can install Rails:
sudo gem install rails
Be sure to install all the suggested dependencies when prompted. This step takes a little while to complete, but it is a testament to the simplicity of Rails that you are ready to go once this command completes. One of the problems I've experienced with Perl-based WAFs is that installation can be a nightmare, especially when different versions of various CPAN modules throw up compatibility and dependency errors. Thankfully, there's no such maddeningly frustrating problems with Rails!
I did have one small problem with Rails on Ubuntu, which relates to the installation of the rails command in /usr/bin/, in that it wasn't there. Ubuntu expects you to install Rails using apt-get, but as I wanted the latest-and-greatest Rails, I went with the RubyGems installation method. To fix this small problem, create a link to the rails command, as follows:
sudo ln -s /var/lib/gems/1.8/bin/rails /usr/bin/rails
As we are using PostgreSQL as our database, we need to download and install the PostgreSQL Ruby gem. This, too, is straightforward:
sudo gem install postgres
If this causes an error, make sure the development libraries for Ruby are installed (called ruby1.8-dev on Ubuntu), as well as those for PostgreSQL (called libpq-dev). If compile-time errors still result (due to header files not being found, for instance), use this command instead (which should be entered on a single line):
POSTGRES_INCLUDE=/usr/include/postgresql   \
sudo gem install postgres
At this point, Ruby, PostgreSQL, the PostgreSQL gem and Rails are installed and ready for action.
In a directory of your choosing, type the following command:
rails soccer_club --database=postgresql
This command creates a new Rails application called soccer_club, resulting in a long list of messages from Rails, and creates a new directory called soccer_club.
Let's add some database tables to our application. Begin by first changing into the newly created soccer_club directory.
We could create the necessary tables using a series of SQL CREATE TABLE statements, patiently entering them into PostgreSQL's psql command-line tool. However, Rails provides a technology called Database Migrations that allows you to manipulate your database tables without directly using SQL. Migrations operate at a higher level, shielding the Web developer from the underlying SQL dialect. Before we create a Migration, let's tell our Rails application which database to use and provide a user name/password combination.
Edit the config/database.yml file associated with your Rails application, and change the development section to look like this (note that some default values have been suggested by Rails, but for our application, those values need to change):
development:
  adapter: postgresql
  encoding: unicode
  database: soccer_development
  username: soccer_manager
  password: soccer_manager_password
On my Ubuntu system, PostgreSQL is configured to expect connections from a user name equal to the user ID of the currently logged-in user. This is called IDENT Authentication. What this means is that to access the soccer_development database with user ID soccer_manager, we need to be logged in to GNU/Linux as soccer_manager. That's not what we want (and it's not what Rails wants either), so we need to make a quick change to the bottom of the appropriate PostgreSQL configuration file (/etc/postgresql/8.3/main/pg_hba.conf), commenting out the ident sameuser line and adding a password line, as follows:
# "local" is for Unix domain socket connections only
local      all     all            password
# local    all     postgres       ident sameuser
After that edit, it's necessary to stop/start PostgreSQL to apply the change:
sudo /etc/init.d/postgresql-8.3 stop
sudo /etc/init.d/postgresql-8.3 start
To check that all is well with the Rails connection to the database, type the following within the top-level directory of your Rails application:
rake db:migrate
A single line of output results (in /home/barryp/rails/soccer_club on my system), which is Rails' way of telling us that everything is okay with the database connection. Any other message may indicate an error. If it is not immediately clear what the problem is (assuming, of course, that you have one), try appending --trace to the end of the above rake command.
Rails can help with the creation of our database tables, and we need three: one to hold information on our soccer players, another for squad data and another to maintain medical conditions. For the sake of simplicity, let's assume that each player belongs to one squad and can have a single medical condition (or none at all). Let's tell Rails about the tables:
ruby script/generate model player
ruby script/generate model squad
ruby script/generate model condition
Models in Rails let us talk to our data from our Web application. Each of the above commands produces eight lines of output while Rails does its thing. Note that each contains a file generated in the db/migrate directory. These are our database migrations. At this point, things get less SQL-centric and more Rails-like, as Rails provides a database-independent way to define our tables. To see this in action, edit the db/migrate/xxxxxxxxx_create_players.rb file (where xxxxxxxxx is a unique date/time string generated by Rails), changing the self.up method to look like this:
def self.up
  create_table :players do |t|
    t.integer     :squad_id, :condition_id
    t.string      :name, :address, :contact_tel_no
    t.date        :date_of_birth
    t.timestamps
  end
end
This is the high-level Rails way of telling your database to create a table. Each column in the table gets a unique name and a data type. Note that in addition to the columns you might expect each player to have (name, address and so on), we add in two integer columns that will link to the squad and condition tables. What's cool about using migrations is that it does not matter which database you are using, Rails generates the correct database-specific SQL statements as required and when needed. Let's define the other two tables. Edit db/migrate/xxxxxxxxxx_create_squads.rb, changing the self.up method as follows:
def self.up
  create_table :squads do |t|
    t.string          :name
    t.timestamps
  end
end
And, finally, change db/migrate/xxxxxxxxxx_create_conditions.rb to have a self.up method that looks like this:
def self.up
  create_table :conditions do |t|
    t.string          :name
    t.timestamps
  end
end
Now for the fun part, type the following at the command-prompt:
rake db:migrate
Output similar to the following should scroll by on screen:
(in /home/barryp/rails/soccer_club)
== CreatePlayers: migrating =====================
-- create_table(:players)
   -> 0.1916s
== CreatePlayers: migrated (0.1918s) ============

== CreateConditions: migrating ==================
-- create_table(:conditions)
   -> 0.0183s
== CreateConditions: migrated (0.0185s) =========

== CreateSquads: migrating ======================
-- create_table(:squads)
   -> 0.0309s
== CreateSquads: migrated (0.0311s) =============
What's happened is that Rails has connected to the back-end database and created the three required tables. Note that there's no programmer-written SQL code in sight! Rails handles all the down-and-dirty SQL details. For those readers who don't believe me, log in to PostgreSQL as soccer_manager and bask in the glory of the table schema that Rails has created for you.
At this point, it would be normal to use Rails to generate some scaffolding code, then reach for a CSS reference to pretty up the whole thing. This is doable, but it takes time. For now, let's use Rails to generate empty controllers with these three commands:
ruby script/generate controller player
ruby script/generate controller squad
ruby script/generate controller condition
Each of these commands produces seven lines of output. Note that a Ruby file is generated in the app/controllers directory. These are source code files that will contain any business logic we want to add to our Rails application. We will do this in a little while. To complete the default Rails setup, we need to specify our table relationships. Edit app/models/player.rb to look like this:
class Player < ActiveRecord::Base
  belongs_to  :condition
  belongs_to  :squad
end
ActiveScaffold is written and maintained by a dedicated group of Rubyists who live at activescaffold.com/team. ActiveScaffold is a Rails plugin, and as such, gets installed into an existing Rails project, so let's do that first. From the top-level directory of your Rails application, type the following (which should be entered on a single line):
git clone git://github.com/activescaffold/active_scaffold.git \
          vendor/plugins/active_scaffold &&                   \
          rm -rf vendor/plugins/active_scaffold/.git
This command fetches ActiveScaffold and installs it into your Rails application. When this process completes, a new directory has been created within the vendor/plugins/ directory of your Rails application called activescaffold. For the plugin to work its magic, we need to create an application-level layout that will be used throughout our Rails application. Here's a bare-bones layout, which we need to create in the app/views/layouts directory and which is called application.rhtml:
<html>
<head>
 <title>Soccer Club Database System</title>
 <%= javascript_include_tag :defaults %>
 <%= active_scaffold_includes %>
</head>
<body>

<%= yield %>

</body>
</html>
This is a straightforward, essentially empty, HTML page. Take note of the code included within the <%= and %> tags. These tags allow us to execute Ruby code from within an HTML template. The first set of such tags adds a set of JavaScript routines to our page; the second pulls in the ActiveScaffold goodness, and the third executes the Ruby yield method. Any layouts that are created within our application (whether manually by us or dynamically by Rails or ActiveScaffold) will be wrapped in the application.rhtml layout, with their content replacing the invocation of yield as required. With the default layout created, we need to edit each of our existing controllers to switch on ActiveScaffold. Here's how the app/controllers/player_controller.rb file should appear after this edit:
class PlayerController < ApplicationController
  active_scaffold    :player
end
Add a similar line of code to the app/controllers/squad_controller.rb and app/controllers/condition_controller.rb files, then start your Rails application:
ruby script/server
Fire up your browser and load the http://localhost:3000/player page. Take a look at Figure 1, which shows the default ActiveScaffold player listing—it looks great. Note that ActiveScaffold has spotted the links between the three tables and pulled in the appropriate data values. Note also that I've added some sample data to my Web app. Unfortunately, the ordering of the columns leaves a little to be desired, and this is no more evident than when we view the default ActiveScaffold player form, as shown in Figure 2. This form displays the table columns in alphabetical order, which is not what we want. In addition, the subforms that provide access to the squad and medical condition data are cool, but what we want is a simple drop-down list for our application. Thankfully, adjusting ActiveScaffold's default behaviors is not difficult, as we shall see in a few moments.
Another problem (which you may have noticed if you've been following along) is that the date range associated with the date_of_birth value is very restrictive, using 1997 as the earliest start year. As all of our soccer players were born in the early 1990s, we need some way to adjust the start year for any entered dates. ActiveScaffold (together with Rails) can help here too.

Figure 1. Default Player Listing as Generated by ActiveScaffold
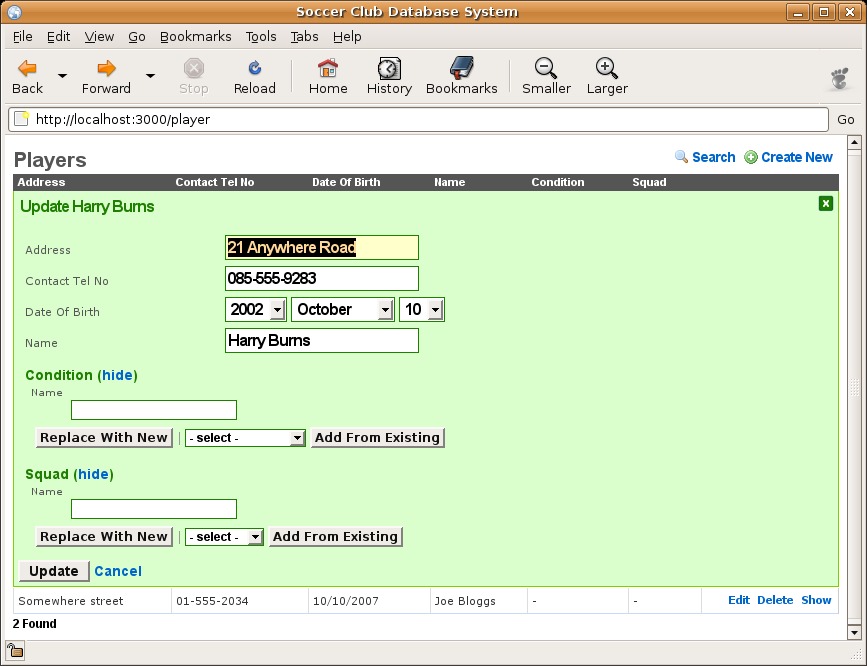
Figure 2. Default Player Data-Entry Form as Generated by ActiveScaffold
Let's begin by fixing the order of our columns. Change the app/controllers/player_controller.rb file to look like this:
class PlayerController < ApplicationController
  active_scaffold :player  do |c|
    c.columns = [:name, :squad, :address,
                 :date_of_birth,
                 :contact_tel_no, :condition ]

    c.columns[:squad].ui_type = :select
    c.columns[:condition].ui_type = :select
  end
end
In this code, we provide a configuration code block to the activescaffold method where we specify the ordering of the columns, in addition to setting the ui_type associated with the squad and condition data to be :select. This fixes our ordering issue and sets the squad and condition selection mechanism to a standard drop-down list.
Sorting out the date problem requires the creation of a Rails helper method for the players table. Edit the app/helpers/player_helper.rb file, and add the following code:
module PlayerHelper
  def date_of_birth_form_column(record, input_name)
    date_select :record, :date_of_birth,
                :name => input_name,
                :start_year => 1990
  end
end
The oddly named date_of_birth_form_column helper method calls the ActiveScaffold-supplied date_select method, which lets us adjust the earliest start date associated with our date_of_birth data. With these changes made, restart the Rails application and reload the browser window. Figure 3 shows the new-and-improved player listing, and Figure 4 shows the final version of our player data-entry form. As I'm sure you'll agree, both screens look the business. Take time to play around with the added functionality that ActiveScaffold has provided for free, including sort-ordering links on each of the column headings.

Figure 3. Improved Player Listing
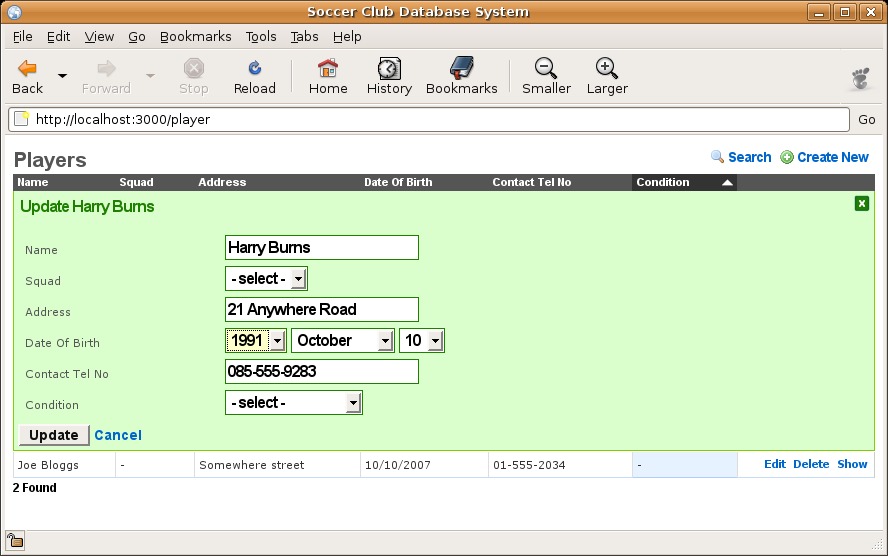
Figure 4. Improved Player Data-Entry Form
To learn more about Rails, I highly recommend Agile Web Development with Rails by The Pragmatic Programmers (now in its second edition, with a third due soon), as well as O'Reilly Media's Rails Cookbook. To learn more about ActiveScaffold, check out the well-written documentation and code examples available on-line at the ActiveScaffold Web site (see Resources). As I hope this article demonstrates, it doesn't take much to turn an ugly, default Rails application into something you just might want to show off!
Resources
Ruby on the Web: www.ruby-lang.org
The RubyGems RubyForge repository: rubyforge.org/projects/rubygems
ActiveScaffold Web Site: activescaffold.com
Rails Plugin Repository: agilewebdevelopment.com/plugins
“An Ajax-Enhanced Web-Based Ethernet Analyzer” by Paul Barry (LJ, May 2007): www.linuxjournal.com/article/9614
“A Database-Driven Web Application in 18 Lines of Code” by Paul Barry (LJ, March 2005): www.linuxjournal.com/article/7937
Reuven Lerner's Excellent Series of Articles Comparing PostgreSQL to MySQL (April, May and June 2007 issues of LJ): www.linuxjournal.com/article/9571, www.linuxjournal.com/article/9618 and www.linuxjournal.com/article/9649
Paul Barry (paul.barry@itcarlow.ie) lectures at the Institute of Technology, Carlow in Ireland. Find out more about the stuff he does at this Web site: glasnost.itcarlow.ie/~barryp.


