
Hack and / - Memories of the Way Windows Were
I'm a half-organized person. On one hand, if something of mine has a place, I can be pretty anal about making sure I put it back every time I use it. On the other hand, if something doesn't have a place, it inevitably ends up in a pile or a junk drawer. I've learned that if I want to be organized, I must give everything a home.
The same rule applies to my desktop environment. Back when I used to use Windows, I didn't have much of a choice—everything ended up stacking up on the same desktop, either maximized or at some arbitrary size. Once I started using Linux though, I discovered this interesting multiple desktop model. With Linux, I could assign windows into certain groups and then arrange each group on a particular desktop. The main downside to this much organization was that every time I opened a window, I usually needed to resize it and move it to a particular desktop. That's a lot of manual work on my part, and it wasn't long before I discovered that certain window managers supported window memory. With window memory, every window I use on a regular basis can be assigned a location, a size and a desktop.
My first exposure to window memory was with the Enlightenment window manager. Its window memory was quite easy to use and to set. All you had to do was right-click on a window, and you could check off attributes that Enlightenment would remember the next time you opened the window. In addition to having certain sets of terminals and Web browser windows open on certain desktops, I also was able to have windows always stay on top or stick across all desktops. Although it did require a little setup, by the time I was finished arranging my windows once, everything I used on a regular basis had its place on my desktops.
I stayed with Enlightenment for quite some time, even though I was eyeing this new window manager called Fluxbox as a potential replacement. It wasn't until Fluxbox added window memory, however, that I made the switch. Fluxbox's window memory worked a lot like Enlightenment's—right-click on a title bar and toggle the attributes you want to remember. As with Enlightenment, these attributes were assigned based on the window title, so if you had two windows with the same title (say, xterm, with no extra arguments), they both would take those same settings.
I used both Enlightenment and Fluxbox for years, but I kept eyeing the GNOME and KDE desktops all the cool kids were using. For me, window memory was the crucial requirement though, and it wasn't until I made the switch to using Ubuntu that I decided to give one of the “standard” desktop environments a fair shake. Out of the box, it didn't seem like Compiz had any window memory, and this was a major strike against it in my book. However, almost a year later, I still am using Compiz, and I have to credit the advanced window memory that I discovered buried in advanced Compiz settings for keeping me here.
By default, at least in Ubuntu, there are only so many settings you can tweak in Compiz. Compiz provides a tool, however, called CompizConfig Settings Manager (or ccsm) that gives you very detailed control over many different aspects of both Compiz eye-candy effects as well as a lot of the important settings for the window manager itself. The major downside to ccsm, however, is that there are almost too many options—if you don't know exactly what you are looking for, expect to spend some time digging through different categories. Even window memory settings are split between two different categories.
Ubuntu didn't install ccsm automatically for me, but I was able to install it with a quick trip to the package manager, and it should be packaged for other distributions that include Compiz. Once it is installed, you either can type ccsm in a terminal window or click System→Administration→Advanced Desktop Effects Settings. As I mentioned, the default window can be a little daunting (Figure 1) and is split into a narrow left pane that displays the categories and a larger right pane that shows all the particular settings you can configure for the category.

Figure 1. Default CCSM Window
Everything you need to configure window memory in ccsm can be found in the Window Management category, and once you click on that category in the left pane, you drill down into a much more manageable set of options (Figure 2). For some reason, ccsm splits window memory into two different sets of options, Window Rules and Place Windows. The Window Rules options allow you to configure window attributes like stickiness and geometry, and the Place Windows options let you control the viewport and location where the window is placed.
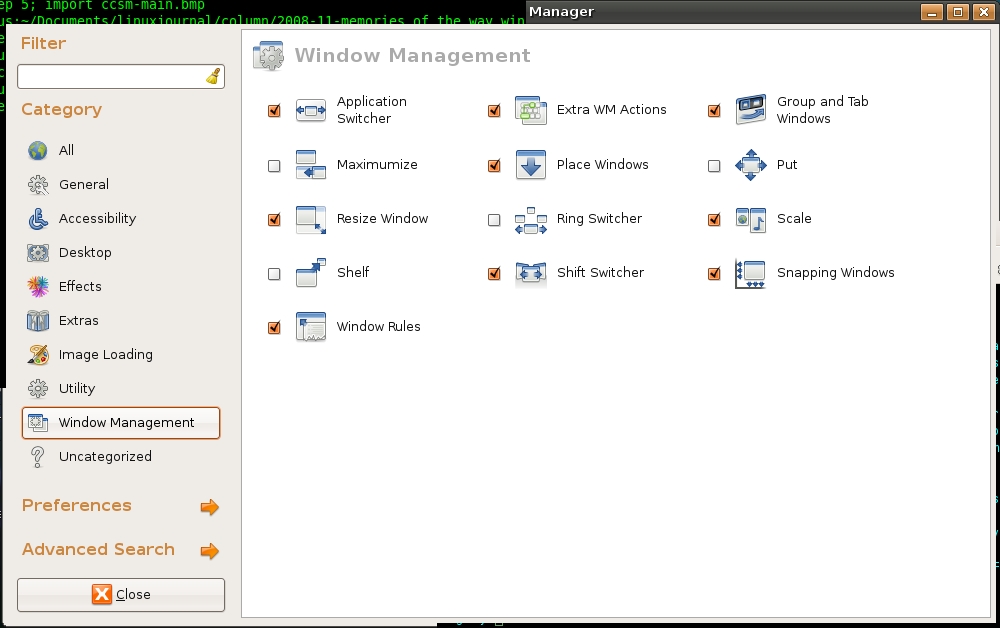
Figure 2. Window Management Configuration Options
Once you click the Window Rules icon, you will see the first set of window attributes Compiz can remember, split into tabs for Matches and Size Rules. Matches (Figure 3) contains standard window attributes, such as Above, Below, Sticky and Fullscreen, that you could set on a window manually, as well as many options you can't, such as non-movable, non-resizable, non-maximizable and no focus. To assign one of these attributes to a window, you need to add some sort of identifier in the field next to the attribute.
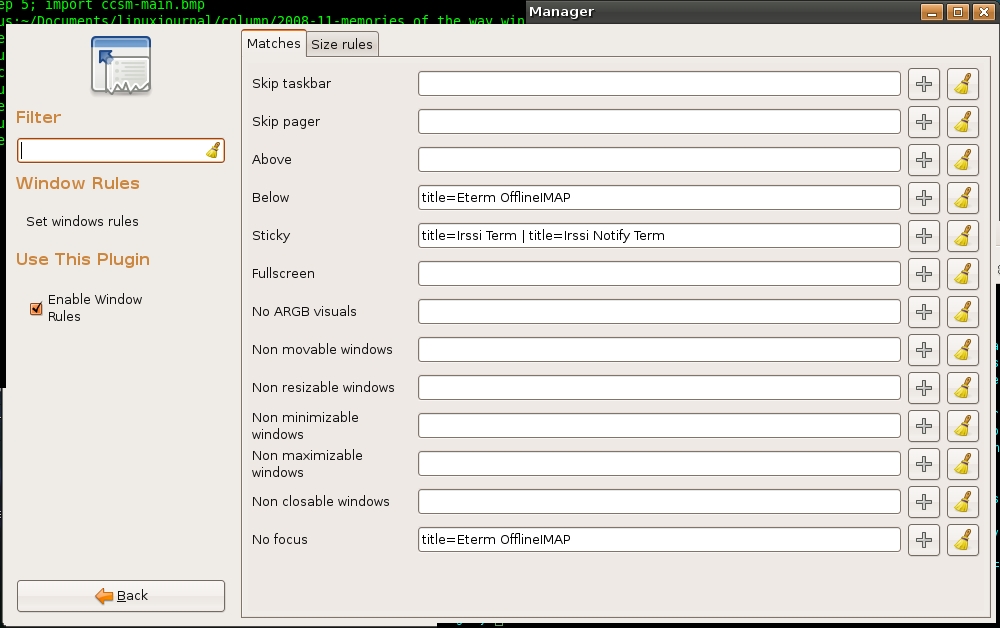
Figure 3. Window Matching Rules
Compiz can match windows based on a number of different attributes documented at wiki.compiz-fusion.org/WindowMatching, such as window type, role, class, title, xid and state—all of which you can find out about with the xprop command-line utility. Simply run xprop, and then click on the particular window for which you want information. Even though there are lots of possible attributes to match, probably the easiest attribute to use is the window title. To figure out a window's title, either view its title bar, or alternatively, run:
xprop WM_NAME | cut -d\" -f2
and then click on the window of interest. Compiz doesn't necessarily need the full title of the window, just some identifying information. So for instance, if you want Mozilla Firefox to be sticky, you could add title=Mozilla Firefox to the Sticky option, or you simply could add title=Firefox.
You also can add multiple window attributes to each of these fields and separate them with a | for “or” or & for “and”. So if I wanted both xterms and aterms to be sticky, I would add the following to the sticky field:
title=xterm | title=aterm
Note that I use the or operator. If I had used the and operator, only windows with both xterm and aterm in their titles would be sticky.
You even can use basic regular expressions to match windows (so ^ and $ would match the beginning and the end of a string, respectively), along with more advanced nested expressions. All of these more advanced options are documented on the Compiz Wiki page mentioned above.
The second tab in the Windows Rules window is labeled Size Rules and allows you to force windows to a particular geometry (Figure 4). The configuration is pretty straightforward. Click New to add a new size rule, input the attribute to match your particular window (in Figure 4, I match only on title), and then add the width and height in pixels for that window. Once you finish your changes, click the Back button at the bottom of the left pane to return to the main ccsm screen.

Figure 4. Window Size Rules
The CompizConfig Settings Manager makes a logical distinction between window geometry and settings and actual window placement. Click Place Windows from the main ccsm screen, and you will see two different options on the right pane (Figure 5): “Windows with fixed positions” and “Windows with fixed viewport”. In “Windows with fixed positions”, you can configure the exact X and Y coordinates to use for a particular window. Use the same window-matching statements (such as, title=) for these options. I noticed this typically requires a little trial and error unless I'm placing a window exactly in the left-hand corner.
You also can configure a window to appear only in a particular viewport. Again, you can match on window attributes and then specify the X and Y viewport positions to use. In my case, I have a desktop that is five viewports wide and only one viewport high, so my Y viewport setting was always set to 0, and I could choose between 0–4 for my X viewport.
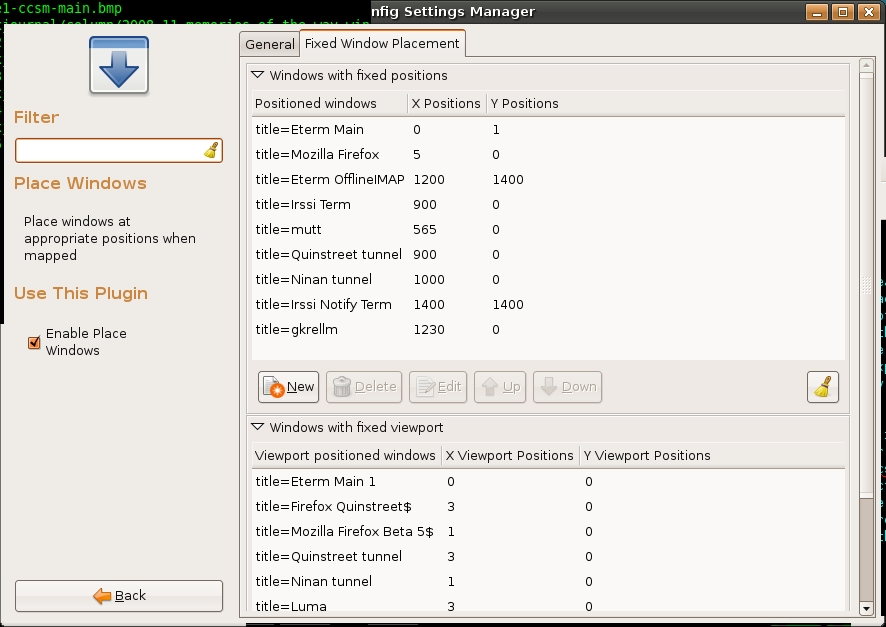
Figure 5. Window Placement Configuration Window
Now that I have all of these window management options, how do I use them? Well, I always have liked my first desktop to be for normal terminals, so I have my default terminals always open there at a particular size. I also have a different terminal I use exclusively for IRC. I want that to be available on all desktops, so I set that to sticky and also move it to a particular position on the desktop. I like my second desktop to be for Web applications, such as Firefox, so I configure them for that viewport. I also like to segregate terminals, browsers and IM clients I use exclusively for work, so I have all of those open automatically on a special desktop.
Other options you could consider might be to move GIMP and all of its windows to a special desktop. I also run a number of scripts in the background that do things such as sync my e-mail to a local directory. These scripts actually open their own small terminal in the background, so I move them to a desktop specifically created for them and also have them configured to not steal focus. I find I naturally end up assigning window memory for windows once I get tired of positioning them every time. The time it saves me in the long run makes up for the initial configuration, and it also saves me from always Alt-tabbing through the junk drawer that is the default user desktop. Most important, it helps keep this Linux user organized—at least half the time.
Kyle Rankin is a Senior Systems Administrator in the San Francisco Bay Area and the author of a number of books, including Knoppix Hacks and Ubuntu Hacks for O'Reilly Media. He is currently the president of the North Bay Linux Users' Group.
