
The COWON iAudio 7
I was on the prowl for a new portable media player. I wasn't happy with just a music player though. I wanted something that would play videos, FM radio, show pictures, display text, record my voice, record old LPs via a line-in jack, record FM radio and play music—not just MP3s, but Ogg, FLAC and (yuck) my few WMAs. Finally, it would be great if it sounded better than, and had double the battery life per charge of, an iPod Nano. And, I found it, the COWON iAudio 7. This Swiss-Army knife of multimedia players comes in 4GB, 8GB and 16GB varieties of Flash drives that cost $150, $200 and $300 retail, respectively, but you easily can find one for less at most on-line retailers that sell this player. Best of all, this player is very Linux-friendly.
Its default setting is for use as a UMS device out of the box. That means you can move your media in and out of this player easily by dragging and dropping to and (unlike many other players) from this device. You don't need to install any software to do this, just turn it on, plug it in to any of your computer's USB ports, and within seconds, it mounts as an external drive. You will see an icon pop up on your desktop when it mounts. Open it, and navigate to whatever folder you wish to move files to and from, and when you're done, simply right-click and unmount it.

Figure 1. COWON iAudio 7
Videos do require re-encoding prior to loading them for playback on the iAudio 7, and there is an open-source Linux solution for this purpose. This is necessary, due to the small size of the iAudio 7. Smaller than a credit card, it's about the same size as a large pack of gum. The screen measures 1.3", 160 x 128 dot and is a 260,000 color TFT LCD. Small as this screen is, it has good detail and color saturation. This makes it relatively enjoyable to view a TV show or even a movie. An hour of video after re-encoding is about 178MB, so it's possible to carry quite a few TV shows or movies in this player and still have room for your music library too. If you think you'll be carrying a lot of videos, you might want to opt for the 16GB version. Videos need to be encoded in xvid-.avi at 256–384kbps, at no more than 15fps. I provide a step-by-step rundown on how to re-encode later in this article.
The iAudio 7's best feature is its sound quality. It puts most other players to shame. The earbuds COWON packs with this player are of average quality. To really appreciate the sound quality this player puts out, you need to buy better earphones, like the Shure e2cs I own or any other $100+ brand of your choice. Another way to hear this player's outstanding audio quality is to plug it in to your car's radio, if it's equipped with an MP3 player (line-in) jack, like many newer models now have.
Its equalizer is called Jet Audio, which is a software branch of COWON. This little player has the most elaborate choices for equalization I ever have seen on any player. If you can't find a setting you like listening to, you might want to consider buying a hearing aid instead—it's that good.
Controlling the iAudio 7 is done with a touch interface to the right of the screen. It's called a swing-bar, and it's fairly easy to learn how to use, but it can be a bit difficult getting used to the touch sensitivity. You can make it better by going to Settings→General and changing the touch sensitivity to low. Fortunately, it does have a lock switch, so when it's locked, you can run it in your pocket without fearing it will switch to something you don't want to hear. To use the swing-bar, simply stroke the bar up or down, or hold your finger down at one end or the other to scroll through the menu. Tapping either end of the bar tells it to skip to the next file. The play arrow opens any file or function, whether it's music, video, radio station and so on. You can shuttle forward or reverse with videos or music, using the swing bar. This is useful if you recorded a TV show off-air with commercials or if you just want to shuttle over a segment of video. If the shuttle speed is too slow for your liking, you can make it faster by going to Settings→General and increasing the scan speed.
There also are three control buttons on the top of the player. The left button is power on/off/hold. The center button is the master menu control, which switches between all folders and playlists. The right buttons are for volume up and down. On the left side are the earphone and line-in jacks, and on the right side is the USB port, with a sturdy rubber flap covering it.
Speaking of playlists, you may be thinking that because you would be using it in UMS mode, you wouldn't be able to save custom mixes of your favorite songs. You would be wrong. The iAudio 7 has a feature called DPL, for Dynamic Playlist. To use this feature, simply hold the play button while playing a song until you see a small box that has a choice of DPL, Bookmark or Lyrics. Choose DPL, and it saves that song to the DPL folder. You can arrange the songs in that folder in any order you like, up to 200 songs. Just remember, the last song added always ends up at the bottom of the list.
You also can create subfolders on your computer for DPL, if you want to have special mixes of songs. Simply load the mix folder to the Music folder on the player. Then, on the player's main menu, click on Music, navigate to that folder, hold down the play button, and choose DPL on the drop-down menu. To get to the DPL folder, simply navigate to the Music folder on the main menu (using the top-center button), scroll down and click on Dynamic Playlist.
I'm sure you're curious about those other choices that appear in the menu box. Bookmark simply bookmarks your song or video where you paused it, if you want to navigate away to another song or folder. Lyrics displays the lyrics to the song you are playing. (This works only for songs that have this feature.)
The line-in, voice and FM recording features also are a nice touch, and they do make quality recordings. I did find it odd that with the support for Ogg, FLAC and Xvid open-source files for playback on this player, it records only line-in, voice and FM radio in unprotected WMA with a limit of 128kbps. In spite of this, the recordings sound surprisingly good, thanks to the Jet Audio equalizer. Voice recordings are done through a built-in mic, which sounds fine on the higher bit-rate settings. Line-in recording is one of those functions I feel all media players should offer. Maybe it's because it appeals to those like myself, who are old enough to have a large collection of music on vinyl LPs. In any case, you can digitize all your old vinyl records by recording directly into the iAudio 7 from your analog stereo amp. Simply connect your amp using standard RCA A/V plugs connected to an RCA-to-mini-plug conversion jack, and connect the mini-plug end to the line-in jack on the iAudio 7. If you want to burn a CD of the music you digitized, simply drag the songs out of the player and on to your computer for burning.
The FM radio has good signal pick up and can be used in several ways. You can scan for stations manually if you want, but it's easier to auto-scan all the stations it can pick up in your area and then assign presets for the stations you like. As for recording FM radio, you can do it on the fly, or you can use the timer settings in the Settings menu and preset a time to record a station—like a TiVo for radio. This same timer also can be used to lull you to sleep with your stored music or to wake you up with the FM radio—like a clock radio.
The picture and text display functions are pretty straightforward. Both can be displayed separately as your music plays. To load text or pictures, simply drag and drop into the appropriate folder, just like all other content stored on the player. Pictures are resized automatically as they load. They also can be used as wallpaper for your screen, or you can hold down the play button while the picture is displayed to add it to a slideshow of your own creation.
I know video encoding is a bit of a pain for some of you, but the pay-off is in the quality of the video on a player this small and portable. You may want to watch video on a player this small on a camping trip or commuting on a crowded train or plane. For me, it beats lugging around a laptop just to watch a video. I get most of my videos by recording off a cable box at home using Freevo or by downloading a video podcast using Rhythmbox (yes, Rhythmbox can catch video podcasts, it just can't play them).
Encoding is a two-step process that begins by using Avidemux. Avidemux is great for converting most videos codecs, and it works very well for what we're doing here too. The second step involves taking the finished video conversion to Xvid AVI using Avidemux and reprocessing it, using a tool called i7remux 0.1. This is necessary, because the iAudio 7 will play only videos made with I frames; b frames are removed by Avidemux. i7remux is a free, open-source converter made just for the iAudio 7 (see Resources for the download link).
Compiling and installation after extracting from a zip file are easy. Simply open a terminal, and type ./configure, make, then sudo make install. i7remux rearranges the internal structure of a given AVI file and rebuilds the indices. Once i7remux does this, and it does it much faster than the first encoding using Avidemux, the video is ready to be loaded into the player. It doesn't take as much time as it may seem, a one-hour show takes about 30 minutes to encode using these two processes.
First, in Avidemux, open the video file you want to encode. If it's a TV show recorded with a capture card, it will be an MPEG-2 file. Avidemux runs an indexing for the video before it's loaded for the next step. Many video podcasts, however, are m4v files and h264 codec. Avidemux will pop up a dialog box that says it has detected h264 and will use another mode to bypass B frame referencing. You don't need to use this alternate mode that loses frame accuracy, because you will be getting rid of the B frames later anyway, so choose Cancel to keep the frame accuracy.
Next, choose Xvid4 for conversion, select the Configure box, and on the Main tab, choose single pass bit rate, and change the default bit rate to 384 (Figure 2).
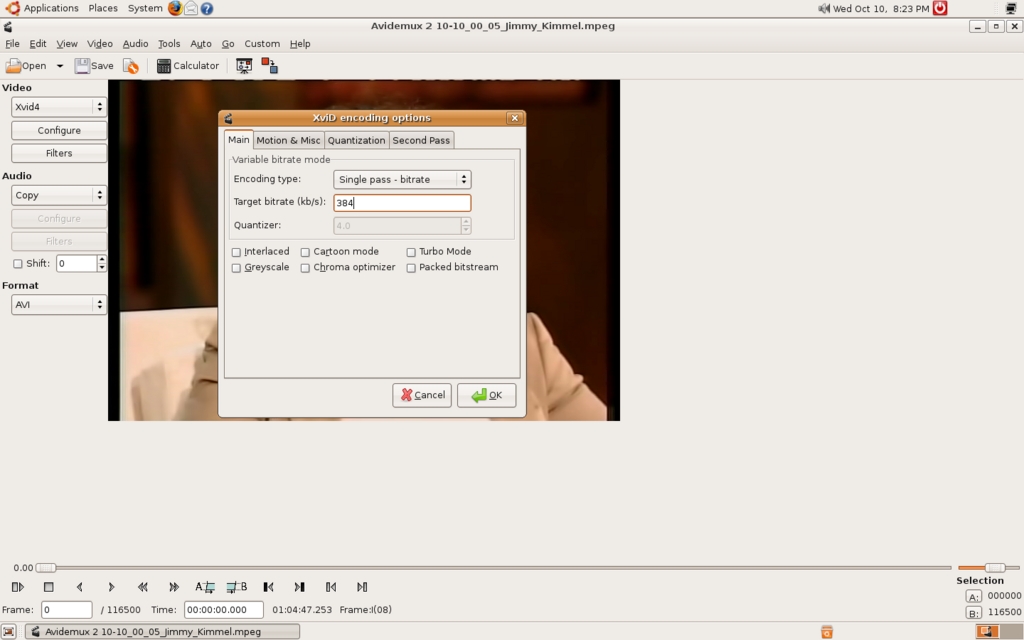
Figure 2. Setting the Bit Rate
Next, choose the Motion & Misc tab, and uncheck all the boxes. Change the I frame interval to min 2, max 66 (the maximum interleaving time), and reduce the default amount of B frames to 0 (Figure 3).
Figure 3. Motion & Misc Settings
Then, under the Quantization tab, reduce the B frame quantizer to 1 for both min and max (the lowest setting). Then, click OK, and go to the Filters box (Figure 4).

Figure 4. Quantization Settings
Choose MPlayer Resize, and program 4:3 for source and destination, and program width 160, height 120, and click OK. Do not click Apply. For some reason, Apply doesn't seem to function; I think it's a bug in Avidemux. Also, if you have a video recorded in 16:9 ratio, simply change the source setting to 16:9, and program a width of 160 and a height of 90. That way, the images will not be distorted (Figure 5).

Figure 5. MPlayer Resize
Next, choose Resample FPS, enter 15.000000, and choose no linear blend (Figure 6).
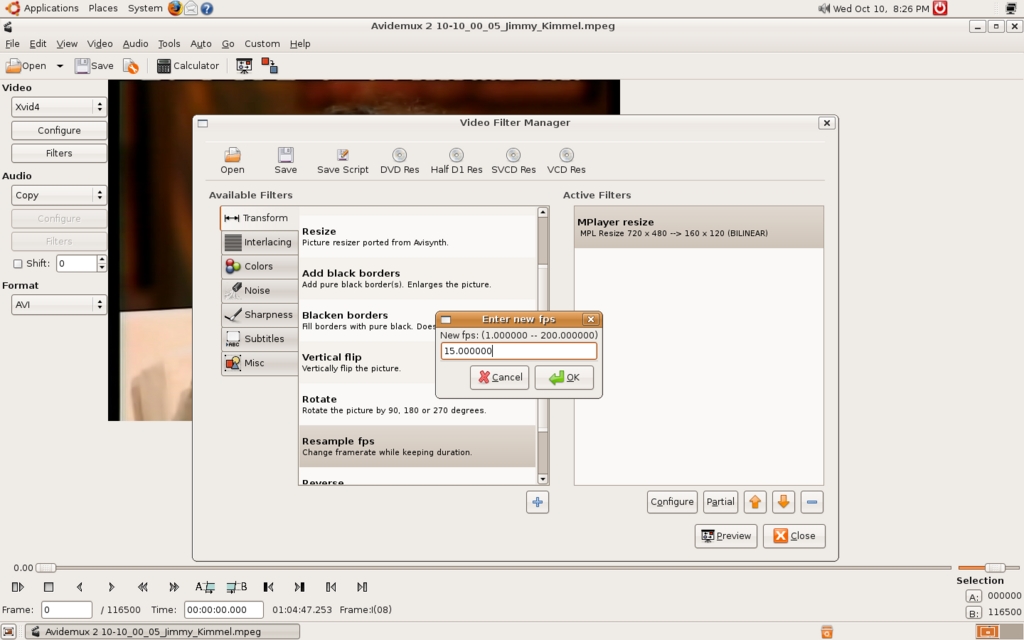
Figure 6. Resample FPS
For audio, choose Lame for MP3 encoding, and click Configure. The default settings should be 128kbps CBR 2 channel stereo, and if they are, don't change them. Then, under Filters, choose Resample, and set it to 44100Hz. Finally, save your project to whatever folder you want, and be sure to give it a name ending with .avi. Click OK, and Avidemux now will convert your video to xvid4. When it's done, close Avidemux, and move on to the next step.

Figure 7. Avidemux Encoding
Now, you're ready to use i7remux to finish encoding your video. This is a command-line program, so open a terminal and simply type i7remux (no need for sudo), then copy and paste the name of your video from the video created by Avidemux. Next, copy and paste again, only this time change the filename of the video by adding a random letter or number to it, then press Enter. If you don't add a letter or number, it won't let you encode. i7remux then creates the video you will load to the player when it's done; this should take about 10–20 seconds. i7remux sends it to the same folder to which Avidemux sent your video.
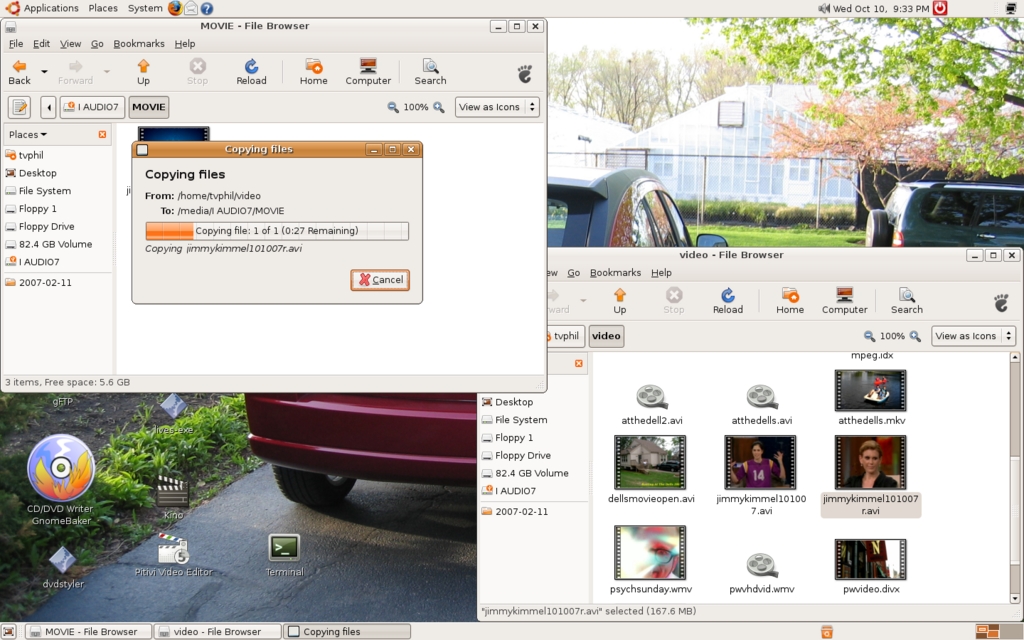
Figure 8. File Copying
Next, plug in the player to any USB port, and click and drag the video you created with i7remux to the Movie folder in the player. When you navigate to Videos in the player's main menu, you should see your video. Simply highlight it, and touch the play button. You might hear only audio for a few seconds before the video shows up in the screen. If this bothers you, pause the video and start it again.
Firmware updates for the iAudio7 are available from the support link at cowonamerica.com. To install one, download it to your desktop and extract it. Plug in the player to a USB port, and drag the firmware to the Root folder of the player. Then, unmount the player, and it will power off. Turn it back on, and it begins to install the firmware update. When it's done, after about 20 seconds, it turns itself off. When you power it back up, you should see the new firmware installed, indicated by the new version number on the boot splash. Firmware updates are a good idea, as the player always is being tweaked by COWON with improvements. However, a firmware update deletes all content on the player prior to the update. So, be sure to have a backup of your content on your computer or an external drive before updating. If you don't think the update is worth the hassle, just don't do it, the player still will run fine.
This, obviously, isn't the only multimedia player that functions with Linux. In fact, COWON's D2 player is a good choice if you want a larger 2.5" screen, but it's also a larger player, so there's a size trade-off. Another player worth considering is the iriver clix, which now can be used as a UMS device, unlike last year's model, so it too can function on Linux. The reason I chose to buy the iAudio 7 is that it had the most bang for the buck, and it slips into my pocket very easily. I have the 8GB version, but the 4GB and 16GB versions give everyone a wide range of choice for personal storage needs, and they're all priced competitively. Not to mention, a 16GB Flash drive player of any sort is rare, though more are coming in the near future. It also gives me some peace of mind, using a player that supports open-source codecs. The best part is not having any DRM restrictions on how I can use the player for my own personal use.
I mentioned my desire to have longer battery life at the start of this article. COWON claims its internal lithium-ion battery will last up to 60 hours on one charge. This claim is based on using it almost exclusively for music playback. Video playback will knock this claim down to about 40 hours per charge. Regardless of how you use it, it's a superior amount of battery power when compared to the competition. It also accounts for why the iAudio 7 is about three times thicker than an iPod Nano, but that's a trade-off I don't mind making. It's still relatively thin, as I measured it to be only .75" thick. The COWON iAudio 7 is a mini-marvel of a media player that also lets you cast your vote in supporting products that function in an open-source environment, and that environment just got more inviting with this player.
Resources
COWON America: cowonamerica.com
i7remux-0.1 Download: www.powerwebvideo.homestead.com/files/i7remux-0.1.zip
Philip Raymond has been using several Linux distros during the last four years. He has worked professionally as a Broadcast Technician for 34 years, the last 23 at WFLD-Fox Television in Chicago. He also is the Webmaster and co-creator of thepulsechicago.homestead.com, a Web site focused on the Chicago music scene, past and present. He can be contacted at tvphil@yahoo.com.
