
Backups to the Future: Eliminate Tape Backups with FreeNAS and Bacula
Backups in today's environment are in a state of flux. Tapes have been the mainstay of most organizations for years—and in some cases, decades. However, as the cost of hard drives decreases and their capacity increases, conventional wisdom about backups and tapes is changing. Although tapes still prove useful for archiving and offsite storage, inexpensive disk-based technology slowly is creeping into areas that tape has traditionally dominated.
Many enterprises find it's just as easy and reliable to back up data over their network to near-line storage, such as a Storage Area Network (SAN) or Network-Attached Storage (NAS), instead of tape. Also sometimes referred to as disk-to-disk (D2D) backups, the benefits of near-line storage are many—especially speed and capacity. When deciding to go near line, you really have only two choices: SAN or NAS. Of the two, NAS is more cost-practical for most shops. In this article, I explain how to implement a near-line backup to a NAS to illustrate how easy it is to begin the transition from tapes to disks.
I've chosen two programs for reaching the goal of a tapeless backup: FreeNAS (to create a networked storage area for backup files) and Bacula (to automate backups and provide a pseudo-daily, weekly and monthly rotation).
To keep things simple, let's build two systems, one running FreeNAS and one running Bacula on top of Fedora 8. All configuration done on the Bacula system for this article was performed as root, but it also could be done with sudo. Bear in mind, the options covered in both programs here represent only a handful of their full capabilities.
FreeNAS is one of the simplest programs I have ever deployed. It's small enough to run a system from a CD or USB key. However, for this example, let's install it on our server to the local hard disk. On your system, I suggest at least 256MB of memory and SATA drives for decent performance. If you want to use RAID on your drives, use hardware-based solutions. They are faster, and there have been issues with the built-in software RAID capabilities of FreeNAS. If you opt to use hardware RAID, check the FreeBSD hardware compatibility list, on which FreeNAS is based, before making a purchase.
Download the latest ISO from the FreeNAS site, and burn it to CD (version .684b at the time of this writing). Boot the system from CD, and when you come to the options menu (Figure 1), select option 7 to install the server image to a local hard disk. Next, select option 2 to create two UFS partitions. UFS is the native filesystem in FreeNAS, and as we plan to access our data on the disk via a networked protocol (NFS), any system should connect to it. Select these options to create a small partition for the server software, and use the rest of the space for a second data partition. When prompted, enter the name of the CD drive (acd0 in my install), and then enter the destination drive (da0). When the install routine is complete, enter 3 at the prompt to return to the main menu, and then enter 1 to assign an interface. Accept the default interface, and give it an IP address (unless you are using DHCP). Once assigned, return to the main menu, and reboot the machine. Remove the CD, and the system now should boot from the system partition on the disk.
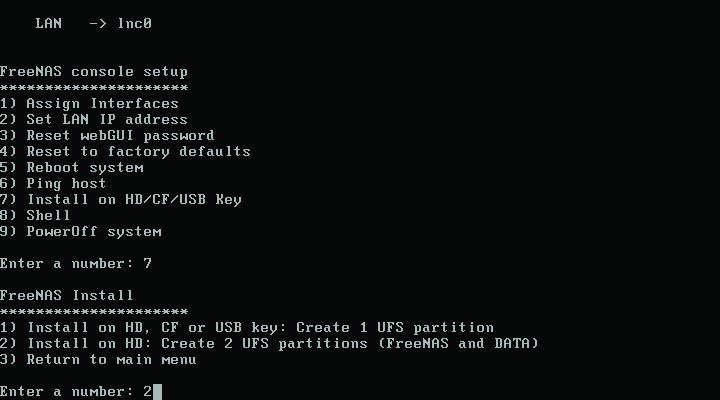
Figure 1. FreeNAS Install Options
Once the system is back up, open a Web browser from another system, and enter the IP of the FreeNAS machine as the URL to access the management site. At the prompt, enter admin as the user name and freenas as the password. From this management site, you can change a multitude of settings, but for now, we need to change only our hostname (Figure 2), mount the auto-created DATA partition and enable NFS.
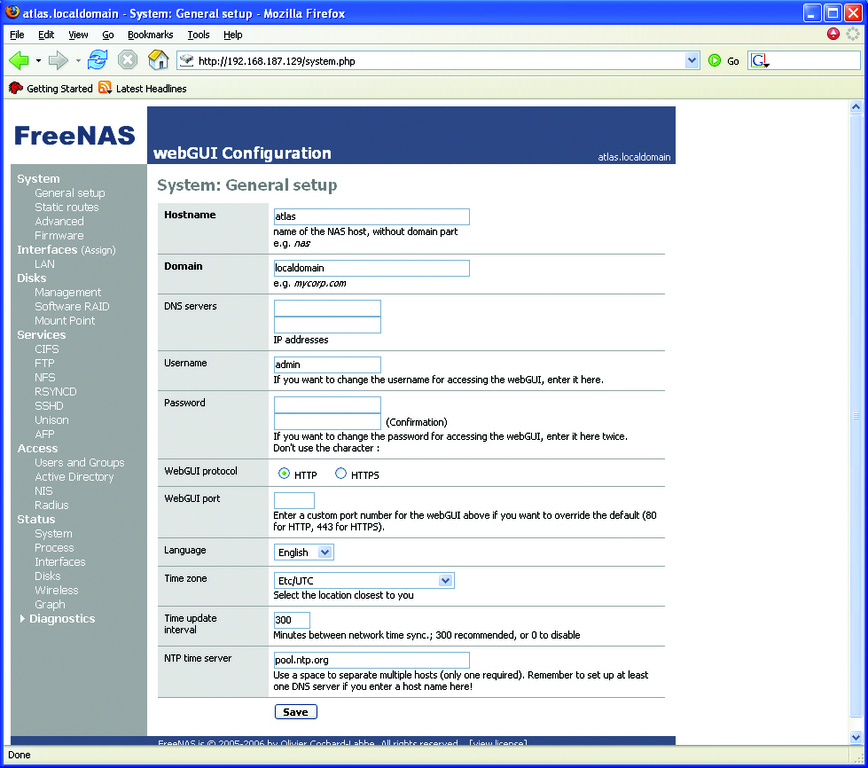
Figure 2. Setting the Hostname on the FreeNAS Management Page
Click the Management link under the Disks section of the Web page. You should see a message saying that you need to add your hard drive to the disk list. Click the + icon to add it (Figure 3). Leave all the options at their defaults, except PreFormatted FS. Set this to UFS, as FreeNAS already has done the work for us. Once you click the Apply Changes button, the status column of your disk will change to ONLINE.
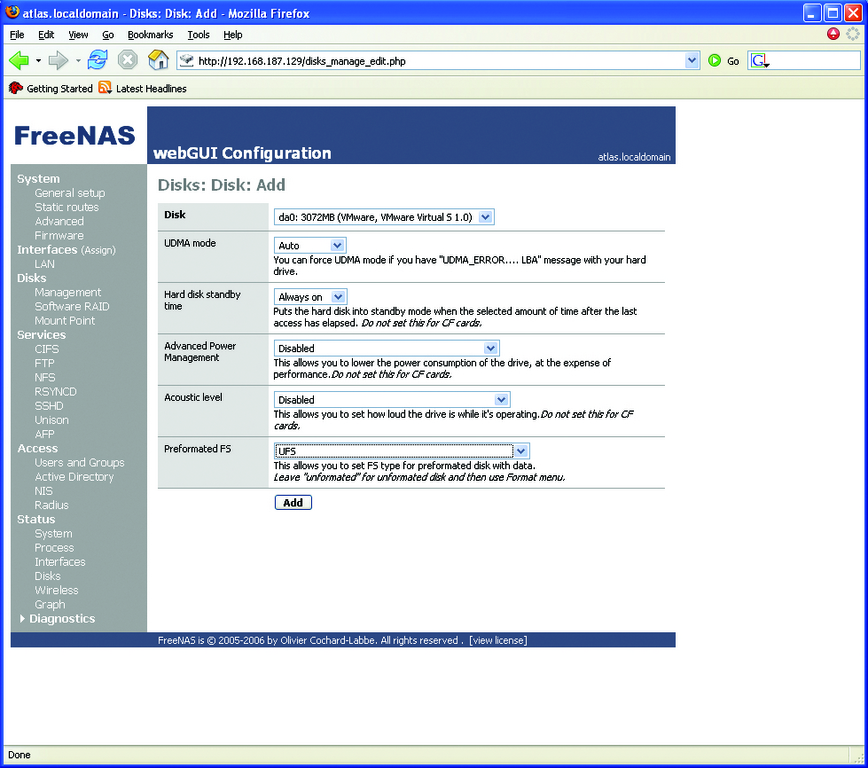
Figure 3. Adding the Disks
Now click the Mount Point link, and click the + icon again on this page to edit the Mount Point properties (Figure 4). From this screen, change the partition to 2, as partition 1 is the system partition, which cannot be used. Leave the File System as UFS, and enter DATA as the share name. Click Add when finished. This takes you back to the original Mount Point page. Click Apply Changes.
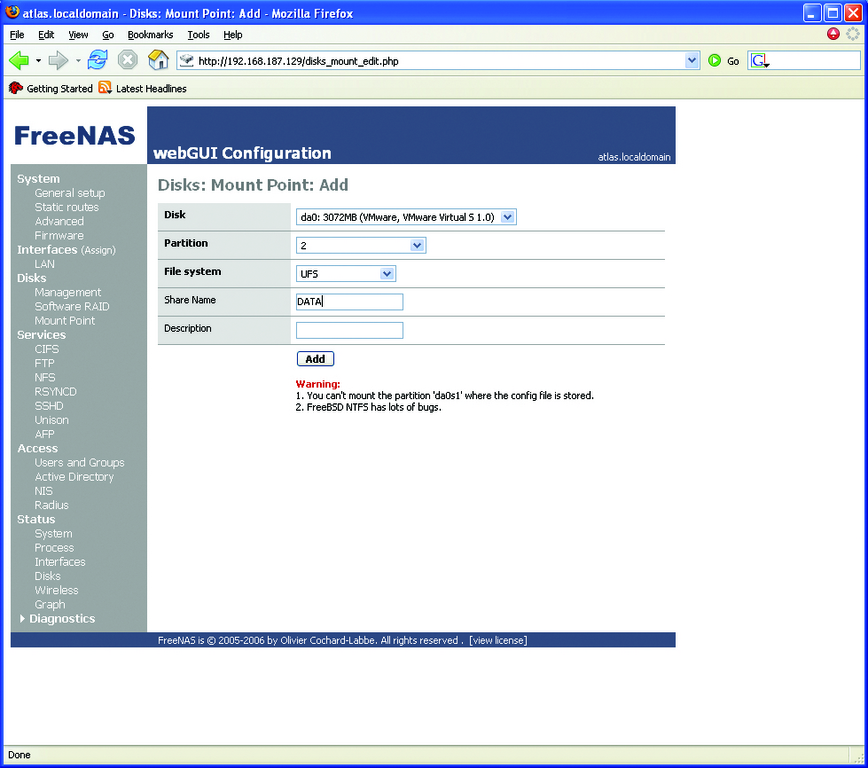
Figure 4. Mounting the DATA Share
Under the Services links, click NFS. Check the Enable box to turn NFS on, and type your network address range in CIDR notation. Click the Save button, and your NAS build is complete.
With the FreeNAS system in place, let's start building the Bacula system. The test system used here was built on Fedora 8 (Werewolf) with GNOME, because it includes Bacula and its dependencies in its core RPM library. To add the necessary packages and related dependencies, all you need to do is use the Add/Remove Software utility under the Applications menu. When ready, install the following packages:
bacula-client
bacula-common
bacula-console
bacula-gnome
bacula-console-gnome
bacula-console-wxwidgets
bacula-director-common
bacula-director-mysql
bacula-docs
bacula-storage-common
bacula-storage-mysql
bacula-traymonitor
mysql
When the installs are complete, start mysqld, and set it to start runlevel 5 from the Services utility in GNOME or use chkconfig. If you're using a different distribution, you need to use the Bacula source files and make/configure the install to get to the next step. This can be more challenging than using an RPM, because of the numerous command-line install options available.
Next, open a terminal to create the MySQL tables needed for Bacula to operate. Run the following scripts created by the Bacula RPM:
/etc/alternatives/create_bacula_databases
/etc/alternatives /make_bacula_tables
/etc/alternatives /grant_bacula_privileges
After setting up the database, create a local mountpoint (like /mnt/freenas), and mount the FreeNAS share created previously. An easy way to do this on every startup is to add the following line to your /etc/fstab file:
FreeNASServerHostName:/mnt/DATA /mnt/freenas nfs defaults 0 0
To mount the partition immediately, type mount -a.
Before moving on to editing Bacula's configuration files, here's how Bacula works. The Bacula program is composed of three separate dæmons: the director, the storage dæmon and the file dæmon. The director is the boss. It's the main server dæmon that defines jobs, pools, schedules and most of the important settings related to backups. As such, the majority of setup deals with its configuration file /etc/bacula/bacula-dir.conf. The storage dæmon (SD) controls the media written to by Bacula, usually either tapes or disks. These items are configured in the bacula-sd.conf file. The file dæmon (FD), also referred to as the client, runs locally on any system you want to back up. Two other related utilities used here are the GNOME console (gnome-console.conf) and the tray-monitor (tray-monitor.conf) utility.
With this basic knowledge of Bacula's interoperation, open your /etc/bacula/bacual-dir.conf file, and add the following lines (for brevity, I have added only those sections used in our scenario):
JobDefs {
  Name="UserHomes" Type=Backup Client = bacula-fd FileSet =
  "UserHomeFolders" Storage = File Messages = Daemon
}

Job {
  Name = "WeeklyHomeBackups"
  JobDefs = "UserHomes"
  Level = Full
  Schedule = WeeklyFullandDiffs
  Pool = Weekly
  Priority = 10
  Write Bootstrap = "/var/spool/bacula/WeeklyHomeBackups.bsr"

}

Job {
  Name = "MonthlyHomeBackups"
  JobDefs = "UserHomes"
  Level = Full
  Schedule = MonthlyFull
  Pool = Monthly
  Priority = 10
  Write Bootstrap = "/var/spool/bacula/MonthlyHomeBackups.bsr"

}

Schedule {
  Name = "WeeklyFullandDiffs"
  Run = Level=Full Pool=Weekly sun at 3:00
  Run = Level=Differential Pool=Diffs mon-fri at 3:00
}

Schedule {
  Name = "MonthlyFull"
  Run = Level=Full Pool=Monthly 1st sat at 3:00
}

FileSet {
  Name = "UserHomeFolders"
  Include {
    Options {
      compression=GZIP
      signature = MD5
    }
    File = /home
  }
}

Pool {
  Name = Weekly
  Pool Type = Backup
  Recycle = yes
  AutoPrune = yes
  Volume Retention = 6 days
  Maximum Volumes = 5
  Label Format = Bkup-Full

}

Pool {
  Name = Diffs
  Pool Type = Backup
  Recycle = yes
  AutoPrune = yes
  Volume Retention = 23 hours
  Maximum Volumes = 1
  Label Format = Bkup-Diff
}

Pool {
  Name = Monthly
  Pool Type = Backup
  Recycle = yes
  AutoPrune = yes
  Volume Retention = 364 days
  Maximum Volumes = 12
  Label Format = Bkup-Monthly
}
Although it may seem odd to start at the bottom and discuss the Pool section, it is vital that it is configured correctly. A pool is simply a collection of volumes. Volumes are tapes or disks to which the backup files are written. A pool can contain any number of volumes, but it must have at least one volume. Here, we have set up three pools: a weekly full, a differential and a monthly. This allows us to maintain backups for the current week up until the previous day and a 12-month rotation for our monthly backups.
Then, going from the top section down, there is a Job Definitions (JobDefs) section, and two Jobs modeled around our backup strategy. The JobDefs section defines common properties that several jobs share, like a template. In it, we have listed settings common to both jobs. The Schedule section defines when a given job runs and how often. The schedules listed here run weekly backups every Sunday, daily differentials Monday through Friday and a monthly backup the first Saturday of every month. The Fileset section lists what folders and files to back up and with what options. For this example, we have set Bacula to back up the local users' home folders, a common scenario for backups. Recursion is enabled by default on FileSets, so we need to specify only the parent folder. The backup files also are set to compress using gzip and to hash/encrypt themselves using MD5. Doing both is good practice.
Before saving and closing the file, go through and change any instance of @@Password@@ or like entries to a common password. Rather than cover how each Bacula dæmon authenticates with the other, it's easier simply to change all of them to the same password for the time being and get the system up and running. You can change these passwords later if desired. Change any other password-related fields in the following files to the common password as well: bacula-sd.conf, bacula-fd.conf, bconsole.conf, gnome-console.conf and tray-monitor.conf. After changing the passwords, you also need to change any references to your host in all the .conf files, so each dæmon can communicate with each other. If all of the dæmons run locally, you can use localhost. You also could use an FQDN or IP address. The field you want to edit is listed under each section as Address. So, for example, change the line:
Address = server.example.com
to:
Address = localhost
You also could search for the client.example.com and storage.example.com entries to find some of the other entries that need to be changed. Once the passwords and Address fields have been set, open the /etc/bacula/bacula-sd.conf file in your editor, and comment the following line in the Device section of the Filestorage device:
Archive Device = /tmp
Then, add the line below in its place to associate the locally mounted FreeNAS partition with the storage dæmon so you can back up to it:
Archive Device = /mnt/freenas
The final step is to open the Services utility under System→Administration, and check the box to set bacula-dir, bacula-sd and bacula-fd to start on runlevel 5 (Figure 5). You now can use the syntax:
service bacula-dir|sd|fd start|stop|restart
to control the dæmons. On other distributions, you can start the dæmons directly from /usr/sbin and use chkconfig to set the runlevel.
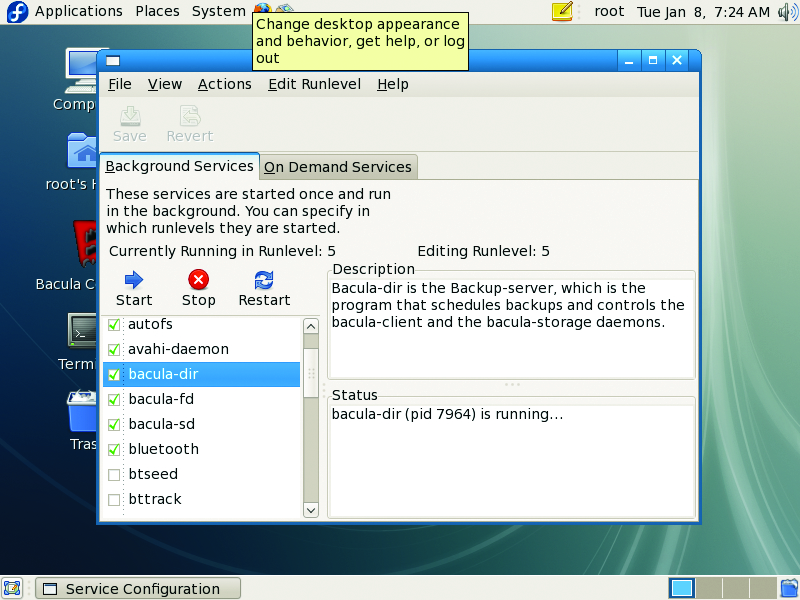
Figure 5. Start all three Bacula dæmons, and set them to runlevel 5.
Running a backup is quite simple, as you already have done most of the work by editing the bacula-dir.conf file. Start the Bacula console from the Applications→System Tools Menu (Figure 6) in GNOME. You may need to edit the launcher, as I did, to point it to the correct /etc/bacula/gnome-console.conf file. Start the Tray Monitor utility from the System Tools menu as well. The Tray Monitor (Figure 7) is nice, because it gives you a quick glance at the status of the dæmons and any running jobs. This is helpful when you are multitasking or have jobs that run nightly and you want to check their status the next morning. Return to the console, and click the Run button to bring up the backup job dialog window. Under job, select WeeklyHomeBackups (Figure 8). This pre-fills the field selections with the items specified in your .conf file. You could change any of these options at this point, but they must first exist in the .conf file or they will not appear in the fields. In other words, you can't create a job from the drop-downs without populating the Job section of the .conf file.
Up to this point, there are no volumes, which as previously mentioned, need to exist before you can run a backup. Typically, you would have to use the label command from the console's command line to create a volume in a pool manually, but because of our settings, the system will create them automatically, auto-name them and recycle them when the volume retention period triggers. I like this better than manually creating the volumes, as you are less likely to encounter naming errors. Click OK to run the job, and view the results in the console.
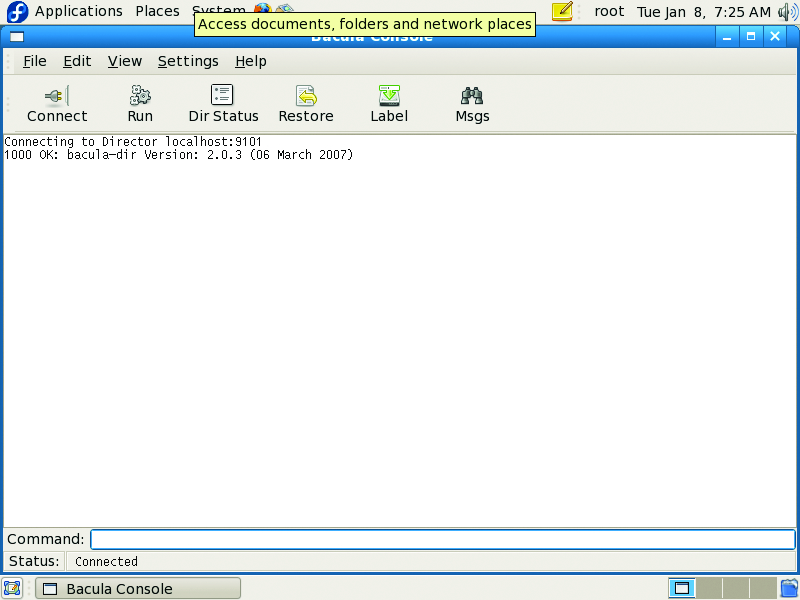
Figure 6. The GNOME Bacula Console
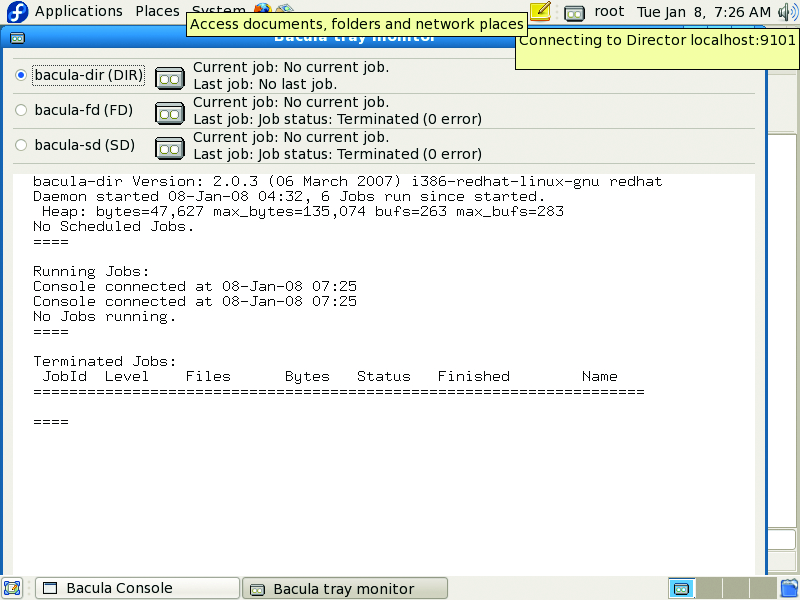
Figure 7. The Bacula Tray Monitor

Figure 8. Running a Backup Job from the GNOME Console
If you were to change the Volume Retention setting on the same pool, restart the dæmons and run the job again, you would see the system auto-recycle a volume in the pool for the next job. Otherwise, it will prompt you to create a new volume, as no existing volumes can be recycled due to retention settings. You can run these jobs manually as often as you want, but they also will run according to the schedule defined in the bacula-dir.conf file.
Restoring a file in Bacula also is remarkably simple. You can use either the Restore button on the console toolbar or the restore command. Both are easy to use, but the restore command provides more options. To keep it simple, let's use the Restore button. When the dialog opens, select a job, client, pool and so on from which to restore (Figure 9), then click Select Files to mark the files/folders you want to restore (Figure 10). Before the restore job runs, you will be prompted to confirm your options, at which point you could type yes, mod or no. Typing mod provides more options over the job, including the option to restore to a different path from the original one.
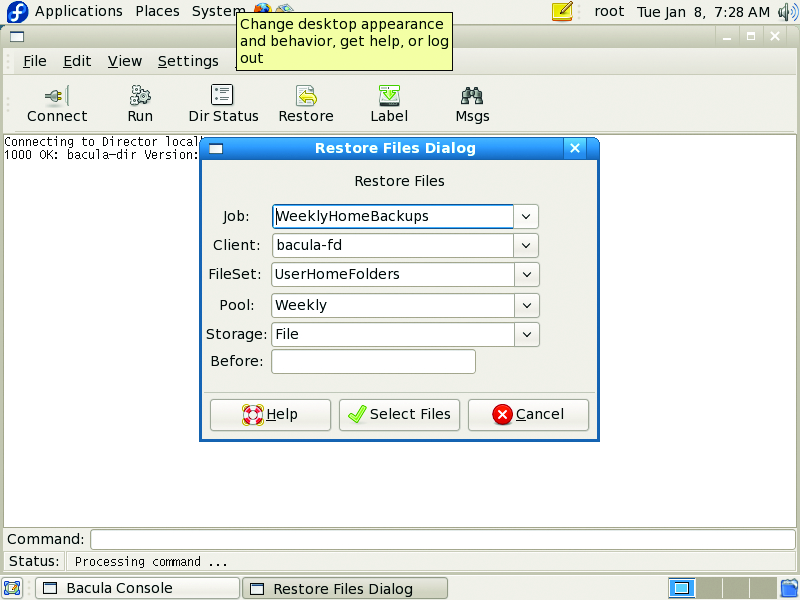
Figure 9. Bacula's Restore Options Dialog Window
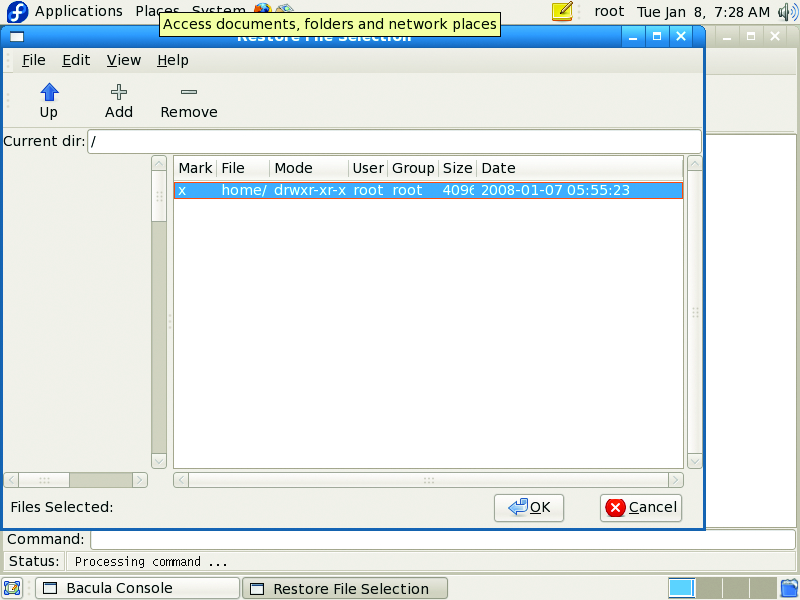
Figure 10. Marking the Files to Restore
Although we have simplified the near-line backup process here, it's only the beginning. Our simple setup has accomplished what we set out to do: back up our data to a networked disk. To replace tapes completely in most backup strategies, you need some sort of offsite storage/synchronization scheme, which I've not addressed here. However, once you see much faster backups and how much more data you can store on a disk, you'll be itching to make the move and get rid of those tapes.
Resources
FreeNAS Main Site: www.freenas.org
FreeBSD Hardware Compatibility Checklist: www.freebsd.org/releases/5.1R/hardware-i386.html
Bacula: www.bacula.org
Bacula Download Site: sourcefort.net/projects/bacula
Bacula Documentation: www.bacula.org/rel-manual/index.html
Jeramiah Bowling has been a systems administrator and network engineer for more than ten years. He works for a regional accounting and auditing firm in Hunt Valley, Maryland, and holds numerous industry certifications including the CISSP. Your comments are welcome at jb50c@yahoo.com.

