
3-D Graphics Programming with Irrlicht
There's something about 3-D graphics that just draws you in. Even though I have a degree in Mathematics, I've always had the impression that programming in 3-D would be difficult. I've recently discovered though, that it's really not very hard. In fact, it's almost easy and a lot of fun—thanks to the Irrlicht 3-D graphics engine.
The Irrlicht 3-D graphics engine is written in C++ and allows you to get impressive results without a whole lot of code, as you'll see later in this article. With Irrlicht, you can write programs that will run under Linux or Windows and take advantage of OpenGL or DirectX. Irrlicht directly supports 3-D models in various formats, including Maya (.obj), COLLADA (.dae), Quake 3 levels (.bsp), Quake 2 models (.md2) and Microsoft DirectX (.X), among others. This means there are plenty of ready-made models available for download on the Internet that can be used with Irrlicht. Also, many tools are available for creating models and textures to use with Irrlicht.
When I was evaluating some other 3-D engines, I chose Irrlicht because it seemed to be the easiest to wrap my head around, while at the same time, it had all the features I wanted. Irrlicht supports both mesh-based animation as well as a skeletal animation system. With Irrlicht, materials can be layered to produce stunning effects. And most important, Irrlicht is extremely well documented with tutorials on-line as well as a very responsive on-line forum. Oh, and it's free. And, it's open source.
Listing 1 shows a sample program I wrote in order to demonstrate a few of Irrlicht's features.
Listing 1. Irrlicht Sample Program
1  #include <irrlicht/irrlicht.h>

2  #include "unistd.h"

3  using namespace irr;
4  using namespace irr::core;
5  using namespace irr::video;
6  using namespace std;

7  IrrlichtDevice*                 device;
8  video::IVideoDriver*	           driver;
9  scene::ISceneManager*           smgr;
10 scene::ICameraSceneNode*        camera;

11 scene::IAnimatedMesh*           ground;
12 scene::IMeshSceneNode*          ground_node;

13 scene::IAnimatedMesh*           house;
14 scene::IMeshSceneNode*          house_node;

15 scene::IAnimatedMesh*           avatar;
16 scene::IAnimatedMeshSceneNode*  avatar_node;

17 video::SMaterial                material;
18 scene::ISceneNode*              cube;

19 int    main () {

20     //video::EDT_SOFTWARE
21     //video::EDT_NULL
22     //video::EDT_OPENGL,

23     device=createDevice(video::EDT_OPENGL,
24     dimension2d<s32>(640,480),16,false,true);
25
26     if (device == 0) return(1);

27     driver = device->getVideoDriver();
28     smgr = device->getSceneManager();

29     smgr->addSkyBoxSceneNode(
30             driver->getTexture("./graph/irrlicht2_up.jpg"),
31             driver->getTexture("./graph/irrlicht2_dn.jpg"),
32             driver->getTexture("./graph/irrlicht2_lf.jpg"),
33             driver->getTexture("./graph/irrlicht2_rt.jpg"),
34             driver->getTexture("./graph/irrlicht2_ft.jpg"),
35             driver->getTexture("./graph/irrlicht2_bk.jpg"));
36
37     smgr->addLightSceneNode(0, vector3df(0, 100, 0),
38             video::SColorf(1.0f, 1.0f, 1.0f), 1000.0f, -1);

39     smgr->setAmbientLight(video::SColorf(255.0,255.0,255.0));

40     camera = smgr->addCameraSceneNodeFPS(0,30.0f,90.0f,-1,
                        0,0,false,0.0f);
41     camera->setPosition(vector3df(30,10,30));

42     ground = smgr->getMesh("./graph/grass.obj");
43     ground_node = smgr->addMeshSceneNode(ground);
44     ground_node->setScale(vector3df(1000,1,1000));
45     ground_node->setMaterialFlag(EMF_LIGHTING, false);

46     material.setTexture(0,
                  driver->getTexture("./graph/building.tga"));
47     house = smgr->getMesh("./graph/building.obj");

48     for (int i=0; i<5; i++) {
49         house_node = smgr->addMeshSceneNode(house);
50         house_node->setScale(vector3df(.5,.5,.5));
51         house_node->setPosition(vector3df(30*i+5,0,-30));
52         house_node->getMaterial(0) = material;
53         house_node->setRotation(vector3df(0,90,0));
54     }

55     material.setTexture(0,
                  driver->getTexture("./graph/sydney.bmp"));
56     avatar = smgr->getMesh("./graph/sydney.md2");
57     avatar_node = smgr->addAnimatedMeshSceneNode(avatar);
58     avatar_node->setScale(vector3df(.1,.1,.1));
59     avatar_node->setPosition(vector3df(5,2.5,5));
60     avatar_node->setRotation(vector3df(0,270,0));
61     avatar_node->getMaterial(0) = material;

62     cube = smgr->addCubeSceneNode(1.0f, 0, -1,
63                    vector3df(10, 2, 10),
64                    vector3df(45.0, 0, 0),
65                    vector3df(1.0f, 1.0f, 1.0f));
66     cube->setMaterialTexture(0,
               driver->getTexture("graph/purple.jpg"));

67     cube->addAnimator(
               smgr->createRotationAnimator(vector3df(1,.5,.25)));

68     while (device->run()) {
69         driver->beginScene(true,true,
                     video::SColor(255,100,101,140));
70         smgr->drawAll();
71         driver->endScene();
72     }

73     driver->drop();

74     return(0);
75 }
The first 18 lines of code are pretty easy to follow. They include the irrlicht.h header file, which contains all the declarations I'll need. Then, I define a few namespaces and variables for later use in the program. The main function begins on line 19.
On line 23, I ask Irrlicht to set up my display window. Here, I tell it to use the OpenGL render engine and to use a 640x480 display resolution. I've included comments in lines 20–22 that show what values to use to select from the various other render engines that Irrlicht supports. In line 26, I check to make sure the call to createDevice() was successful. If it wasn't successful, it's Game Over, literally.
Lines 27 and 28 initialize a few objects that I'll use throughout the rest of the code. The driver object allows me to change various aspects of how the window is rendered; I'll use this object in the next code block. The smgr object is the scene manager object and is the object I use to add objects to my scene, such as cameras, lights and other objects.
In lines 29–35, I set up what's known as a skybox. A skybox is exactly what it sounds like. Imagine a giant box that is set down over a scene, each face of the box having a different mural on it. So, if you were to look to the west, you would see the mural on the western face of that skybox. And, if that mural were a picture of a sunset, it would present the illusion that you were looking at a real sunset. In my example here, I use the skybox textures that came with the Irrlicht tutorials.
A common mistake that first-time Irrlicht users make is building up their scene by adding all kinds of models and various types of objects, but when they go to display their creation, they don't see anything but black. You can't see anything without light. I add a light object as well as some ambient light in lines 37–39.
At this point in the code, I get my first introduction to what's known as a vector. A vector is simply an object that has more than one numerical component. In this case, it's a vector3df object, which simply means it's composed of three floating-point components. You can think of these components as X, Y and Z, or perhaps up/down, left/right and forward/backward. Essentially, a vector allows you to store a location in 3-D space. The SColor vector in line 39 also has three elements. In this case, it's safe to think Red, Green and Blue.
Lines 40 and 41 are probably the most important. Without them, I still would not see anything, nor would I be able to “walk around” in my scene. In line 40, I add a First Person Shooter (FPS) camera to the scene. It's this camera that determines what I see. It's also this camera that I move around with the arrow keys and mouse. The FPS camera is my eyes into the game. The Irrlicht engine supports various other camera types, but the FPS camera is the most intuitive, because it mimics the FPS games everyone's familiar with. In line 41, I position the camera at a location described by the vector, (30,10,30).
Lines 42–45 are where I add my first mesh to the scene. Think of a mesh as just a bunch of triangles and rectangles that are put together to form the shape of an object. In this case, I'm adding a simple rectangle shape to form the ground in my demonstration. First, I call getMesh() to read a mesh from an external file. Then, I call addMeshSceneNode() to convert that mesh into a local representation and add it to my scene. This function returns an object that gives me access to that representation. Using this object allows me to use the setPosition() and setScale() methods to move the mesh around and set its size in my scene. Finally, I use the setMaterial() method to tell Irrlicht that this object does not emit light on its own.
At this point, I have a sky, some light to see by, a camera to see with and some ground to stand on. But, it gets better.
I put in a few background objects in lines 46–54. In this block of code, I create my first material by reading in an external texture file. This material then will be applied to the meshes as I add them to my scene. On line 47, I read in the mesh that eventually will be used to add a row of stone “houses” to my scene. Inside the loop, I add them to the scene, scale them, position them in a row, and turn them around a bit.
Finally, on line 52, I apply the material that I created on line 46. Figure 1 shows what's inside building.tga—it's what might happen if you thought of the house as simply a box and “unfolded” it so all of its sides fit flat on a piece of paper. I then added a slate texture and a label to each face. When I apply this material to the mesh in line 52, the faces from building.tga are wrapped around the model to form an object that appears to be made of stone. This process is known as UV mapping.

Figure 1. 3-D Texture Represented in Two Dimensions
Lines 55–61 expose as much complexity as you're going to see in this short example. Here, I reuse the material variable, which is probably bad form, but this is only meant to be a quick demonstration. This time, I'm reading in a UV mapping that is considerably more complex than the box I created for the houses earlier. This material is used as a skin for the sydney.md2 Quake model. In line 57, you can see that this is an animated mesh, which is different from the meshes discussed so far. An animated mesh contains several meshes that can be used, in turn, to create animations. In this case, Sydney has various death-scene animations. She also has a running animation. Sometimes, at one point, I swear she's doing the Macarena! The rest of the code block is devoted to scaling, positioning and rotating the model to our liking.
Now things get a little psychedelic. In lines 62–66, I create a cube that appears to be floating just above the ground. I also apply a purple skin to it. Sure, purple floating cubes are one thing, but on line 67, I make it rotate in space. To add to the visual effect, I specify that the cube revolves once per second around the X axis while revolving around the Y axis twice a second, and finally, it revolves around the Z axis three times a second. The result is a cube that floats in space and spins around in an apparently random fashion.
Lines 68–72 are the main run loop. The run() method returns true until users press the Esc key, indicating they want to end the game. If this game needed to move objects around, such as flying missiles or attacking bad guys, those game updates would take place between the call to beginScene() and the call to drawAll().
Finally, when users press the Esc key, I release some resources in line 73, and the program returns to the operating system.
I can compile the program with a command that resembles this one:
g++ ./lj.cpp -lIrrlicht -lGL -lXxf86vm -lXext -lX11
 ↪-lenet -ljpeg -lpng -o game
See Figure 2.
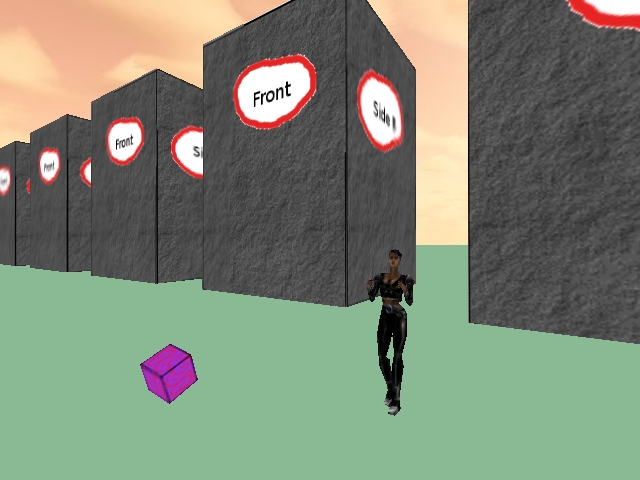
Figure 2. The Completed Scene
So there you have it. The example here shows building a simple scene, adding a moving character and a spinning cube. You even can walk around and explore this simple world, or fly around and explore it from above, or below—all this in less than 100 lines of code!
As powerful as Irrlicht is, it's not without its weaknesses. I've not had much success with Irrlicht's support of materials other than UV-mapped materials. I desperately tried to get the ground to resemble actual grass, but I couldn't seem to get it to work. On the other hand, UV mapping a complex model is a daunting challenge. I also noticed some of the tools used to create or export the models behaved strangely. Sometimes the resulting models would look okay. Other times, they'd need to be rotated or scaled in order to look right. Of course, most of these problems are problems with the 3-D modeling tools used to create content for Irrlicht, and not with Irrlicht itself.
I've also discovered that writing a 3-D game is more about artwork than codework. This simple demonstration has all the major elements of an FPS game. But the scene is still quite simple and not very realistic. However, by merely changing the models and textures, this scene could be made to look like a row of realistic houses with doors and windows, perhaps a street and sidewalk complete with grassy lawns and a newspaper sitting on the porch—no code changes required. I simply could have used an existing Quake or Doom level instead, but I'm kind of tired of the Gothic atmosphere of most of those games. I'd like to see a new crop of brighter, more familiar-looking FPS or MPORPG games.
While researching this article, I examined some of the competing 3-D graphics libraries. Ogre seems to be the leading contender in my opinion. From reading the user's manual, I formed the impression that Ogre had a more intuitive API, but that I'd have to write much more code to get the same results that I do with Irrlicht. I also was put off by the fact that Ogre supports only a single mesh format, although exporters are available for converting other formats.
As you might have guessed, I'm writing a 3-D game using Irrlicht. However, I started this project as an excuse to learn C++. When I started, I really thought the stumbling block would be writing the code needed to make the game functional. I've discovered that the hard part of writing any 3-D game is in the artwork. Creating compelling scenes and realistic landscapes with trees and shrubs is hard. Coding is relatively easy, thanks to advanced libraries like Irrlicht. The example in this article doesn't even begin to scratch the surface of what Irrlicht can do. Indeed, I've not even begun to scratch the surface in my programming efforts.
Resources
Irrlicht Home Page: irrlicht.sourceforge.net
Description of Quake 2 model files (md2): tfc.duke.free.fr/coding/md2-specs-en.html
Irrlicht Support Forum: irrlicht.sourceforge.net/phpBB2/index.php
Mike Diehl is a self-employed computer consultant and lives in Albuquerque, New Mexico, with his wife and three sons. He can be reached at mdiehl@diehlnet.com.
