
Building a Multisourced Infrastructure Using OpenVPN
Have you ever needed to expand your colocated servers at more than one provider and allow applications to communicate as if they were on the same LAN, possibly over multiple sets of firewalls and layers of NAT? Or, maybe you've wanted to move from one hosting service to another to take advantage of lower pricing or better uptime but would have preferred to do it gradually instead of in a single swoop (and a weekend-long maintenance window)? Or, maybe you've considered the Amazon EC2 cloud to host part, but not all, of your infrastructure? If your answer to any of these questions is yes, what you want is essentially a multisourced infrastructure.
The Amazon EC2
The Amazon EC2 (Elastic Compute Cloud) is a Web service that allows users to provision new machines in an Amazon-hosted virtualized infrastructure in a matter of minutes, using a publicly available API. Users get full root access and can install almost any OS or application in their Amazon Machine Images. Web service APIs allow users to reboot their instances remotely and scale capacity quickly if necessary, by adding tens or even hundreds of machines. Additionally, there is no up-front hardware setup costs—Amazon charges only for the capacity you actually use; there is no minimum fee. As more applications find their way to Amazon's virtual computing environment, system administrators are looking for ways to provide secure connectivity over the public Internet between new machines in the Amazon EC2 and old machines in their regular data centers. This article describes one such technique—how to build a multisourced infrastructure based on OpenVPN.
Let's take a look at a simple distributed application, which consists of multiple services, a LAMP stack. Traditionally, you would start with Apache and MySQL on a single server. As your site grows, you would provision another server from your provider and add a second Apache instance. Later, you might want to provision yet another machine to be a dedicated database server to improve performance. This is a typical single-sourced infrastructure—all services run within a single physical environment, controlled and supported by a single provider.
In contrast, with a multisourced infrastructure, you no longer are limited to one provider or one data center. You are free to mix and match hosting plans from different providers to suit your business and architecture better, and you can use as many providers as you like. Your applications still can communicate with one another, but instead of having a physical LAN, it's now a virtual LAN that sits on top of public Internet links. You can grow your services horizontally and achieve better geographic redundancy and fault tolerance at the same time, all without significant changes in your application. If it works in a single-sourced physical LAN, it most likely will work in multisourced virtual LAN as well.
Additionally, you can leverage the strengths of a particular provider for just a subset of your services. Going back to the LAMP stack as our example, with Amazon EC2, you can provision many Apache instances in response to the current load quickly; although you might prefer to run MySQL on bare metal elsewhere instead of in an EC2 virtual machine.
Finally, this method allows you to expand your corporate infrastructure outside your current data center or allow outside services to use applications in your corporate data center. Consider a remotely hosted data-crunching cluster that you rent by the hour, which uses your corporate data warehouse system for its input. As you can see, a multisourced infrastructure is more flexible and can accommodate various scenarios and needs.
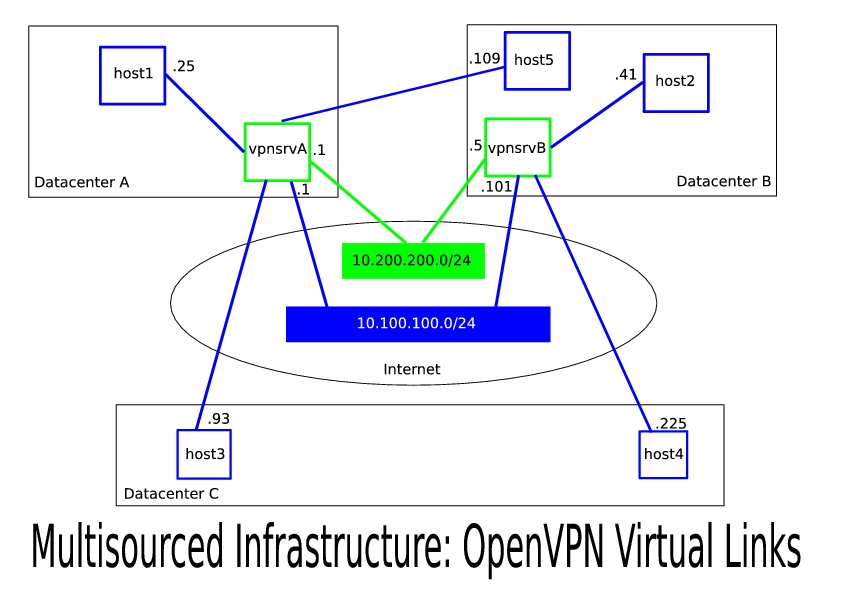
Figure 1. Multisourced Infrastructure: OpenVPN Virtual Links
In this article, I describe a particular implementation of the multisourced infrastructure concept that we at CohesiveFT (www.cohesiveft.com) developed using OpenVPN and that has been running in our production environment since mid-summer 2007. We chose OpenVPN primarily because it uses standard OpenSSL encryption, runs on multiple operating systems and does not require kernel patching or additional modules. The latter benefit is of key importance. Many Virtual Private Server (VPS) hosting solutions currently provide great service with pricing that is often better than other forms of hosting. These providers build guest OS kernels specifically tailored for their environment and method of virtualization. As a result, you probably want to avoid rebuilding the Linux kernel on your VPS as much as possible. Not that it can't be done, but you can save some time and probably get faster technical support if you don't do it.
Among the alternatives to OpenVPN, there is Openswan, a code fork of the original FreeS/WAN Project, but it requires a kernel patch to support NAT traversal, according to its wiki (wiki.openswan.org/index.php/Openswan/Install).
The OpenVPN protocol also is firewall-friendly, as it can pass all traffic over a single UDP tunnel (the default port is 1194). That feature, coupled with SSL encryption, makes this solution very difficult to attack when data packets pass through the public Internet.
OpenVPN turned out to be a great choice and offered us all the functionality we expected, except for one very important feature, fault tolerance. When you use a VPN to provide corporate network access to remote users, the solution is very simple—you deploy several OpenVPN servers and configure each server with its own network segment (for example, server 10.5.0.0 255.255.0.0 and server 10.6.0.0 255.255.0.0). In a typical scenario, the dynamic IP address assigned to a remote user will not matter much, as long as you configure firewalls, applications and services to allow both subnets.
When you build a multisourced infrastructure, however, this is not an acceptable solution, unless you want servers to change their IP addresses from time to time. To satisfy redundancy and fault-tolerance requirements, we needed an active-active pair of OpenVPN servers to share a common address space—all hosts must be able to access each other by static IP addresses at all times, no matter which OpenVPN server provides connectivity at either end of the communication. Then, if we lose one OpenVPN server, the other will provide all connectivity. And, if they are both up, both will be accepting connections from clients to share the load. This feature was not available as a part of the OpenVPN source distribution, so we developed a standalone dynamic routing dæmon to facilitate active-active load balancing. You can find its source code, along with useful links, use-case scenarios and mailing lists, at www.cohesiveft.com/multisourced-infra.
You need two machines to run the OpenVPN dæmon in server mode (we refer to them as vpnsrvA and vpnsrvB, and let's assume their physical IP addresses in your network are 192.168.7.1 and 192.168.17.1, respectively) and two new private subnets: data (for example, 10.100.100.0/24) and management (10.200.200.0/24). All of your applications and services will run in the data subnet, and vpnsrvA and vpnsrvB will exchange runtime status and routing information in the management subnet. Think of these two machines as virtual network switches for your virtual LAN. Also, note that these subnets do not have to be class C; you can choose a bigger data network, especially if you are planning to connect a large number of hosts.
Listing 1a. OpenVPN Server Configuration for vpnsrvA
server 10.100.100.0 255.255.255.0

ifconfig 10.100.100.1 10.100.100.2


push "route 10.100.100.0 255.255.255.0"
push "route 10.200.200.0 255.255.255.0"
dev tun
proto udp
user nobody
persist-key
persist-tun
dh keys/dh1024.pem
ca keys/ca.crt
cert keys/vpnsrvA-1.crt
key keys/vpnsrvA-1.key
comp-lzo
verb 3
keepalive 10 60
client-config-dir ccd
management tunnel 5656 /etc/openvpn/pass
Listing 1b. OpenVPN Server Configuration for vpnsrvB
mode server
tls-server
ifconfig 10.100.100.10110.100.100.102
ifconfig-pool 10.100.100.410.100.100.251
route 10.100.100.0255.255.255.0
push "route 10.100.100.0255.255.255.0"
push "route 10.200.200.0255.255.255.0"
dev tun
proto udp
user nobody
persist-key
persist-tun
dh keys/dh1024.pem
ca keys/ca.crt
cert keys/vpnsrvB- 1.crt
key keys/vpnsrvB-1.key
comp-lzo
verb 3
keepalive 10 60
client-config-dir ccd
management tunnel 5656 /etc/openvpn/pass
Configure vpnsrvA and vpnsrvB as OpenVPN servers for the data subnet (Listings 1a and 1b). You may add more configuration options as needed. Note that the “server” line in the configuration file is a shortcut and cannot be used for both vpnsrvA and vpnsrvB. It actually expands to a set of commands that would have assigned 10.100.100.1 to both servers (see the OpenVPN man page for more details). We want an active-active configuration; therefore, we need vpnsrvA and vpnsrvB to be in the same subnet but to have different IP addresses. To accomplish this, we explicitly expand the server definition for vpnsrvB and assign it the 10.100.100.101 IP address.
Another important note is that the client configuration directory (usually called ccd) and keys directory (called keys) need to be identical on both vpnsrvA and vpnsrvB. One of the easiest ways to accomplish this is to use rsync. rsync allows us to keep it simple and avoid extra variables in the mix. Plus, we always can switch the direction of rsync and promote either of the servers to be the master. For now, let's assume that vpnsrvA is the master and that vpnsrvB mirrors the ccd and keys directories from vpnsrvA using rsync. You will create keys (preferably using the easy-rsa package that ships with OpenVPN) and update the ccd entries on the master server.
Listing 2. OpenVPN Client Configuration
# Note: "remote" must point to servers' physical
# (not virtual) IP addresses
client
remote 192.168.7.1
remote 192.168.17.1
dev tun
proto udp
user nobody
persist-key
persist-tun
keepalive 10 60
comp-lzo
ca keys/ca.crt
cert keys/client-1.crt
key keys/client-1.key
ns-cert-type server
At this point, you can configure several hosts on your network as OpenVPN clients (Listing 2). Each host will have its own certificate/key pair, and the ifconfig-push directive in the ccd entry for this host will set its IP address (see Resources for a link to the OpenVPN HOWTO for a detailed explanation of how to set it up). We tie the virtual IP address to a host based on its certificate/key pair, in much the same way as in a DHCP configuration you would tie an IP address to a host based on its Ethernet MAC address. Therefore, each client must have its own unique certificate/key pair.
Note that we use OpenVPN's built-in capability to round-robin between multiple servers and reconnect after connectivity failures, which is controlled by the keepalive option. Once this is done, you should be able to start the OpenVPN clients, and they should at least be able to communicate with their current OpenVPN server and refer to it by IP—10.100.100.1 or 10.100.100.101. If your client connects to vpnsrvA and you bring down the openvpn dæmon on vpnsrvA, the client will detect it and automatically reconnect to vpnsrvB.
A quick note about firewalls—in a virtual LAN, your main data interface will be called tun0. Therefore, all the rules you used to define for interface eth0 in a single-sourced configuration will need to be redefined for tun0. The Ethernet interface, however, will require additional rules to allow UDP on port 1194 (OpenVPN) from the client machines to both vpnsrvA and vpnsrvB.
The setup that we already have accomplished is somewhat fault-tolerant. If vpnsrvA becomes unavailable, all clients will reconnect to vpnsrvB, and connectivity will be restored. In other words, this is active-passive redundancy. But, what will happen if both vpnsrvA and vpnsrvB are up? Let's assume that host1 and host2 run the openvpn dæmon in client mode. host1 connected to vpnsrvA and was assigned 10.100.100.25; host2 connected to vpnsrvB and was assigned 10.100.100.41. The routing table on vpnsrvA is shown in Listing 3. In this scenario, when host1 attempts to ping 10.100.100.101, its outgoing packets will be routed first to vpnsrvA but then will go back to the same tun0 interface, because vpnsrvA does not know about the existence of vpnsrvB. Similarly, when host1 attempts to ping host2, vpnsrvA also will send these packets back, as indicated by the 10.100.100.0/24 route. As a result, both operations will fail.
Listing 3. Parts of the Routing Table on vpnsrvA
10.100.100.2   0.0.0.0       255.255.255.255  UH    0 0  0 tun0
10.100.100.0   10.100.100.2  255.255.255.0    UG    0 0  0 tun0
To address this issue, we developed a dynamic routing dæmon called cube-routed (download it from www.cohesiveft.com/multisourced-infra). It shares routing information between vpnsrvA and vpnsrvB and adjusts routing tables depending on which client connects to which server in near real time. Its internal structure is not very complex. One thread connects to a local OpenVPN dæmon process via its management interface (see the management option in the OpenVPN configuration file) and regularly runs the status command to update the list of clients connected locally. Another thread publishes this information for the remote instance of cube-routed. The third thread regularly reads a list of connected clients from the remote instance of cube-routed. Finally, the fourth thread adjusts the local routing table based on the following two rules: 1) adds a host route for every host connected to the remote OpenVPN server and 2) deletes the host route for every host connected to the local OpenVPN server.
cube-routed instances will exchange information over the management subnet we selected earlier. Create a second tunnel tun1 between vpnsrvA and vpnsrvB. vpnsrvA can be a server with IP 10.200.200.1, and vpnsrvB is its client with IP 10.200.200.5. You can use the configuration files from Listings 1 and 2 as a basis, but remember to adjust the IP addresses and select a different port—for example, you could add port 11940 to both the server and client. Start both OpenVPN dæmons, and use ping 10.200.200.1 and ping 10.200.200.5 to verify connectivity between them.
Now, create configuration files for cube-routed on both vpnsrvA and vpnsrvB, as shown in Listings 4a and 4b, and start both instances as root with the path to the configuration file as the only parameter (note that OpenVPN must already be running, and the tun0/tun1 interfaces on both vpnsrvA and vpnsrvB must be up).
Listing 4a. vpnsrvA cube-routed Configuration File
vpnsrvA
mgmt_interface = tun1
data_interface = tun0
remote_mgmt_ip = 10.200.200.5
remote_data_ip = 10.100.100.101
openvpn_mgmt_pass_file = /etc/openvpn/pass
openvpn_mgmt_port = 5656
cube_routed_port = 5657
Listing 4b. vpnsrvB cube-routed Configuration File
mgmt_interface = tun1
data_interface = tun0
remote_mgmt_ip = 10.200.200.1
remote_data_ip = 10.100.100.1
openvpn_mgmt_pass_file = /etc/openvpn/pass
openvpn_mgmt_port = 5656
cube_routed_port = 5657
Once you start everything and after several minutes of initial convergence time, host1 from the example above will be able to communicate with host2, even though they connected to different OpenVPN servers. Thus, you've achieved a fully fault-tolerant virtual LAN connectivity, with data traffic encryption as an added bonus.
This implementation is not without its limitations. First, applications that use broadcast or multicast will not work with OpenVPN's tun device. You can use the same network layout as described here, but instead of tun, experiment with OpenVPN's tap device to work around this. Second, latency of network links over the public Internet is significantly higher than that of Ethernet. If this is an inherent requirement for your application, you probably should leave this part of your infrastructure single-sourced. Third, because we use UDP-based tunnels, OpenVPN links will tend to go up and down more often than Ethernet, especially during times of network congestion. You can implement data caches, avoid long-lived TCP connections, focus on network exception-handling logic and experiment with TCP tunnels to reduce negative impact. Finally, there are exactly two OpenVPN servers in this setup. This generally should be sufficient, as it doesn't affect the number of actual hosts that you have connected to your multisourced infrastructure. If for some reason you need more than two, it becomes much more difficult to implement route sharing among cube-routed instances. In that case, you might want to consider a messaging system instead of raw sockets (for example, RabbitMQ). All in all, in our case, we found that the overall benefits of a multisourced infrastructure far outweighed the problems caused by these limitations, particularly if you design your architecture with these limitations in mind.
Multisourced infrastructure is a logical extension of its single-sourced predecessor, similar to the distributed service-oriented architecture, which came after monolithic applications and enabled greater flexibility, a faster development cycle and higher availability. It can help you design a smarter architecture and avoid a lock-in to a single hosting provider, on top of a standard time-tested open-source OpenVPN.
Resources
OpenVPN: openvpn.net
OpenVPN 2.0 HOWTO: openvpn.net/howto.html
“Meet OpenVPN” by Hans-Cees Speel: www.linuxjournal.com/article/7949
“Introduction to OpenVPN” by David Bogen: www.osnews.com/story.php/5803/Introduction-to-OpenVPN
Openswan: www.openswan.org
cube-routed: www.cohesiveft.com/multisourced-infra
Amazon EC2: aws.amazon.com/ec2
RabbitMQ: www.rabbitmq.com
Dmitriy Samovskiy works at CohesiveFT (www.cohesiveft.com), an innovative maker of custom virtualized application stacks, where he focuses on open-source technologies, distributed applications, systems integration, Python and Ruby. You can reach him at dmitriy.samovskiy@cohesiveft.com.


