
Paranoid Penguin - Get a Clue with WebGoat
As more and more critical applications have adopted Web browser front ends, Web security has become the most critical front in Internet security. And yet, year after year, the same types of Web application security mistakes keep cropping up in security bulletins: SQL injection, cross-site scripting, authentication mechanisms that “fail open” and so forth. How, as a Web developer or administrator, can you avoid making these mistakes with your own Web applications?
The WebGoat can help. Developed by the Open Web Application Security Project (OWASP), the WebGoat is an “intentionally insecure” Tomcat Web application that walks you through common Web security mistakes, exploits and solutions. In this article, I explain how to install WebGoat on your Linux system and use it to educate yourself on Web application security.
The WebGoat on Linux has a critical dependency: the Java 1.5 Software Development Kit (JDK 1.5). Therefore, make sure you've installed your distribution's package for the JDK 1.5. On SUSE and OpenSUSE systems, this package is called java-1_5_0-sun-devel. On Debian and Debian-derived distributions, like Ubuntu, it's called sun-java5-jdk. Note that Red Hat and its derivatives don't have their own JDK 1.5 packages; see Resources for links to two articles that may help.
Your JDK 1.5 package's setup script should set your JAVA_HOME environment variable to the JDK's root directory. (On my OpenSUSE system, this is /usr/lib/jvm/java, which is actually a series of links to /usr/lib/jvm/java-1.5.0-sun-1.5.0_12/.) You may need to log out and back in for this variable to “take”, but regardless, it must be set correctly for WebGoat to run. If in doubt, do an echo $JAVA_HOME from a bash session to check to see whether it's set correctly.
Note that you do not need Apache installed to run WebGoat. In fact, if it is installed, I recommend you shut it down. WebGoat runs on its own bundled Tomcat installation, so although Tomcat is required, you don't need to install it separately.
To get the latest version of WebGoat, go to either WebGoat's SourceForge Web site (sourceforge.net/project/showfiles.php?group_id=64424&package_id=61824) or its Google Code Downloads site (code.google.com/p/webgoat/downloads/list). Along with the Windows releases of WebGoat, you'll find the standalone Web Application Archive file (WAR) version of WebGoat for UNIX/Linux and the “Release” version that includes Tomcat. You should opt for the latter, unless you've already got a working Tomcat installation on your system.
On my OpenSUSE system, I unzipped the Release version (Unix_WebGoat-5.0_Release.zip) in my home directory, which resulted in a new subdirectory, WebGoat-5.0 (/home/mick/WebGoat-5.0/). This directory contains a readme file (readme.txt), WebGoat's startup script (webgoat.sh) and another directory, tomcat, that contains the Tomcat servlet engine plus, of course, the WebGoat WAR file.
Now that you've installed WebGoat and the things on which it depends, but before plunging into Web-hacking mayhem, there's one other thing you need: a good graphical local Web proxy. Not a proxy server like Squid; rather, a local proxy you can use to intercept, view and alter the data your Web browser sends to Web servers. This is a critical tool in the Web hacker's bag of tricks—it's also very useful for Web developers who need to troubleshoot their own Web applications—and you'll need it to complete many lessons in WebGoat.
OWASP recommends the official OWASP proxy, WebScarab, which is available at www.owasp.org/index.php/OWASP_WebScarab_Project. WebScarab is a free, full-featured Web proxy and spider (a spider follows all links on a Web site, effectively cataloging it), all with a convenient GUI. It's also written in Java, which means it's cross-platform.
WebScarab can be downloaded as either a “self-contained” JAR file (Java archive) and run with java -jar ./webscarab-selfcontained-20070504-1631.jar or as an installer (currently webscarab-installer-20070504-1631.jar) that, when executed via the command java -jar webscarab-installer-20070504-1631.jar, unpacks WebScarab into the WebScarab directory in your home directory and installs a shortcut in your KDE or GNOME start menu. Start WebScarab either via this shortcut or by executing the self-contained version with the java -jar command.
Another good graphical, Java-based local Web proxy is Paros, available at www.parosproxy.org/index.shtml. Maybe I'm just more familiar with it, but I prefer Paros' interface. In my opinion, it's a little more friendly to non-expert users. You be the judge—both WebScarab and Paros are free, so there's no reason not to give each of them a spin.
Paros comes in the form of a zip file that decompresses to the directory paros. Inside, among other things, are a couple different versions of a startup script. The one you want is called startserver.sh. Start it with the command sh ./startserver.sh.
Note that you don't need to be root to install or start either proxy. In fact, there's no good reason for you to be root, because both proxies, by default, listen on the unprivileged port TCP 8008. You can change the listening port in WebScarab's Listener tab or in Paros' Tools→Options→Local proxy screen.
You're almost ready to start WebGoat, but there's one last thing to do: configure your Web browser to direct all traffic to your local proxy (for example, WebScarab or Paros). This is done in precisely the same way as specifying a proxy server; to a Web browser, a local proxy and a proxy server are the same thing. The only real difference is that instead of a proper fully qualified domain name, you need to give the name localhost or the IP address 127.0.0.1. Be sure to specify the correct port too—the one on which your local proxy is listening (8008 unless you changed it).
Figure 1 shows the proxy configuration screen in Firefox. Access this screen from the Edit menu: Edit→Preferences→Advanced→Network→Connection→Settings. This dialog is very similar in other browsers. If your browser's proxy configuration dialog has a proxy-exceptions field, like Firefox's “No Proxy for:” box shown in Figure 1, make sure this field is blank or that it at least does not contain the values 127.0.0.1 or localhost.
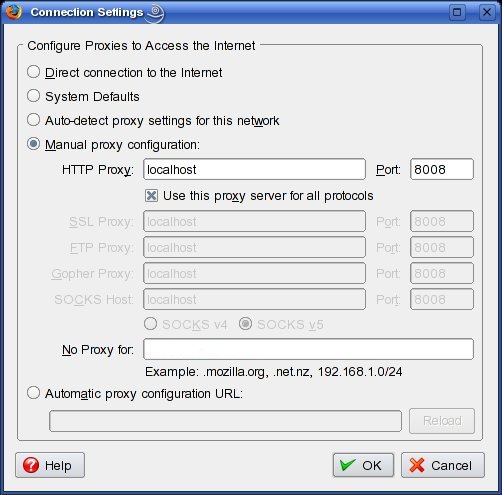
Figure 1. Configuring Firefox for Proxy Use
Now, you've got JDK 1.5, you've got a local Web proxy running, and you've reconfigured your browser to use the proxy. It's time to milk the goat!
To start WebGoat, open a bash shell in your terminal window program of choice (I'm still partial to plain-old xterm), and change your working directory to the one WebGoat unzipped into—/home/darthelm/WebGoat-5.0 on my system. You don't need to be logged in as root to start WebGoat, but you do need to start WebGoat with root privileges—for example, via sudo, so you will need root's password. Therefore, to start WebGoat listening on TCP port 80, issue this command:
sudo sh ./webgoat start80
If you're running Apache or some other process on TCP port 80 (though I don't recommend doing so), you can start WebGoat on TCP port 8080, with this command:
sudo sh ./webgoat start8080
In either case, you'll be prompted for root's password, and WebGoat will start up, logging startup messages and errors both to your shell and also to the file WebGoat-5.0/tomcat/logs/catalina.out. Note that you can run WebGoat safely in the background by appending an ampersand (&) to your startup command, but there's little point. Although you'll, thus, be able to issue other commands from the same shell, all those log messages still will make that particular shell nearly unusable. It's better simply to open another terminal window.
And, now, you can log in to WebGoat. Simply point the browser you just reconfigured to http://127.0.0.1/WebGoat/attack (or http://127.0.0.1:8080/WebGoat/attack if you started WebGoat on TCP 8080). You'll be prompted for a user name and password. Enter “guest” for both values. If you receive the page shown in Figure 2, you're ready to go!
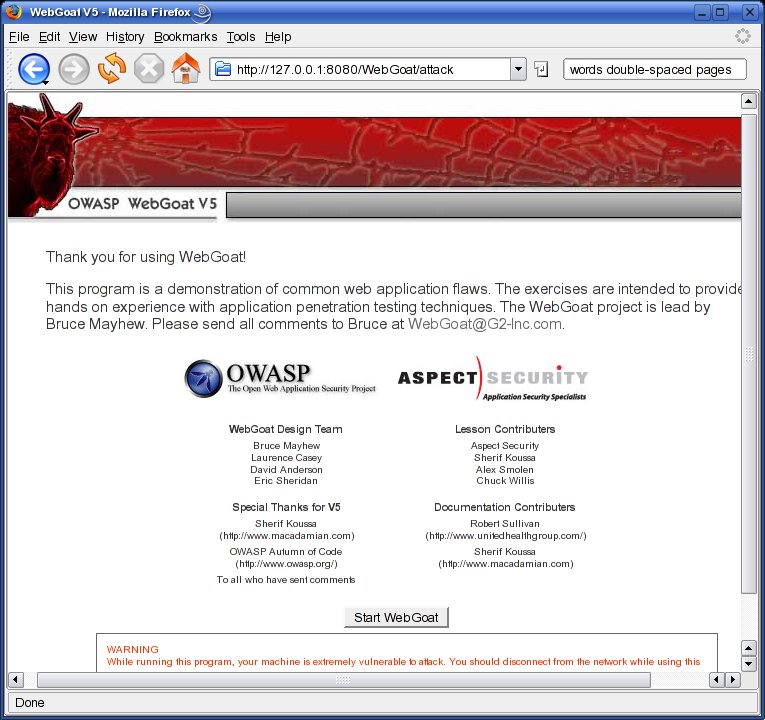
Figure 2. WebGoat Welcome Screen
If you don't see the screen shown in Figure 2, double-check your browser's proxy setting, make sure your local Web proxy is running, and check the terminal in which you started WebGoat for error messages. Also, make sure you used sudo to start WebGoat—you might think that using the start8080 command would make this unnecessary, as TCP 8080 is an unprivileged port, but I've never had any luck running WebGoat as an unprivileged process.
Once you get the welcome screen, click the Start WebGoat button to begin.
The first lesson in WebGoat is an introduction to the WebGoat interface. It walks you through a simple HTTP transaction and gives you the opportunity to use WebGoat's various buttons: Hints, Show Params, Show Cookies, Show Java and Lesson Plans. The Hints and Lesson Plans buttons are particularly important (your local Web proxy is more useful for viewing HTTP parameters and cookies), but I find that Lesson Plan pop-ups don't render properly under KDE's Konqueror browser (they render fine in Firefox).
After the first lesson, the lessons in WebGoat tend to assume that prior to running WebGoat, you've done some studying of Web application security, by at least reading the report “OWASP Top 10 2007” (available from www.owasp.org, in the “Top 10 Project” section). Therefore, I highly recommend you download the full PDF version of this report, read it carefully, and keep it available while you're running WebGoat.
Some of WebGoat's lessons are self-explanatory; the lesson text itself or the lesson plan tells you everything you need to know in order to complete the exercise successfully. Other lessons, however, are not as straightforward. The Hints button can help, but even then you may find yourself copying and pasting an attack string suggested in a hint, without really understanding how the attack works.
So my other piece of advice, besides reading “OWASP Top 10 2007”, is to feel free to jump around between lessons. They are not presented in order of difficulty, nor do later lessons build on earlier ones, as far as I can tell. If a given lesson is too hard for you, feel free to try a different one instead. You always can try the harder lesson again later.
This doesn't mean WebGoat is poorly organized; it just means that the lessons are nonsequential, being instead grouped by type (Code Quality, Invalidated Parameters, Buffer Overflows and so forth). In summary, you will have a much more positive WebGoat experience if you first read the “OWASP Top 10 2007”, attempt whichever lessons strike your fancy, paying attention to each lesson's Lesson Plan button, and click the Hints button as necessary. And, if all else fails, there's always Google!
Local Web Proxies: Good or Evil?
You need to use a local Web proxy in order to carry out many of the practice attacks in WebGoat. But the only thing that makes them “practice” attacks is the fact that you're running them against an educational Web application running on your own system. The very same tools and techniques can be used for good or evil.
As with any penetration-testing tool, it's up to you to use your local Web proxy responsibly and ethically. If you run WebScarab or Paros when interacting with somebody else's Web server, you may be breaking the law (for example, by probing the site or sending intentionally malformed requests), even if all you're trying to do is learn.
Unless you're being paid to conduct a legal, fully authorized penetration test, you should run these tools only on and against your own systems.
Because WebGoat is itself a tutorial, it would be redundant for me (and beyond the scope of a single article) to walk through every lesson. Similarly, Web proxies are too versatile and complex to explain fully here. (In the future, I may very well devote an entire article to them.) But, I can walk you through a sample WebGoat lesson, including correct proxy use, as an illustration.
One of my favorite WebGoat lessons is the one on fail-open authentication mechanisms. If it's possible to make a user-authentication transaction fail in a way that results in successful authentication, that authentication mechanism is said to “fail open”. Needless to say, this is not the way a secure access mechanism behaves! But, it's a common Web coding mistake.
WebGoat covers this under the “Improper Error Handling” section, in the “How to Bypass a Fail Open Authentication Scheme” lesson. To start this lesson, click the “Improper Error Handling” link on the left-hand frame of the WebGoat interface, and then click the “How to Bypass a Fail Open Authentication Scheme” link that appears below it.
In this lesson, you'll enter a user name and password, use your local Web proxy to intercept the resulting HTTP request before it reaches the server (WebGoat), edit the request and then send it on its way.
Therefore, you need to put your Web proxy into intercept mode (trap mode on Paros). Figure 3 shows WebScarab set up for interception—all you need to do is check the box next to “Intercept requests”. Paros is similar: click the Trap tab, and check the box next to “Trap request”.
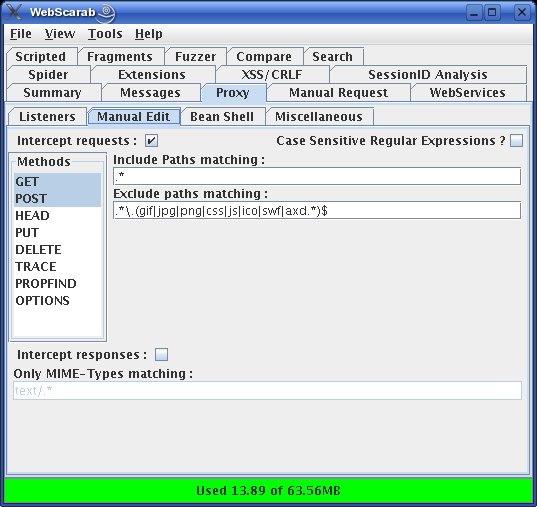
Figure 3. Putting WebScarab into Intercept Mode
Now, whenever you navigate to a new Web page or submit a Web form, the resulting HTTP request will be intercepted and stopped by your local proxy, allowing you to alter the request before forwarding it on. (WebScarab will pop up an edit window in the same virtual desktop as your browser session; Paros won't, so you'll need to click on your Paros window manually.)
Continuing the sample lesson, you now can go back to your browser, and type in the user name webgoat and some arbitrary string for a password (Figure 4).
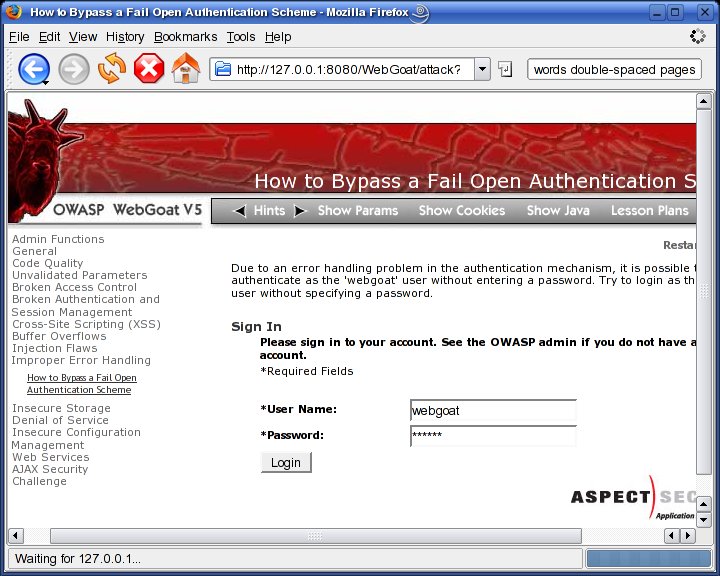
Figure 4. Entering User Name and Password
Be sure your local Web proxy is in intercept/trap mode before clicking the Login button. After you do, WebScarab will pop up an Edit Request window like the one shown in Figure 5.
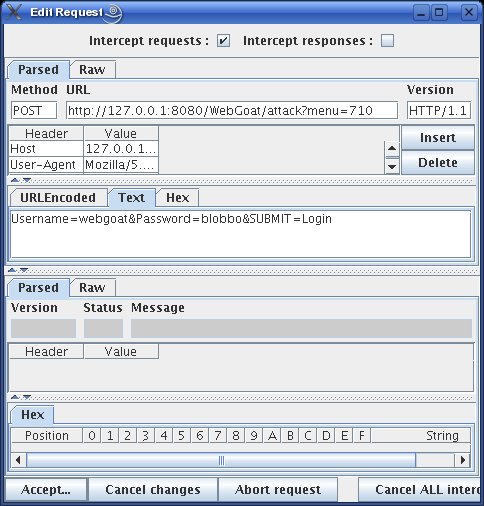
Figure 5. Editing an Intercepted HTTP Request
And now, we work our magic. In this Edit Request window, click the Text tab, select the string Password=blobbo&, and delete it. That's right, we're erasing the entire Password parameter from our authentication submission. This should result in a failed authentication, right?
But, when you click the Edit Request window's Accept button and switch back to your browser, you'll see the screen shown in Figure 6.
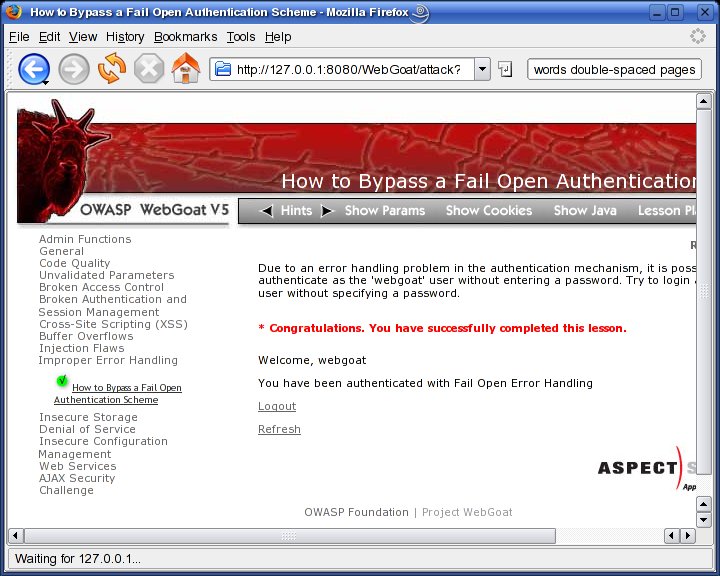
Figure 6. The Attack Succeeded!
The attack succeeded: you just logged in without knowing, or even attempting to submit, a password! Before clicking on other links, you may want to turn off your Web proxy's intercept/trap mode; otherwise, you'll need to click the proxy's Accept button (Continue in Paros) repeatedly simply to navigate to and load the page.
The last thing you should do before leaving this lesson is, arguably, the most important: click WebGoat's Show Java button, and see exactly what coding errors led to this fail-open condition. You'll find WebGoat's code to be well-commented and easy to analyze, even if you're a novice programmer. Remember, the whole point of using WebGoat is not only to see what can go wrong, but also to learn how to prevent it from going wrong in the first place.
The OWASP Web site contains much more information about WebGoat, WebScarab and Web security in general. You may find the WebGoat User and Install Guide, located in the WebGoat section, especially useful. Be safe!
Resources
The Open Web Application Security Project home page, with links to its WebGoat, WebScarab, OWASP Top 10 and OWASP Guide Projects: www.owasp.org.
The Paros home page, where you can download the free Paros local Web proxy: www.parosproxy.org.
Russ Herrold's “HowTo Install Java on CentOS 4 and CentOS 5”: wiki.centos.org/HowTos/JavaOnCentOS.
Jan K. Labanowski's “Sun Java 6 Development Kit on Fedora Core 7”: ccl.net/cca/software/SOURCES/JAVA/JSDK-1.6.
Mick Bauer (darth.elmo@wiremonkeys.org) is Network Security Architect for one of the US's largest banks. He is the author of the O'Reilly book Linux Server Security, 2nd edition (formerly called Building Secure Servers With Linux), an occasional presenter at information security conferences and composer of the “Network Engineering Polka”.
