
PacketFence
With the ever-increasing number of attacks on networks—either by people accessing them anonymously or generating illegal activities from them, having great security tools is essential. Although a good firewall and tools, such as Snort and Nessus, can increase security, network administrators are looking for solutions that complete those security tools by responding automatically to a violation of network usage policy. Such tools are called network access control (NAC) solutions. Many of those tools exist—especially proprietary ones from big vendors, such as Cisco—but an open-source solution, PacketFence, deserves attention.
PacketFence is a free and open-source solution that provides network access control functionalities, including the following standard features:
Registration of network components (desktops, laptops, printers and so on) and, optionally, acceptance of a network usage policy upon registration before gaining complete network access.
Detection of network usage policy violations based on passive and active network scans on all connected nodes.
Isolation of offending nodes.
Notification (e-mail, pop-ups and so on) based on a network usage policy violation.
Remediation so that network components can regain their network access after a violation.
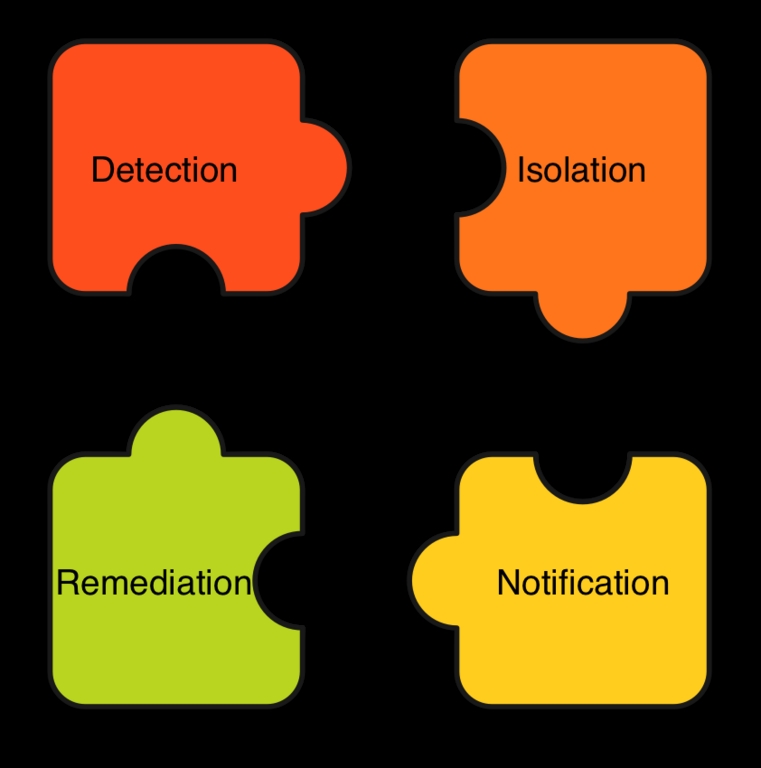
Figure 1. The Relations between PacketFence Standard Features
PacketFence is written in Perl and makes use of common open-source components, such as MySQL, Apache, Snort and Nessus. It does not require a user agent to be installed on computers accessing the network. Its deployment is non-intrusive, and every interaction with users goes through a captive portal that can be accessed by every Web browser.
PacketFence currently supports ARP, DHCP/DNS and VLAN isolation techniques. Choosing the right isolation method depends on the size of your network and the networking equipment you possess. In this article, we cover ARP-based isolation, which works on any kind of networking equipment.
ARP-based isolation works by poisoning the ARP cache of any equipment connected to the network. As you know, ARP is a protocol used to map IP addresses to MAC addresses. Fundamentally, four basic types of messages exist in Ethernet ARP that are interesting for PacketFence:
ARP request: request for the destination MAC.
ARP reply: reply containing the MAC.
RARP request: request IP from MAC.
RARP reply: reply containing the IP.
The problem with ARP is that when a client issues an ARP request, it simply trusts the reply that comes in and stores it into its cache. Poisoning the ARP cache is as simple as sending ARP replies to the client, even if it hasn't asked for one. The operating system likely will update the cache upon reception of such packets, or it'll use the poisoned data we send when it decides to update the cache.
PacketFence has been developed on Red Hat Enterprise Linux 4, CentOS 4 and Fedora Core. Several people have succeeded in running it on different distributions, but to ease your first installation, it might be better to stick with one of the officially supported distributions. Because PacketFence is a NAC solution and installing it will act on your current LAN, make sure to coordinate your tests with your network administrator.
PacketFence uses a MySQL database to store the information about the nodes connected to the network, whom they belong to and whether there are any violations of the specified network policy. So, if you don't already have a dedicated MySQL server you want to use for this purpose, install MySQL server by running up2date -i mysql-server.
As mentioned previously, PacketFence can use Snort and Nessus, and we describe below how you can integrate both tools with PacketFence.
Snort is an open-source network intrusion detection system that uses signatures to analyze the network traffic. Once a given packet matches a signature, Snort can generate an alert. Signatures not only exist for many computer viruses and spyware, but also for network traffic, such as BitTorrent, ICQ, Skype or even Hotmail access. They are available from Sourcefire, Inc., through the Snort Web site, and through Bleeding Edge Threats (see Resources). PacketFence also ships with an Oinkmaster configuration to obtain and cut down the ruleset automatically to only what is required by PacketFence. Because PacketFence support for Snort 2.6 is still under development, download Snort 2.4.5 from www.snort.org/dl/binaries/linux/old, and then install the RPM by executing:
rpm -ivh snort-2.4.5-1.RHEL4.i386.rpm
Nessus, on the other hand, is an active vulnerability scanner—meaning that it generates connections to the hosts you want to test for vulnerabilities. You have to register with Tenable Network Security, the owner of Nessus, in order to receive the available plugins. Install Nessus by downloading version 2.2.9 for Linux and executing:
sh nessus-installer-2.2.9.sh
Nessus 3 is not yet well supported, and due to the licensing issues surrounding it, stick with 2.2.9.
Once the installation finishes, start Nessus with:
/opt/nessus/sbin/nessusd -D
Download the PacketFence RPM from the SourceForge repository, and install it using:
rpm -ivh packetfence-1.6.2-1.i386.rpm
In /usr/local/pf, you will find two Perl scripts that will help you with the necessary configuration steps: installer.pl and configurator.pl. Change your current directory to /usr/local/pf, and execute installer.pl. The script, among other things, sets up the PacketFence database, installs all the necessary Perl modules (which are quite a few) and creates a user account for the Web GUI.
Now, the real configuration work starts. First, execute configurator.pl, and you'll be offered several choices. Choose the template configuration based on the testing mode. You'll be asked to supply several network parameters (DHCP servers, DNS servers and so on), and a basic configuration file, /usr/local/pf/conf/pf.conf, will be created. This configuration file contains only the differences you apply to the default configuration parameters saved in /usr/local/pf/conf/pf.conf.defaults. Have a look at conf/pf.conf.defaults to get an idea of the available options. To help you see what's going on inside PacketFence, add the following lines to /usr/local/pf/conf/pf.conf to increase the logging level:
[logging]
verbosity=8
Start PacketFence with service packetfence start. Have a look at /var/log/messages, and you should see that PacketFence started creating an inventory of all nodes on your network, as in the following example:
Jan  3 16:05:28 pf pf: update_hashes(5): UPDATE
 New node 00:07:e9:05:4c:f2 (192.168.0.1)
Jan  3 16:05:28 pf pf: update_hashes(5): UPDATE
 New node 00:90:27:6a:71:ea (192.168.0.2)
/usr/local/pf/bin/pfcmd is the PacketFence command-line interface. Executing it without any further parameters shows a help screen with the available options. In order to show all nodes in the database, execute:
#/usr/local/pf/bin/pfcmd node view
mac|pid|detect_date|regdate|lastskip|status|
user_agent|computername|last_arp|last_dhcp|switch|
port|vlan|dhcp_fingerprint
00:07:e9:05:4c:f2|1|2007-01-03 16:05:28|||unreg|||
2007-01-03 16:10:11|||||
00:90:27:6a:71:ea|1|2007-01-03 16:05:28|||unreg|||
2007-01-03 16:10:12|||||
Manually registering a node can be done with:
/usr/local/pf/bin/pfcmd
 ↪node edit 00:07:e9:05:4c:f2 status="reg",pid=1
You also can use pfcmd to access the documentation for every configuration parameter. To see the documentation for the logo parameter from the [general] section:
# /usr/local/pf/bin/pfcmd config help general.logo
GENERAL.LOGO
Default: /common/packetfence.gif
Logo displayed on Web pages.
Have a look at the available reports using:
/usr/local/pf/bin/pfcmd help report
The os and osclass reports use PacketFence's DHCP fingerprinting feature, which tries to determine the operating system of every DHCP request (including the ones made by printers, VoIP phones, switches and so on).
Running:
/usr/local/pf/bin/pfcmd report os
shows the number and percentage of nodes on your network for every detected operating system. Note that the DHCP fingerprinting feature easily can be used to disallow access to your network by computers running specific operating systems.
PacketFence also features an administrative Web GUI, which, by default, is available on the secured port 1443. Direct your browser to https://<pf-host>:1443/. Once you enter the login/password you defined during the installation, you can start monitoring and configuring PacketFence through the GUI.
When you start enforcing the registration of nodes with PacketFence, all nodes on the network have to be registered before they can gain complete network access. This registration requirement applies to all gear with network access, including wireless access points and printers. So, before actually activating this option in the configuration file, it is wise to preregister those types of devices manually.
For computers with Web browsers, on the other hand, the registration can be done by the user through the PacketFence captive portal. The portal can verify login/password information through a htaccess file, Radius or LDAP, which we use in our example. In order to do this, you need to adapt the provided template /usr/local/pf/conf/templates/ldap.conf to fit your LDAP structure.
Because all your users will be redirected to the registration screen, it also is wise at this point to change the default PacketFence logo, which is shown on the Web pages, to your own company logo. This can be done by adding logo=/common/mylogo.gif to the [default] section in /usr/local/pf/conf/pf.conf and copying the file mylogo.gif into the directory /usr/local/pf/html/common/.
To activate the registration, incorporate the following parameters into /usr/local/pf/conf/pf.conf:
[trapping]
testing=disabled
detection=disabled

[registration]
aup=disabled
auth=ldap
Now, restart PacketFence with service packetfence restart. You should see in /var/log/messages that PacketFence is trapping unregistered nodes by ARP-spoofing your network's gateway. From the client side, opening a Web browser and accessing any outside Web site should lead to a redirection to the PacketFence captive portal, which allows you to register the computer. You also can determine whether a client has been ARP-spoofed by executing arp -n -a (under Linux) on the client and checking which MAC is saved in the ARP cache for your network's gateway.
You can take it a step further by adding Snort alerts to your PacketFence installation. Let's assume that using BitTorrent clients is prohibited in your environment and you want to configure PacketFence to enforce this policy. Edit /usr/local/pf/conf/violations.conf so that the section containing BitTorrent reads as follows:
[2000334]
desc=P2P (BitTorrent)
priority=8
url=/content/index.php?template=p2p
disable=N
max_enable=1
actions=trap,email,log
trigger=Detect::2000334,Detect::2000357,
↪Detect::2000369
This tells PacketFence that:
The BitTorrent violation can be generated by the Snort alerts 2000334, 2000357 and 2000369 (the trigger parameter).
The system has to act upon this violation by isolating the user, sending an e-mail alert to the administrator and logging the violation to /var/log/messages (the actions parameter).
The user is allowed to re-enable network access once (the max_enable parameter).
Finally, you need to activate Snort from inside PacketFence by incorporating the following into conf/pf.conf:
[trapping]
detection=enabled

[interface eth0]
type=internal, managed,monitor
and restarting the PacketFence service. Note that if you are using switches, you have to redirect a copy of your network traffic to eth0 (the PacketFence monitor—that is, the interface Snort listens to for packets).
Generating a violation in PacketFence is now as simple as launching your favorite BitTorrent client, such as Azureus. Do so, and open a torrent file to start a download. Once a couple of packets are exchanged on the network, Snort should catch some and match them with the 2000334, 2000357 or 2000369 rules. Those rules, which come from the Bleeding Edge Threats rulesets, correspond to BitTorrent peer sync, traffic and announce, respectively. Once Snort logs such unusual activity, PacketFence reacts by creating a violation.
As an administrator, you can see the list of violations with:
/usr/local/pf/bin/pfcmd violation view all
As a user, on your computer, launch your favorite Web browser and try to open any outside Web site. You'll be redirected to the PacketFence system automatically, which will display the peer-to-peer template, as shown in Figure 2.
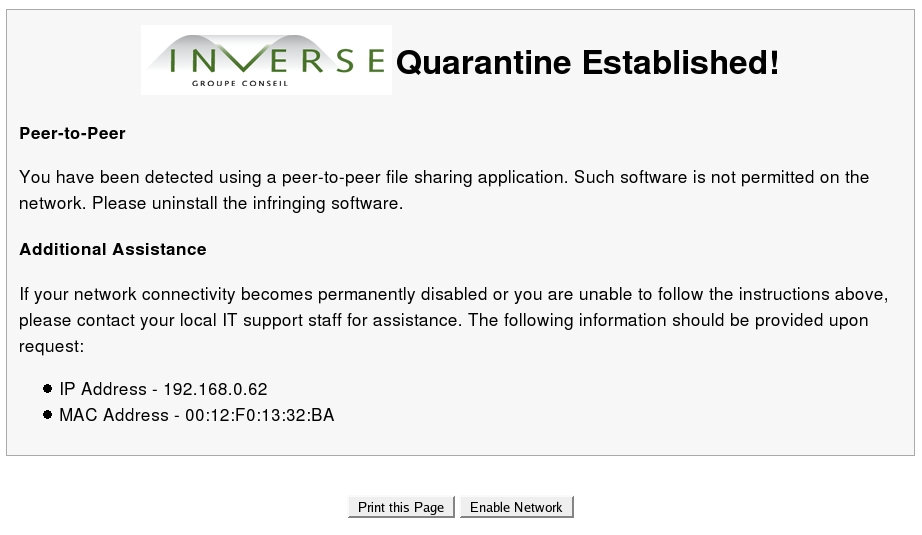
Figure 2. PacketFence Peer-to-Peer Template
Stopping the BitTorrent client lets you regain network access. Now, try to use BitTorrent a second time. As before, an alert is generated, and your browser is redirected to the PacketFence portal. But this time, however, you won't get another chance to re-enable your access. In real life, offending users would have to call their network administrator to re-enable network access.
To activate the Nessus scanning of hosts trying to register with PacketFence, add the following section to /usr/local/pf/conf/pf.conf:
[scan]
ssl=enabled
pass=<nessus_passwd>
user=<nessus_user>
port=1241
host=127.0.0.1
registration=enabled
and restart the PacketFence service. Trying to add a computer running an unpatched version of Microsoft Windows now generates an immediate violation. You also can use the administrative Web GUI (the Scan tab) to define that complete Nessus scans should be executed every night.
Deploying PacketFence in your network with ARP-based isolation is simple. Although this isolation technique is easy to deploy, it doesn't necessarily scale well and could be bypassed by wise users with static ARP-cache entries.
Other isolation techniques exist in PacketFence, such as DHCP/DNS, which scales well. At Inverse, we also added VLAN-based isolation to PacketFence, which makes this solution more secure and appealing for large networks. PacketFence is an ideal solution for securing campus networks or even a part of your network (a VLAN or subnet). Finally, a high-quality NAC solution has emerged from the FOSS community, and the evolution of PacketFence is promising.
Resources
PacketFence: www.packetfence.org
Snort: www.snort.org
Bleeding Edge Threats: www.bleedingsnort.com
Oinkmaster: oinkmaster.sourceforge.net
Nessus: www.nessus.org
Azureus: azureus.sourceforge.net
Ludovic Marcotte (ludovic@inverse.ca) holds a Bachelor's degree in Computer Science from the University of Montréal. He is currently a senior systems architect for Inverse, Inc., an IT consulting company located in downtown Montréal that specializes in the deployment of infrastructures based on free and open-source components.
Dominik Gehl (dgehl@inverse.ca) holds a Master's degree in Computer Science from the University of Montréal. He is currently a systems architect for Inverse, Inc., an IT consulting company located in downtown Montréal that specializes in the deployment of infrastructures based on free and open-source components.
