
Break the Hardware Upgrade Cycle with Win4Lin Windows Virtual Desktop Server
Win4Lin Virtual Desktop Server (www.win4lin.com) is a client/server virtualization solution that can be used to migrate an organization from an expensive and high-maintenance Windows infrastructure to a more robust and sleeker Linux base gently. How? A single copy of Windows can be delivered directly to multiple users' desktops with the click of a mouse. You don't want your users to have a full Windows desktop? No problem. Virtual Desktop Server (VDS) can be configured to deliver a single application to the Linux desktop instead. Given its flexibility, it's not surprising that the reasons for using VDS to move to a Linux infrastructure are equally as varied.
Linux server requirements are generally lower than those of Windows servers. Therefore, Win4Lin VDS can be used to break the hardware upgrade cycle. With Vista on the horizon, many organizations are faced with potentially costly hardware upgrades in the next few years.
Although arguments can be made on either side of the Total Cost of Ownership (TCO) issue, organizations that have come to the conclusion that Linux offers a lower TCO are then faced with the technical and logistical burdens of migrating their infrastructure. VDS allows the baseline software swap to occur while still allowing employees to continue using their familiar Windows environment and applications.
VDS offers organizations indefinite breathing room. Once the OS baseline has been swapped out, organizations can choose to remain in the Linux/Windows VM posture, or they can carry on with the business of sourcing or porting Linux solutions to their functional applications.
VDS offers “single application” deployment to the desktop, meaning that single mission-critical apps need not ever be ported. Single Windows applications can be launched right into the client Linux desktop.
Aside from the infrastructure questions, running a VDS server allows for a centralized point of management, upgrades and maintenance. Because all clients are being served the same Windows image, single changes on the server end mean rapid organization-wide change.
Existing Windows licenses can continue to be used under their respective terms.
VDS is different from a lot of client/server virtual machine (VM) solutions on the market. Most VM server products simply provide a remote display to the client, whereas VDS provides a proper client/server X Window System display to the client. If the client cannot support X Protocol messages, the alternative “display” methods can be used via traditional Virtual Network Connection or Tarantella, which really opens up the door for pretty much any client with a recent Web browser installed on it.
One of the main tasks for many Windows administrators is keeping Windows patched and updated in order to protect clients from the many spyware and malware attacks perpetrated against hapless Windows machines on a daily basis. As mentioned, VDS offers a single instance of Windows to patch and upgrade, which not only takes less time, but also offers more simplicity than staging patches throughout the organization. Further, because the end users' environment is a product of a combination of the master Windows image and their own locally stored settings, simply logging off and logging back in refreshes their session with the master image and thus eliminates any running malware or spyware in their session.
Win4Lin recommends using the native Win4Lin Terminal Services Client in order to make use of all the advanced functionality a native Win4Lin client/server connection offers. However, there are a plethora of ways to connect to a VDS server, and unless you're desperately in need of seamless printing, almost any client will get the job done.
Connection to a VDS server is possible with Telnet, rlogin or SSH (with X11 forwarding enabled). For Telnet and rlogin, the {$DISPLAY} environment variable must be set correctly. In general, the remote login options are suitable only for high-speed environments, such as local LANs. WAN and consumer-grade high-speed Internet connections do not generally provide enough bandwidth to use these methods. Connections also are possible using the RealVNC client, the NoMachine client and Tarantella.
In short, if you can't find a way to connect to the VDS, you're simply not trying.
A base license starts at $2,500 US for 25 seats. Bump licenses can be obtained in various increments to enable VDS to handle up to 1,000 users. Whether your server can handle 1,000 users is up to you to decide. It's important to note that these are licenses for VDS and not for Windows. Organizations will have to provide their own Windows licenses under Microsoft's conditions. In most cases, however, existing licenses can be used.
The current version of Win4Lin VDS is 3.0, but 3.5 is in tail-end beta and probably will be released before this article goes to print. Because it doesn't make a whole lot of sense to write an article about a potentially moving target, we use the 3.0 stable version.
Win4Lin Pro and VDS are the same binary, but different licenses unlock different functionality. There are DEB and RPM packages for 32- and 64-bit Linux. The installation prompts for a license code, and that's when the product turns into either Pro or VDS.
There is no upgrade path from Win4Lin Pro to Win4Lin VDS, so if you have Pro installed, you'll have to relicense it with a VDS license by using the ask_license.sh script.
VDS clients are available for Linux, Solaris and Windows, but the source also is available for download, which allows moderately skilled Linux users to compile a client for almost any platform.
We downloaded our packages from the Win4Lin FTP site (ftp.win4lin.com/pub/releases/linux/pro/3.0/index.html). There are server packages available as 32- and 64-bit RPM, 32- and 64-bit DEB and tarball.
We downloaded the 32-bit RPM package for our test platform, a Centrino Duo Core running at 1.83GHz with 1GB of RAM running a beta of Edgy Eft. We ended up moving to SUSE 10.1 after the initial install, because Edgy's “edgy” kernel had issues with the Win4Lin client. Serves us right for trying to use a beta release on our testing platform, and we've been properly chastened. I mention it only because some sharp-eyed readers may be able to detect differing platforms in some of the screenshots.
The win4linpro_6.3.0-07_i386.deb package was only 3.7MB and installed without a hitch. The VDS installation manual advises that the toolchain for supported distros must be installed prior to installing VDS. The reasoning behind this is that all Win4Lin products provide a specialized KQEMU module in order to deliver satisfactory speed performance. As long as you've dutifully installed the toolchain, the building and insertion of said module will be largely transparent to you (Figure 1).
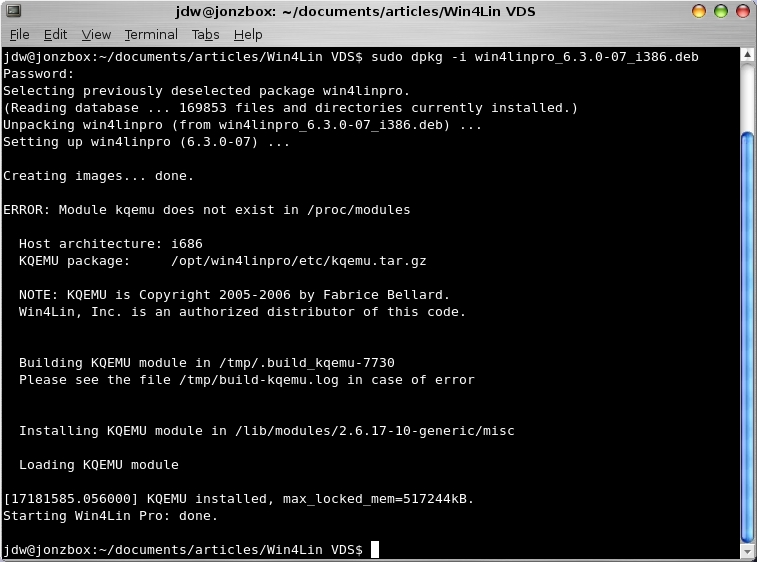
Figure 1. Building and Installing the Modules
Now it's time to install my single Windows instance. We used Windows XP Home, installed it and allowed it to upgrade itself to service pack 2 before provisioning accounts. To do so, we put our Windows XP CD into the drive and ran the command:
sudo loadwinproCD
If you haven't installed your VDS license yet, you will be prompted to do so at this time. You can choose not to enter a license at this time and use the product for 14 days, but none of the server functionality will be enabled, effectively leaving you with a single-user workstation.
In Figure 1, you will see that we had to use the -r switch to load the guest media. This is because our testing bench already had Win4Lin Pro installed on it previously, and the loadwinproCD command detected this. The -r switch simply tells VDS to reload the guest media.
There are two steps to installing VDS. First, the superuser must copy the guest media to the hard disk, which is what loadwinproCD does. The next step is actually to install Windows, which is done under a normally privileged user account. The process of installing Windows and creating the master profile, from which all other user accounts will derive their Windows environment, are tightly coupled—so much so, in fact, the entire next section is devoted to understanding the process.
Win4Lin VDS uses profile-based provisioning. In a nutshell, this means that a single master profile must be configured. This is the profile all other users will inherit from, and this is also the only profile where patches, upgrades and applications need be installed and other maintenances need be performed. Once a master profile has been configured as desired, individual user profiles are created for each system user.
VDS must be installed under a user account. As with all infrastructure decisions, a few moments spent now can save countless headaches later. I've decided to install my master profile under my main user account jdw. I've further decided that I'm going to provision two other user accounts on my system named jwatson and dwatson. My first step, then, is to create the two jwatson and dwatson accounts. Organizations already running a Linux system quite likely have all of their user accounts set up and may be required to create only an account for the master VDS profile.
To create the master profile, first I log in to my system and run:
sudo adduser jwatson
sudo adduser dwatson
After assigning these new user account passwords, they are ready to go. Now it's time to create the master profile. This involves installing Windows, designating that installation as the master and then configuring it as required.
So, I log out and back in as my master profile user jdw, and then run the installwinpro command.
Various options to this command dictate the characteristics of the virtual machine into which Windows will be installed. I accept the defaults, which include a 4GB disk image size. Depending on the amount of applications you intend to install, 4GB may not be enough. There is no need to take user space into account, however, because individual user's documents and settings are stored in the Linux filesystem on a user's respective workstation and not within the image (Figure 2).
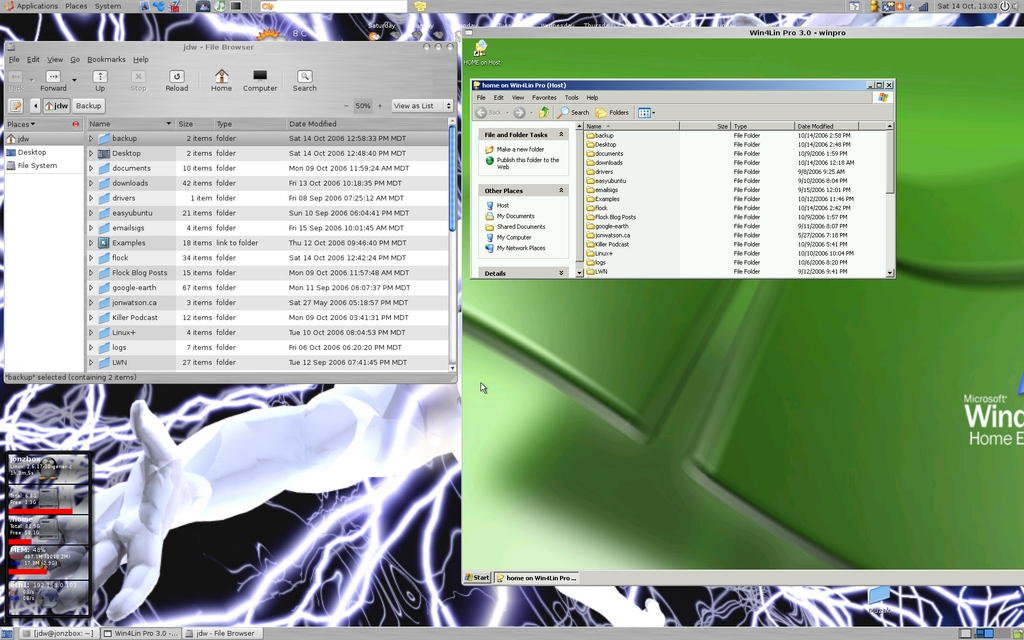
Figure 2. User documents and folders are stored on the Linux filesystem.
The default profile name will be winpro unless you change it with the -d switch. Keep in mind that if you switch the configuration name, you will need that information to export the master profile in the next step.
Take my word for this—back up your image now. Living through one Windows install is painful enough, you don't want to have to do it twice.
Backing up your image is as simple as copying the GUEST.IMG file to another location. If you took the default installation options, you'll find the GUEST.IMG file in /home/jdw/winpro/ (obviously, you'll need to substitute your own user name). If you modified your installation, you'll know where to find it.
Once installation is complete, designate this installation as the master by running the command /opt/win4linpro/bin/export-profile <configuration name>.
If you changed the configuration name while installing the guest session in the previous step, you need to provide that name in place of <configuration name>. If you didn't specify a configuration name, the default winpro was used, and you need not supply it to export the master profile.
Launch the image and customize it. It is critical that you launch and shut down the image at least once in order to create the master profile properly. To launch the master Windows profile, either double-click the Win4Lin icon on your desktop, or run the command winpro from the command line.
Because provisioned users will receive a fresh copy of the master image each time they log in to the VDS, it's not critical that you fully customize your image right away. In theory, you can skip to creating your user profiles right now and then come back and customize your master image later. In practice, however, there are a few reasons why you probably should do it now:
Familiarity: it's quite likely that one of the reasons your organization is using VDS to swap out the infrastructure is to minimize the impact on users. Therefore, common sense seems to say that every effort should be made to provide users with the most familiar desktop and set of applications possible.
Security: because users' sessions are refreshed with a copy of the master image every time they log in to the VDS, it's easy to think that security can take a back seat. If the OS is refreshed back to the master image at least daily, how much damage can spyware, malware or a virus do? That's a good question, but consider what can happen if your master image contains malware or a virus. Lock it down, now (Figure 3).
Technical: the master profile cannot be running when any user profiles are running. Because you have to fire up the master profile in order to make changes to it, failing to customize it now might mean a lot of off-hours work in the near future—or significant work disruptions as all users are forced to log off and stay off while the master image is worked on.
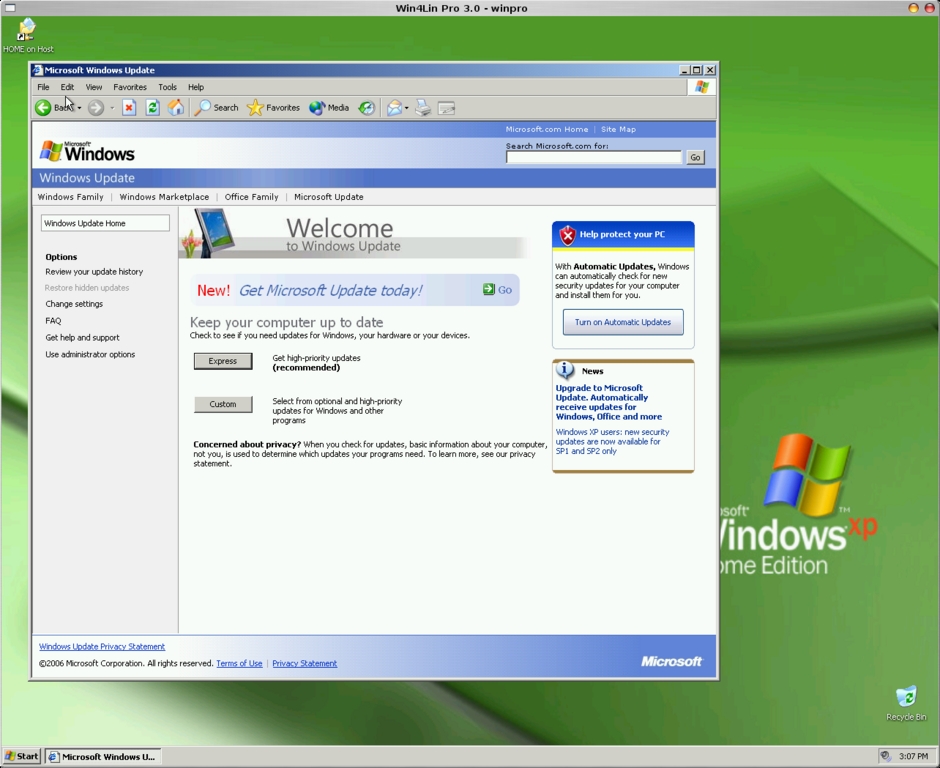
Figure 3. Update your Windows master image, but lock down a known good state.
Now is probably a good time to take another backup of your image. Every time you make a change to the master profile, it's wise to create another backup of the image. Remember that if your image becomes corrupted, a whole lot of users won't be able to get their work done until you've restored it. It takes only a few minutes to copy a 4GB image back to the master directory, but it takes a lot longer to re-install Windows or bring an old image up to date.
The Win4Lin VDS service should start itself. If it doesn't, or if you need to restart it from some reason, you can do so with:
/opt/win4linpro/etc/mergepro_rc start
Only provisioned users will be able to use the master profile. System users that are not intended to use VDS need not be provisioned, but the provisioning process must be done under each user's account. If you have only a few users, if might be quicker to su to each user account and run the import command manually. If you have many users, however, some clever bash scripting or log-on scripts might be in order to facilitate the process. In my example, this means I have to log in as both jwatson and dwatson and run the following command:
/opt/win4linpro/bin/import-profile /home/jdw/winpro
The master profile has been created, and users have been provisioned. The bulk of the server work is done now, and any changes made to the master profile from this point on (such as new applications being installed or patches being applied) will propagate on down to provisioned users each time they log on.
But, how will these users log on? It's time to install a client.
As mentioned before, there are several ways to connect to a VDS. I look only at the Win4Lin client as it is free and easily attainable.
Using the native Win4Lin client against the VDS server provides the best speed and feature set. The Win4Lin client can be downloaded from the Win4Lin site (www.win4lin.com/component/option,com_repository/Itemid,76/func,fileinfo/id,2) and comes in flavours for Linux, Solaris, Windows and source.
Strangely, although the VDS itself is available in both DEB, RPM and a tarball, the Linux client isn't available in DEB format. Because installing from source usually makes me lose my lunch, we're going to grab the RPM, use alien to convert it to a DEB and then use dpkg to install it on a Debian-based system. Here are the steps:
Download the RPM from Win4Lin.
Run sudo alien wtsclient_1.0.0-4_i386.rpm.
Run sudo dpkg -i wtsclient_1.0.0-4_i386.deb.
Run the wtsclient command to connect to the server.
The Win4Lin VDS can be configured to deliver a single application or an entire Windows desktop. We connected both configurations to the Win4Lin demo server and provided two screenshots. The first screenshot shows an entire Windows desktop configuration, and the second shows only Internet Explorer being delivered to our Linux desktop (Figures 4 and 5).

Figure 4. The Win4Lin Client Running a Desktop

Figure 5. Win4Lin can deliver only a single application instead of the entire desktop.
So far, all we've covered is how to get a full Windows XP desktop delivered to a Linux desktop. Although that might be suitable for many situations, there are others when users may require only a single Windows application. How can VDS be rigged to open up an application instead of a full desktop? By tweaking the Windows registry, of course. The Win4Lin VDS manual is the best place to look for current instructions on how to achieve this, but in the interests of sitting down and getting it done with just this copy of Linux Journal, now we provide steps required to deliver a single application.
Regardless of the application or the version of Windows being used, a Win4Lin registry key must be set or verified first:
Open the regedit application.
Navigate to the HKLM\Software\Microsoft\Windows NT\CurrentVersion\Winlogon.
Ensure the Userinit variable reads exactly B:\mrgpro32.exe. If the value isn't exact, change it.
It doesn't make a whole lot of sense to have users log in to Windows just to run a single application. Therefore, step one—although optional—is to set the master Windows profile to log in a user automatically. Different flavours of Windows have different provisions for allowing automatic log in.
Launch the Control Panel.
Launch the Users and Passwords applet.
Uncheck the box that reads Users must enter a user name and password to use this computer, and click OK.
When prompted, enter the user name and password of the account under which you would like Windows to launch.
Launch the Control Panel.
Launch the User Accounts category.
Click Change the way users log on/off.
Uncheck the Use the Welcome screen check box.
Click Apply Options.
Launch the alternate user account editor by clicking Start→Run and entering control userpasswords2. Click OK.
Uncheck the box that reads Users must enter a user name and password to use this computer. Click OK.
When prompted, enter the user name and password of the account under which you would like Windows to launch.
Launch the registry editor by clicking Start→Run. Type in regedit and click OK.
Navigate to HKLM\Software\Win4Lin.
Right-click in the empty right-hand pane to create a new variable.
Select String Value.
Type SingleAppStart (case-sensitive).
Double-click on the newly created SingleAppStart variable.
In the Value data: field, enter the full path to the executable to be launched. For example, to run Microsoft Word, WORD.EXE is not sufficient. The full path of C:\Program Files\Microsoft Office\word.exe (or wherever your Word executable is located and named) is required.
Exit the registry editor, and you're done!
Now when users launch their clients and log in, Microsoft Word will launch onto their desktop right beside their Linux applications. This may not seem like a big deal, because the Microsoft Office suite is nicely supported by Wine and CrossOver Office, but swap out Word for absolutely any other application on your Windows desktop, and the power becomes obvious. Because a full copy of Windows is being brought to bear to deliver the application, there is an almost unlimited number of Windows applications that can be delivered in this manner with zero modification.
Virtualization technology isn't new. IBM has been playing with it since the 1960s. What's making virtualization exciting again is the widespread availability to fast networks and powerful servers. Using Linux to deliver Windows is cost effective in terms of hardware, management and training, and products such as Win4Lin Virtual Desktop Server make the technology easy to install and use. In fact, virtualization technology has come so far that the tricky points are no longer technical in nature; they are logistical. It's more difficult to plan a virtualization strategy than it is to implement one.
Jon Watson (www.jonwatson.ca) is a Canadian GNU/Linux enthusiast who regularly contributes articles to the Linux community. When not writing, blogging and podcasting about free and open-source software, Jon frequently can be found in his office polishing his Linux+ certification, which impresses no one but himself.

