
Cooking with Linux - If Only You Could Restore Wine
François! What is that truck doing at the back door to the restaurant, and why are they loading up the files from our office? I'm not angry, mon ami, and I've already asked them to put everything back. Surely there must be some simple explanation for this. Quoi? Ah, I see where the error occurred. François, when I asked you to arrange for an off-site backup of our files, I didn't mean I wanted every piece of paper in the office moved to another location. I was talking about the files on our Linux systems—data, mon ami. Yes, I agree, I should have made my request clearer.
What I really wanted was for you to find a simple, easy-to-use backup program that would handle network backups, so that we could store the information from the Linux desktops in this restaurant to some of our off-site servers. Don't worry, François, I've got just the programs to make things very easy for you. In fact, I will be showing them to our guests as soon as they arrive.
But they are already here! Quickly, François, to the wine cellar while I help our guests to their tables. Bring back the 2000 Napa Valley Cabernet Sauvignon we were submitting to, ahem, quality control, earlier today. Vite! Please, mes amis, sit and make yourselves comfortable.
François and I were discussing backups and backup software. Every Linux system comes with some basic, classic and powerful backup tools. These include the tar, cpio and rsync commands to name only a few. Many major distributions provide front ends to these commands via their own administrative interfaces. Today, I thought it might be interesting to visit some alternative backup software, all of which make backing up and restoring data easy.
Ah, François, you have returned with the wine. Excellent. Please, pour for our guests.
The first item on our menu is Jean-Remy Falleri's Keep, a simple, easy-to-use backup utility for KDE. What makes it attractive for a desktop user is that Keep can sit quietly in the background and regularly back up your directories. It does this by using its own KDE service dæmon. Backups also can be run at any time with the click of a button, and restores are a piece of cake. Because the package uses rdiff-backup to do its work, you need to install this as well. Source is available from the Keep Web site (see the on-line Resources), but I found binaries easy to get from various contrib sites as well.
Once Keep and its rdiff-backup prerequisite are installed, start Keep by running the command, keep. A simple window with five icons appears (Figure 1). The top three options are the ones you will use most often: adding a directory to the backup list, restoring from a backup or running a backup right now. Existing backup lists can be edited, and Keep also provides a simple backup log.
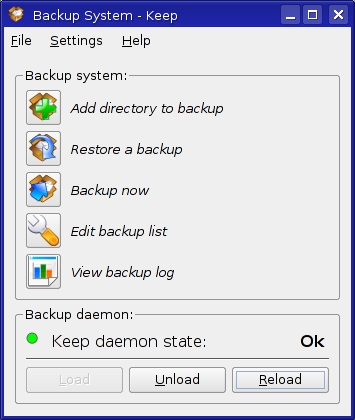
Figure 1. Keep's interface is compact and easy to use.
When Keep runs for the first time, you'll see a message at the bottom of the main window indicating that the Keep dæmon is not running. That's because the dæmon starts when you start KDE. You can click the Load button to start it, but if you run into problems, have no fear. You also can fire up the dæmon via the the KDE Control Center (command name, kcontrol). Look under KDE Components, and start the dæmon from the Services Manager.
To create a backup, click the Add directory to backup button. This starts a wizard-like dialog that begins by asking you to select a directory for backup (for example, your home directory). Click Next, and a KDE file selector appears from which you can identify the location of your backups. Click Next again, and you are almost done. The final screen is where you select the backup interval (Figure 2). The default is to run automatically every three days and to delete archives after 60 days, but you can change this to whatever you like. Extra options let you select compression and whether or not so-called special files are excluded. There's also a check box to fine-tune what exactly gets backed up using the Advanced Configuration dialog.

Figure 2. Keep runs automatically scheduled backups.
Click Finish, and your backup definition is created and scheduled to run at a later time. When the Add a backup window closes, you'll be back at the main Keep window. Feel free to create more than one backup definition with different backup intervals. At the bottom of the main window is a View backup log button where you can check on the status of your current backup. If you don't want to wait for your scheduled backup to run, click the Backup now button. A small window appears with the various backup jobs you have defined. Click on the one you like, and then click OK to launch the backup.
As the days go on, Keep starts to build a list of incremental backups based on the original full backup. Each of these snapshots are dated in preparation for the inevitable. After all, the whole point of a backup is to prepare for the day when you need to restore something that has gone missing through some disaster, non? To restore a file or folder, click the Restore a backup button. Choose a backup directory from the list presented, click Next, and then choose where you want your directories restored—either in the original directory or in an alternate location of your choosing. If you want to restore an individual file, you'll want to restore to an alternate directory rather than overwriting your own.
Click Next, and a list of dates appears. This is how you decide to which point in time you want to return. Click on a date, then click Finish, and the restore process begins. Keep is decidedly simple, but if your backup needs are equally simple, this is a program worth looking into.
For the GNOME users out there, we have Aigars Mahinovs' appropriately named Simple Backup. This program was created as part of Google's “Summer of Code” and was envisioned as an Ubuntu application. Unlike Keep, Simple Backup is a two-part application, with the backup configuration as one application and the restore as the other. Like Keep, Simple Backup runs predefined backups in the background according to whatever schedule you assign. In many ways, however, Simple Backup is much more flexible and powerful. You can get Simple Backup from SourceForge (see Resources).
The first step in using Simple Backup is to start the configuration program. This is done by selecting Simple Backup Config from the GNOME System menu in the top panel. Because this qualifies as an administrative task, you'll need to enter the root password to proceed (or your password if you are running Ubuntu). This brings up the Backup Properties dialog (Figure 3).
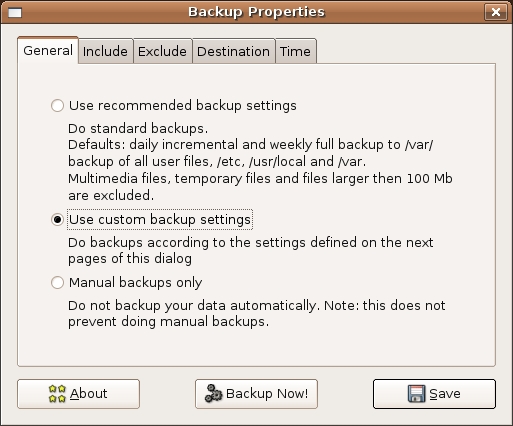
Figure 3. The first step in creating a Simple Backup is to define a backup configuration.
Three radio buttons allow you to select your backup settings. By default, Simple Backup does standard daily and incremental backups of user data to the /var/backup directory. Large data files, greater than 100MB, are excluded as are multimedia and temporary files.
The Include and Exclude tabs allow you to specify which directories or files you want to have backed up. On desktop systems, I tend to back up my data, the system configuration files and nothing else. With servers, I back up everything. Your choice may likely be somewhere in between. The most interesting option here is the Destination tab, and the reason I suggested that you choose a custom backup configuration on the General tab. You still have the option of choosing the default backup directory of /var/backup as well as an alternate directory.
To recover a directory using Simple Backup, click System on the GNOME top panel, and select Simple Backup Restore from the Administration submenu. Once again, you'll be asked for a confirmation password, after which the restore files dialog appears (Figure 4).

Figure 4. To restore from a Simple Backup, select the date of the backup you want and choose the directories you want restored.
Your default backup location (or restore source) is indicated at the top of the window; however, if you have backups in a different location, click the Custom restore source check box, then enter the pathname in the location field and click Apply. A list of available backups appears in the drop-down window below. Click on one, and the folders from which you can restore will show up in the main central area. Navigate to the folder you want (by clicking the arrows to expand subdirectories), and make your selection.
You now have two choices. The first is to restore the folder as it was, in its original location. In some cases, the right choice will be Restore As, which lets you select an alternate location or name for the directory you are restoring. When you have made your choice, a confirmation box asks you whether you really, really want to restore the folder to the location specified. Assuming the answer is yes, click Yes. The whole process from backup to restore is very simple. If I could make one recommendation, however, it would be to provide a log progress window and an easily accessible log. Otherwise, Simple Backup is very much as the name would indicate.
Finally, I would like to show you Johnathan K. Burchill's KDar, or KDE Disk Archiver, a friendly, graphical interface to Denis Corbin's powerful command-line dar utility. Of the programs on today's menu, this is by far the most flexible, for reasons I'll explain shortly. Where the other programs work at the directory level, KDar can restore individual files as well. It can do full and incremental backups, and it can break up the archives into slices to fit on the storage media with which you choose to work. This media can be a CD-ROM, DVD and so on. You can get KDar from SourceForge (see Resources) where source bundles are available. Should you prefer binary packages, KDar is easily found on a number of contrib sites.
Once the package is installed, fire up KDar by running the kdar command (use the Alt-F2 quick launch if you prefer). A splash screen flashes a moment before the actual interface starts (you can turn off the splash screen in the configuration dialog under Settings). When the program starts, the main window looks fairly plain (Figure 5). Along the top is a pretty standard menu bar with some quick access icons directly below. Pause your mouse cursor over the icons, and tooltips identify them for you. Below that are two large, empty panes. The top pane lists archives and files, and the bottom is a log window.
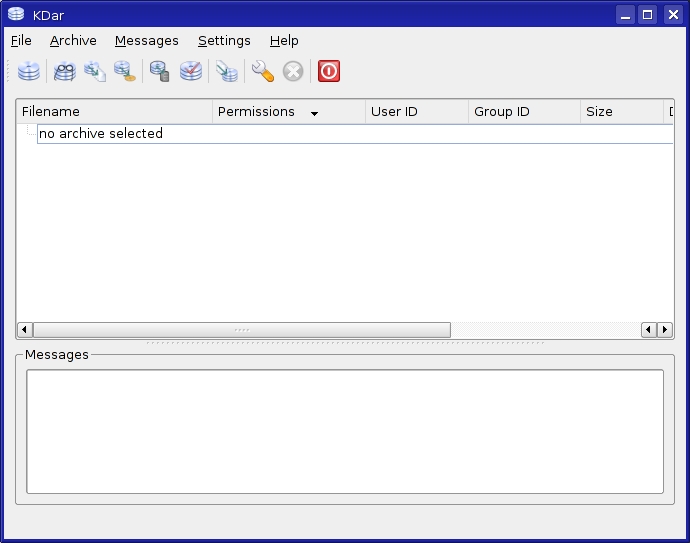
Figure 5. KDar's Interface at Start Time
The easiest way to create a backup is to click on the Create icon or select Create from the Archive menu off the menu bar. You'll be asked for the top-level folder you want to back up, where you want the backup stored and so on. You'll also be asked to configure creation options, and these are substantial, so take some time to look them over. These options include compression, cryptography, files and folders to include or exclude, and file types to exclude (such as MP3, AVI and so forth) and much more. Once you have finished with the creation of your backup, you can save the profile, export the dar command (more on this in a moment), do a dry run of the backup (without actually writing) or simply start the backup. A progress window lets you know how things are progressing (Figure 6).

Figure 6. KDar's backups provide a graphical progress report with estimated time to completion.
When it comes time to restoring a file or folder, your first step is to pull up an existing archive. Click File on the menu bar and select using the Open menu (or go for Open Recent). The top pane of the KDar main window displays the archive with a small arrow beside it. Click the arrow to expand the folder list, and each subdirectory also opens with an arrow beside it until you get to the file level (Figure 7).
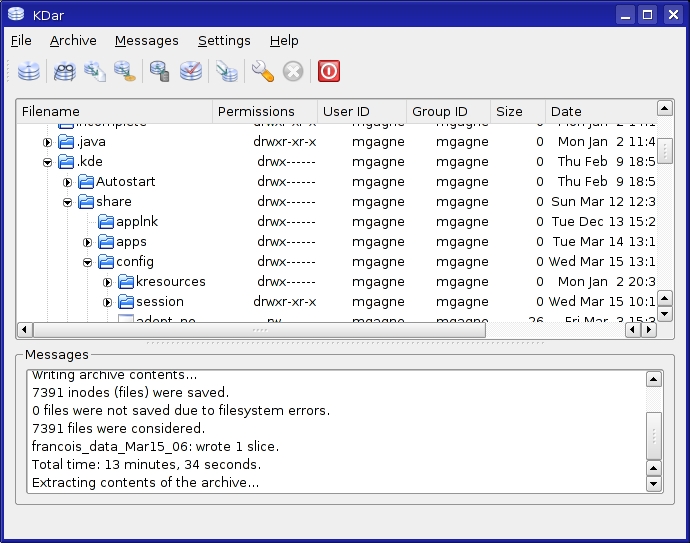
Figure 7. KDar can restore individual files as well as directories.
Select the file, directory or combination of both that you want restored, then right-click on your selection. This brings up a small menu from which you can choose to restore, do a diff comparison of your backup against the current files or do a test restore (Figure 8). All of these choices also are available by clicking Archive on the menu bar.

Figure 8. The final step in a KDar restore allows you to store or load profiles. You also can export the commands to a shell script.
KDar provides a log of the restore process, including the number of files restored, the time taken and any errors that were encountered.
Whenever you run a backup or a restore using KDar, there is a button on the final screen that lets you export the equivalent dar command to a bash shell script. This is important, because it makes it easy to create cron jobs for your backups. Although KDar is much more flexible than any of the other candidates I've covered, it lacks a dæmon that backs up in the background. Nevertheless, the shell scripts it generates makes KDar (and its dar counterpart) suited to more complex environments.
Ah, mes amis, if only there was some way to restore the clock to an earlier time. It seems that this is still somewhat beyond the talents of even the most skilled programmer. Until such a time as this wondrous package becomes available, I'm sure that François will not mind if we keep the restaurant open just a little longer so he can refill your glasses once more before the final “Au revoir”. It's also too bad that we can't restore all this wine. Can you imagine it, mes amis? And endless wine cellar. That dream is very much alive. On that note, please raise your glasses, mes amis, and let us all drink to one another's health. A votre santé Bon appétit!
Resources for this article: /article/8940.
Marcel Gagné is an award-winning writer living in Mississauga, Ontario. He is the author of the all new Moving to Ubuntu Linux, his fifth book from Addison-Wesley. He also makes regular television appearances as Call for Help's Linux guy. Marcel is also a pilot, a past Top-40 disc jockey, writes science fiction and fantasy, and folds a mean Origami T-Rex. He can be reached via e-mail at mggagne@salmar.com. You can discover lots of other things (including great Wine links) from his Web site at www.marcelgagne.com.

