
A Basic Text-Based Recording Studio
Whether you're into Metal, Jazz, Noise, Baroque or something in between, it is becoming more and more popular for artists to take on not only the roles of composer and performer, but also the roles of audio engineer, producer and even distributor of their own work.
The capability and quality of Linux audio applications are very good and constantly improving. Support for high-end and low-end audio cards is also getting better all the time. Whether it becomes the dominant platform in the field is largely irrelevant—those of us who find the flexibility of Linux and open-source tools to be valuable now have a platform suitable for creating high-quality audio tracks.
This article outlines a simple method, which may be built upon, for recording layered, multitrack recordings. In keeping with the Linux tradition, in this article, we discuss a number of small, command-line tools that perform very specific tasks very well. We then combine the power of each of these tools into a digital audio workstation. As you will see, using these tools in such a way, it is possible to overcome the (rare) shortcomings in some of these tools.
The tools we cover here are Ecasound and JACK. The Hydrogen drum machine is mentioned briefly too. We use no ALSA- or OSS-specific features directly, and either will do fine. In fact, for those who have lost their way and have strayed from the path to enlightenment (kidding), these tools and techniques also work under CoreAudio on Mac OS X.
Figure 1 shows how data flows between each of these components at a high level.

Figure 1. Audio Data Flow
For the examples outlined in this article, any sound card will do. I even have performed some relatively acceptable recordings using the onboard Intel i8x0 sound device in one of my Linux laptops. However, the difference between lower-end audio controllers and the mid- to high-end ones is quite noticeable.
We also require a Linux distribution. If you have trouble getting JACK and Ecasound for your distribution, try the AGNULA live distribution. Most distributions come with the relevant packages these days anyway.
A mixer is desirable. Using a small (read: cheap) mixer may give you more flexibility and a chance at better sound. You also may find that a direct injection box or a microphone preamp is adequate.
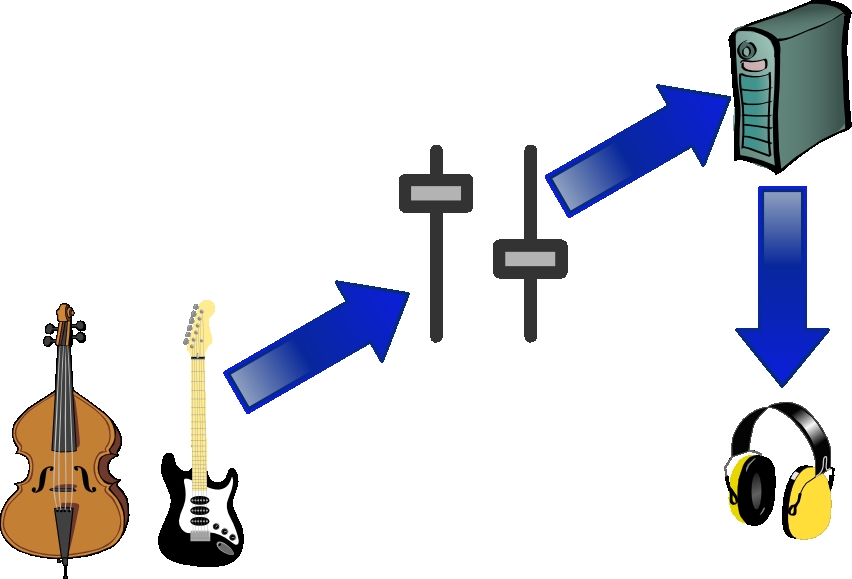
Figure 2. Equipment Signal Flow
Note that Figure 2 suggests plugging the headphones in to your Linux box. Most mixers allow the sound card to be plugged in to a signal return port and allow the headphones to receive the audio signal either before or after the signal is sent to the Linux box. This is acceptable too.
In this article, we don't assume much, apart from needing the following:
A Linux box with a configured and tested audio controller.
The ability to source and install necessary packages and their dependencies.
A familiarity with your choice of noise-making device (for example, guitar, cello, cat and so on).
JACK, which stands for the JACK Audio Connection Kit, is an API and a service that provides audio connectivity between applications on many POSIX-compliant systems. JACK has been designed with low-latency communication in mind.
Many of the examples in this article may work equally well without JACK. I personally have had fewer audio dropouts on systems employing JACK running with real-time priority than without, and it is quite useful for interconnecting audio applications, such as the Ecasound and Hydrogen examples discussed later.
For applications to make use of JACK, they must be linked against the JACK API libraries, and the JACK service, called jackd, must be started. Distributions shipped with JACK often already have most applications linked against the JACK API. If not, consult the build or compile instructions for your given application.
To start the JACK service, execute a command similar to the following:
jackd -R -d alsa
The -R option instructs JACK to attempt to attain real-time privilege, and -d alsa instructs JACK to use the ALSA sound system. For users still using the OSS sound system, -d oss should suffice, and -d coreaudio should get Mac OS X users off to a start.
Each driver supports a series of driver-specific options. These may be viewed by specifying --help after -d alsa.
Before leaping in too far and beginning to record audio, I strongly recommend spending some time getting the various settings and levels right. The good news is that this involves plugging the instrument of your choice in to the mixer or sitting it in front of a microphone and playing.
Begin by getting the average signal coming into the mixer at around the 0VU mark, and try to avoid sending the signal into the red too often. Once the mixer levels are generally okay, connect it to your PC and check that the input level and output level are fine:
ecasound -i jack_auto -o null -ev
The -i jack_auto command-line option tells Ecasound to get its input from JACK. Because we're not running any other JACK-aware applications at the moment, JACK takes this input from the sound device. The -o null tells Ecasound to send output to the great bit bucket in the sky.
The -ev option tells Ecasound to keep track of amplitude statistics, and the -c option starts Ecasound in interactive mode. With a little luck, you should see a few informational messages and no errors or warnings.
Any percussive sounds (such as palm-muting on the guitar) are likely to cause a spike in your audio track. While checking the signal levels, use any of these techniques you intend to record later—it'll save a nasty surprise in the moment of creative genius. To stop, press Ctrl-C. You should be presented with output similar to the following:
....
(audiofx) Peak amplitude, period: pos=0.30495 neg=0.26996.
(audiofx) Peak amplitude, all : pos=0.30495 neg=0.26996.
(audiofx) Clipped samples, period: pos=0 neg=0.
(audiofx) Clipped samples, all : pos=0 neg=0.
(audiofx) Max gain without clipping, all: 3.27926.
(audiofx) -- End of statistics --------------------------------
First, check that you have no clipped samples (positive or negative). Second, check the maximum gain figure. This gives the percentage that this sample can be amplified (theoretically) before clipping starts to occur. Depending on your hardware, you may never get within a few percentages before you hear audible distortion, so it pays to leave yourself a little room until you're familiar with your hardware. Listen as you test.
Once you have made mixer adjustments, try the previous few steps again.
Once you're happy with the input levels, set the output level to a comfortable level for you to monitor using your headphones.
Ecasound is a command-line tool capable of multitrack recording and more. The basic concept key to using Ecasound is chains. For our purposes, you can consider chains to be similar in function to a patch lead in a patch bay. A signal enters one end of the chain from a sound source and exits the chain into another component. A patch lead has exactly one input source and one output destination, and the same can be said about Ecasound's chain concept.
Sources and destinations for chains in Ecasound are usually audio files or audio controllers. It is quite normal to have a complex set of chains. The first track we will record will see Ecasound take audio from the running JACK instance and write the data back to JACK, as well as keep a copy in a PCM audio file. The two chains we need to perform these tasks are shown in Table 1.
This equates to the following Ecasound command:
ecasound -c -b:64 \
-a:1,2 -i jack_auto \
-a:1 -o jack_auto \
-a:2 -o track1.wav
Once Ecasound has initialised, it prompts you for instructions. Use the t command to start recording/playing and s to stop. If you make a mistake, you can issue a stop (s), the setpos 0 command, and t to start again. The q command quits when you're done. There's no need to issue any kind of command to save the result—that happens as you record.
The above command can be broken down into the following functions:
-c: don't start processing immediately, instead enter interactive mode.
-b:64: set the number of samples buffered to the smallest possible, reducing latency.
-a:1,2 -i jack_auto: create two chains (1 and 2) and set their input to come from JACK.
-a:1 -o jack_auto: set the output of chain 1 to JACK.
-a:2 -o track1.wav: set the output of chain 2 to track1.wav.
The overall result of this particular example is that chain 2 records anything coming in through JACK (and therefore probably the sound card) to track1.wav. Chain 1 allows you to hear the audio signal as it's being recorded.
Unless you're recording a live stereo track, you're likely to want to overdub other tracks. It is possible to use Ecasound to listen to tracks you've already recorded while recording (and listening to) a new track.
To listen to an already-recorded track while recording a second track, create three Ecasound chains (Table 2).
Table 2. Chains for Listening to an Already-Recorded Track While Recording a Second Track
| Chain | Input Source | Output Destination |
|---|---|---|
| 1 | track1.wav | JACK |
| 2 | JACK | JACK |
| 3 | JACK | track2.wav |
Creating a chain setup like this causes the contents of track1.wav to be sent to JACK to be played, and any input from JACK is sent back to JACK and saved to a file called track2.wav. track2.wav will contain only the new track—not the new track mixed with the old track. We'll mix them later.
Converting this chain setup to an actual Ecasound command is straightforward:
ecasound -c -b:64 \
-a:1 -i track1.wav \
-a:2,3 -i jack_auto \
-a:1,2 -o jack_auto \
-a:3 -o track2.wav
Recording further tracks is a similar process. We create a chain for each of our already-recorded tracks and set their output to JACK. We also set up two chains to take input from JACK and send it to a file and back to JACK, so we can hear it. The chain setup in Table 3 would suffice.
Table 3. Chains for Recording More Tracks
| Chain | Input Source | Output Destination |
|---|---|---|
| 1 | track1.wav | JACK |
| 2 | track2.wav | JACK |
| 3 | JACK | JACK |
| 4 | JACK | track3.wav |
This chain setup translates into the following Ecasound command:
ecasound -c -b:64 \
-a:1 -i track1.wav \
-a:2 -i track2.wav \
-a:3,4 -i jack_auto \
-a:1,2,3 -o jack_auto \
-a:3 -o track3.wav
I'm not a drummer, but some of the things I record need drums. Although the Hydrogen drum machine is probably the best that I have seen on Linux, it hasn't yet attained the magical 1.0 version number and isn't yet perfect. One feature that's broken in the snapshot I'm running is the ability to export to a PCM audio .wav file. As luck, or rather good design, would have it, Hydrogen can use JACK to output digital audio.
To use JACK and Ecasound to record the output of an audio application such as Hydrogen, we can perform the following steps:
Configure Hydrogen to use JACK for its output.
Configure Hydrogen to play in song mode, as opposed to pattern mode.
Execute the the following command:
ecasound -a:1 -i jack_auto -o drum_track.wav -G jack,ecasound,recv
Click the play button in Hydrogen.
The above command configures a single chain within Ecasound that draws input from JACK and sends output to a file called drum_track.wav. The -G jack,ecasound,recv instructs Ecasound to listen to JACK for a start command, which is sent when we click the Play button in Hydrogen, as a JACK client called ecasound.
It can take a second or so for Ecasound to start and initialise after receiving the start command, so I like to have a pattern of silence at the start of the Hydrogen track.
Unless you have impeccable timing, you would most likely record any software sources first. It is harder to synchronise a software source, such as a drum machine, with an existing human-recorded track than is is to record the human tracks around the machine-created tracks. This includes any MIDI tracks you intend to use.
At this point, we have a series of .wav files that correspond to each of the audio tracks we have recorded. Should we need to, we could use Ecasound, SoX or even Audacity to add effects or make minor corrections or alterations to any of the tracks. Once we're happy with the individual tracks, we can mix a single master track.
The process of turning our multiple tracks into a single stereo master track is straightforward. We create a chain for each track and set the output to be a .wav file.
Table 4. Turning Multiple Tracks into a Single Stereo Master
| Chain | Input Source | Output Destination |
|---|---|---|
| 1 | track1.wav | all_tracks.wav |
| 2 | track2.wav | all_tracks.wav |
| 3 | track3.wav | all_tracks.wav |
Ecasound provides a means to make this particular case easier. The all pseudo-chain name can be used to redirect the output of all of our tracks to a single place, namely a file called all_tracks.wav:
ecasound -a:1 -i track1.wav \
-a:2 -i track2.wav \
-a:3 -i track3.wav \
-a:all -o all_tracks.wav
To listen to the result, enter:
ecasound -a:1 -i all_tracks.wav -o jack_auto
It is also possible to write the master directly to the sound card without writing to a file first:
ecasound -a:1 -i track1.wav \
-a:2 -i track2.wav \
-a:3 -i track3.wav \
-a:all -o jack_auto
You also can attach a series of effects, including reverb, compression and amplification to each chain before it is written to the output destination. It is even possible to add delay and alter the panning of a particular track or even perform noise reduction; however, such topics are beyond the scope of this article.
As we have demonstrated, it is possible to create a simple multitrack recording using a handful of Linux audio tools. Once we started jackd, it was a simple process of telling Ecasound where to receive input from and where to send output to as we recorded our initial track and overdubbed a series of subsequent tracks.
Each of these tracks has been stored in its own individual .wav file. This allows us to use any other soundfile editor to make manual modifications to the track before mixing a final track, which can then also be tweaked. Common applications for processing audio files include Ecasound, SoX and Audacity.
We have really just scratched the surface of this particular aspect of a large field. With luck, it will form a solid foundation on which you can build your creative genius!
Resources for this article: /article/9269.
Matthew Geddes' hobbies are music and Linux. Luckily for him, and those around him, they also happen to be his career. When he's not playing his own stuff, he's listening to everything from Bach and Son House to Rachel Singleton and A norexia Nervosa. He can be reached at lj@musicalcarrion.com or through www.musicalcarrion.com.

