
Cooking with Linux - Is Your $HOME a Money, er, Messy Pit?
That's very amusing, François. I can't remember when I've I laughed so much. Quoi? I'm sorry, mon ami, I did not realize that you were serious. It's true that most people will tell you that their home is a money pit, but that is not the reason the environment variable for a user's home directory is $HOME. The dollar sign in front of the variable name is simply how these things are accessed by the shell. Now, don't look so sad, François. It really was very funny, and if I were you, I would write that down and use it someday.
Since you mentioned it, however, your $HOME can become expensive in other ways. People always seem to be able to find some kind of construction project for their homes, whether it be remodeling a bathroom, updating a kitchen or building a new deck. So it seems to be a similar case when running their Linux systems. I'm guilty of it myself, mon ami. During the course of any given year, I download hundreds of packages that I compile and install. Sometimes, I uninstall them and sometimes I forget about them, deleting the source folder and its accompanying uninstall scripts. The result is unused programs, forgotten programs and hanging files without a purpose. Because most Linux software is free, your Linux home isn't a money pit, but it can be a messy pit. All of this fits in nicely with tonight's menu.
We'll talk later, François—the door is opening and our guests are arriving. Vite! Direct them to their tables. Welcome, everyone, to Chez Marcel, home of the finest in Linux fare, not to mention the world's greatest wine cellar. François will show you to your tables, and then he will fetch the wine. I believe the 2003 Clarendon Hills Brookman Syrah is already drinking well. François, you will find a case in the East wing of the cellar.
Those of you who visit Chez Marcel on a regular basis are very familiar with the extract-and-build five-step. As a quick recap, let's consider a package called ftl-drive-3.1.tar.gz. To build and install the package using the extract-and-build five-step, you would use the following commands:
tar -xzvf ftl-drive-3.1.tar.gz
cd ftl-drive-3.1
./configure
make
su -c "make install"
This tends to work quite well, and if you decide that this package doesn't do what you want it to do, or that you no longer need it on the system, the way to install it is to go back into the source directory and type the following:
su -c "make uninstall"
Sounds simple enough, except that many source packages do not include an uninstall script. This is what makes package managers like RPM or DEB so much nicer, and it's why I suggest that you look for precompiled packages whenever possible. The package managers keep track of what files were installed where and handle the messy process of removing everything that makes up an installed package. It would be truly fantastic if you could do the same with source packages. That's where Felipe Eduardo Sánchez Díaz Durán's CheckInstall comes into play. To get your copy, go to the CheckInstall Web site (see the on-line Resources). Source is available (though you likely won't need it), as well as RPM, DEB and Slackware packages. The advantage of the binary packages (other than simplicity) is that they are already configured for your distribution's package manager. Why is this important? Keep reading.
CheckInstall makes it possible to generate DEB or RPM packages from source code bundles. The idea is that you run the first four steps of the extract-and-build five-step and run the checkinstall program instead of the final su -c "make install". Because the result is a precompiled package, your system's package manager takes care of the installation and removal of the packages. Let's pretend that you already have gone through the extract of a source package, right through to the make stage. Now, type the following:
su -c "checkinstall"
The first time you run checkinstall, you will get the following message:
The package documentation directory ./doc-pak does not exist.
Should I create a default set of package docs?  [y]:
The correct answer here is y, or simply press Enter to accept the default. The next step puts together the documentation package. In some cases, you may get a message that no documentation was included with the package. There's no need to worry if this happens. Just before things really start happening here, you'll be asked for a description of the package. As I write this, I am using CheckInstall with a kids' concentration game I found (see Resources), so my description looks something like this:
Please write a description for the package.
End your description with an empty line or EOF.
>> Concentration game for kids

**************************************
**** RPM package creation selected ***
**************************************

This package will be built according to these values:

1 -  Summary: [ Concentration game for kids ]
2 -  Name:    [ concentration ]
3 -  Version: [ 1.1 ]
4 -  Release: [ 1 ]
5 -  License: [ GPL ]
6 -  Group:   [ checkinstall ]
7 -  Architecture: [ i386 ]
8 -  Source location: [ concentration-1.1 ]
9 -  Alternate source location: [  ]
10 - Requires: [  ]
11 - Provides: [ concentration ]

Enter a number to change any of them or press ENTER to continue:
Once you pass this point, a lot of information will fly past you on the screen, followed by the creation of the RPM package itself. Assuming everything worked out well, you should see a message similar to the one I received when building the above game:
Done. The new package has been saved to

 /usr/src/RPM/RPMS/i386/concentration-1.1-1.i386.rpm
 You can install it in your system anytime using:

      rpm -i concentration-1.1-1.i386.rpm
Should you decide that you want to uninstall this package, the standard RPM tools will do the trick, either graphically or with the command line:
rpm -e concentration
For those who prefer to avoid the command line whenever possible, you might want to check out Ingo Stieran's KInstaller, an install program geared specifically to KDE. You can get a copy of KInstaller from the Web site (see Resources). It's kind of interesting that building a package to avoid the command line is done at the command line, but this is a pretty straightforward (you guessed it) extract-and-build five-step.
When you first start the program, you are treated to a setup wizard (Figure 1). Because this is essentially an installation tool for other KDE programs, your first step is to identify the KDE base directory. The easiest thing to do here is to click the Guess button. The field you should pay more attention to, however, is Storage dir. By default, KInstaller needs to know where you are going to extract and perform the installs for your packages. That directory is /tmp, but that may not be the best choice for everyone. Because I do a lot of package testing, I have a rather large partition, /mnt/bigdrive, that I use exclusively for this purpose. Choose something appropriate for your system. Finally, look at the check box labeled Move source packages to storage directory after installation. If you want to keep a copy of your source packages, check this box before continuing.

Figure 1. KInstaller starts with a simple configuration wizard.
When you click Finish, KInstaller starts. You'll see a two-tabbed window with the Installation tab selected by default. Near the top is a field labeled Select, which you will use to navigate to a source package. Once you press the Install button, the log window below starts filling up with the details of the build, from extraction to compilation (Figure 2). It's all done automagically. When the compilation completes, the install process launches and you'll get a pop-up box asking you to enter the root password.
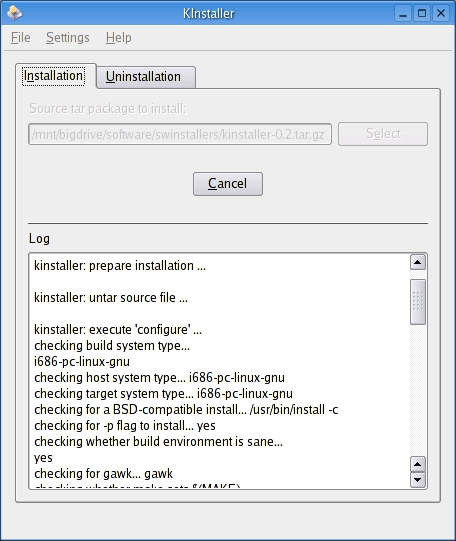
Figure 2. KInstaller handles every step of the extract-and-build five-step.
Once you have done a few of these, take a moment to look at those tabs again, and you'll see that one of them is labeled Uninstallation. Every package you have installed using KInstaller will have an entry here. To uninstall the package (regardless of whether an uninstall script was provided), select the package you want removed from the list and click the Uninstall button. Once again, a pop-up window will ask you for the root password to go ahead and remove the package. KInstaller does all this without using checkinstall. The package tracks installs on its own. It is also, as I mentioned earlier, geared to KDE packages.
While François attends to what appears to be an unusually large number of empty glasses—it seems, mes amis, that you are enjoying the wine as much as I am—I would like to show you another package in the style of KInstaller. Check out Javier Campos Morales' KConfigure. KConfigure isn't geared specifically to KDE packages, despite the very KDE-ish sounding name. What makes this package interesting is the way it handles the process of uninstalling software; it uses our old friend, checkinstall.
To start working with KConfigure, visit the Web site at SourceForge (see Resources). Source is available (and yes, it is a simple extract-and-build five-step). When you run the program, a basic two-paned window appears with a small number of icons running along the top. The icons have familiar-sounding names like Configure, Make and Install.
This is where things get interesting, so let's pause for a moment and look at KConfigure's configuration menu (Figure 3). I'll let you explore the Fonts and Miscellaneous settings on your own. For now, I want to concentrate on the Check Install Settings. To use the checkinstall program, click the Use Checkinstall check box and make sure you have the right path to the checkinstall executable (on my system, it resides in /usr/bin). I make a point of mentioning this since the default entered by KConfigure is /usr/sbin. When you are happy with your settings, click OK.
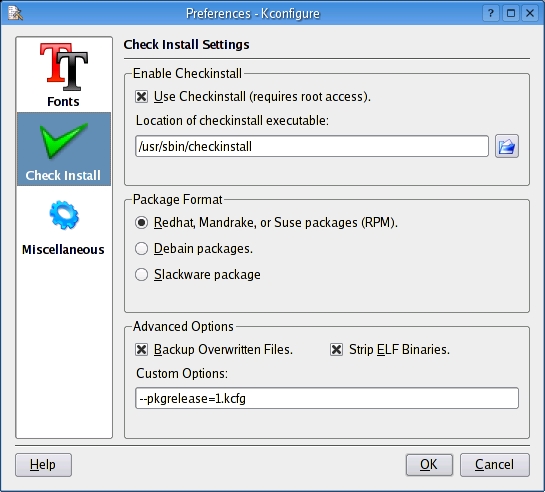
Figure 3. KConfigure's settings allow you to use checkinstall to build packages.
Time to build a package. Click Open and select a source bundle. KConfigure now shows you a window with a listing of the files that are about to be extracted. The default directory for the extract and build is the directory from which you selected the bundle, but you can override that by clicking the Extract files in... radio button and selecting another location. Click OK when you are happy with your choice, and a few seconds later a dialog box will inform you that the package was extracted successfully. Now you are ready to click the Configure button. A log of the configure process appears in the top-half window with any errors displayed in the bottom half. The same display format applies when you finally click the Make button (Figure 4).
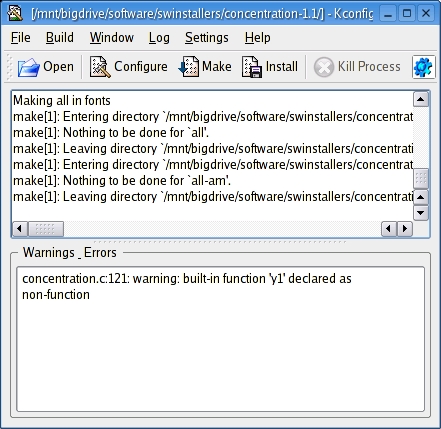
Figure 4. Details, details—a KConfigure build displays the work happening in the background.
Once the configure and make process has completed, you could just go ahead and click Install. Assuming that you have checkinstall and that you want to use it, make sure that you click Build on the menu bar and select Check Install from the Install With submenu. Now, go ahead and click Install. A prompt appears asking you to confirm the root password before continuing. After doing so, the RPM package is created. Make sure you check the bottom of the log window where the path to your newly created RPM package will be. On my system, that was:
/usr/src/RPM/RPMS/i386/concentration-1.1-1.kcfg.i386.rpm
Mon Dieu! The time has come and gone so quickly, and it is already closing time. Surely there must be an open-source programmer somewhere working on a program to extend time. We could even use one of the tools covered today to build and install the package, non? In the meantime, we shall have to live with the clocks we have. Besides, we can easily keep the doors open a little longer while we enjoy one last glass of wine. Please raise your glasses, mes amis, and let us all drink to one another's health. A votre santé Bon appétit!
Resources for this article: /article/8634.
Marcel Gagné is an award-winning writer living in Mississauga, Ontario. He is the author of the all new Moving to Linux: Kiss The Blue Screen of Death Goodbye!, 2nd edition (ISBN 0-321-35640-3), his fourth book from Addison-Wesley. He also makes regular television appearances as Call for Help's Linux guy. Marcel is also a pilot, a past Top-40 disc jockey, writes science fiction and fantasy, and folds a mean Origami T-Rex. He can be reached via e-mail at mggagne@salmar.com. You can discover lots of other things (including great Wine links) from his Web site at www.marcelgagne.com.

