
A Server (Almost) of Your Own
Would you like to have a dedicated server at an ISP, for the price of a mere virtual hosting account? For most Linux users, the answer is certainly, yes. You want root access to your own box and the ability to run the software that you choose—even if the budget calls for virtual hosting.
In this case, the solution is a Virtual Private Server (VPS). VPS accounts effectively partition a physical computer's resources into several virtual machines. You get root access to your VPS and configure it just like you would a dedicated server.
Of course, the flexibility of a VPS comes at the price of increased complexity. You are the system administrator of your VPS, not your ISP. The correct operation of the virtual machine—particularly security—is your responsibility.
The typical VPS account holder, however, needs to support only a small number of users, with a few relatively simple services. This makes the task of administering the system much easier. If you are at least somewhat comfortable with managing a Linux machine from the command line, you should be able to make a successful transition to a VPS account.
In this article, we focus our attention on the most critical aspect of switching to a VPS from virtual hosting—getting your e-mail working. E-mail is one of the most important communication tools today. With the exception of DNS, it is also the most complex service you are likely to encounter. Learning how to get your e-mail working should give you a good overall sense of how to manage your VPS.
With respect to DNS, you may want your VPS provider to handle it for you entirely, at least in the beginning. Ask about the additional fees before you sign up. They should be a few extra dollars per year. Some domain name registrars and third parties also can provide you with DNS service.
We use the VPS service provided by tummy.com to implement and test our e-mail solution. Its VPS accounts are based on Red Hat's Fedora by default, but you easily can choose Debian instead during the sign-up process. We use the Fedora-based VPS for this article—Fedora Core 3 at the time of writing. Some of the steps shown in the following discussion are specific to Fedora, but most are applicable to any recent Linux distribution. Updates for more recent Linux distributions are available at /article/9380. There is a corrections notice at the start of that document—just keep reading past it to get to the updates.
Here are some names that you will see in the examples. Your VPS hostname is myvps, your workstation is ws, your first domain name is first.domain, and your second domain name is second.domain. Your user name on your workstation is usera, and the mail users on the VPS are maila and mailb.
Additional domain names beyond the first one are optional—only remember to delete all references to second.domain when you use any of the code from the article. You also can host more than two domain names—simply configure them in the same way as second.domain is configured in the examples.
Of course, the actual domain names that you use should be valid and registered to you. For example, my first.domain is openlight.com. You also can call your VPS and workstation anything you want. Now, let's begin.
Log in to your new VPS account as root with ssh root@MY.VPS.IP.ADDRESS. You would have already chosen your root password when you signed up for the account, and your VPS provider should have given you the IP address of your virtual machine.
One of the first tasks when you set up a new Linux server is to configure the built-in iptables firewall. Your VPS provider may have set reasonable defaults, but you should always verify this yourself.
On the Fedora Linux distribution, run the following command:
[root@myvps ~]# system-config-securitylevel-tui
You can now move from one control to another with the cursor keys. Use the spacebar to activate buttons and toggle check boxes. Make sure that the Security Level is set to Enabled. Then, activate the Customize button.
On the next screen, you must enable SSH, WWW and Mail. Do not enable any Trusted Devices.
Next, scroll down to the Other ports text box, and add the entry https:tcp, which allows secure https connections. You will need https if you decide to configure Web mail, as described later in this article.
Activate the OK button when you are finished with the customization screen. Also, activate OK on the next screen. Finally, restart iptables to make sure that the changes take effect:
[root@myvps ~]# /etc/init.d/iptables restart
You must be very careful when you reconfigure your iptables. In addition to the usual danger of creating new vulnerabilities, it is easy to lock yourself out of the remote VPS server. In that situation, you will have to ask your VPS provider for help. Other common ways to render the VPS inaccessible are shutting down networking, the SSH dæmon (sshd) or halting the virtual machine.
Next, create an ordinary user login that you will use later to read and send e-mail. Set the password for the new account:
[root@myvps ~]# useradd maila
[root@myvps ~]# passwd maila
Changing password for user maila.
New UNIX password:
Use names such as maila or pseudonyms for logins. This is more secure and guards against inadvertent release of personal information on-line. Verify that you can log in to the new account. You are now ready to configure your mail server.
Warning:
There have been many automated attacks against SSH. At the very least, you must use strong passwords, or your system will be compromised. The apg utility simplifies this task. It generates random, non-dictionary “words” that you can pronounce. There are apg packages for most popular Linux distributions.
Make sure to look in the on-line Resources for this article for more information. SSH security is not specific to the VPS environment—it is also an important issue in standard virtual hosting. With a VPS, however, you do have the flexibility to protect yourself properly. The resources page is at /article/9380.
The mail server, also known as the Mail Transfer Agent (MTA), is a program that delivers and receives e-mail messages. The MTA will receive all the mail that others send you. Likewise, any messages you send to others will leave your VPS through the MTA.
The default MTA on your VPS is Sendmail. This sophisticated, powerful program has advantages for complex e-mail configurations. Unfortunately, it also is difficult to configure and tends to have a lot of security problems.
Therefore, we replace Sendmail with Postfix. Postfix is efficient, very secure and, most important, easy to configure. Before proceeding with the installation, shut down Sendmail, and make sure that it will not start again on reboot. Then, install Postfix:
[root@myvps ~]# /etc/init.d/sendmail stop
Shutting down sendmail:                      [  OK  ]
Shutting down sm-client:                     [  OK  ]
[root@myvps ~]# chkconfig --del sendmail
[root@myvps ~]# up2date --install postfix
Note that using the up2date command to install packages is specific to Red Hat and related distributions. You may be presented with a configuration screen the first time that you run up2date. You can simply press Enter to accept the default values. In addition, up2date is sometimes very slow and can even fail for transient reasons. You can try the command again if it does not work the first time.
The main Postfix configuration file is /etc/postfix/main.cf. Save a copy of this file to read later, because it contains many helpful comments. Then, replace /etc/postfix/main.cf with the code from Listing 1. You should modify your new main.cf to specify the domain names that you will be hosting on your VPS.
# Example "main.cf" file for Postfix on a VPS.
#
# Note that lines that begin with whitespace
# continue the previous line.
#

# LOCAL PATHNAME INFORMATION
queue_directory = /var/spool/postfix
command_directory = /usr/sbin
daemon_directory = /usr/libexec/postfix

# QUEUE AND PROCESS OWNERSHIP
mail_owner = postfix

# Host name is usually the domain name on a VPS.
myhostname = first.domain
mydomain = first.domain

# Where locally-posted mail will come from.
myorigin = $myhostname

# Listen on all interfaces.
inet_interfaces = all

# This server is the final destination for these domains.
mydestination = localhost, localhost.localdomain,
                $myhostname, localhost.$mydomain,
                $mydomain, second.domain

# IMPORTANT -- accept mail for relaying ONLY from
# the local machine.
mynetworks_style = host

# Where your aliases are.
alias_maps = hash:/etc/aliases
alias_database = hash:/etc/aliases

# This user should receive any mail whose recipient
# could not otherwise be matched.
luser_relay = maila@localhost.localdomain

# IMPORTANT -- local recipient checking must be
# turned off for the "luser_relay" directive to
# work.
local_recipient_maps =

# Error code to reject mail with when the local
# recipient is not known.
unknown_local_recipient_reject_code = 550

# Your server's greeting banner.  IMPORTANT -- it
# MUST start with your server's hostname, and the
# reverse DNS lookup on the server's IP address MUST
# match this hostname, or your outgoing mail could
# be rejected as SPAM.
smtpd_banner = $myhostname ESMTP

# See the "main.cf" that came with your Postfix
# distribution for discussion on the rest of the
# directives in this file.
debug_peer_level = 2

debugger_command =
  PATH=/bin:/usr/bin:/usr/local/bin:/usr/X11R6/bin
  xxgdb $daemon_directory/$process_name $process_id
  & sleep 5

sendmail_path = /usr/sbin/sendmail.postfix

newaliases_path = /usr/bin/newaliases.postfix

mailq_path = /usr/bin/mailq.postfix

setgid_group = postdrop

html_directory = no

manpage_directory = /usr/share/man

sample_directory = /usr/share/doc/postfix-2.1.5/samples

readme_directory = /usr/share/doc/postfix-2.1.5/README_FILES
Replace all occurrences of first.domain in Listing 1 with your own fully qualified domain name, such as openlight.com. The reverse DNS lookup of your VPS's IP address must return this domain! Otherwise, your outbound messages may be rejected as spam.
If you are hosting an additional domain name, substitute it instead of the second.domain entry. Otherwise, delete second.domain before using Listing 1. If you wish, you can also, replace maila in Listing 1 with the user name of your choice.
Now, append an entry to the /etc/aliases file to specify the user who will receive root's mail. Here is an example:
root: maila
Next, create accounts for the other e-mail users. Append any aliases for these users to /etc/aliases. The following example entry will cause user mailb to receive all messages sent to promo@first.domain:
promo: mailb
Note that if you have an additional domain name, messages to promo@second.domain will also go to mailb. For a small organization, this is probably the right default behavior, because all domain names that you will be hosting are almost certainly related. For example, if you are hosting an additional domain for your product, then tech-support questions about the product should likely go to the same person, regardless of which domain name appears in the e-mail address.
When you are finished, update the alias database file, and start Postfix:
[root@myvps ~]# postalias /etc/aliases
[root@myvps ~]# /etc/init.d/postfix start
Starting postfix: [  OK  ]
Check the log file /var/log/maillog for any errors.
You can update the aliases file even while Postfix is running, just run postalias /etc/aliases again when you are finished.
You should now verify that Postfix is doing what you expect. Connect to port 25 on your VPS using telnet, as shown in Listing 2. Enter just the text highlighted in bold—the rest of the text is the system's responses. Of course, you should type the IP address of your VPS in place of MY.VPS.IP.ADDRESS, and your actual domain name instead of first.domain.
[usera@ws]$ telnet MY.VPS.IP.ADDRESS 25
Trying MY.VPS.IP.ADDRESS
Connected to MY.VPS.IP.ADDRESS.
Escape character is '^]'.
220 first.domain ESMTP
HELO example.com
250 first.domain
MAIL FROM: test@example.com
250 Ok
RCPT TO: promo@first.domain
250 Ok
DATA
354 End data with <CR><LF>.<CR><LF>
This is a test
.
250 Ok: queued as MESSAGEID
QUIT
221 Bye
Connection closed by foreign host.
Use Listing 2 as a guide to run the following tests:
Connect to port 25 of your VPS from an outside machine, such as your workstation. Verify that Postfix accepts messages for each e-mail address you intend to use. Then, make sure the right users are receiving the messages. See the following discussion for details.
Connect again from the outside, and check that Postfix will refuse to relay mail to other systems. Use an e-mail account that you have on some other system as the destination, just in case. It is very important that your MTA refuse any relay requests from external machines. Otherwise, spammers will quickly discover that they can route their junk e-mails through your system.
Using telnet from a shell prompt on your VPS itself, check that the MTA will relay mail to remote servers. Use your own e-mail account on some other system as the destination. Note that the remote MTA may refuse to accept the message, because your system is not live yet, so reverse DNS lookups will not yield the right result.
You can verify that a user on the VPS has received mail with the mail command. Here is an example that checks the mail for maila:
[root@myvps ~]# mail -u maila
The mail command is a simple mail reader. Type h to view the received messages, then type the number of the message to view it. Press the spacebar to scroll through the message. You also can scroll through the message with the Enter key, but it will start viewing the next message after it gets to the end of the current one. You can type q to stop viewing a message. When you are not viewing a message, typing q will exit mail. The ? key brings up a help screen.
When everything is working as it should, tell your initialization scripts to launch Postfix automatically on system reboot:
[root@myvps ~]# chkconfig --add postfix
In this article, we discuss two methods for reading your mail. One is to download the mail to your workstation. The other is to leave it on the VPS and use a Web-based solution to view the messages through your browser. You can use both methods together.
The first approach requires the POP3 protocol, and the second needs IMAP. On Fedora, the simplest way to get both is to install Dovecot:
[root@myvps ~]# up2date --install dovecot
When the installation finishes, edit /etc/dovecot.conf. Find the protocols directive and replace it with the following. Do not delete the original line, but comment it out for future reference:
#protocols = imap imaps pop3 pop3s
protocols = pop3 imap
As a security precaution, configure both POP3 and IMAP to accept requests only from the VPS itself. Once again, do not delete the original code, but leave it commented out for future reference:
#imap_listen = [::]
imap_listen = [127.0.0.1]
#pop3_listen = [::]
pop3_listen = [127.0.0.1]
Start dovecot, and add it to your system's initialization scripts:
[root@myvps ~]# /etc/init.d/dovecot start
Starting Dovecot Imap:                       [  OK  ]
[root@myvps ~]# chkconfig --level 345 dovecot on
We will be using SSH tunneling to read and send mail securely from your workstation. With SSH tunneling, you can temporarily map ports on the VPS to available ports on the workstation. All communication on the mapped ports takes place over an encrypted tunnel.
Give the following command on your workstation. Use your VPS's IP address if you did not add an entry for myvps in the /etc/hosts file on your workstation:
[usera@ws ~]$ ssh -Nf maila@myvps \
-L 2525:localhost:25 -L 2110:localhost:110
The user maila must have shell access to the VPS. You will be prompted for maila's password.
This tunnel maps ports 25 and 110 on the VPS to ports 2525 and 2110 on the workstation, respectively. If you are already downloading your inbound mail using POP3 and sending your outbound mail through an ISP's mail server, you will require very few changes to your mail client's configuration.
Simply set your POP3 server as localhost with port 2110, and your outbound mail server to localhost with port 2525. You even can leave your outbound mail settings unchanged, unless you plan to cancel the account at the ISP whose mail server you are currently using. Here are specific instructions for two popular e-mail clients.
If you use Mozilla Thunderbird, select Account Settings... from the Edit menu. Add a new account by clicking the Add Account... button in the dialog box, and follow the prompts in the Account Wizard. After you create the new account, click on its Server Settings list item in the left pane to configure the POP3 server and port. Figure 1 shows the screenshot. Red-colored highlights indicate the most important parameters.
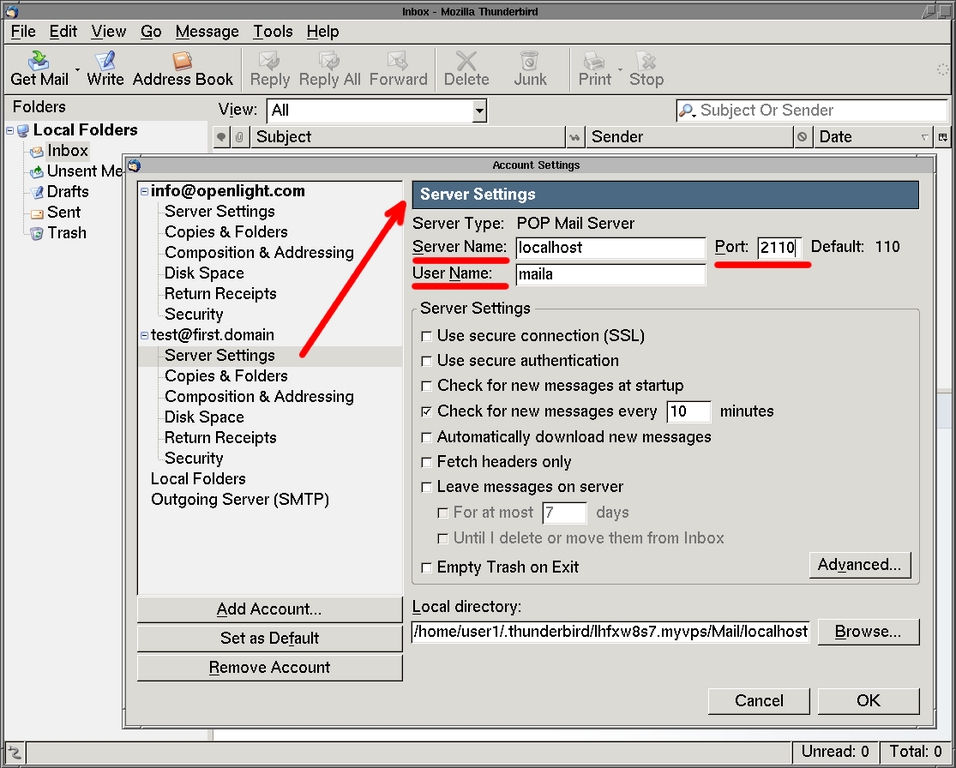
Figure 1. Setting Up Your Mail Account in Mozilla Thunderbird
You also can configure Thunderbird's outgoing mail server from the same Account Settings dialog box. Click on Outgoing Server (SMTP) in the left pane of the dialog. Figure 2 shows the resulting screenshot. Remember to uncheck the Use name and password check box.
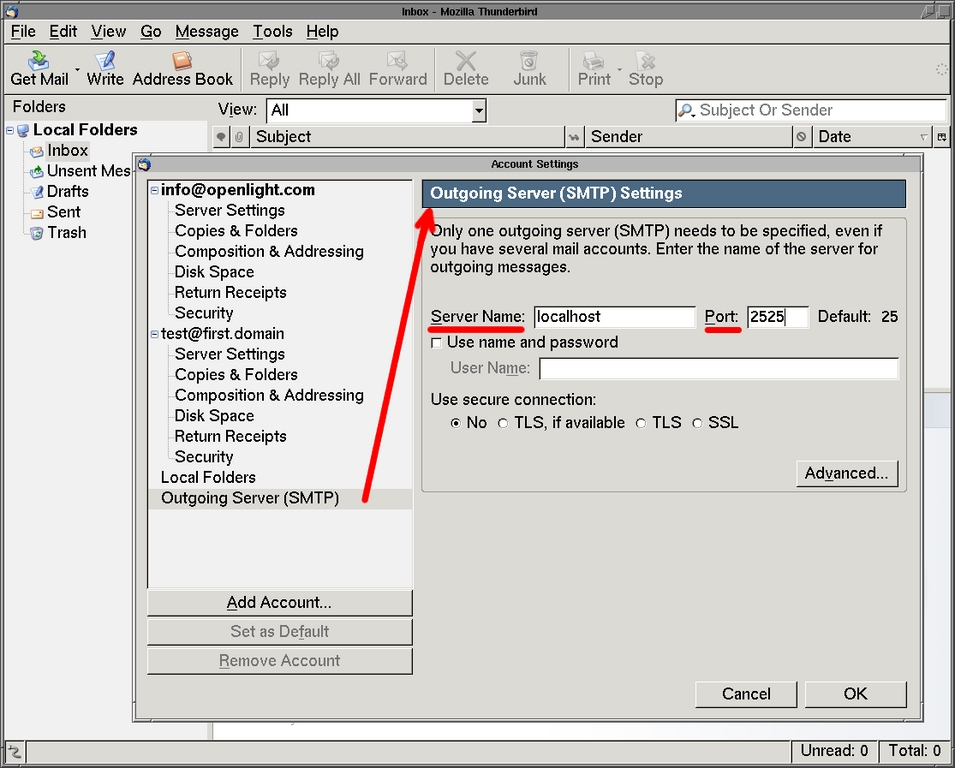
Figure 2. Set up your outgoing mail server to localhost at port 2525.
Another popular mail client is Mutt. A typical Mutt-based configuration uses Fetchmail to download the mail, Procmail to sort it into mailboxes and ssmtp to deliver the outbound mail. See Listing 3 for an example .fetchmailrc file and Listing 4 for an example ssmtp.conf file. Both use the SSH tunnel that we created earlier. Do not forget to change the code in Listing 3 to reflect your correct user names and passwords.
set postmaster "usera"
set no bouncemail
set no spambounce

poll localhost with protocol POP3 and port 2110
and options no dns:
   user "maila" there is usera here and wants
   mda "/usr/bin/procmail -d %T" options fetchall
password "MAILA'S VPS PASSWORD"# The person who gets all mail for userids < 1000 # Make this empty to disable rewriting. root=postmaster # The place where the mail goes. The actual machine # name is required; no MX records are consulted. mailhub=localhost:2525 # The full hostname hostname=localhost # The "From" line sender address will override any # settings here. FromLineOverride=YES
Finally, note that you need to set up the SSH tunnel again every time you reboot your workstation. There are many ways to automate the process, but it is beyond the scope of this article to discuss them.
The Fedora Linux distribution provides a Web-based e-mail interface that requires very little work to configure. It is based on SquirrelMail and Apache. Web mail is an easy way to support Windows clients. It also does not require shell access on the VPS.
First, install SquirrelMail:
[root@myvps ~]# up2date --install squirrelmail
This process also installs several other packages that SquirrelMail requires. Next, enable secure https access by installing mod_ssl:
[root@myvps ~]# up2date --install mod_ssl
You must disable unsecure http access to SquirrelMail. Edit the file /etc/httpd/conf.d/squirrelmail.conf, and append the following lines:
<LocationMatch "/webmail">
SSLRequireSSL
</LocationMatch>
Now, start the Apache Web server:
[root@myvps ~]# /etc/init.d/httpd start
Connect to https://MY.VPS.IP.ADDRESS/webmail. Your browser will warn you about the SSL certificate—just accept it permanently, and you will not be warned again. The only way to avoid this error altogether is to use a certificate signed by a recognized Certificate Authority (CA). The CA will need to verify your identity and also will charge an annual fee for signing the certificate.
After accepting the certificate, you should be able to log in as any of the mail users that you have created earlier. If a particular mail user—for example mailb—does not need shell access, disable it with the following command:
[root@myvps ~]# usermod -s /sbin/nologin mailb
Do not forget to add the Apache Web server to your startup environment:
[root@myvps ~]# chkconfig --level 345 httpd on
Your Web mail users should click on the Options link in the SquirrelMail interface and configure their account information. Otherwise, SquirrelMail will format their messages with something like mailb@localhost.localdomain in the From field. This certainly will confuse anyone who receives such a message.
This article has covered one of the most difficult aspects of switching to a VPS account—setting up your e-mail. As you have seen, e-mail service is provided by a collection of several different programs working together. There are many other ways to configure this service. Unfortunately, it would require a lengthy book to describe and compare them all. This article tries to provide a simple solution with good security that a new VPS user can implement quickly.
Welcome to the world of VPS hosting—the server that is (almost) your own.
The author wishes to acknowledge Sean Reifschneider and Evelyn Mitchell of tummy.com, LTD., for generously providing a VPS account used to test the examples presented here, as well as their valuable comments on this article.
Resources for this article: /article/9380.
George Belotsky is a software architect who has done extensive work on high-performance Internet servers, as well as hard real-time and embedded systems. His technology interests include C++, Python and Linux. He is also the author of the Flightdeck-UI Open Source Project, which uses the ideas from aircraft instrumentation to implement computer user interfaces. You can reach George at questions@openlight.com.

