
Dirt-Cheap 3-D Spatial Audio
Many computer systems set up for advanced gaming include Dolby Surround Sound. The typical speaker configurations are 4.1—four speakers and one subwoofer— 5.1 and 7.1. This system is designed for all speakers to be located on a plane centered at the listener, and thus it is not possible to have a sound truly be emitted from above or below the listener, although some systems attempt to simulate that effect. Imagine a game scenario where a monster is climbing down a wall above and behind the player while, at the same time, a mouse is scrambling across the floor behind the listener. In a planar surround system, the sound effects for both the monster and the mouse would come from the rear speakers, making it hard to distinguish the actual locations of the sound sources.
With true 3-D spatial audio, the monster's sound effects could be played from speakers located to the back upper-left and the mouse's sound from speakers located to the back lower-left and back lower-right. In this setup, the player has a much better feel for what is creating the sound and where the sound is coming from. Now the player can arm the rocket launcher and turn toward the back upper-left directly and blast the monster—no need to aim toward the harmless mouse.
Spatial sound has been available for several years and primarily is employed in immersive virtual environments. The systems are not in mass-scale production and often must be installed by professionals, making them costly and out of the reach of most home users. We have devised a low-cost true 3-D spatial audio solution that requires only inexpensive consumer-level hardware and open-source software. This solution allows for the arbitrary placement of speakers, not necessarily co-planar as in other systems. Our 3-D spatial audio solution is the first that we are aware of to provide true 3-D sound at such a low cost.
Preliminary technology for 3-D spatial audio, Fantasound, first was developed in the late 1930s by Disney for the movie industry. Over the years, a great deal of work has been done to advance the field, especially by Dolby Laboratories. In the last few decades, researchers enabled personal computers to emit spatial audio. Today, spatial audio is commonplace in modern computer games. Home systems typically use headphones or a planar array of speakers, usually in a preset configuration, such as Dolby Surround Sound 5.1.
Headphones present a unique opportunity to provide inexpensive 3-D audio. Algorithms that use head-related transfer functions (HRTFs) can create convincing 3-D spatial audio on headphones using a simple stereo sound card. HRTFs use data about how sound is transformed by the user's body, especially the shape of the ears, for mapping sounds with 3-D positional sources. The technique relies heavily on applying different time delays for each ear. Ultimately, we decided not to use headphones, because we needed a system that scaled easily to many users. It was far more practical and cost efficient to use speakers.
A number of high-cost professional-grade hardware packages are available, such as the RME Hammerfall series, M-Audio Delta series and Lake Audio, that provide true 3-D spatial audio. Each package has a cost exceeding $1,000 US, boasts high sound quality and has a large array of features aimed at the professional market. Although the acoustic quality of these packages undoubtedly is higher than that of our low-cost 3-D audio solution in terms of audio clarity and fidelity, both options provide true 3-D spatial audio.
When we started putting together a spatial audio system, no inexpensive hardware and software combination existed to produce true 3-D spatial audio. Although there are software APIs that allow arbitrary, not necessarily co-planar positioning of sound sources, such as Microsoft DirectSound and the Advanced Linux Sound Architecture (ALSA), the low-level drivers officially support only the co-planar 4.1, 5.1 and 7.1 speaker positions mentioned earlier. There is no way to tell the drivers that the speakers have been moved to an alternate configuration, for example, with speakers above or below the listener. So even though software developers could position a sound above or below the user's head, the low-level drivers still assumed the sound was emitted in a circle around the user's head. The bulk of true 3-D spatial audio support comes from customized APIs.
Tommi Ilmonen at the Helsinki University of Technology (HUT) developed a 3-D spatial audio API called Mustajuuri that is built on the ALSA drivers. The Mustajuuri API implements Vector Base Amplitude Panning (VBAP), introduced by Ville Pulkki (see the on-line Resources), as the underlying 3-D spatial audio model. In short, VBAP is the algorithm responsible for moving a sound across a 3-D array of speakers and making the sound appear to come from a specific direction. VBAP selects the three speakers closest to the virtual sound position and calculates the required volumes for each speaker. See Figure 1 for an example of how VBAP panning works. Mustajuuri also simulates depth for audio by using time delays and distance attenuation. This makes it possible to position a sound anywhere in space relative to the listener. Mustajuuri already has been used to produce 3-D spatial audio using high-end audio cards, but up until now it has not supported low-end audio cards.
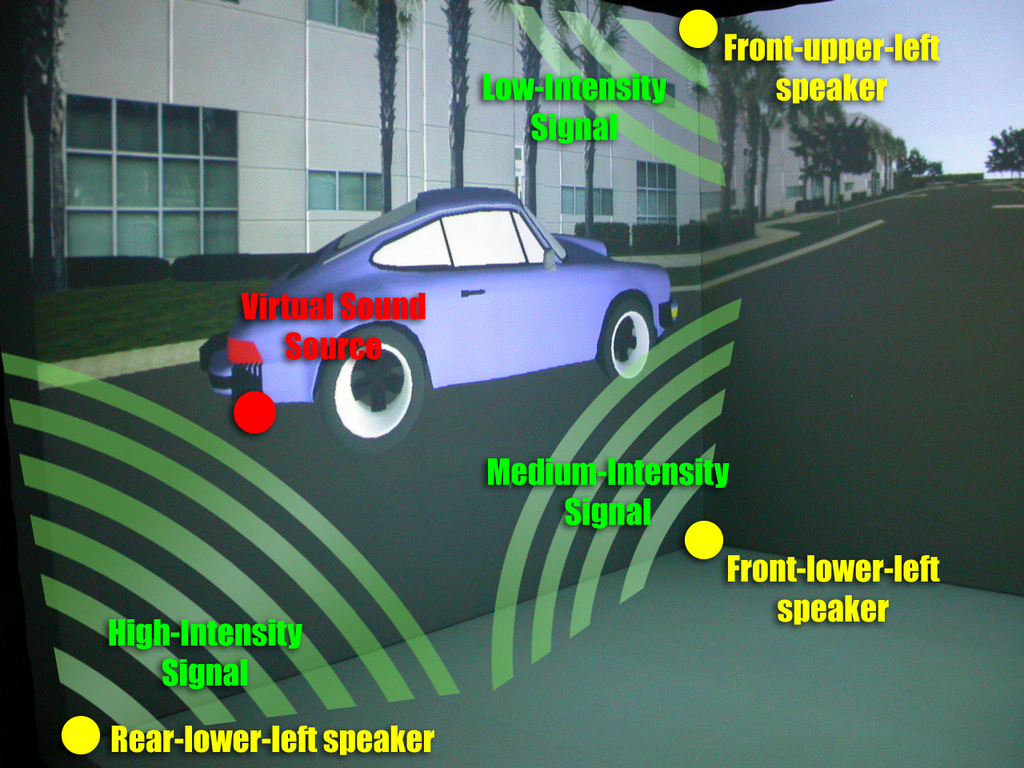
Figure 1. View of 3-D spatial audio test case in the immersive room. Visual depictions show from which speakers the sound is coming for the current view. For each sound, the three speakers closest to the virtual sound source are used to play the sound. Their volumes are varied based on the distance from the speaker and a number of other factors.

Figure 2. Audio Hardware Setup
The hardware needed to set up a low-cost 3-D spatial audio system includes a commodity sound card with certain features, speakers and audio cables. Here, we describe our choices for hardware components and the steps needed to set up the hardware. Throughout the discussion, refer to Figure 2 for an illustration of the hardware interconnections, speaker placement and wiring.
The first thing to consider is the number of speakers needed to produce 3-D spatial audio for a specific application. A minimally encompassing setup produces sound from all directions around the user—left-right, front-back and up-down. The speakers can be placed in any configuration, but setting up the 3-D audio panning functions is not as simple for irregular configurations. We decided to use eight speakers in a cubic configuration, with each speaker at a vertex of the cube, as shown in Figure 2. There is nothing special about the speakers needed for this task—the choice is a matter of budget and taste. We used eight amplified commercial-grade speakers for the simple reason that we already had them in our lab.
The eight speakers require a sound card that can produce eight channels of audio. Of the low-cost commodity audio cards, the only applicable candidates are the 7.1 cards. We chose the Creative Labs Audigy 2 card, which we found available at the time of this writing for as low as $90 US. Although it is possible to produce eight independent channels of audio using more expensive sound cards, the Audigy 2 card is the only commodity card we are aware of that has drivers in place to support what we are doing.
It is important to understand the output from the card. In a typical Dolby Surround Sound 7.1 speaker arrangement, there are two front speakers, left and right; two side speakers; two rear speakers; a center speaker, which sits in front and above the video screen; and a subwoofer channel, the .1 speaker. The Audigy 2 ZS has three analog output jacks, an 1/8-inch mini-phone, labeled 1, 2 and 3, that provide line-level outputs for the eight speakers. Jack 1 is three-pole, meaning it carries three signals—two signals drive the front left and right speakers and the third is ground. Jacks 2 and 3 are four-pole, each carrying four signals. Jack 2 drives the rear speaker pair and a side speaker, while jack 3 drives the subwoofer, the center speaker and the remaining side speaker. One final consideration is these signals are unamplified line-level, so the speakers need to be the amplified type that accept line-level inputs. Alternatively, a separate amplifier or set of amplifiers should be used between the sound card and the speakers.
The next step is to install the speakers. Many speakers designed for surround use include mounts, but speaker mounts are available commercially for a number of other speaker types. In our application, we already had the cubic infrastructure in place and used custom mounts to attach the speakers to the cube. The simpler the speaker configuration, the simpler the software configuration can be—that process is explained later in this article.
Finally, the speakers must be connected to the audio card. How one connects speakers to the Audigy 2 depends on the type of speaker and amplification used. A trip to a favorite electronics store should yield any necessary connectors. In our case, the speakers each have a two-pole 1/4-inch phone jack, so we needed to split the three combined outputs of the sound card into eight separate signals. For jack 1, we used a readily available 1/8-inch-stereo-to-dual-RCA adapter. For jacks 2 and 3, we found similar adapters with four poles and three RCA connectors. These adapters are used most commonly with camcorders, where the three signals are used for composite video and stereo audio. These adaptors gave us eight separate RCA connectors, and after obtaining eight long RCA-to-1/4-inch-mono cables, we were set.
In our final configuration, we used an Alesis Studio 32 mixer. This device fits in-line between the audio card's outputs and speakers' inputs and allows fine-tuning of the volume levels. Although the mixer made it a little easier to test and tune the audio, it wasn't truly necessary, as the same adjustments can be made in software.
The software solution for low-cost 3-D spatial audio is best described by the layered hierarchy shown in Figure 3. The software layers required to interface with the sound cards include low-level audio drivers and a 3-D spatial audio API. We focused our primary development efforts on Linux because of easy access to the source code for low-level audio drivers and the overall support community that exists for developers working on projects such as ours.
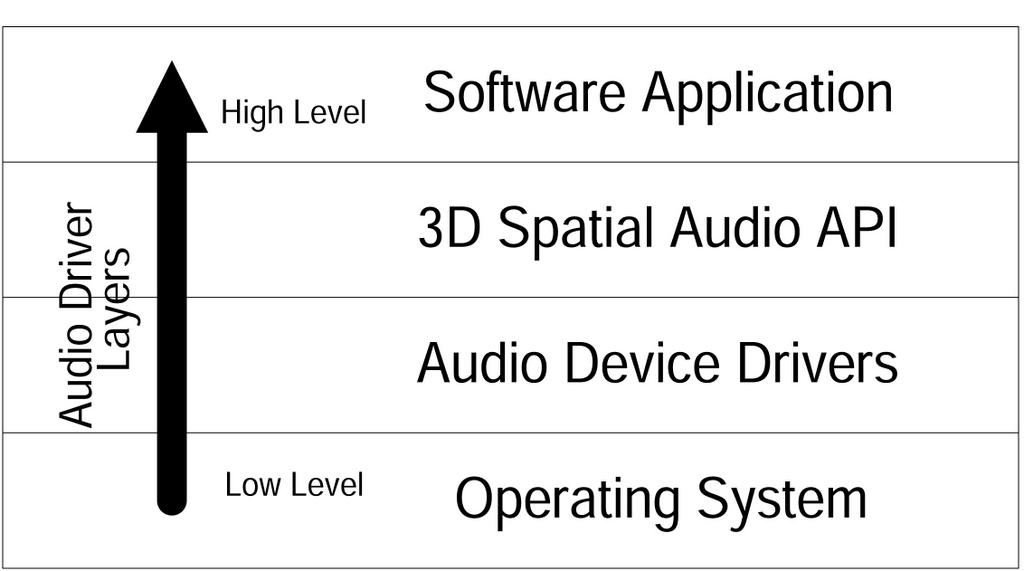
Figure 3. Audio Driver Layers
For the driver layer, we chose ALSA, which was mentioned previously. ALSA provides audio and musical instrument digital interface (MIDI) functionality to the Linux operating system. It supports many types of audio hardware, ranging from consumer sound cards to professional multichannel audio interfaces.
We selected ALSA because it appeared to require the least effort to generate the eight channels we needed for 3-D spatial audio. Until we modified the ALSA driver to access all eight channels, it supported only six channels (5.1) on the Audigy 2. These changes have been incorporated into ALSA, but they may or may not be in a release version at publication time. In that case, one can get the latest source and build it—be sure to include the emu10k1 sound card argument when using the ./configure script so that the ALSA driver recognizes the Audigy card.
After the driver is set up, the 3-D spatial sound API can be installed. It distributes sound effects from a given 3-D position to the appropriate audio channels. Although there are quite a few APIs to choose from, we chose Mustajuuri, as mentioned previously. The Mustajuuri software works with ALSA and provides 3-D panning over an arbitrary array of speakers using the VBAP algorithm, also described previously. The Mustajuuri API provides all of the features needed for a basic 3-D positional sound system and is fairly easy to extend. Over the course of this project, we made several minor source code modifications, and they are included in the October 2004 release.
Mustajuuri does its magic by way of a module called the Mixer, which mixes multiple sound sources—sound files, microphone inputs or other sources—into individual audio streams. These streams then are piped into a panning module, which is responsible for routing each input signal to the appropriate speakers, setting the correct gain and time delay at each speaker and mixing multiple streams meant for the same speaker into a single stream to be sent to that speaker. It does the routing and gain calculations based on VBAP, and some additional gain and delay calculations are based on distance. The result is each incoming sound source to the panning module leaves from a set of three speakers, and the resulting sound appears to come from a specific 3-D position in space. Doppler shifting also is simulated.
Once Mustajuuri is compiled and installed, several tasks must be performed to configure the software to work with the given 3-D speaker array.
ALSA needs to know how to communicate with all eight channels of the audio card. This normally would be achieved simply by using the device named surround71, but it is not fully compatible with the spatial sound API Mustajuuri. Mustajuuri requires support for input channels. The device surround71 supports eight output channels but no input channels. Therefore, it is necessary to define a new device that has eight output channels and some input channels.
In order to meet this requirement, an asymmetric device is defined. The device is called asymmetric because the number of input and output channels are not necessarily the same. Notice that the number of input channels is not stated explicitly. ALSA determines the number of input channels automatically and assigns the maximum; the Audigy card we used has two.
To configure ALSA, add the following text to the file /etc/asound.conf or create the file if necessary. This file holds information about user-defined devices, so we use the following text to add an asymmetric device called eightout:
ctl.eightout {
   type hw
   card 0
}

pcm.eightout {
   type asym
   playback.pcm {
      type route
      slave.pcm surround71
      ttable.0.0 1
      ttable.1.1 1
      ttable.2.2 1
      ttable.3.3 1
      ttable.4.4 1
      ttable.5.5 1
      ttable.6.6 1
      ttable.7.7 1
   }
   capture.pcm {
      type hw
      card 0
   }
}
Next, an environment variable must be set to allow Mustajuuri to talk to the audio card through ALSA. Set the following environment variable:
export MJ_AUDIO_CONF=
"Input=2=hw:0,0 | Output=8=eightout"
Once this is done, Mustajuuri should be able to output audio through all eight channels of the audio card.
Mustajuuri uses a mixer-board-style GUI for sending input audio streams to a speaker array, combining them or just passing them through intact. The input streams can come either from sound files or from live sources, such as a microphone. The GUI lays out several strips of channels that can be assigned different functions applied in a sequential process. Some example functions are input, send (to speaker), amplitude gain, panning and synthesizer. The gain and panning modify how the audio is distributed to individual output audio channels.
The Mixer Panel configuration we use is shown in Figure 4, which uses two mixer strips. The first has two interesting channels: a synthesizer channel, which manages the sound files, and a panning module, which handles the VBAP-based panning across speakers. The second strip is used to manage remote connections from external applications and does not accept an audio stream as input. It sends commands to the synthesizer and the VBAP module.
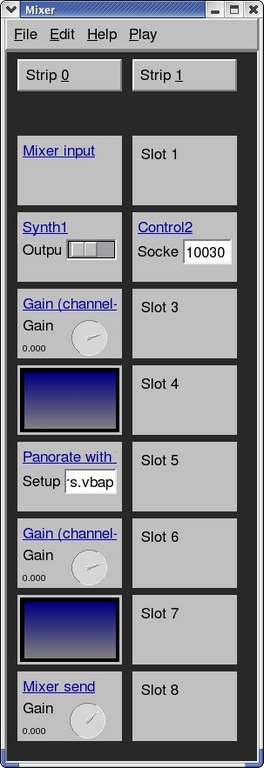
Figure 4. Screenshot of the Mustajuuri Mixer GUI (Tommi Ilmonen, Mustajuuri-2004)
To create a similar configuration, launch Mustajuuri and create a new mixer from the File menu. This mixer has several strips already, and all of these strips essentially are blank. The number of strips and the number of modules per strip can be changed using the Edit menu, if needed. Modules can be assigned by clicking with the mouse on a particular slot. To adjust the module's properties, simply click on the blue link defining the module's type, such as Synth1 or Mixer Input. The Strip X button at the top of a strip can be used to modify and remove the modules in any slot in that strip. All mixer configuration changes are saved by using the save options from the File menu. The resulting configuration file, for example, SpatialAudio.mj, is specified on the command line when Mustajuuri is called.
In order to use VBAP, it is necessary for Mustajuuri to know the locations of the speakers in the 3-D array. Mustajuuri does this through a configuration file that is specified as part of the VBAP panning module setup; this module was created as part of configuring the Mustajuuri Mixer Panel. This file specifies the azimuth and elevation angles (in degrees) for each speaker relative to the listener. Because our system uses eight speakers arranged in a cube configuration, our configuration file is specified as follows:
3        # dimensionality
# Azimuth, followed by elevation.
# 0 0 would be straight ahead.
-45 45   # Front upper left
45 45    # Front upper right
-135 45  # Back  upper left
135 45   # Back  upper right
-45 -45  # Front lower left
45 -45   # Front lower right
-135 -45 # Back  lower left
135 -45  # Back  lower right
This configuration file is used by the main configuration file for the Mustajuuri Mixer. This file assumes that all speakers are equidistant from the listener. If this is not the case, adjust the gain and delay for each speaker manually by using the Mustajuuri Mixer. In our system, such adjustments were not necessary, and it would involve significant work if it were necessary. The easiest solution is to try to place all speakers equidistant from the ideal listening position.
In order to use a sound file from Mustajuuri, that sound file must be known to Mustajuuri at load time. The mechanism used to do that is a configuration file that specifies all of the sound files that possibly might be used by Mustajuuri. This configuration file is used by the synthesizer mixer module, which was created when we configured the Mustajuuri Mixer Panel above. A sample configuration file that loads three sound files follows. Once a file is created, any name can be assigned; make sure the synthesizer module points to that file.
unusevoices *-stk
polyphony 48

sample audioeffect1.wav
sample audioeffect2.wav
sample sudioeffect3.wav
The polyphony line specifies the maximum number of audio files that should be loaded by Mustajuuri, so it should be at least as large as the number of audio files listed in this file. The last three lines specify three sample audio WAV files. Any audio files specified here must be placed in a directory specified separately as part of the synthesizer module configuration. The unusevoices line is a somewhat more-advanced setting, but one that should help improve efficiency somewhat.
Mustajuuri is designed to act as a standalone program to manipulate audio, not as a library to be linked against by another application. To control Mustajuuri from another application, as is the case with our project, two steps are required. The first involves setting up Mustajuuri to listen for control commands over the network. The second step consists of writing a simple API in the main application to talk to Mustajuuri.
To get Mustajuuri to accept commands from the network, a network module must be loaded. This network module is the only way for an external application to control Mustajuuri, even if both the application and Mustajuuri are running on the same machine. Adding this module is a simple task and simply requires configuring which port Mustajuuri will listen to; the default port is 10030. This module automatically communicates with the synthesizer module and the VBAP panning modules, if they are in the mixer.
In order to control Mustajuuri from an application, it is necessary to add code included with the Mustajuuri API into the application. We present example code segments here that show how to connect to a remote audio server, play audio specified coming from a given 3-D position and change the position of a sound source and listener position.
The first code segment shows the initial commands to connect the application to the remote Mustajuuri audio server and initialize it. If Mustajuuri is running on another machine, change the address to reflect this. To change the default port, 10030, that Mustajuuri listens to, specify the new port in the address string, for example, mjserver.mydomain.com:12345. The two objects that we created, one instance each of AC_Control and AC_VrControl, are used later to send commands to Mustajuuri:
// connecting to a remote server
  #include <ac_vr_control.h>

  AC_Control acControl =
    new AC_Control();
  char* mjServerAddress = "127.0.0.1";
  if(!acControl->init(mjServerAddress))
  {
    // error handling code here
  }

  AC_VrControl acVrControl =
    new AC_VrControl( acControl );
The next code segment shows how to specify the position of the source of the audio and play it. One interesting thing to note here is that the variable outputChannel identifies the intended sound source to use. The number of supported sound sources was specified in the synthesizer module from the Configuring the Mustajuuri Mixer Panel section, and outputChannel should be between 0 and the number of sources, minus one. The variable soundFilename should not have a path as part of the filename. The filename should be one of the files listed in the configuration file created as part of configuring the Sound File Loader file. Lastly, the soundLevel is essentially the initial gain level for the new sound. This needs to be experimented with to find an appropriate setting:
  AC_Vector3 location(
    positionX,
    positionY,
    positionZ);

  int soundId =
    acVrControl->playSample(
      outputChannel,
      soundFilename,
      soundLevel,
      location,
      true,
      0, 0);
The last code segment shows how to reposition the sound source location and the orientation and position of the listener. The outputChannel variable refers to the sound source that is desired to be moved and should be the same value used to call playSample from the previous example. The listenerRotation matrix specifies the orientation of the listener relative to the world, and the worldRotation matrix specifies the orientation of the world relative to the speakers:
// reposition a source of sound
  AC_Vector3 location(
    positionX,
    positionY,
    positionZ);

  acVrControl->moveSource(outputChannel,
    0.05, location);

// reposition the listener orientation
  AC_Matrix3 listenerRotation(
    ... listener rotation matrix ... );
  AC_Matrix3 worldRotation(
    ... world rotation matrix ... );

  acVrControl->setTransformations(
    location, listenerRotation,
    worldRotation, 0.05);
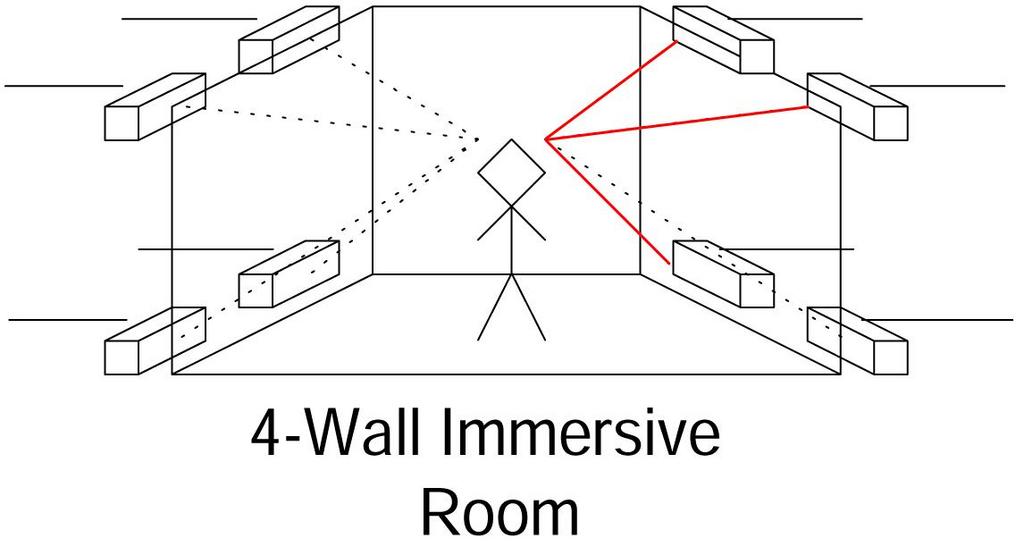
Figure 5. Immersive room depiction showing placement of speakers in a cube array and audio coming from the user's front upper-right direction; the lines are colored red.
We tested the hardware design of our 3-D spatial audio system by integrating the hardware with our four-wall immersive virtual reality room at the Virtual Reality Laboratory, part of the Naval Research Laboratory in Washington, DC. We arranged the speakers in a cube array and placed them at the corners of the immersive room, as shown in Figure 5. We designated a 1.2GHz Red Hat Linux machine as an audio server and installed an Audigy 2 ZS card. We connected the speakers using the cabling described before and tried the system both with and without the mixing board mentioned earlier.
While Mustajuuri was running with three audio sources in motion, CPU utilization on this machine generally was less than 20%, and the memory usage was negligible. Further savings could be realized, of course, by using optimized compiler settings rather than the debug settings we used.
We tested the outputs from each speaker to determine the range of intensities that could be played on each channel. We listened to each speaker individually for sound quality, sound balance and percussive resonance. The easiest aspect to listen for is the sound balance between treble and bass. If one of the two obviously is higher than the other, adjust the related frequency filters as needed. For example, if there is too much bass, decrease the bass and/or increase the treble. If there seems to be excessive low-end or high-end noise, adding a low-pass or high-pass filter may be necessary.
Another easy aspect to listen for is speaker distortion. Simply put, if the speakers are so loud that the sound produced is bad, lower the volume of the speaker. If a given set of speakers cannot produce quality sound at an acceptable volume, it may be necessary to acquire more powerful speakers.
One of the hardest aspects to listen for is the resonance of percussive sounds generated by a speaker. This quality basically is how much the sound echoes from where the speaker is located. Adjustments have to be made if it sounds like a speaker is reverberating with percussive sounds. Depending on the quality of the speaker and the quality of the mixer board, this problem may be corrected to some degree by continuing to filter the signal. For excessively bad cases, hard objects such as exposed metal, concrete, hard plastic and even glass should be covered with a sound dampening material such as cloth or foam.
Once each speaker is calibrated, the entire setup has to be balanced. This can be done either by using devices designed to measure acoustic levels or by listening to the speaker from the predetermined center of the 3-D speaker array. Either way, the gain of each speaker should be adjusted until the same audio intensity level is received from each channel. Keep in mind that the outputs for each channel of the audio card were customized by the manufacturer for the intensity requirements for each type of speaker—satellite, center and subwoofer—normally attached in a surround configuration, and the intensity output for each type differs. There are many published methods for dealing with this problem, but we went with the low-tech solution of having someone stand and listen at the center of our speaker array. We set the software control to maximum gain and adjusted the mixer board based on feedback from the listener. Remember that these changes can be made in software with the ALSA drivers and Mustajuuri if a mixer is not available.
We tested the software by integrating sound into an existing in-house simulation platform, BARS-Utopia, that operates on a Linux visualization cluster from ORAD Incorporated, which drives our immersive room. BARS-Utopia supports several virtual world databases, interaction methods and spatial audio. However, no support was available for interacting with the Mustajuuri API in particular, so we implemented a plugin to bridge the BARS-Utopia spatial audio support with Mustajuuri. BARS-Utopia already contains all of the information needed by Mustajuuri, such as sound source positions, listener position and orientation and sound source creating/deletion notifications—the plugin simply translates that data into a form that Mustajuuri understands.
When the plugin was completed, we tested and debugged the new system. The primary software adjustments we made were to the attenuation level of the audio channel outputs. Mustajuuri uses a simple attenuation model and requires some manual tweaking for the expected environment, things such as outdoor, indoor, time of year and so on. In the real world, sound attenuation rates are quite complicated and are influenced by factors such as temperature, humidity and the frequency makeup of the sound.
We tested the sound system by implementing several scenarios, each with a different scene dataset and different audio effects attached to an animated object. Before the audio objects were animated, we evaluated several volume levels and several distances away for each object. Figure 1 shows a simple scenario we designed and tested—the sound effects of a car. When we finished testing the volume and distance effects, we generated an animated path for the car to follow.
Figure 6 shows a more complex scenario with three audio sources, tank, jet and helicopter—the jet is off the screen and not shown in view. We performed some simple tests to see how many sound sources interacted together. It was of primary importance that the jet, typically far away, not sound too quiet, while the tank and helicopter, typically closer to the camera, not dominate the aureal bandwidth. As a result, some minor tweaking was done on both the far and near objects' attenuation parameters.
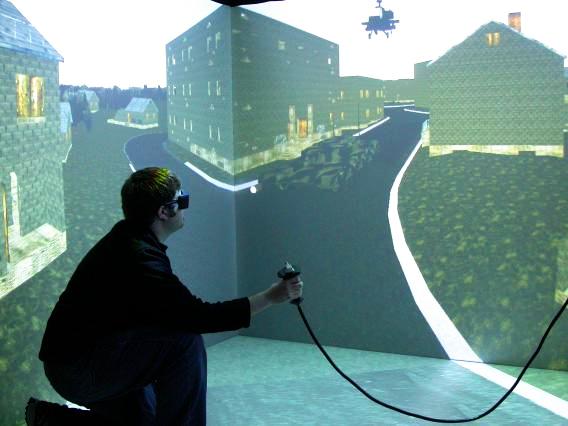
Figure 6. Shows a user interacting with a scene with multiple sound sources—a tank, helicopter and a jet that is not visible. The nearest speakers are determined for each sound source and the output is mixed at each speaker, if overlapping.
After all of the testing and calibration was completed, we performed two informal, qualitative user tests that would help us validate our new low-cost spatial audio system. The first test evaluated how the new sound system configuration with eight speakers compared with our previous planar configuration containing four speakers. The prior configuration simply used the four speakers on the top of the cube array. We realize that directly comparing these two configurations is somewhat biased, due to the placement of the four-speaker array being located above the user's head. It would be fairer to compare against a four-speaker array located at the height of the user. However, by using the top four speakers, we were able to switch between the two configurations without dismantling our installation.
We performed the experiment by asking a few test subjects to stand in the middle of the immersive room and listen to sounds played for each configuration. We played different sequences of audio on both speaker configurations and made use of the full range of speakers available. The subjects were not told which configurations were being used, nor in which order the pairs of configurations were presented. Several iterations of the pairs of configurations were tried for each subject. After each pair was presented, the subjects rated the two systems. Admittedly, this was not a scientific test, as is evidenced by several unaddressed biases, but all test subjects clearly preferred the eight-speaker configuration.
The second user test evaluated how well the listener is able localize the source of the audio using the eight-speaker configuration. Again, the subjects were tested and each were asked to stand in the center of the immersive room. Each subject was presented with several sounds played one at a time and originating from different positions surrounding the subject. The subjects were asked to point in the direction of the sound source, as they heard it. The visual system was not running, so the users did not get visual cues as to the sound source's location. The subjects were able to localize the sounds with a high degree of accuracy, especially with respect to elevation.
The implementation of our 3-D spatial audio system integrated with our immersive room really enhanced the simulation and training demos we have. Our completed system has improved dramatically the sense of immersion when running the demos. A simulation user easily perceives helicopters and jets flying overhead and a tank rumbling down one of the many streets nearby in the virtual world. The perception of depth from the source of audio is conveyed accurately and also includes doppler effects. Our system is a step above a four-speaker solution we had previously using the Microsoft DirectSound API. It also is a good replacement for the capable but outdated and unsupported eight-speaker solution we had running using another expensive hardware and software platform.
We have devised a true 3-D spatial audio solution that is low cost and has comparable quality to expensive high-end commercial systems. The 3-D spatial audio solution allows sound effects to be generated from all directions surrounding a user, not only planar directions. We accomplished this feat by using only commodity hardware and open-source software. We feel this feature, now available at an affordable price, creates numerous options for game and virtual reality system developers.
We feel our system leads the way for others to devise similar solutions with current and future commodity audio equipment. The developer needs only to purchase a Dolby Surround Sound 7.1 audio card, four pairs of low-cost speakers and audio cables. We spent less than $150 US on hardware—Audigy 2 audio card and audio cables—as we already had speakers available. From start to finish, including hardware and software debugging, configuring and testing, we spent less than a month developing the low-cost 3-D spatial audio system. We feel that using this document as a guide, it should be possible for others to implement this system in less than a week.
Future Enhancements
Although the system currently meets our needs quite nicely, these features would be nice to add to the 3-D spatial sound API in the future:
Directional sound cones: directional sound cones are a mechanism to provide directional sound with the strongest intensities propagated along the central axis of the cone and weakest toward the edges. Because many sound sources are directional by nature, such as sound emanating from a megaphone, directional sound cones would allow these sound sources to be generated more accurately. Also, because some major APIs, such as Microsoft DirectSound, offer sound cones, it would be nice to offer such a feature.
Additional environmental reverberation effects: although a number of simple environmental reverberation effects are available in the common 3-D spatial audio APIs, supporting more sophisticated effects, such as sound reflection and absorption off of different surfaces, greatly would enhance the listening experience. This is an area of ongoing research, and the Mustajuuri system would be a good testbed for trying out new techniques.
Enhanced sound attenuation level: the current distance attenuation models for sound in Mustajuuri are quadratic by nature, thus they are fairly simple. In the real world, sound attenuation is much more sophisticated and depends on heat, humidity, sound frequency and many other factors. For example, low-frequency sounds generally carry much farther than high frequency. Accounting for these complexities could help significantly in providing distance cues.
We wish to thank Tommi Ilmonen from the Helsinki University of Technology (HUT) for support on modifications made to Mustajuuri. We also wish to thank Bryan Hurley, Simon Julier, Mark Livingston, Yohan Baillot and Jonathan Sabo for contributions to the research. This research was sponsored by the Office of Naval Research under contract #N00014-04-WX-20102.
Resources for this article: /article/8407.
Eric Klein is a graduate student in the Institute for Data Analysis and Visualization Virtual Reality Laboratory at UC Davis. He is working on a PhD in Computer Science, specializing in virtual reality. Eric received his BS from UC Santa Barbara and spent several years working as an engineer in the industry before returning to graduate school. His primary research interests are immersive audio, data sonification, scientific visualization, collaborative environments and human-computer interaction.
Greg S. Schmidt is a computer scientist in the 3D Virtual and Mixed Environments Laboratory at the Naval Research Laboratory. He has a PhD and MCS in Computer Science from Texas A&M University and a BS in Biomedical Engineering from Marquette University. His research interests include scientific and information visualization, human-computer interaction, augmented reality, modeling and simulation for terrain and medical applications and computer vision.
Erik B. Tomlin is a student at the University of Pittsburgh majoring in computer engineering. He has been working for the 3D Virtual and Mixed Environments Laboratory at the US Naval Research Laboratory on research projects involving virtual and augmented reality, human-computer interaction and scientific visualization.
Dennis G. Brown is a computer scientist at the Naval Research Laboratory. He received his BA in Computer Science from Rice University and his MS in Computer Science from the University of North Carolina at Chapel Hill. He works on the Battlefield Augmented Reality System (BARS) and multi-modal virtual reality projects. His research interests include augmented and virtual reality, specifically, novel user interfaces and data distribution.
