
OOo Off the Wall: Fielding Questions, Part 2 - Cross References and User-Defined Fields
Frankly, cross-references are a disappointment in OpenOffice.org Writer. Several posters to the OpenOffice.org mailing lists have referred to them as glorified bookmarks, and they're not far off. Compared to other software designed for writing long documents, Writer's cross-referencing tools are lacking. To start with, Writer does not give you the option of creating cross-references from headings. Instead, you have to add the sources manually--exactly as you would a bookmark. To make matters worse, cross-references between documents require kludges. And, if that was not enough, Writer also lacks the building blocks used by FrameMaker to create standard sentences and sentence fragments that lead to cross-references.
Unfortunately, nothing can be done about the inability to cross-reference headings automatically. However, a little ingenuity allows references between documents, and designing a few user-defined fields solves the lack of lead-ins.
Cross-references are used in academic and technical documents to refer to related material. In Writer, cross-references have three main purposes:
They reduce repetition in a document. Instead of repeating information already given, you can give it once and reference it in other places.
They help readers quickly find information in which they might be interested.
When writing a document, they provide a hyperlink that you can select to change the position of the mouse cursor in the document.
Once cross-references are made, they are listed in the Navigator under References, so that you easily can find them.
Cross-references are placed in fields because they are likely to change frequently. While you are writing, the wording of a cross-reference is likely to change as well as the page on which it appears. You could change them all manually, but because they are in fields, you only have to select Tools > Updates > Fields to have all cross-references immediately updated.
Creating a cross-reference within a document is done in two steps:
Create the cross-reference source. The cross-reference source is the text to which the cross-reference directs users.
Create the cross-reference. The cross-reference is the field that points to a source.
Cross-references can be used only in paper documents or within on-line Writer documents. If you are writing an HTML document, use a bookmark instead.
By convention, a cross-reference source usually is a heading or title. You can use any text as a cross-reference source. The advantage of using a heading or title is that when a reader follows the cross-reference, the source can be seen quickly because it is formatted differently from the body text.
To add a cross-reference source:
In the document, select the text for the cross-reference source. To help readers find it as quickly as possible, in most cases the text should be a non-text body style that is formatted to stand out. Headings are used most often reference sources, but captions are almost as common.
Select one of the following:
Insert > Cross reference.
Insert > Field > Other > References.
In both cases, the Fields window opens. The References tab is active.

Select Set Reference as the field type. The selected text appears in the Value field on the tab. Because you cannot edit the selected text from the tab, it is grayed out.
Enter a name for the cross-reference source. This is the name listed in the Selection pane of the References tab. Even though the Value field is available when you select the name, the most useful name for a reference source usually is its actual text or perhaps an abbreviation of it. With this choice, you immediately can identify the reference source later. The main reason for not making the Name and Value field identical is if the text of the reference source is not unique in the document.
Select the Insert button. The content of the Name field now is listed alphabetically in the Selection pane. It now is ready to be used in a cross-reference. In the document, the selected text is no longer highlighted. Instead, it has the gray background of a field. You can get much the same effect by adding a bookmark using Insert > Bookmarks and then typing in the text for it. The only difference is a bookmark is invisible in a document, while a cross-reference source has a field's characteristic gray background.

A cross-reference points readers to another part of the document whose contents is related to the present one. The cross-reference usually consists of fields for the cross-reference source and some lead-in text, such as "For more information, see". The lead-in can be typed, but you also can use custom fields to add lead-in text automatically as well.
To add a cross-reference:
If necessary, add the cross-reference source, as already described.
Type the lead-in text in the position where you want to add the cross-reference. Common lead-ins are "For more information, see ", or simply "See".
Select one of the following:
Insert > Cross Reference
Insert > Field > Other > References
In both cases, the Fields screen opens. The References tab is active.
From the Type pane, select Insert Reference.
From the Selection pane, select the cross-reference source.
From the Format pane, select the information to include in the cross-reference.
Format choices are:
Page: The page number for the cross-reference source is added at the mouse cursor.
Chapter: The chapter number for the cross-reference source is added at the mouse cursor. For this choice to work, you must have selected a numbering style for the first level heading in Tools > Outline Numbering. By default, it is the Heading 1 paragraph style.
Reference: The text of the cross-reference source is added at the mouse cursor.
Above / Below: The word above or below is added, depending on where the cross-reference is in relation to its source.
As Page Style: The page number for the cross-reference source is added at the mouse cursor, using the numbering style defined in Page > Layout Settings > Format on the Page Styles screen.
Add any formatting for the cross-reference using character styles.
Adding a cross-reference to another document is a process entirely different from adding a cross-reference within a document. Instead of setting the cross-reference first and then adding a field, add a hyperlink using the following procedure:
Open the target document for the cross-reference. The target document is the one that will contain the cross-reference.
Open the Navigator by selecting Edit > Navigator or by pressing the F5 key.
Select the source document--the document you are referencing--from the drop-down list at the bottom of the Navigator.
Set the Drag Mode tool to Insert As Hyperlink.
Drag the heading you are referencing into the target document. A hyperlink to the heading is placed in the target document. The hyperlink is active and can be used to jump to the source document. If you want the hyperlink to resemble regular text, edit the Internet Link and Visited Internet Link character styles.
If necessary, add:
The lead-in text.
The page number. This must be added and updated manually.
The document name. This can be added manually or by dragging and dropping the title or chapter title of the source document.
Text added as a hyperlink is not updated automatically when the original changes. However, the link is preserved.
Adding cross-references to sub-documents in a master document is similar to adding cross-references in a standalone document. However, the cross-reference exists only in the master document. When you have a sub-document open, you can't read the cross-reference directly. Instead, you have to view the master document. You also cannot read a reference in one sub-document from another sub-document.
The solution is to note the name of the reference source as you create it and then enter it for the cross-reference in the target sub-document. The cross-reference field in the second document is blank when you are viewing only the second document, but it displays the reference within the master document. Or, to follow the procedure step-by-step:
Open the sub-document in which you want to set the reference. You can open it by itself or from the master document.
Select the text for the reference.
Select Insert > Cross-Reference > Set Reference.
The Fields screen opens with the References tab open. The selected text is entered in the Value field.
Enter a name for the reference. The name should be unique not only in the sub-document, but in all sub-documents in the master document. The easiest way to ensure uniqueness is to make the name and the value identical. Make a note of the reference's name.
Select the Insert button. The selected text now has the gray shading that marks a field.
Save the sub-document with the reference.
Open the sub-document in which you want the cross-reference. Again, you can open the sub-document by itself or from the master document.
Select Insert > Cross References > Insert Reference. The Fields screen opens with the References tab open. Because the reference is in another document, it is not listed in the Selection pane.
Enter the reference's name. You can leave the value blank.
In the spot where you want the cross-reference, enter the lead text and then select the format followed by the Insert button to add the cross-reference. Because the sub-document cannot find the reference in the other sub-document, only the gray shading for the field is visible.
Save the sub-document with the cross-reference.
Open or return to the master document. Because the master document can locate the reference in the first sub-document, the cross-reference's field(s) now have information from the reference in them.
Remember that the filling of the field in the master document naturally causes changes in paragraph length. To avoid any unexpected changes in the master document, place all cross-references in their own paragraph. Because few cross-references are likely to be more than one line, the chances of changing the formatting are reduced. If you open the sub-document with the cross-reference by itself, the cross-reference field(s) are empty again.
Writing lead-in text for cross-references gets repetitive. Instead of retyping the same messages every time, you can automate the process by creating user-defined fields to add them automatically. For example, I usually get by with "For more information, see" or ", page____". The first field provides the lead-in for a Reference format and the second is for the page number. Taken together with the cross-reference fields, these user-defined fields produce sentences such as "For more information, see 'Setting Up Cross References', page 45."
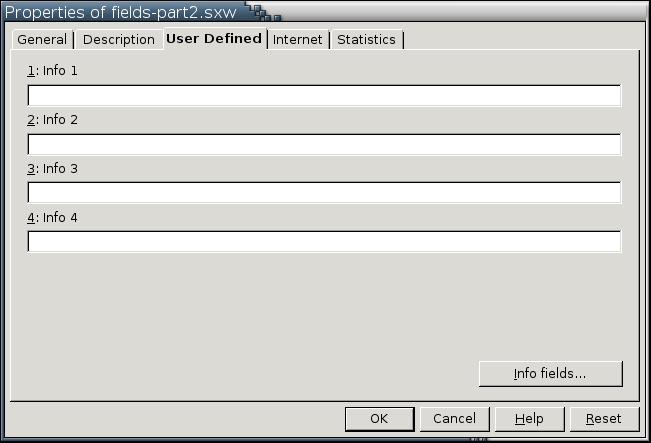
Writer offers two ways to create a custom field. First, you can use the four vacant fields in File > Properties > User Defined to create text fields. By default, these fields unimaginatively are named Info 1 through 4, but you can click the Info fields button on the User Defined tab to give each a more descriptive name. However, if the field names are changed in a template, documents based on the template don't retain the new name for some reason. At any rate, I personally prefer to use these user-defined fields to add information about the document that I want noted in headers and footers or on title pages.
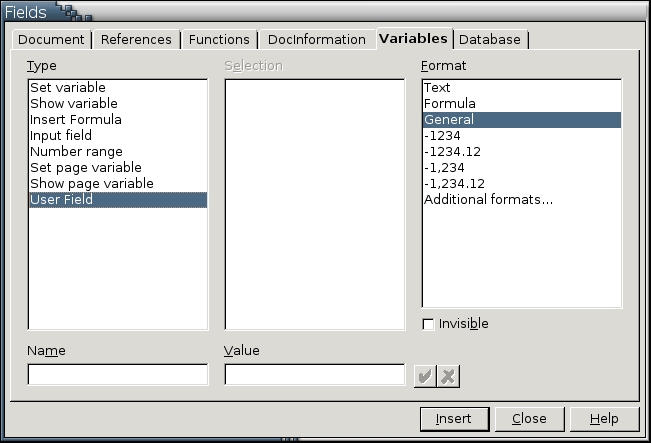
The second way to define your own user fields is by adding a new type of field in Insert > Fields > Other > Variables > Type > User Field. Each user field has a name that appears in the Selection pane of the Variable tab and a value, or actual entry. More importantly, unlike the Info fields available from File > Properties > User Defined, these fields can be set to have their own number format or even to be invisible. This trait can be used as hidden proof of ownership of the file or as a secret condition that makes the field unreadable unless changed. However, when augmenting cross-references, you can settle for text format.
User-defined fields have other purposes, too. For example, if you are doing documentation, you could create one field for recording the software version and another for the document version. Similarly, if you regularly collaborate on papers, you could create a Joint Author field to customize by-lines quickly. However, using them for cross-references undoubtedly is one of the most useful purposes. Use Tools > Macro > Record Macros to create a macro for each lead-in, and once the result is mapped to a keyboard combination or added to the GUI, your insertion of cross-references becomes even easier.
If all this sounds clumsy and roundabout, you're understanding the situation pretty well. Unfortunately, the workarounds are going to be with us for a while. From the developer's builds I've seen, the cross-reference tool is not due to be improved in version 2.0, so we'll be living with the workarounds for at least a couple of years. The most that can be said for them is that they're better than nothing. That said, if you're doing academic or technical work, be prepared for some frustrations as you work with cross-references.

