
Setting Up Subversion for One or Multiple Projects
The history of versioning systems is quite extensive. They have proven to be effective during the many stages of project development, from source code management to documentation and publishing. In the Open Source community, the Concurrent Versioning System (CVS) has become the standard in the development process, being an essential tool to coordinate the efforts of tens to hundreds of developers around the world.
After many years' worth of success stories, however, CVS has begun to show problems, mostly related to security and to the lack of such important features as atomic commits. Recently, many CVS-replacement candidates have begun to appear on the scene. Some of them still are immature for critical deployments, while others propose radically new approaches, making them inadequate for a smooth migration.
Among this plethora of new players, Subversion is receiving the attention of many open-source developers due to its robustness, similarity to CVS and innovative architecture. Having recently marked its 1.0 version release, Subversion is being used in many open-source projects, including SpamAssassin, the Linux 1394 FireWire support project and the SILO Sparc Boot loader.
As with any new toy that comes into a system administrator's hands, security is the first concern when dealing with Subversion. The good news is Subversion has been developed in these hard times, in which few can be trusted. Subversion takes the smart approach of coupling with the Apache Web Server and delegating many security functions to Apache. This approach has many advantages:
Apache is a mature and well understood platform for handling security functionalities, such as authentication, access control, confidentiality and so on.
Apache is monitored strictly for security bugs: response times to a new vulnerability are very low.
Apache adopts many of the most recent standards, making it an always current platform.
Apache often is present in the established network infrastructure, so there's no need to open new network ports and adapt your firewall accordingly.
Apache's flexibility in log management eases the task of security auditing, which can be accomplished using well-known tools.
In this article I deal with a complex Subversion repository deployment and show how security concerns can be addressed from a system administrator's point-of-view.
Our task is to deploy a Subversion repository for our projects; it must be accessible both from our internal network and the Internet. Our organization already runs an Apache Web Server, so we will use it as our gateway to the repository. Thus, the Subversion configuration must meet the following requirements:
We want to host multiple projects in the repository, grouped as public and private.
We want our developers to have unlimited access the projects in which they are involved from anywhere around the world.
We want other people to have read-only access to our public projects.
Given these requirements, we must configure the Subversion server properly to manage authentication, access control, data confidentiality and integrity. But, in what form does the Subversion server come? There's no unique answer to this question, but a common strategy is to build the Subversion server as an Apache 2.0 shared module by extending the built-in mod_dav.so Apache module. In such a configuration, Apache takes care of many of the aforementioned security aspects, so you don't need to learn another configuration language. Simply adapt the familiar Apache configuration files to your new needs.
Even if Subversion requires Apache 2.0, this is a minor problem, because you are not required to migrate your current Apache installation to the 2.0 series. A simple and effective strategy consists of letting the Apache 1.3 Web Server proxy any Subversion HTTP requests to the Apache 2.0 Web Server. You can migrate your Apache 1.3 installation at a later time or never migrate if you aren't forced to.
Figure 1 illustrates the environment with which we are working. Subversion clients connect to the server from the Internet or from a trusted subnetwork. Here the term "trusted" means passwords won't be sniffed either because we trust users or because we adopted other countermeasures. The HTTP request--possibly sent over a secure channel--enters the server and contains DAV methods from the Delta-V extensions. Then, Apache 1.3 proxies the request to the Apache 2.0 Web Server, which begins the examination. The user issuing the request is authenticated via plain HTTP authentication or through the use of client-side certificates. Then, an access-control decision is taken and the access control rules are enforced. Accepted requests are passed to the Subversion module, which generates a response.
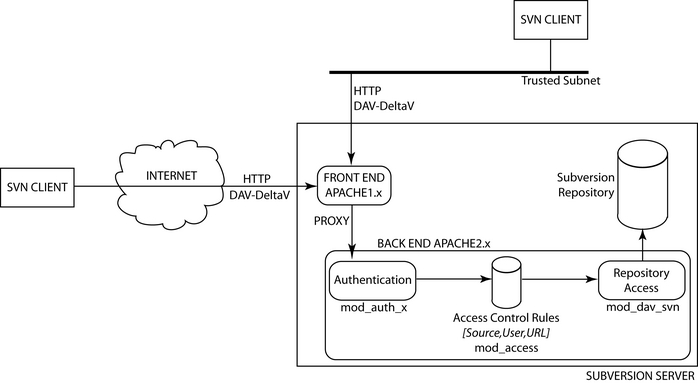
Figure 1. Our Subversion Environment
Before installing Subversion, we need to install the Apache 2.0 Web Server. So, download and unpack the source tarball and start the configure script:
sackville httpd-2.0.49 # ./configure --enable-mods-shared=most
The command-line option enables most of the Apache modules, building them as shared modules. You may need to fine tune the command-line options to include (or exclude) more modules; for example, you may need LDAP modules to authenticate against an LDAP server. To install the Apache Web Server, issue a make && make install.
Next, grab the latest Subversion source tarball, unpack the sources and start the configure script:
sackville subversion-1.0.1 # ./configure
--with-apxs=/path/to/apache2/bin/apxs \
                                         --with-ssl
The option -with-apxs may not be required if you installed Apache2 in a default location. Likewise, the option -with-ssl is not needed if you plan to install a server-only Subversion, because SSL support is provided by Apache's built-in mod_ssl.so module. In addition you may need to specify locations for your shared libraries. In particular, many users seem to have trouble with the Berkeley DB libraries. Carefully read the Subversion users' mailing list if you encounter problems.
Issue make && make install to build and install mod_dav_svn.so modules. If everything went well, you'll find mod_dav_svn.so among your modules.
The Subversion installation process should have created the proper entries in your Apache configuration file to activate the mod_dav_svn.so module. In addition, you should see entries for a mod_authz_svn.so module; it's part of the access control machinery of Subversion and we'll take a look at it later.
In our setup, Apache2 must reside side by side with Apache1, so we need to tell Apache2 to listen to a port other than 80--assume it's the 8080 port. Because Apache2 is accessed through Apache1, you should block that port in your firewall configuration or make Apache2 bind to the loopback interface. The latter solution is better than the former, because we don't need to rely on a firewall to drop incoming connections from external hosts. You also should apply common security tips to enhance Apache2 security, which I won't describe here. For example, Apache with Subversion modules tends to be a little too verbose in its error messages, showing version numbers for most activated modules (SSL, DAV, Subversion and so on). Security purists call this behaviour information leakage; to minimize it act on the ServerTokens directive.
Now it's time to decide where the repository will live. We must answer the following questions:
Where in the Apache2 URL's space will our repository be accessible? Because Apache2 is being used as a Subversion-only server, we decide to have the server root be the root of our repository.
Where in the server's filesystem is the repository physically located? We have no constraints here, so we choose /svn to contain all the Subversion-related files.
Where in the external Apache1 URL's space will our repository live? A common strategy is to put Subversion repositories in the /svn directory.
The layout of the /svn directory thus is:
/svn/conf: contains all the files needed for Apache2 and Subversion to work, such as user authentication information, access control policies and so on.
/svn/repository: contains two subdirectories for public and private projects. Inside each subdirectory we create a project using svnadmin's create command.
In the Apache2 httpd.conf file we add the following lines:
<IfModule mod_dav_svn.c>
Include /svn/conf/mod_dav_svn.conf
</IfModule>
Including the file /svn/conf/mod_dav_svn.conf, we centralize any Subversion-related information in the same place, that is, the directory /svn.
To proxy all the HTTP requests from Apache1 to Apache2, add the following entry to your Apache1 configuration file:
Proxy /svn/ http://localhost:8080/
When defining the access control policy, we must distinguish plain HTTP connections from HTTPS connections, because passwords are not protected over a plain HTTP connection. In the following lines, we define the default policy for HTTP connections. We add the following entries to the /svn/conf/mod_dav_svn.conf file:
Include /svn/conf/public_default_policy.conf
Include /svn/conf/private_default_policy.conf
Each *_default_policy.conf contains the default access control policy for the corresponding project group. We want read-only HTTP public access for public projects, so add the following lines to your /svn/conf/public_default_policy.conf file:
<Location /public>
        Dav svn # Tell Apache to use Subversion's own module
                # for HTTP's Dav extensions.

        SVNParentPath /svn/repository/public

        <LimitExcept GET PROPFIND OPTIONS REPORT>
            Order deny,allow
            Deny from all
        </LimitExcept>
</Location>
This configuration denies access to any HTTP method except GET, PROPFIND, OPTIONS and REPORT, which are used during a read-only session. If you have a trusted subnet (assume 192.168.0.0/24) you want to allow write access from, you may change the above configuration snippet to:
<Location /public>
        Dav svn
        SVNParentPath /svn/repository/public

        <LimitExcept GET PROPFIND OPTIONS REPORT>
            Order deny,allow
            Deny from all
            Allow from 192.168.0.0/24
        </LimitExcept>
</Location>
Notice, however, that if you don't add more access control rules to restrict access, anyone connecting from the subnet 192.168.0.0/24 can write to the repository. If you need strict user-based access control, then I advise you not to use this default policy.
The access control policy for the private project group denies access to anyone over an HTTP connection. The corresponding configuration snippet you must put in your /svn/conf/private_default_policy.conf is:
<Location /private>
        Dav svn
        SVNParentPath /svn/repository/private

        Order deny,allow
        Deny from all
</Location>
If you wish to allow access from the trusted subnet, use the following:
<Location /private>
        Dav svn
        SVNParentPath /svn/repository/private

        Order deny,allow
        Deny from all
        Allow from 192.168.0.0/24
</Location>
To achieve greater granularity in the access control management, we want to define separated policies for each project. The case in which we have a trusted subnet will be analysed here because it's much more involved. In this scenario we allow password-based authentication over HTTP only from the trusted subnet. We specify the policy for each project in a separate file contained in the /svn/conf/private and /svn/conf/public. To achieve this, add the following lines to your /svn/conf/mod_dav_svn.conf file:
Include /svn/conf/policies/public/*
Include /svn/conf/policies/private/*
Suppose we have foo and bar public projects. John and Bob are foo's developers, while John and Mike are bar's developers. We want one project's developers to have full access only to the project they develop over HTTP from the trusted subnet. First of all, let's fill in the users' password file:
sackville apache2 # bin/htpasswd -c /svn/conf/svnpasswd john *****
sackville apache2 # bin/htpasswd /svn/conf/svnpasswd bob *****
....
Then, we create the users' group file: each project is associated with a group whose name has the form (public|private)_projectname and contains the users participating in the project:
public_foo: john bob
public_bar: john mike
We save this file as /svn/conf/svngroups. The last operation consists of associating a file in the /svn/conf/policies/public directory with a project. foo's access control policy file is called /svn/conf/policies/public/foo and contains the following lines:
<Location /public/foo>
        <LimitExcept GET PROPFIND OPTIONS REPORT>
                AuthType Basic
                AuthName "Public Subversion repository for project Foo"
                AuthUserFile /svn/conf/svnpasswd
                AuthGroupFile /svn/conf/svngroups

                Require group public_foo
        </LimitExcept>
</Location>
We could move AuthType, AuthUserFile and AuthGroupFile to the default policy file to avoid replication of configuration entries. We had to add the Satisfy directive to require users to authenticate from the trusted subnet during a read/write session. So modify your public_default_policy.conf file in this way:
<Location /public>
        Dav svn
        SVNParentPath /svn/repository/public

        <LimitExcept GET PROPFIND OPTIONS REPORT>
            Order deny,allow
            Deny from all
            Allow from 192.168.0.0/24

            Satisfy all
        </LimitExcept>
</Location>
The configuration for private projects is quite similar; we simply discard any LimitExcept directive so the public_default_policy.conf becomes:
<Location /private>
        Dav svn
        SVNParentPath /svn/repository/private

        Order deny,allow
        Deny from all
        Allow from 192.168.0.0/24

        Satisfy all
</Location>
and the private project worldconquest's access control policy file is:
<Location /private/worldconquest>
        AuthType Basic
        AuthName "Private Subversion repository for project WorldConquest"
        AuthUserFile /svn/conf/svnpasswd
        AuthGroupFile /svn/conf/svngroups

        Require group private_worldconquest
</Location>
Now it's time to consider HTTPS connections, which allow users around the world to access the repository, granting password confidentiality and data integrity over insecure channels such as the Internet. Apache manages HTTPS in a separate virtual host space, which is set up using a configuration like this one:
<VirtualHost _default_:443>
...
</VirtualHost>
But which Apache are we talking about? External Apache1 or internal Apache2 plus Subversion? Subversion clients using HTTPS can connect to the external Apache1 Web server, of course, and try to establish secure connections to it. So we must configure HTTPS for our external Apache1 Web server. There's no need for proxy requests to the internal Apache2 Web server to be delivered over a secure connection too, but because we want to centralize access control policies in our Apache2 Web server, we must provide a mechanism for Apache2 to discriminate proxy requests coming from an external secure channel.
We use another port (assume 8081) to discriminate when an HTTP request has been delivered to the Apache1 Web server using SSL. So when an HTTP request hits Apache1 over SSL, it is proxied internally in clear to port 8081, where Apache2 is listening. As usual, remember to block incoming connections to port 8081 from external hosts or to bind Apache2 to the loopback interface (or both).
In the Apache1 configuration file, add the following line to the SSL virtual host directive:
Proxy /svn/ http://localhost:8081/
Now tell Apache2 to listen to port 8081, adding the following entry to your httpd.conf file: Listen localhost:8081.
Now we must set up a virtual host environment for access through port 8081. The main difference with respect to HTTP connections is related to source-based access control: using HTTPS connections we drop the notion of trusted and untrusted subnet. HTTPS requests can arrive from just anywhere.
Thus, the default policy files must include a VirtualHost directive for the port 8081. Here's the one for public projects that we put in the /svn/conf/public_default_policy.conf file:
<VirtualHost _default_:8081>
<Location /public>
        Dav svn
        SVNParentPath /svn/conf/repository/public

        Order allow,deny
        Allow from all

        <LimitExcept GET PROPFIND OPTIONS REPORT>
                Order deny,allow
                Deny from all

                Satisfy all
        </LimitExcept>
</Location>

Include /tmp/LJ/policies/public/*

</VirtualHost>
As usual, using the Satisfy clause allows us to write access only to authenticated users. In addition, we recycled the per-project configuration files (see the Include directive) because they do not depend on the source-based access control policy, but we can specialize them for another purpose if we need to. The default policy for private projects is similar:
<VirtualHost _default_:8081>
<Location /private>
        Dav svn
        SVNParentPath /svn/conf/repository/private

        Order allow,deny
        Allow from all

        Satisfy all
</Location>

Include /tmp/LJ/policies/private/*

</VirtualHost>
In the configuration section I mentioned the mod_authz_svn.so module, created and installed by the Subversion installation process. This module allows us to define the access control policy on a directory basis, thus increasing the level of granularity.
Why do we need a separate module to take care of directory-based access control? Couldn't we use Apache configuration primitives? The problem here is the URL passed to Apache to access a repository, which is of the form:
/public/foo/!svn/act/b2a07a33-85d9-0310-857b-b13ae1b9c55b
As we can see, only the project path and name is visible: the project's accessed directory is hidden in the numeric code. Thus, we cannot directly apply Apache Location-based access control primitives. The solution consists of delegating directory access control to the mod_authz_svn.so module, which is able to parse the numeric code and identify the accessed directory.
The mod_authz_svn.so's access control policy is specified in a plain-text file with a simple syntax. Here's the one we use for our public projects (/svn/conf/policies/public_svn_authz):
[groups]
foo = john, bob
bar = john, mike

[/]
* = r

[foo:/]
@foo = rw

[foo:/branch/john]
bob = r

[foo:/branch/bob]
john = r

[bar:/]
@bar = rw
We first define the groups of users we want to specify the policy for, then we list the access control rules. The one under the [/] section specifies that any user can read the content of any project. For each project (for example [foo:/]) we specify a global access control policy, specifying it for the inner directories. There's no need to specify an access control rule for user john in the /branch/john directory, because it's inherited from the one in the upper-level directory.
In addition, we had to specify again the different groups' composition. We should avoid replication of such configuration directives as a good security practice. This problem is solved simply by removing any AuthGroupFile directive from the project configuration files and changing the related Require directive to a Require valid-user one, thus delegating group management to the mod_authz_svn.so module.
At this point all that remains is to add the directive AuthzSVNAccessFile to the default policy files in order to tell Apache that we intend to use the mod_authz_svn.so module as an access control facility. To do so, we must specify its configuration file. Here's the one for public projects:
<Location /public>
Dav svn

SVNParentPath /tmp/LJ/svn/repository/public

<LimitExcept GET PROPFIND OPTIONS REPORT>
	Order deny,allow
	Deny from all
	Allow from 127.0.0.1

	Satisfy all
</LimitExcept>

AuthzSVNAccessFile /tmp/LJ/svn/conf/public_svn_authz
</Location>

<VirtualHost _default_:8081>
<Location /public>
Dav svn
SVNParentPath /tmp/LJ/svn/repository/public

Order allow,deny
Allow from all

<LimitExcept GET PROPFIND OPTIONS REPORT>
       Order deny,allow
       Deny from all

       Satisfy all
</LimitExcept>

AuthzSVNAccessFile /tmp/LJ/svn/conf/public_svn_authz
</Location>

Include /tmp/LJ/svn/conf/policies/public/*

</VirtualHost>
You may ask why we didn't use the mod_authz_svn.so module before. If we hadn't any trusted subnets, we could throw away most of the Apache access control machinery and rely solely on the mod_authz_svn.so, even if this is true only from Subversion 1.0.1. But because mod_authz_svn.so's access control strategy is user-based when in the scenario with a trusted subnet, we need a mix of source-based access control and user-based access control.

