
Point-and-Click E-Mail Crypto
I use a laptop with Linux, and I don't want people reading my mail if the laptop falls into the wrong hands. I've also had my e-mail monitored, and I didn't want the network administrator to view anything personal. GnuPG offers good encryption and is available for all. With KDE's KGPG and KMail, things are even easier. This article explains how to use KGPG for e-mail and file encryption. It may get a little complicated, but by following this article, you should have everything up and running within an hour or so. If you have any questions, please write me—try out your new secure e-mail if you like. My address is in this article.
Gnu Privacy Guard (GnuPG) is an implementation of the OpenPGP standard. These standards grew out of the work done by Philip Zimmerman and his PGP (Pretty Good Privacy) software. PGP has been around since 1991 and is now proprietary software. However, OpenPGP standards were established in 1997, and version 1.0 of GnuPG appeared in 1999.
GnuPG is all done through the command line and is quite complex. Tools to simplify it for you are available; this article covers KDE, KGPG and KMail.
GnuPG and PGP are compatible. For those already using PGP, if you use the IDEA algorithm, there is some more work involved with switching to GnuPG; otherwise, there shouldn't be a problem. If you need to communicate with or replace PGP 2.x, see the on-line Resources for this article.
It takes discipline to implement and enforce privacy and security policies for an organization. I was in a Military Intelligence unit back in my Army days, and security was taken very seriously. If policies were not followed, there were serious consequences. For any organization, someone should be appointed as a security manager and given the proper authority to make sure guidelines are followed. Just like any good practice (such as using CVS for code), once people are trained to encrypt sensitive information, it will become standard. Depending on the size of the organization, it could take anywhere from a week to a month of checking and training to get the policy in place.
As an example, I'm going to encrypt a message and send it from my work account to my rhoobler@comcast.net mail account. Both accounts are using KMail. Next, I send an encrypted reply back to my work account. First, however, I set up keys for the comcast.net account, so I have somewhere to send it.
Once you install KGPG, you should have an icon on the system tray. If not, you can launch it from a terminal by typing KGPG -k. The -k option is important to bring up the user interface—the Key Management tool (Figure 1). Without the -k option, KGPG runs as a service in the background, and the system tray icon appears. Clicking on the system tray icon brings up the the user interface.
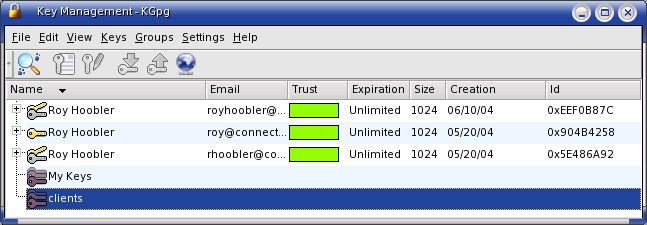
Figure 1. Use the Key Management tool to browse GnuPG keys by name or e-mail address.
First, I make a private and public key pair for my comcast.net e-mail account. Inside the Key Management program, select the Keys→Generate Key Pair menu item, which brings up a rather simple dialog box. Selecting Expert Mode launches GnuPG in a terminal. For now, enter your name, e-mail address and a comment using the dialog window. Depending on your security policies, you can set when keys expire as well.
The next step is entering a passphrase for GnuPG. This is very important. If you forget this, you won't be able to read any messages, and KGPG prompts you for a passphrase whenever you want to read anything. Then wait a few seconds for GnuPG to make your keys for you. As a safety measure, I also suggest making a revocation certificate (name the file something like rhooblerrev.asc). If your system is ever stolen or compromised, you can send out this certificate to let people know your public key is void.
That's it. Now we have a public and private key for rhoobler@comcast.net. Two things are left: exporting the public key and optionally exporting the private key. These keys are exported separately; for the public key, I name the file rhoobler.asc and for the private key, rhooblerprivate.asc. Beware: if someone gets hold of your private key and guesses your passphrase, the attacker can read encrypted mail for you and cryptographically sign mail as you.
After exporting the private key and the revocation keys, burn them to a CD-ROM and put it in a safe or a safe-deposit box, then delete the revocation (rhooblerrev.asc) and private key (rhooblerprivate.asc) files from your hard drive.
GnuPG keeps the following files in each user's .gnupg directory. All are read/writable only by the user:
gpg.conf: general GPG configuration.
pubring.gpg: list of public keys.
secring.gpg: list of secure (private keys).
trustdb.gpg: database file that records who trusts whom.
For convenience, now I export the public key for rhoobler@comcast.net to a default keyserver. Using the Key Management tool, select the key and right-click, and then choose Export Public Key(s). Another simple dialog box comes up with three options. I choose Default keyserver and then OK. The keyserver can be configured in the Settings menu, but by default it is subkeys.pgp.net, which always has worked for me. You also can export it to a file then e-mail it, or upload the key to your Web site. There is nothing wrong with everyone knowing your public key, but they should verify that it is yours (more about this later). Having your public key means they can encrypt files that only you will be able to open.
So, now we can encrypt files and send encrypted e-mails. But it works only if you have someone to share this information with. For this article, I went to my other workstation and set up another set of keys for my business e-mail account, using the same set of steps.
The next step is to import the rhoobler@comcast.net public key by using the Key Manager from the keyserver and selecting the globe icon or File→Key Server Dialog from the menu. You can type in the e-mail address and import the key. Before fully using the key, select it from the main dialog window then select Keys→Sign Keys from the menu.
If I wanted to set up a large group, I could create my own keyserver, sign the keys and then distribute them. Another approach is for people to e-mail their keys to others, then meet in a physical location and have them verify and sign each other's keys. This builds the web of trust. For example, I've signed Bill's key and Bill has signed Kate's key. If I get mail from Kate, her key can be added to my trust database.
Keys have a fingerprint, and if I am not sure whether a key is authentic, I can look at the fingerprint and call the person to verify it. The fingerprint can be found in the Key Manager by selecting the key and then selecting Edit Key from the menu (Figure 2).
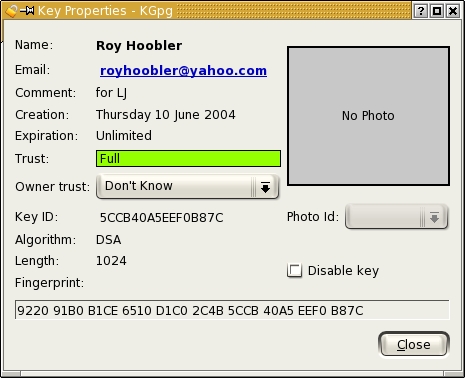
Figure 2. To check the authenticity of mail, simply call the sender and check the key fingerprint.
KGPG is integrated nicely into KDE and KDE applications. The most useful is the Konqueror browser. Once KGPG is installed, you can right-click on a document, and under the Actions menu, create an encrypted version of the document. One of the options is to shred the original, which makes a lot of sense if keeping the unencrypted version is a problem. When encrypting files, you can add multiple keys for different people who can read the document. If you shred the original file, make sure you include your own key whenever you encrypt it. If I use only my rhoobler@comcast.net key, I am the only person that can decrypt the file.
Finally, we are ready to send an encrypted e-mail. Using KMail (or Kontact), type a message—I'll use rhoobler@comcast.net as the To: address. Select the Lock icon (or Options→Encrypt from the menu). When you click Send, a dialog comes up. If you do not see the recipient's key, press the refresh button. Also, if you didn't sign the key, it won't show up; go back and sign it with the Key Management tool and then press the refresh button. Finish typing the message and click Send.
With KMail, decrypting messages is built in. When you receive an encrypted message, you are asked for your passphrase and the message opens. If you are sending an encrypted message, if the e-mail address is in your keyring, it is encrypted and sent automatically. You also can send the message encrypted to several people at once, as long as you have their public keys.
Another method is to encrypt the file with KGPG and send the encrypted file as an attachment. KMail automatically decrypts the attachment for viewing (select view not open). For Web-based e-mail clients, you can download the file and decrypt or view it with Konqueror.
If you are using a Web-based e-mail client such as Yahoo mail, you can cut and paste the encrypted messages from the clipboard to the KGPG editor by right-clicking on the Tasks Tray icon, and then select decrypt clipboard. The same holds true for encrypting messages.

Figure 3. Decrypt Clipboard
More popular than encryption is signing e-mails. Of course, this doesn't encrypt the text, but signing a message proves that it is from you. If I sign all my e-mails, because it is policy, and you get an e-mail from me that is not signed (or the signature doesn't match), you can assume it is a fake and alert whoever needs to be notified.
With KMail, the e-mail message is color-coded to let you know if it is a signed message and if the message came from a trusted source—yellow means signed, and green means signed and trusted.
Another handy tool in KGPG is the ability to create groups of keys. I could have an Administrative group that contains three or four keys. When sending a message, I can select that group and send it out. Later, if a recipient forwards the message to another person in the group, it already will be ready to read.
One other thing, under Configure KGPG, use the ASCII Armor option. It should be on by default. This makes signatures and encryption in plain text, so it is easy to mail, print and cut and paste. Without ASCII Armor, some files will be binary and may cause problems.
Time permitting, I'll try to decrypt and answer any encrypted messages that may come in. Because KGPG is included with KDE, it is included with most Linux distributions. Setting up a few keys and testing it yourself is only an hour or two worth of work.
With GnuPG and KGPG, using keys and encryption is a viable solution if you need to tighten up security. In my career, a lot of attention has been given to security for connections and transactions over SSL, but little attention has been given to files and e-mail. With KDE, and some effort, having secure e-mail is easy to set up. One idea to start with is encrypting any e-mail you send to your manager or the owner of the company. Another idea is to set up a private folder on the network that stores only encrypted documents. Following these types of security policies makes encryption easier to implement.
Resources for this article: /article/7863.
Roy Hoobler is owner of Connect Computing, Inc. (www.connectcomputing.com). As an independent consultant with ten years of proprietary software experience, his firm now focuses on helping small businesses to use Linux, as well as implement open-source business applications.
