
Desktop Publishing with OpenOffice.org
Desktop publishing is easy, and it also can be fun. With OpenOffice.org you have a rich selection of tools to create high-quality documents for personal or business use.
Desktop publishing (DP for short) differs from word processing. In word processing, you type pages of characters and numbers to create documents for others to read. They might include graphics, such as tables and charts, to illustrate points made in the text, but the goal is to create a written document to convey information. In DP, you use graphics, along with text, to create a document with more visual appeal. Look at any printed advertising--the graphics in the document often are more important than the written word.
A while ago, I needed to create a simple one-page document--a Christmas gift card--to give with a set of open-source CDs (OpenOffice.org 1.1.0 for Microsoft Windows and Knoppix 3.3) that I made for colleagues and friends. I also wanted to test the abilities and performance of OO.o 1.1.0. I had used previous versions of OO.o for simple tasks with less than enthusiastic results. I was anxious to see how OO.o 1.1.0 would perform on a real DP test.
I am not a desktop publishing professional or a graphic artist. My DP experience has been limited to writing documents for my employer or for personal use, such as Letters to the Editor, resumes and cover letters. I've used other desktop publishing programs, such as Microsoft Publisher and CorelDraw for Windows, to create simple documents and to make signs and flyers.
The computer I did this work on is a home-built box with a 1.2 GHz AMD Athlon Thunderbird processor running on an ASUS mainboard. It has 512MB of RAM and has two IDE hard disks. I am running SuSE Linux 8.1 Professional with a SuSE-compiled 2.4.21-athlon kernel. The desktop is KDE 3.1.2.
Before you begin planning a project, you need to understand a few basics of DP. Text is letters and numbers and special characters typed on a page. Text is put into a DP document exactly where you want it by placing text boxes on the page. You then type your text in the box (see Figure 1_. Text boxes can be moved, rotated and resized. Clicking on the text box allows you either to type characters or to paste them in from another document. You can format text fonts and sizes and other attributes such as making it boldface, italicized or underlined.

Figure 1. A simple text box in editing mode, indicated by the hatched border. The green squares are the "handles" used to resize the text box.
You must make sure your text fits into the box and does not overrun. You can reformat and resize the text (or edit it) to make it fit. You also can resize the text box, as we will see below.
Graphics and images are considered to be objects. These also are inserted into the document and moved to their desired location. With OpenOffice.org, you have a tremendous amount of control. You can precisely place your image and resize it by shrinking or stretching it or by resizing it and keeping the proportions in tact. You can rotate it and choose the axis of rotation, as well.
Graphics can include charts, tables, graphs, raster or vector graphics and images of any format including JPEGs, GIFs, TIFFs and PNGs. For more information on these file formats and on the differences between raster and vector graphics, see Resources.
So, how do you manipulate text boxes and images? Clicking on a text box or image object activates it by making it the active layer. You can see small green boxes at the corners of the object (including text boxes). These boxes are "handles" you can "grab" with your mouse pointer by clicking on them, holding down the left mouse button, and move by dragging the mouse. Figure 1 shows the mouse pointer changed to a double-arrowed line indicating the handle--and the side of the text box--can be moved to the left or right. Releasing the left mouse button sticks the handle in place. When you place your mouse pointer over the active object, you should see arrows indicating that you can move the object. A set of arrows in a cross formation indicates you can move the object in any direction. A diagonal, vertical or horizontal arrow set indicates you can move only that corner or handle to resize the entire object.
Figure 2 illustrates an object--our beloved Tux--being moved to a new location on the page. The shadowed Tux is at the original location and the full-color image with the handles is being moved to its new location.
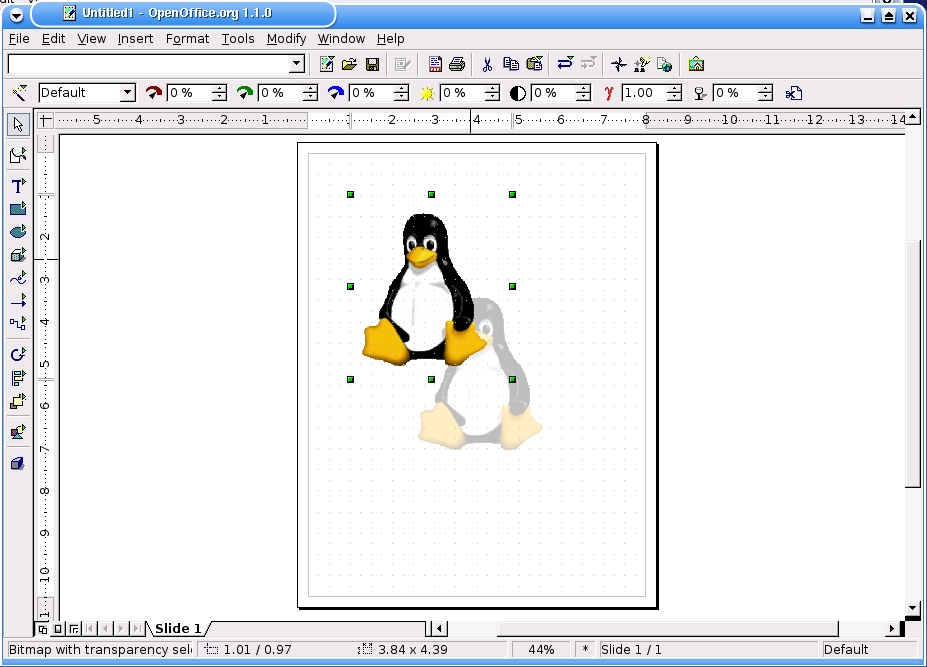
Figure 2. Graphics and text boxes can be moved on the workspace. Here we are moving Tux from his original location indicated by the shadowed Tux to his new location. The active layer is indicated by the visible object handles.
When you want to rotate an object, you have some interesting choices. You can choose a pre-determined rotation, such as 90 or 180-degrees, or you can custom rotate the object. When you choose to custom rotate, you can choose the axis of rotation and exact rotation of the object. When you drag the corner of the object to rotate it, and you see as in Figure 3 a semi-circle with arrows on it indicating rotation.

Figure 3. Objects can be custom rotated. Here Tux is being rotated clockwise as though he had too much holiday cheer. The object handles have turned to red, and the pointer turns into a visible semi-circle. The object rotation tear-off is visible.
For this project we create text boxes, move and rotate them. We need to edit and format the text we put into the boxes to make sure it fits. We'll also be hunting around the Web for an appropriate graphic and insert it into our document, move it around, resize it and rotate it.
Before you sit down at your keyboard and open OO.o, you need to have a plan. The best way to do this is with old-fashioned pencil and paper. Get out a pad of paper and draw what you want to do. Where do you want the graphics to go? What about text? What orientation? What about logos and other artwork?
You should have a good idea about the text you plan to use. What font and size, and how long will the text be? It needs to fit into the text boxes you make, and it needs to formated so it makes the point you wish to convey in your document.
Figure 4 shows what I did. First, I drew lines to divide the page into quarters. I then folded the page into quarters and oriented it like a greeting card. I roughly drew where I wanted the text to go and where graphics should be placed. Opening up the rough layout gave me a guide on where I needed to place text and objects.

Figure 4. The basic layout, made with paper and pencil. This helps guide you in placing objects, text and artwork.
Don't be afraid to make mistakes here or at any other point in the process. You probably will make changes as your project takes shape. If it is a complex project, you may need several revisions, even at this stage, before you start working on the computer. If you need to back out of a change you just made, press the Ctrl-z keys, as in any other DP program.
Before I had a finished product I made several changes. I used three different graphics before I found one that I liked. I inserted them, resized and rotated them, even printed out the drafts. I decided "I don't like that" and removed them from the document before I found one I liked.
The same goes for text. I had to make several changes to the text, including formatting, before I had something I liked. I moved text around, reformatted it and re-wrote it several times before I liked it.
Once we have a rough layout and a good idea of how the document should look, it's time to start OO.o and get to work. Clicking on the OO.o icon on your desktop opens OO.o in writer mode, which is default.
OO.o 1.1.0 is very fast compared to 1.0.3. Programming optimizations have made a huge increase in performance. I can open OO.o with folding@home running and use OO.o normally without much of a performance hit. It would run smoother if I had shut down the background apps, but doing so wasn't necessary for creating either this project or article. While working on this article, I had not only folding@home running, but I was running multiple OO.o workspaces, Mozilla, The GIMP for working on the screenshots--and I was listening to albums in mp3 format in xmms without problems.
Once open, you need to go to the drawing application, called Draw. Click on the File -> New -> Drawing. This opens a fresh OO.o workspace. Some distributions install a separate menu item on your programs menu for OO.o from which you can directly select the Draw application.
You can customize your view in OO.o. The default Draw view in Figure 5 shows the Main Toolbar on the left side of the workspace. This is where the drawing tools are located. The tools in the Main Toolbar change depending upon the OO.o application. At the top of the workspace we have the Function Bar with tools common across OO.o applications. The Object Bar has text formatting tools, such as underline, italics, font type, size and color. Tools here change depending on the OO.o application. These toolbars can be turned on and off by clicking on the View Pull-down menu or by right-clicking on the toolbars. They also can be customized, but that is beyond the scope of this article. Vertical and horizontal rulers also appear; we use them below.
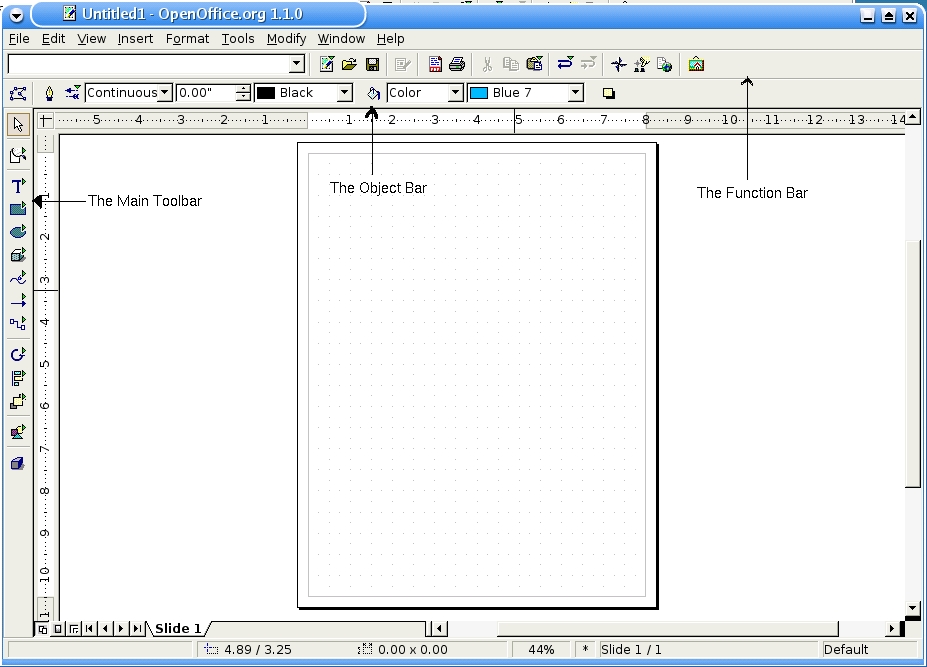
Figure 5. The Draw workspace, indicating location of the Main Toolbar, the Object Bar and the Function bar. The workspace is shown in Grid View mode.
OO.o is designed to be used around the world. So, you need to make sure the document size is appropriate. Clicking Format -> Page allows you to set the page size. This document is US Letter size, 8.5 x 11.0 inches in Portrait layout.
Because we need to keep track of how we lay out items on the page, enable the grid view on the document workspace. Clicking View -> Grid -> visible grid makes the grid visible. Next, I needed to create lines defining the folds of my document. The lines can be removed later. Click and hold down the left-mouse button on the Line Tool on the Main Toolbar. A new box pops up, with several options for lines (see Figure 6). This box is called a Tear-off, as you can keep it open and available and move it around your workspace.
Because I wanted a simple line without arrows on the ends, I clicked the Line (without arrows), and my pointer changed to a + (insertion point) with a \ indicating what type of line was activated. I then moved the mouse pointer to the point I wanted to start the line at, guided by the ruler. I then clicked the left mouse button, held it down and dragged the pointer across the workspace until I was at the point where I wanted to stop. Releasing the mouse button resulted in two small green boxes at each end of the line. These are the handles I mentioned earlier. Move the line around to get a feel of how this works.

Figure 6. The Line Tool tear-off. Other tool tear-offs are similar and can be placed anywhere on the workspace.
I made a second vertical line in the same way as the first. Now, I had the page divided into quarters, along with the grid view, to guide me.
Click the Text tool on the Main Toolbar and hold the mouse button down for a moment to allow the text tear-off to appear. Move the tear-off to a convenient place, as we are going to use it later.
If you are creating a complex document with different text formatting, using Styles greatly increases your productivity. Using Styles is beyond this article, but information is available in the OO.o help and on-line (see Resource).
Click the large T in the tear-off and the pointer turns to a cross. Place the cross--the insertion point--at a point on the document were one corner of the text box should be. Then, hold down the left-mouse button and drag to the diagonal opposite point of the text box. Releasing the mouse button results in a blinking cursor on the box, object handles and a hatched-border of the box. The text box is shown back in Figure 1.
The Object Toolbar changes when you release the mouse button. Text formatting options are now displayed. You can change font, size, color and other attributes.
I've typed some example text in Figure 1, not what I actually used in my document. When done, the border disappears but the handles remain. The pointer has turned to a cross with arrows on the ends, indicating that we can move the text box around. Hold down the left mouse button and try it.
So, how do we change the font, size and color? In this mode we can't. You need to click on the T in the text tear-off again to return to text editing mode. The hatched border re-appears with the blinking cursor. Now you can highlight the text and change formatting. In Figure 7, I've changed the word quick to a blue color and italicized it and the word brown to a brown color and boldfaced it.
With complex or important projects it is important to save changes to your work or be able to return to a defined edit point. Opening the Tools -> Options -> Load/Save dialog box lets you set various options for how often to save. Expanding the OpenOffice.org choice and selecting View allows you to set the level of undo steps and the amount of memory allocated to saved objects. But you really need to save changes at critical points yourself. Remember, you are smarter than the computer.

Figure 7. Some formatted text, showing color and other formating attributes.
Now, let's find and insert a graphic. I wanted a holiday Tux for my gift card. The first place I looked was the penguin gallery on the Linux Weekly News Web site. I looked through several pages and tried a few, but nothing really looked right. The one I finally liked (Figure 8) was from The World Famous Tux Gallery.

Figure 8. Holiday Tux, the final choice for my project, from the World Famous Tux Gallery.
Once you've found the graphic you want to use, you need to insert it into your document. Either click Insert -> Graphics -> From File or open the Insert Tear-Off on the Main Toolbar and select Insert Graphic. Then navigate to the file and click Open. You should see the graphic placed in the center of your document.
Now, you need to place the graphic where you want it and resize it. Click on the graphic make it the active layer. Handles and a cross should appear, indicating you can resize and move the graphic. Hold down the left-mouse button and move the graphic into the planned position as we saw in Figure 2. Don't worry if it isn't precise, we can make fine adjustments later. Now, grab onto a handle and resize the graphic. Remember, if it is a bitmap image, such as a .jpg, you might lose some image quality if you make it too large. Vector graphics, including .gifs and .pngs, don't suffer from this problem.
Now comes the fun part. We need to rotate the graphic into its proper orientation. This graphic will be rotated 180-degrees from its original position. OO.o gives you many ways to do this. First, click on the graphic to make sure it is active (the handles are visible). Then right-click on the graphic, select Flip -> Vertically. Then, flip it back.
Let's have some real fun. Open the Effects Tear-Off on the Main Toolbar. You should see a semi-circle icon with an arrow. A pop-up appears with the Rotate label. Click the Rotate icon, and if the resize (green) handles still are active, you should see them change to red dots (see Figure 3). Place the pointer on a corner dot, and it changes to a semi-circle with an arrow. Placing the pointer on a middle dot changes it to a "you can't do that" symbol. You also should see a small circle in the center of the image indicating a center point. Here's a hint: place the pointer over this center point icon. It changes to a hand pointer, as shown in Figure 9. You can change the Pivot Point by holding the left-mouse button and dragging this icon to the spot you want to set as the pivot point. Now, rotate the graphic and see what happens. Pretty cool, huh? You can return to the previous position by pressing CTL-Z, as before.

Figure 9. Tux shown with the pivot point. This is visible in custom rotation mode. When the pointer is placed over the pivot point, it turns to a "hand" pointer, indicating you can move the pivot point.
The defaults for the base point and the pivot point can be set by having the graphic set active (the green reposition handles appear) and choosing Format -> Position and Size. The dialog box has three tabs that allow you to set several attributes.
Let's put a text box above the graphic and then insert the text. We need to rotate the text box. With the text box active, showing the green position and size handles, select Rotate from the Effects Tear-Off (or, select Modify -> Rotate from the pull-down menu). The green handles change to red, and the Pivot Point icon appears. Grab one of the corner handles with your mouse and rotate the text box into position.
My only real gripe is why there isn't a Flip option for text boxes. That would be helpful here. Maybe there will be one in a future release.
Now, make fine adjustments. Save your work and print it out. Review for changes, and make them. Show your work off and have it reviewed if necessary. Congratulations! You are now a desktop publishing expert.
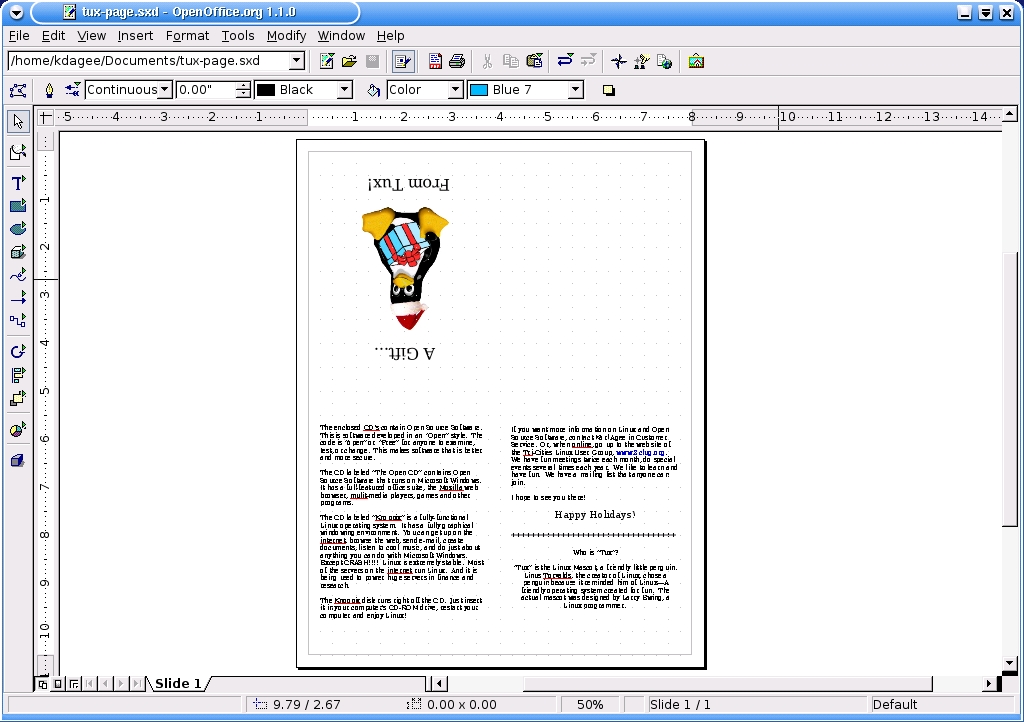
Figure 10. The Finished Product.
OO.o offers other tools to help with DP or Word Processing. One of the cooler ones is the PDF export feature. When you are done with your document, simply click the PDF export button and you will have a nice PDF you can share with anyone on any platform that has Adobe Acrobat Reader. I recently created a presentation in OO.o with many graphics and text styles that was 41 slides long. The native OO.o Impress document is a healthy 3.5MB and the .pdf is a slim 1MB. This make is nice to distribute via the intranet at work.
OO.o's Help is also extremely useful. I used it often in the creation of the project and in writing this article. It is easy to use and to find information. Details are a bit thin at this point, but it serves as a good foundation as more features are added.
Tux Images: www.lwn.net/Gallery and www.tuxgallery.org/tuximages/tux092.png
Screen shots were captured using knsapshot and prepared for publication using The GIMP 1.2.
Information on image formats and graphics: Designing Web Graphics.3. Lynda Weinman. New Riders, 1999. ISBN: 1-56205-949-1
The OpenOffice 1.0 Resource Kit. Solveig Haugland and Floyd Jones, Prentice Hall PTR, February 2003. ISBN: 0131407457.
OOoSwitch: 501 Things You Want to Know About Switching to OpenOffice.org from Microsoft Office. Tamar E. Granor, Scott Carr, Sam Hiser. Hentzenwerke Corporation, September 2003. ISBN: 1930919360.
OpenOffice.org for Dummies Gurdy Leete, Ellen Finkelstein, Mary Leete. Hungry Minds, Inc; November 2003. ISBN: 0764542222.
A man of many interests and careers, Karl found Linux while working at a Barnes & Noble bookstore in 1997. His computing blood-pressure has been much lower ever since. His many interests include classical music, cooking, Washington State wines, nature photography, birding and driving his old Jeep (when it's running) around the backroads and trails of the Pacific Northwest. He can be found prowling the aisles at his local Barnes & Noble and the mailing list of the Tri-Cities (Washington State) Linux User Group (www.3clug.org). You can sample his photography here. He sometimes can be reached at kdagee2@yahoo.com. He loves fish.

