
Chat on the Air with LinPsk
Long before the Internet was established, an international group of people was chatting on the air—the radio amateurs. In the beginning, they used Morse code, a special form of digital communication. Over the years, more digital modes have been introduced to ham radio. Today, you can use satellites for communication or the moon to reflect radio waves. In the past, you could communicate with the Mir Space Station; now, it's with the International Space Station. To learn more about the fascinating world of ham radio, take a look at the on-line Resources section for this article.
One of the most popular new communication modes in use today is PSK31. Peter Martinez (G3PLX) developed PSK31 based on an idea by Pawel Jalocha (SP9VRC). PSK31 was designed for enabling keyboard-to-keyboard chats. PSK31 is a phase shift keying modulation technique, requiring a bandwidth of about 31Hz. By comparison, a ham FM signal is almost 500 times as large, about 10kHz.
In the early days, hams built their equipment themselves and tried to improve it. Today, it is hard to compete against industrial transceivers, but under certain conditions, digital modes offer a new chance to compete. All you need is your transceiver, a computer with a sound card and a program that supports the desired mode. If the program is open source, you also have an opportunity to do your own experiments.
Radio operators have developed a kind of language that they use for communication. Some ham-related abbreviations used in this article are listed in Table 1.
Table 1. Abbreviations
| ALC | Automatic level control |
| bcnu | Be seeing you |
| CQ | General call |
| DL1KSV | This is my callsign. A callsign is a worldwide, unambiguous identifier (like an Ethernet MAC address). The prefix DL stands for Germany. |
| Dummy load | Simulated antenna |
| de | From |
| es | And |
| k | Go |
| pse | Please |
| RX | Receive |
| TX | Transmit |
| QSO | Connection |
| 73 | Best regards |
My first contact with PSK31 was in 1999. Even though I was a fan of Linux, I had to use a Microsoft Windows program for my first PSK31 QSOs. Later, I tried to develop a PSK31 program for Linux. Luckily, I found WinPsk 1.0, by Moe Wheatley (AE4JY), which had been released in source code form. I used this code as the basis for my initial release of LinPsk 0.2. The version 0.7 release of LinPsk included the expanded functionality of RTTY, and around this time, LinPsk also was made available for Mac OS X as DarwinPsk.
The primary source for getting LinPsk is the LinPsk home page, where you can find the current prerequisites. At the time of this writing, they are GCC 3.3, Qt 3.3.x, fftw 3.0.1 and portaudio v18. See the on-line Resources section for LinPsk sources. A Debian package of the LinPsk is available. Currently, it requires either OSS sound drivers or the OSS emulation under ALSA.
For those of you who are new to Linux, an ISO image is available that contains a complete Linux system with many ham-related programs. This image contains LinPsk. You can download it and burn it onto a CD, then boot your PC from this CD without installing any programs.
If you decide to install LinPsk yourself, the installation is straightforward:
tar xzf linpsk-0.8.0.3.tar.gz
cd linpsk-0.8.0.3
./configure
for an installation directory other than the standard /usr/local/bin.
Finally, do:
make
su
make install
That's all. You should find a Linpsk executable in /usr/local/bin.
Now, it's time to connect the sound card to the transceiver. There are different ways of doing so, and a few proposals can be found at WM2U's PSK31 page.
No other program should use the sound card while Linpsk is starting. KDE's artsd, for example, should be stopped before running LinPsk, because it allocates the sound device.
The first time you run the program, a warning appears to alert you that no LinPsk.config file exists. This is a reminder that LinPsk should be configured first. The configuration can be tweaked or changed at a later stage, but an initial configuration must be set up. The configure dialog can be found under the menu title Settings→General Settings. Once selected, a window as shown in Figure 1 should appear.
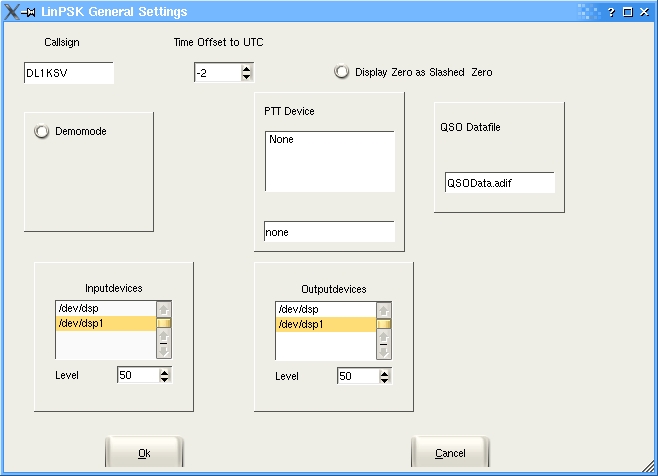
Figure 1. From the LinPsk General Settings menu you can configure your callsign, time zone and the devices to use.
The first field contains the callsign, which is used in the macros. The offset between the local and utc time should be set as well, and it is defined as:
offset = utc - localtime .
To get the configuration dialog for the sound card, demo mode has to be deselected. The available input and output devices appear, and the one that is going to be used should be selected. The configuration dialog can be closed by clicking OK. The settings are not saved automatically for later use, so it is a good idea to save these settings with Save Settings in the Settings menu.
Tune your transceiver to 14.070.15MHz, upper sideband. If the 20-meter band is open, you should hear a variety of warbling tones from the radio speaker, each one representing a ham using PSK31. If everything is connected correctly, the screen should look like Figure 2 after clicking the RX button.
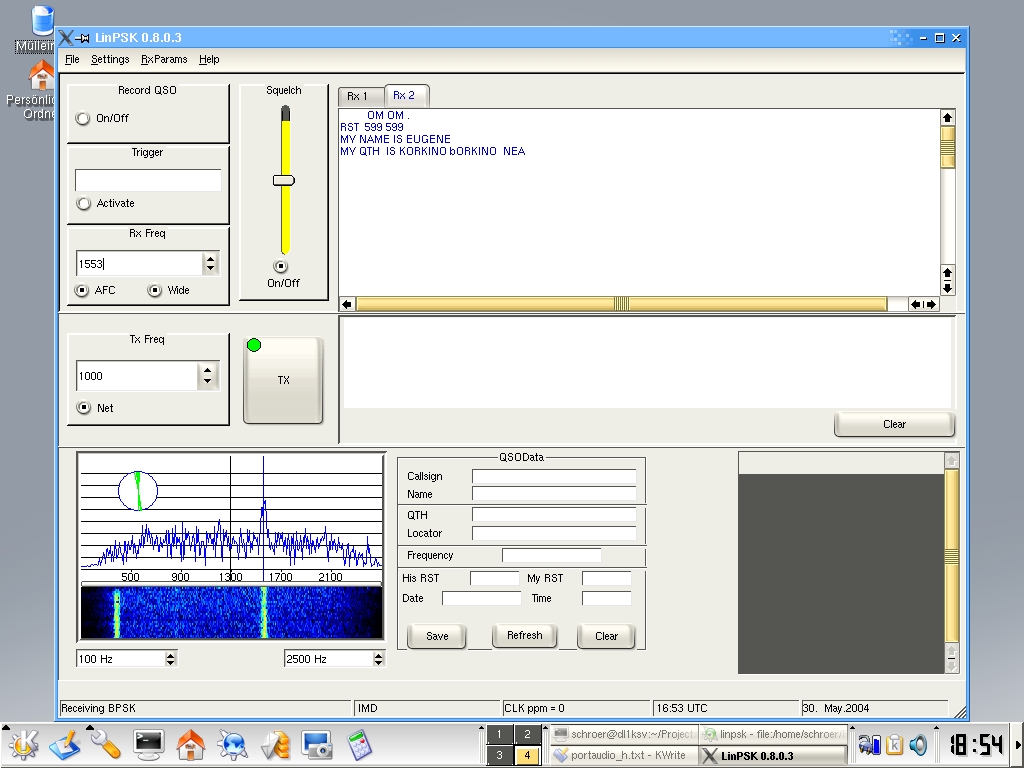
Figure 2. The main LinPsk window shows the available PSK31 signals in the lower left.
In the bottom left corner, the spectrum of the received signal is shown, and beneath that a translation of the spectrum values into colour values appears.
Due to the bandwidth of your transceiver, there may be a black gap on the left and right side of the spectrum. If a PSK signal is received, you should see one or more sharp peaks in the spectrum. If you click near the top of one of such a peak, and the options AFC and Wide under Rx Freq are selected, LinPsk tunes to the signal. In the circle inside the spectrum display, the phase of the received signal is represented.
This phase display can be used as indicator for quality of the received signal and as a tuning indicator at the same time. For a well-tuned BPSK signal, one sees only a vertical line. If the signal is slightly mistuned, the line is a bit buckled and rotated against the vertical.
As the AFC pulls the RX frequency to the center frequency of the PSK signal, the squelch display changes. The bar inside the squelch display increases and exceeds the threshold, and it changes colour from cyan to yellow. If this happens, letters appear in the receive window—you're now seeing the ongoing chat between two or more PSK31 users.
It is possible to listen to more than one QSO at the same time. To do this, one has to open another RX window from the file menu. As LinPsk supports other modes of operation, not only PSK, you are asked to select a mode for the new window. After that, you can click into the spectrum display at the desired frequency and watch.
After watching for a while, you might get curious and decide to answer a call. Be warned, though: you need a license to transmit on the ham bands.
Before transmitting, you should adjust the output volume carefully. PSK31 consumes little bandwidth, but if the output level is too high it can overdrive your transceiver, resulting in a lot of side loops that do not improve the coverage of the transmission. It's a good idea to use a dummy load when adjusting the output volume.
You should set the output volume in the General Settings menu to a low value. Pushing the TX button changes the labeling from TX to RX. The next time you push this button, the state changes to RX again.
Re-open the settings and watch the ALC of your transceiver. You should raise the output volume slowly until the ALC reacts, and then lower the volume some units again until the ALC settles down. Now the settings can be closed. Switch back to RX by pressing the TX button, and you are ready to answer calls.
You might tune to a running QSO and wait until it's over and one station calls CQ. Sending CQ means that the ham operating the station is interested in starting a new QSO with any other ham out there. Frequently, many QSOs are running at the same time. Which station will call CQ again first?
In such a case, open more RX windows from the File menu, tune each window to a QSO and activate the trigger in the upper-left corner. As the text to be triggered, enter CQ CQ. The trigger corresponds to the active RX window each time. Switch between the different RX windows and make another one active by clicking a tab in the right part of the window.
As soon as the trigger text is detected, LinPsk beeps and switches to the window in which the trigger text was detected. Whichever way you prefer, it now is time to answer the call.
Push TX and type the text you want to send into the TX window. Each character of the text transmitted is displayed in the RX window. When all text is transmitted, push RX again and wait for the reply. If the other station returns to your response, your first PSK31 QSO is going to start.
Make sure that the net option is selected in the Tx Freq window, which is the default. This option causes the transmit frequency to be identical to the receive frequency.
You can enter text into the TX window while listening. The prescribe buffer spans up to 1,000 characters. This text is transmitted as soon as you push TX. While the text is being transmitted you can add more text. You can use copy and paste for adding text. When all is transmitted, switch back to RX.
After following or even doing a few QSOs, you should notice that most of the text you type is the same. So instead of typing callsigns and other things over and over again, you can use macros, which are intended to make repeating text as easy as possible. The macro functionality is explained by answering a CQ call as an example.
Answering a call usually follows a few standard steps. Switch to TX, send the remote callsign twice, then “de”, then your callsign three times, then “pse k” and then switch to RX. You can implement all of these steps in a macro. To create a new macro, open Add Macro in the Settings menu. The first thing to enter is the name of the new macro. This name serves as a label for the button that appears in the lower right-hand black box.
We use QSOStart as the macro name and mark the letter Q with a preceeding &, which enables us to execute this macro by pressing Ctrl-Q. Of course, one is able to execute this macro by clicking its button as well. The complete macro definition is shown in Figure 3.
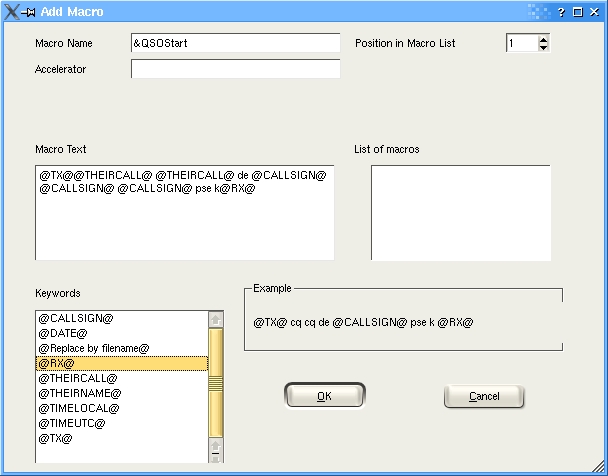
Figure 3. Available keywords for macros include your callsign, the other station's callsign and the time.
In the lower-left side of the window, you can see a list of available keywords. Double-clicking a keyword copies it from the keyword box into the macro definition.
Using the @TX@ and @RX@ keywords allows you to switch between different modes. The @CALLSIGN@ keyword references the callsign entered in the General Settings menu. @THEIRCALL@ and @THEIRNAME@ reference the callsign and name field in the QSOData window. You can fill in these fields by entering the corresponding values directly or by copying and pasting them from the RX window. If one of the referenced fields is empty, an empty string is printed when using the macro.
Even inserting the contents of a complete file into a macro is possible. To do so, one has only to enter the name of file in the user's home directory quoted by @, or click the @Replace by filename@ keyword and replace the text. No replacement of keywords takes place inside the files. I used such a text file for the description of my station and to introduce myself. Because I can use different files, I am able to send this description in different languages. The other keywords do exactly what their names suggest.
You can implement the macros depending on your own needs. The number of macros possible is limited only by memory and storage. If the macros are set up properly, one can handle complete QSOs with only a few mouse clicks.
Final tip: you should always save settings if you are interested in keeping your macros.
Some settings are available to tailor LinPsk to your personal needs. On the Font Settings submenu, for example, you can select the font and its size. In the colour submenu, you can choose the colour used to display text in the RX window. Then, when using many RX windows you can distinguish among them by colour. The colour of the text is calculated automatically, but you might prefer some other colours. Displaying the text is done in the same colour used to paint the center frequencies in the spectrum display.
The colours settings menu sets the colour only for the current active RX window. By saving the settings, all colour settings are saved and used again on restart. If you open more RX windows than there are colours set, the additional colours again are chosen by calculation.
If you want to save the text of a QSO, simply click Record qso. Clicking the Record button again stops the recording. You activate this feature for each RX window individually.
The main data of a QSO can be saved to a file. The data is written as plain ASCII text in adif format. The default name of this file is QSOData.adif and can be reset in the General Settings menu. If no file by this name exists in the home directory, the file is created. Each record is appended to the end of this file.
When beginning work on LinPsk, my objective was to learn C++ and to develop a PSK31 program for Linux that was easy to use. KDevelop was a great help for me during this development. Meanwhile, I implemented RTTY as an additional mode. This mode works, but the decoder part should be improved. At that point, I tried to modify the code to get a framework for implementing different digital modes. I tried to implement MFSK16, but that mode is not functional as of yet. So this is another point for future developments.
I was asked to port LinPsk to Mac OS X. That was an interesting challenge and thus DarwinPsk was born. At the moment, my development platform is a dual-boot iBook with Mac OS X and Gentoo Linux. All examples were taken from the Gentoo Linux part and KDE 3.2. Now I maintain two distributions and receive many proposals for improving the program. Of course, I receive bug reports as well. The latest documentation was version 0.6, dated January 2002, so something new is needed. Help is welcome in the form of writing user-oriented documentation, testing the program or making proposals for improvements or reporting bugs. Even implementing new modes or writing is possible. Improving existing programs or designing new modes fits well with the experimental nature of amateur radio. And, believe me, the ideas of open source fit the spirit of ham radio.
73 es bcnu on PSK31, de Volker, DL1KSV
Resources for this article: /article/7642.
Dr Volker Schroer came into contact with Linux in 1995 when setting up a firewall. Becoming a ham in 1996, he started developing LinPsk in 1999. Comments and proposals are welcome to dl1ksv@users.sourceforge.net.

