
At the Forge - Publishing with Bricolage
If you publish an on-line newspaper or magazine, you probably already have looked into a content management system (CMS). CMS software makes it easy to keep track of the many pages on a Web site by handling issues as varied as users, groups, permissions, editing responsibilities and site-wide templates. The more pages on your site, or the more people working on it, the more likely it is that you can benefit from a CMS.
Many companies have sprung up to meet this need, offering CMS software that claims to do everything but write your site's content. (Although given the quality of writing on some sites, you sometimes have to wonder.) It has taken some time, but a number of open-source CMS packages are available that can fulfill even the most complex site requirements. One of the most powerful and popular packages is Bricolage, which combines the mod_perl module for Apache, the PostgreSQL relational database and the HTML::Mason templating system into one neat package (sourceforge.net/projects/bricolage).
In previous installments of this column, we looked at some basic configurations of a Mason system, including alerts that can be set to fire when certain events occur. Until now, however, we have neglected the most important task of all for a CMS, namely, publishing content to an actual Web site. This month, we follow an article as it goes from inception to publication, working its way down the Bricolage publishing pathway.
The first step in all of this is to create a Web site on which the content can be published. I created a virtual host named output.lerner.co.il on my server, with its own directories for error and access logs. I then added an appropriate VirtualHost directive in my Apache configuration file, as follows:
<VirtualHost 69.55.225.93>
    ServerName output.lerner.co.il
    ServerAdmin reuven@lerner.co.il
    DocumentRoot /usr/local/apache/
    ↪v-sites/output.lerner.co.il/www
    CustomLog /usr/local/apache/v-sites/
    ↪output.lerner.co.il/logs/access-log combined
    CustomLog /usr/local/apache/v-sites/
    ↪output.lerner.co.il/logs/referer-log referer
    ErrorLog /usr/local/apache/v-sites/
    ↪output.lerner.co.il/logs/error-log
</VirtualHost>
Now, when my server receives a request for output.lerner.co.il, it looks in the output.lerner.co.il/www directory rather than in the main document root, generally defined to be /usr/local/apache/htdocs.
Before we can publish any articles to the Web with Bricolage, we must tell the CMS where new files should be deposited. In Bricolage, this is done with the Destinations menu option, under the Distributions heading. You can create multiple output destinations, allowing you to have multiple sites with a single Bricolage instance. This might be the case for a publisher whose staff produces several different newspapers. Each output destination can be on the local filesystem or on a remote site accessed by FTP.
Click on New Destination to create a new publishing destination. Most small sites need only a single channel, which allows all documents to be exported to the site's DocumentRoot on the disk. You then must indicate a few things: 1) whether the Web site resides on the same computer as the Bricolage system or whether files must be copied to a remote computer using FTP and 2) the output channels to which this should be made private. We assume the Bricolage server and the final Web server are on the same computer—but in a larger-scale environment, especially where performance is an issue, it would be wise to split them up. The first new destination screen is shown in Figure 1.
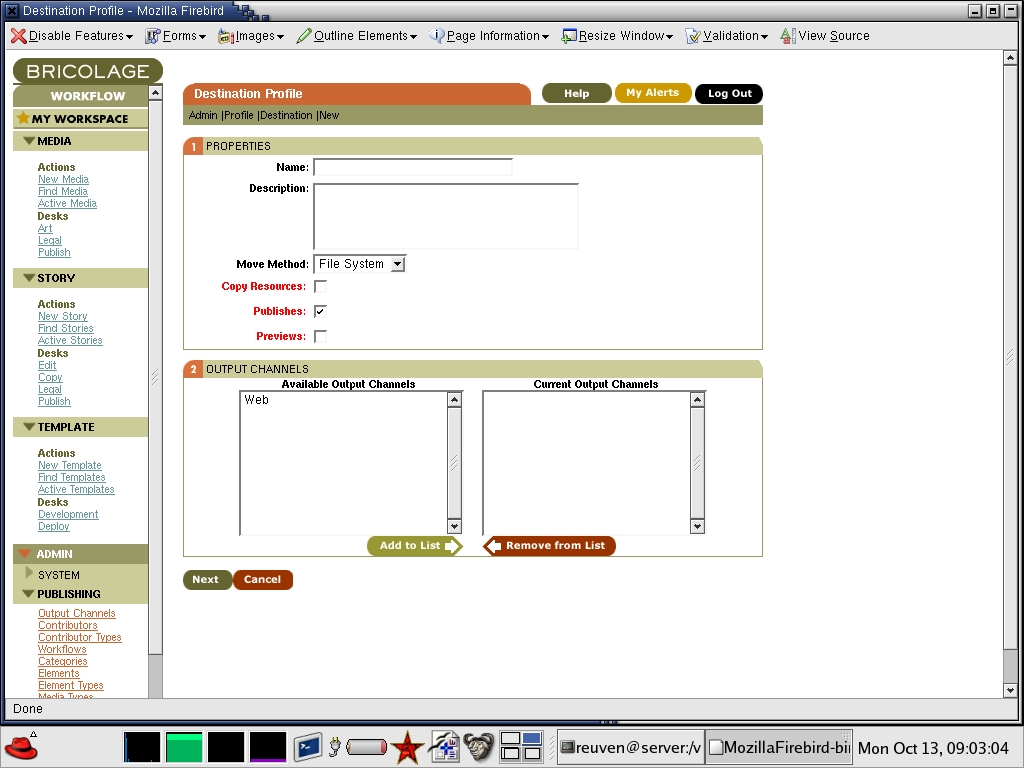
Figure 1. Setting Up a New Destination
Although Bricolage allows you to define new output channels, keep the default Web channel for now. The difference between output channels and destinations can be a bit confusing at first. Think of an output channel as a logical target and a destination as a physical target, and then realize that you can mix and match them in all sorts of different ways. You can have multiple output channels going to a single destination or a single output channel going to multiple destinations.
Once you have provided some basic information about your new destination, you have to define at least one action (“move”) and then define the most important part, the server section. In the server section you indicate the server on which the files eventually should be deposited. As we've already indicated that we are copying files rather than using FTP, we need to fill in only the destination pathname, which should match the DocumentRoot of the Apache virtual host where the document will be available.
Now that we have created an output channel, we can go back and create a new story, putting on our reporter hat. (Remember, each of these menus normally is meant to be used by a different person or group of people on a magazine's staff.) Click on New Story in the the Story menu, giving it the minimum of a title, a category (/, unless you have defined other categories) and a priority (normal). You also can set the publication date, which indicates not only when the story should be published to the Web, but also the URL with which it should be available. Longtime readers of Salon.com probably have noticed that each story's URL contains the date of publication; it should come as no surprise that Bricolage, which evolved from the CMS developed at Salon, continues in that tradition.
When you have filled in this basic information, click on the Create button. You now have the opportunity to create the text of your article, adding paragraphs (one at a time or separated by blank lines using the bulk Edit button). When your story is finished, you can submit it to the Edit Desk using the Check In button at the bottom of the page, sending it to the Edit Desk.
Unfortunately, the nature of a Web-based interface and the flexibility that Bricolage offers means that the interface for Bricolage often is a bit complex, forcing you to work with a number of different Submit buttons. Fortunately, the buttons are labeled clearly, which means that even if you end up saving your story rather than checking it in to the Edit Desk, you probably aren't going to delete the story accidentally. That said, new Bricolage users would be wise to read the labels on the buttons before assuming that all Submit buttons are created equal.
Now that we have submitted the article to the Edit Desk, we change hats once again and pretend to be the editor who has to review the story. Click on the Edit menu under the Desks subheading in the Stories menu, and you get a list of all stories currently checked in to the edit desk (Figure 2). Stories already published have a P in their titlebars. Stories checked out (that is, available for changes by an editor) can be edited. But we're not going to edit the story right now, because we know that the author is one who consistently finishes his sentences and carefully double-checks his work. For now, we send it along to the Publish Desk, where things are reviewed one last time and then sent to the Web. We do this by choosing Publish on the Move To menu and then clicking Move Assets.

Figure 2. At the Edit Desk, you can check for stories ready to edit.
We then can go to the Publish Desk, where items are reviewed one final time before they are published to the Web. Notice that Bricolage comes with built-in support for copyediting and legal reviews. You can create new desks as well, if your organizational structure is more complicated than the default setup.
In many ways, the Publish Desk is the same as the others; it allows you to add notes to a story, view a story's edit trail or even see the log of changes. You also can edit the story at the Publish Desk by checking it out and clicking on the Edit link. The most important parts of the Publish Desk, however, are the additional check box (marked Publish, not surprisingly) and a button marked Publish Checked (Figure 3).
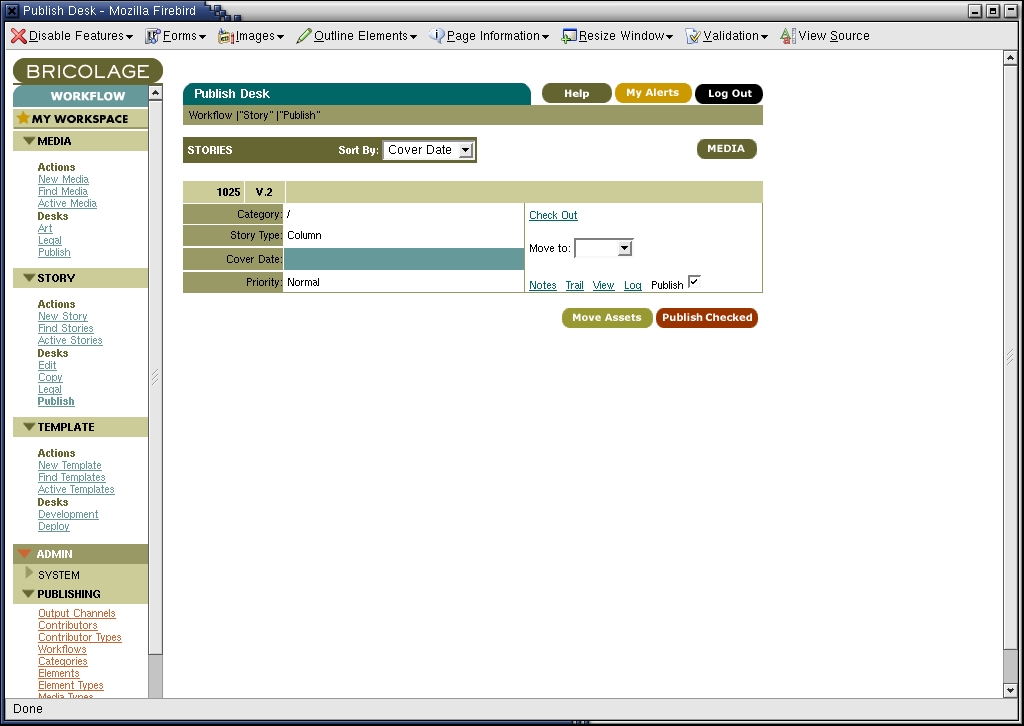
Figure 3. Review stories for publication at the Publish Desk.
When you click on Publish Checked, Bricolage gives you the option of indicating when the story should be published. This is different from the publication date of the story. You might want a story with a February 1st date, for example, to be available on January 31st. Alternatively, you might want it to be available only on February 7th. Clicking on the Publish Assets button puts this process in place, with Bricolage reporting it has published the story (or stories) in question. And sure enough, our document has been published to the URL we assigned it earlier—in this case, as index.html in the DocumentRoot.
When a print newspaper or magazine publishes a story, there is no way to change what has been displayed. But on the Web, all you need to do is modify the story in question, and everyone immediately sees the changes. Ignoring the issues of journalistic ethics raised by this technological ability, Bricolage makes it easy to correct a story and then redeploy it on the site.
To modify an already-published story, go to the Active Stories menu item, which brings up a list of stories currently available. You can choose to check out a story and make it available for editing by the current user. (Bricolage's version-control system ensures that only one person can edit a file at a time.) You then can edit the file and send it to the Edit Desk, just as you did when you originally wrote the story. And as before, the Edit Desk must pass it along to the Publish Desk; from there it can be published to the Web.
If you have worked on only small Web sites before, then this task might appear to be far too complicated. After all, isn't part of the Web's beauty the fact that we can change documents and immediately see the results of those changes? It's true that a content management system introduces a set of trade-offs into the workings of a Web site. No longer can you simply modify a file on the disk; you must log in, check the file out, make the modifications, check it back in and send it to the Publish Desk, which might even reject your changes.
But complicated and bureaucratic as this procedure might be, it is better than the alternative, which is multiple people fighting over ownership of a file or different people trying to edit a file—sometimes in different ways—on a live site. A CMS is designed to slow you down, much as a seat belt is designed to prevent you from moving too much. But in both cases, the restrictions are designed to help you by stopping you from hurting yourself. Moreover, this bureaucracy can save you in a pinch, because every previous version of the document always is available. So if you accidentally removed half of an important story, you can revert to the previous version that Bricolage has stored in its database.
Bricolage is a complete, sophisticated open-source content management system with an impressive array of features. As we saw this month, we easily can set up a Bricolage-based site and publish stories through a distribution channel that we created with a simple set of virtual host definitions in our Apache configuration. Next column, we conclude our discussion of Bricolage by looking at ways in which we can customize the output templates, turning a simple black-and-white publication into something with more pizzazz.
Reuven M. Lerner, a longtime Web/database consultant and developer, now is a first-year graduate student in Learning Sciences at Northwestern University in Chicago, Illinois. You can reach him at reuven@lerner.co.il.
