
Setting Up Virtual Security Zones in a Linux Cluster
An increasing number of projects use Linux and other open-source software as basic building blocks to create clusters. Examples range from clusters that perform massive computations of visual effects for movies to clusters used as next-generation telecommunication servers.
More and more often, various issues, including economics, management and flexibility, require applications to run on the same physical cluster. An illustration of this situation in the telecom world is carrier-grade clustered servers shared among different operators. The operators share the global infrastructure of the cluster and provide different services to their clients but want to keep their binaries and data private. In such cases, cluster administrators do not have access to the source code for these applications, and security mechanisms cannot be enforced at the source code level. Hence, a security infrastructure is needed to ensure that a given application's resources cannot be tampered with or used by other entities on the cluster.
The Distributed Security Infrastructure (DSI) provides a solution for such a situation. It attempts to build a coherent security framework dedicated to carrier-grade Linux clusters by dividing a cluster into several virtual subclusters, guaranteeing controlled/restricted connections between them. Even though the project is only in its second year of design and development, we believe DSI is a useful tool for cluster administrators. This article presents how to use DSI to set virtual security zones inside a Linux cluster.
In this section, we briefly introduce DSI's architecture. DSI is composed of one security server (SS) and multiple security managers (SMs), one per node (Figure 1). The SS centralizes management of the cluster: it gathers alarms and warnings sent by SMs and propagates a unique security policy over the cluster. On the other hand, SMs are responsible for enforcing security on their own nodes. Furthermore, messages are exchanged between the SS and SMs over encrypted and authenticated channels, using SSL/TLS over CORBA event channels.
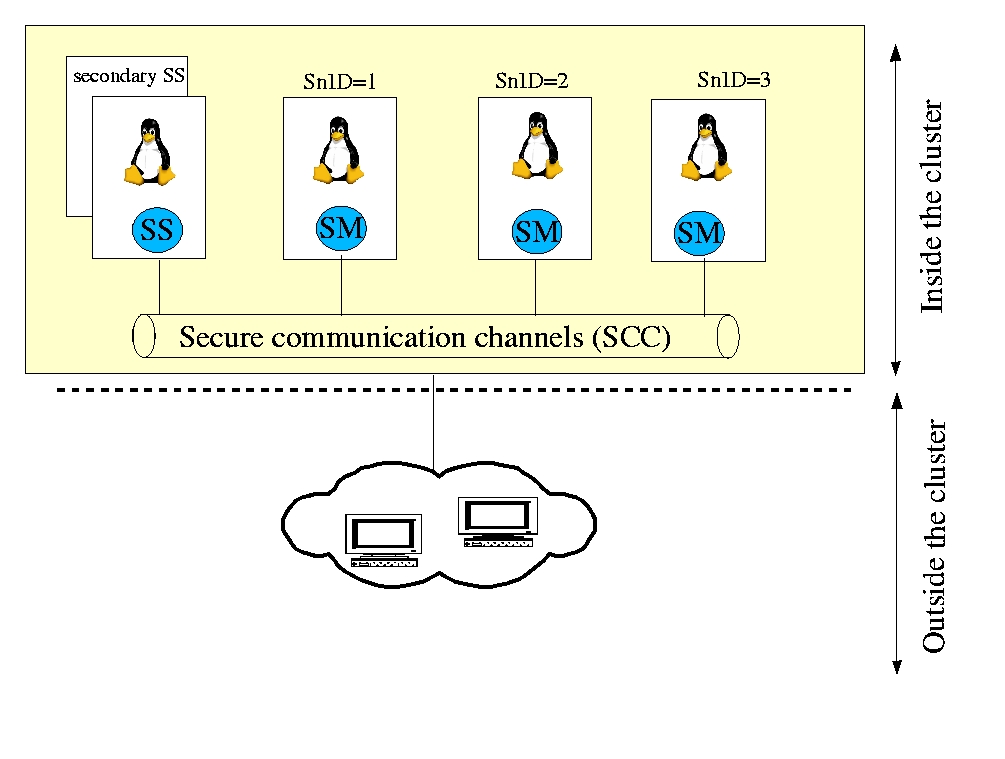
Figure 1. The DSI Architecture
Security mechanisms in DSI are implemented at the process level to check the access privileges a process has to a resource. Each process is identified by its security context identifier (ScID) and the node identification on which it is running (SnID).
SnIDs are assigned using the DSI SetNodeID tool. All processes sharing the same security context are assigned the same ScID. ScIDs can be assigned automatically by the system according to DSP rules (see below), or they can be assigned specifically to a given binary using the DSI SetSID tool. This allows grouping of binaries according to their security contexts.
In DSI, writing a security policy for the cluster consists of granting or denying permissions to a given SnID and ScID pair. These rules are valid for the whole cluster. All rules are centralized in an XML file on the SS to ease management.
DSI provides a way to update and enforce transparently and automatically a unique homogeneous view of the whole cluster's security. Once the administrator modifies existing rules or adds a new rule to the distributed security policy (DSP), the DSP must be loaded on the SS using the dsiUpdatePolicy tool. Then, dsiUpdatePolicy checks the DSP file against our DSP XML schema (syntactical checks). If the DSP is validated, the SS propagates the new rules to all nodes of the cluster using the secure communication channels. Finally, each SM enforces the rules at kernel level calling the distributed security module (DSM, see Figure 2). DSM is based on the LSM kernel patch. Its detailed description is beyond the scope of this article; see the on-line Resources section for links to more information.

Figure 2. DSP Propagation inside the Cluster
Controlling access to local resources is rather simple: the DSM module retrieves the local ScID and SnID of the requesting process and checks corresponding permissions in the security rules. Actually, the originality of DSI lies in distributed access control. Currently, only socket communications are implemented. To illustrate this, we detail the access control mechanisms when a process tries to access a resource located on another node (Figure 3):
The access request first is intercepted by the local DSM, which checks that the process has the privilege to call locally the socket-related systems calls.
Then, the ScID and SnID of the requesting process are added by DSM to each IP packet sent to the remote node.
On the receiving node, the remote DSM uses the ScID and SnID of the requesting process, extracted from the IP packet, to check its permission to communicate with both the target socket and the process to which the target socket belongs.
Finally, the remote DSM locally checks that the process to which the target socket belongs may receive information from the requesting process.
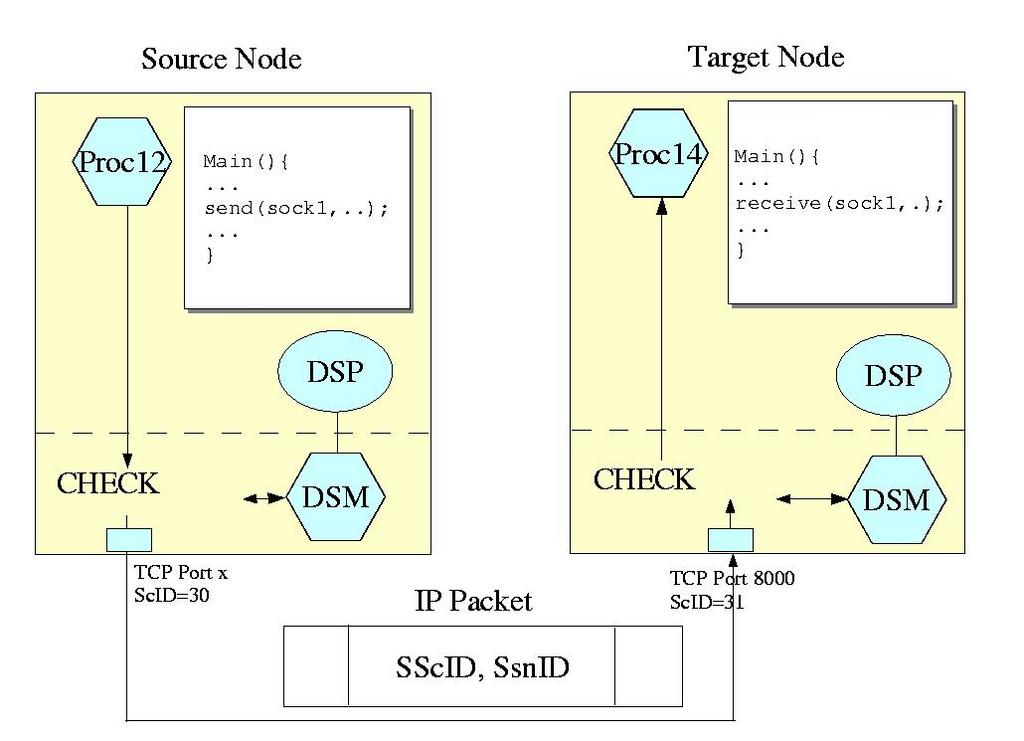
Figure 3. Secure Remote Access Control
In this section, we walk through a simple scenario, which presents a problem and explains how DSI can help solve it. Say we want to share a cluster of two nodes (we begin small), among two telecommunication operators, PhoneMania and RingBell, each running their own applications on the cluster's nodes. Both offer a phone quotation service: end users call entry point servers (using TelecomClient) and request quotes for given companies. The entry point servers (PhoneManiaEP and RingBellEP) forward the requests to their back-end servers (PhoneManiaBE and RingBellBE), which retrieve the quotes and send them back to the end user.
From a cluster operational point of view, the problem is the following: how can we prevent a PhoneMania application from forwarding its requests to RingBell's back-end servers? Without any specific security infrastructure, PhoneMania could do so when its back-end server is overloaded or simply when it does not have the requested information—not to mention more aggravated scenarios of subscriber's data theft or intentional harm meant for competitors and so on. To illustrate such a scenario, we implemented all actors as simple UDP client and server applications (Figure 4).
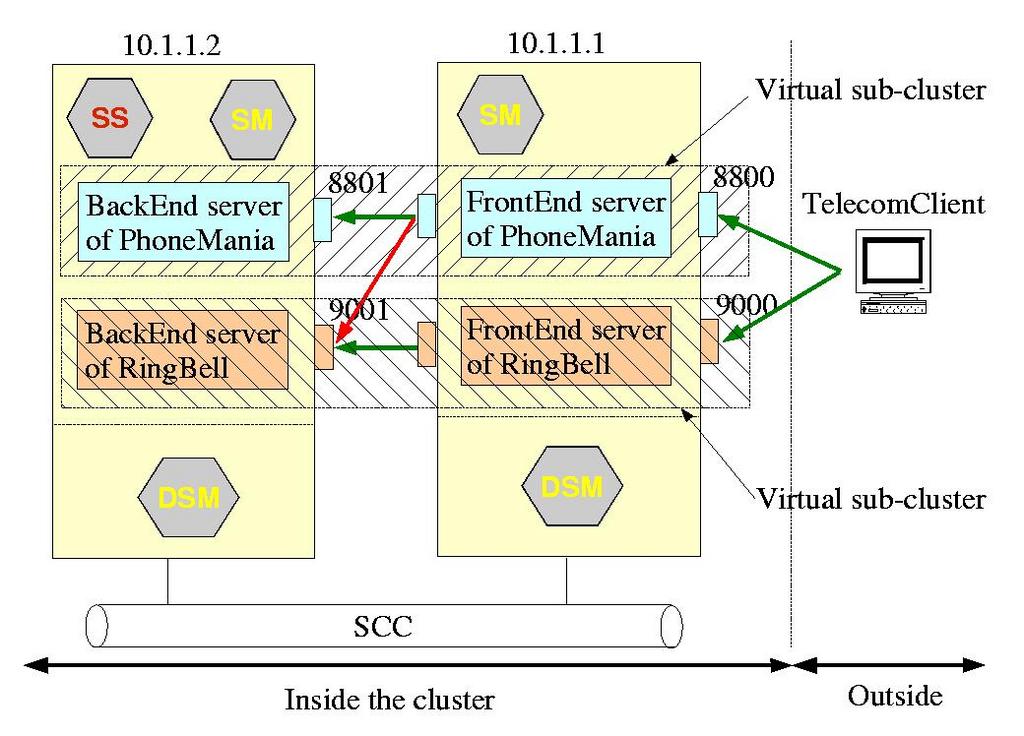
Figure 4. Simple Telecom Scenario
Here is the fraud scenario step by step:
PhoneMania and RingBell launch their back-end servers on a node called munster:
[munster demo]$ ./RingBellBE -h 10.1.1.2 -p 9001
RINGBELL: bind on 10.1.1.2:9001
..
[munster demo]$ ./PhoneManiaBE -h 10.1.1.2
-p 8801
PHONEMANIA: bind on 10.1.1.2:8801
Then, as PhoneMania is overloaded, he decides to use RingBell's resources. So, on node colby, the entry point server of PhoneMania (port 8800) forwards all requests from his customers to RingBell's back-end servers (port 9001):
[colby demo]$ ./PhoneManiaEP -h 10.1.1.1
-p 8800 -b 10.1.1.2 -r 9001
PHONEMANIA: bind on 10.1.1.1:8800
PHONEMANIA: connect on 10.1.1.2:9001
..
When a client requests a quotation at PhoneMania's entry point (port 8800), PhoneMania actually uses RingBell's back-end server to answer (port 9001). Simply put, PhoneMania gets paid by using RingBell's resources:
[colby demo]$ ./TelecomClient -h 10.1.1.1
-p 8800
Connecting to : 10.1.1.1:8800

Requesting quotation for Ericsson
Quote Ericsson
..
[munster demo]$
..
RINGBELL backend : processing quotation request for
                   Ericsson
RINGBELL backend : quotation for Ericsson is 83
Quote Ericsson
To prevent this, we propose to subdivide the shared cluster securely into disjoint zones with DSI. Next, we show step by step how to use DSI to do this.
First, we need to install DSI on all nodes of the cluster. After downloading the latest DSI tarball from SourceForge (see Resources), DSI should compile on your machine, as it uses the standard configure and make strategy. We detail how to build and install DSI in the DSI documentation found on the SourceForge site.
You should run the Security Manager on each node. For our two-node cluster, this means it runs on colby and munster:
[colby]$ cd ~/dsi
[colby]$ source dsi_setup.sh
[colby]$ ~/dsi/bin/dsiSecManager
To simplify, colby also acts as a security server:
[colby]$ cd ~/dsi
[colby]$ source dsi_setup.sh
[colby]$ ~/dsi/bin/dsiSecServer
The SS and SMs communicate with each other using CORBA event channels.
We load the DSI kernel module DSM on each node to enforce security at the kernel level:
$ cd ~/dsi/lsm
$ su root
Password:
# ./load
# /sbin/lsmod
Module                  Size  Used by    Not tainted
dsm                    36332   0 (unused)
...
Then, we configure DSI by defining different IP addresses used on each node for secure and nonsecure communications. To do so, we wrote a tool called DciInit; see the DSI documentation at the SourceForge site for more details on the format of the dci_policy.conf file and how to use DciInit:
$ cd ~/dsi/user/tools
$ ./DciInit ~/dsi/etc/dci_policy.conf
Basically, to create disjoint virtual subclusters, you need to assign different ScIDs to PhoneMania's resources (in our example, ScID=10) and RingBell's resources (ScID=20). Then, add new rules to DSP to restrict any connection from the zone defined by ScID 10 to the zone defined by ScID 20 and vice versa. By organizing the resources of each operator in separate groups, without any possible connection between them, we actually achieve a virtual subdivision of the cluster. Additionally, the administrator can create another zone defined by ScID 30 with privileges to access both subclusters for administrative purposes.
First, let's assign the ScIDs of each binary on each node (using the DSI SetSID tool):
$ ~/dsi/user/tools/SetSID PhoneManiaEP 10
Changing from SID 0 to SID 10
$ ~/dsi/user/tools/SetSID PhoneManiaBE 10
Changing from SID 0 to SID 10
$ ~/dsi/user/tools/SetSID RingBellEP 20
Changing from SID 0 to SID 20
$ ~/dsi/user/tools/SetSID RingBellBE 20
Changing from SID 0 to SID 20
$ ~/dsi/user/tools/ls_dsi .
PERMISSION      USER    GROUP   BSID  FILE
-rwxr-xr-x      lmcaxpr install 10    PhoneManiaBE
-rwxr-xr-x      lmcaxpr install 20    RingBellBE
-rwxr-xr-x      lmcaxpr install 10    PhoneManiaEP
-rwxr-xr-x      lmcaxpr install 20    RingBellEP
When DSM is loaded, it enforces default permissive security rules. To achieve cluster subdivision, we have to edit the DSP file ~/dsi/etc/SampleDSP.xml and replace all the existing security rules with our own.
PhoneMania's sockets are assigned ScID=10, and RingBell uses ScID=20. The following rule assigns ScID=10 to PhoneMania's entry point UDP socket (port 8800):
<class_SOCKET_INIT_rule>
  <protocol>UDP</protocol>
  <port>8800</port>
  <SnID>ALL</SnID>
  <ScID>10</ScID>
</class_SOCKET_INIT_rule>
We need three other similar rules: one for PhoneMania's back-end server and two others for ScID=20 for RingBell.
Then, PhoneMania's processes (source ScID=10) are allowed to create, send or receive messages on sockets they own (that is, with target ScID=10):
<class_SOCKET_rule>
  <sScID>10</sScID>
  <sSnID>ALL</sSnID>
  <tScID>10</tScID>
  <tSnID>ALL</tSnID>
  <allow>CREATE CONNECT LISTEN RECEIVE SEND</allow>
</class_SOCKET_rule>
Create a similar rule for RingBell's processes.
Of course, communication between ScID=10 and 20 must be denied. This is done simply by setting no socket permissions at all between those ScIDs:
<class_SOCKET_rule>
  <sScID>10</sScID>
  <sSnID>ALL</sSnID>
  <tScID>20</tScID>
  <tSnID>ALL</tSnID>
  <allow></allow>
</class_SOCKET_rule>
Create a similar rule between source ScID=20 and target ScID=10.
Back-end and entry point servers of a given operator may be located on different nodes of a cluster; remember, we're sharing a cluster, not dedicating one node to RingBell and another to PhoneMania. Hence, processes of PhoneMania (source ScID=10) must be able to communicate with other PhoneMania processes (target ScID=10) through the network. The same holds true for RingBell:
<class_NETWORK_rule>
  <sScID>10</sScID>
  <sSnID>ALL</sSnID>
  <tScID>10</tScID>
  <tSnID>ALL</tSnID>
  <deny>NETWORK_RECEIVE</deny>
</class_NETWORK_rule>
Finally, PhoneMania (ScID=10) and RingBell (ScID=10) processes usually are launched from a shell (default ScID=2). So, basically, we need to allow the shell to create a new process. This is done with a transition rule:
<class_TRANSITION_rule>
  <parent_ScID> 2 </parent_ScID>
  <SnID>ALL</SnID>
  <binary_ScID>10</binary_ScID>
  <new_ScID>10</new_ScID>
</class_TRANSITION_rule>
The binary_ScID is the ScID explicitly assigned to the binary. Remember, we assigned ScIDs to PhoneManiaBE or PhoneManiaEP using SetSID. The new_ScID is the ScID assigned to the new process also created. As access to sockets 8800 and 8801 is granted only to ScID=10, for PhoneMania, the new process should be assigned ScID=10. A similar rule for RingBell should be created.
This is all we need in the DSP—12 security rules. Then, we update the security policy in the whole cluster by sending an update event to the security server:
[colby]$ cd ~/dsi/SS/test/demoSecOM
[colby]$ ./dsiUpdatePolicy ~/dsi/etc/DSP.xml
The security server reads the updated DSP file (located in ~/dsi/etc/DSP.xml) and displays warnings if there are syntax errors. Finally, it automatically sends updates to each security manager; no need to log in to each machine to update the security policy manually or develop your own version of system management Perl-based software. This feature can be a benediction when you have a cluster of hundreds of nodes physically spread out around the world (think grid computing).
Now, it's time to try the case again in which PhoneMania forwards requests to RingBell's back-end server:
[colby demo]$ ./TelecomClient  -h 10.1.1.1 -p 8800
Requesting quotation for Ericsson
Quote Ericsson
...
[colby demo]$ ./PhoneManiaEP -h 10.1.1.1 -p 8800
-b 10.1.1.2 -r 9001
PHONEMANIA: bind/connect on 10.1.1.1:8800 = 0
PHONEMANIA: bind/connect on 10.1.1.2:9001 = 0
Quote Ericsson

Quotation request received
...
[munster demo]$ ./RingBellBE -h 10.1.1.2 -p 9001
RINGBELL: bind on 10.1.1.2:9001
...
On the other node (munster), we notice that RingBell's back-end server is no longer handling PhoneMania's requests, although PhoneMania illicitly redirects them to RingBell. You can use logs generated by DSI, located in /var/log/messages to trace illicit requests:
May  6 07:47:31 munster kernel: DSI-LSM MODULE -
dsi_sock_rcv_skb check permission sscid 10
ssnid 1 tscid 20
May  6 07:47:31 munster kernel: DSI-LSM MODULE
Error - dsi_sock_rcv_skb - No Permission
We have shown a practical solution for sharing a cluster securely among different applications belonging to different users. The DSI Project allows users to create disjoint security zones for each application in the cluster easily. Once DSI is installed on the cluster, the effort needed to create a new security zone for new applications scales down to setting appropriate ScIDs to binaries and including corresponding rules in the DSP file. Source code modification is not required and probably would be impossible anyway.
Resources for this article: /article/7688.
Makan Pourzandi (makan.pourzandi@ericsson.ca) works for Ericsson Research Canada in the Open Systems Research Department. His research domains are security, cluster computing and component-based methods for distributed programming. He received his Doctoral degree in Parallel Computing in 1995 from the University of Lyon, France.
Axelle Apvrille (axelle.apvrille@ericsson.ca) currently works for Ericsson Research Canada in the Open Systems Research Department. Her research interests are cryptography, security protocols and distributed security. She received her Computer Science Engineering degree in 1996 at ENSEIRB, Bordeaux, France.

