
Antique Film Effects with The GIMP
One of the much-touted advantages of digital cameras over film cameras is, at least at low ISO levels, a silky smooth absence of grain in images. Grain in traditional film prints or scans is the result of several factors, but the main culprit is the design of film itself: light-sensitive particles laid down in emulsion layers on celluloid. The larger these particles are, the more sensitive the film is to light and the faster it is considered to be. This determines the film's ISO rating. Higher sensitivity comes at a price; the larger the particles, the more easily they can be seen as grain in developed prints. Some high-speed black-and-white films, such as Kodak T-Max 3200, are especially grainy and are preferred by photographers who like the visual effect the grain structure adds to the photograph.
With digital, you can get film grain's counterpart, sensor noise. I usually want to reduce noise in my digital images, but sometimes I want that gritty, grainy film look, as seen in art houses, street photography and old photos. In this article, I describe a nifty trick for simulating film grain in an otherwise grainless digital image.
Another classic photography staple that has made the transition to digital imaging is sepia toning. Sepia toning originally was developed to extend the archival life of early black-and-white silver-based prints. The process has the effect of converting the silver grains in the print to silver sulphide, which is more stable than silver and thus slows the inexorable process of chemical deterioration. In the late 19th and early 20th centuries, it also provided a more pleasing color than straight black and white due to the poor quality of photo papers at the time, which were likely to be some shade of brownish-white.
In the traditional sepia-toning process, the developed print is gently agitated in a bleach solution to convert some or all of the silver from its metallic state. After rinsing, the print is soaked in sepia toner until all the bleached silver is toned to the desired degree. Finally, the print is washed again to remove excess toner and then dried. With the transition to digital imaging and the use of archival pigmented inks, sepia toning is done these days almost exclusively for aesthetic reasons. A sepia photograph has a timeless, classic feel to it. With a powerful bitmap image-editing program such as The GIMP and a decent photo-quality color inkjet printer, you can achieve excellent quality sepia toning without the hassle of working up to your arms in toxic, smelly chemicals.
In this tutorial, I also show you how to accomplish the vignette effect, another popular holdover from the portrait world. Vignette in this case does not refer to a “gradually faded oval cutout”, one popular definition of the term. Rather, I mean, lens vignetting, where a special lens or lens hood is used to achieve a gradual light falloff toward the corners of the image frame.
Most of the menus in The GIMP are accessed by clicking the right-most mouse button in an image window. In the description that follows, a right-click is abbreviated RC. If I describe a GIMP action to invoke, I will mention the series of menus or a keyboard shortcut in parentheses. For example, open the image (RC→File→Open), means right-click in the image window and choose File, and from that menu choose Open. If a keyboard shortcut makes more sense, I list the combination of keys to press; for example, copy the image (Ctrl-C) means press and hold the Ctrl key and press C.
To start with, I assume you have a photo with artistic potential loaded into The GIMP, as shown in Figure 1.
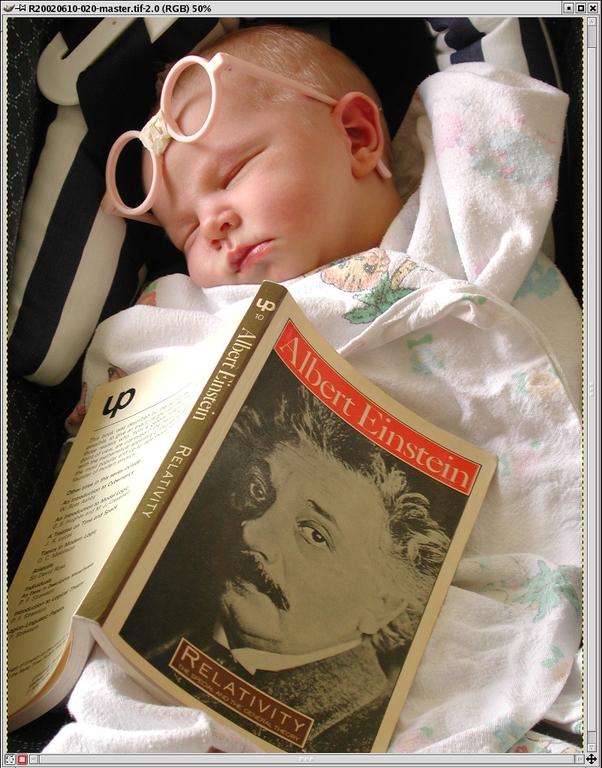
Figure 1. A Photo with Timeless and Classic Potential
If you are like me and want to use the effect in black and white, the first step is to convert it from color. An easy way to do the conversion is to perform a mode change to grayscale (RC→Image→Mode→Grayscale), which provides reasonably pleasing results for a large percentage of images. For some images, though, other approaches may yield better results. For the ultimate in flexibility, try a custom mix using the Channel Mixer plugin (RC→Filters→Colors→Channel Mixer), with the Monochrome option selected. A tutorial on converting to black and white is at mmmaybe.gimp.org/tutorials/Color2BW.

Figure 2. After Mode Change to Grayscale and Back to RGB
Once you have a decent-looking black-and-white image, you are ready to proceed. If you used a standard grayscale mode change, as I did here, you need to put the image back in RGB mode (RC→Image→Mode→RGB).
Click on the foreground color swatch in The GIMP toolbox to bring up the color selection dialog. Dial in the color red = 128, green = 128, blue = 128, as shown in Figure 3, and click OK. This selection should make the foreground swatch in the toolbox a neutral gray, as shown in Figure 4.

Figure 3. The Color Selection Dialog

Figure 4. The GIMP Toolbox after Foreground Color Change
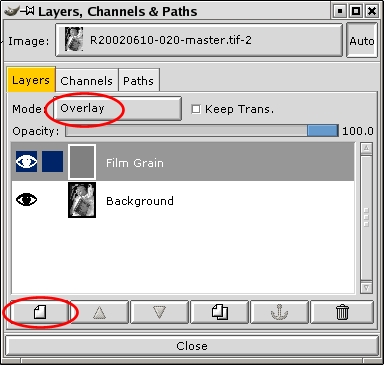
Figure 5. The Layers Dialog after Addition of the Film Grain Layer
Now bring up the Layers dialog (Ctrl-L) and click on the button for a new layer, circled at the bottom of Figure 5. Give it the name Film Grain and choose the option to fill it with the foreground color. Once you click OK, you should see nothing but a solid gray color in the image window as the newly created layer obscures the image in the layer below. Now, change the blending mode of the layer to Overlay (circled at the top of Figure 5), and you should see your image again. The blending mode is an attribute of a layer that describes how it combines with the layers below it to form a composite image. In Overlay mode, anything lighter than neutral gray lightens the image and anything darker darkens it. Our layer is completely neutral gray at this point, so there is no visible difference from the background image.
With the Film Grain layer selected in the Layers dialog, bring up the Scatter HSV filter by right-clicking in the image window and selecting Filters→Noise→Scatter HSV from the pop-up context menus. This filter adds a noise pattern to the neutral gray layer, which overlays to the image below it, creating a grain-like pattern.
Here's a not-too-technical interpretation of the filter parameters for the purpose of creating grain:
Value: think of this as the master control for the granularity and intensity of the grain. Increasing this increases the contrast in the grain and the cluster size of some introduced noise, making the simulated grain seem larger and darker.
Hue: if Saturation (see below) is set to 0, this has little effect other than to change the (random) pattern of the grain. Play with it until you see a pattern you like.
Saturation: set this to 0 unless you want to add colored grain (a color image, for example). If colored grain is what you want, adjust this as well as the Hue control.
Holdness: the fine-tune control for the granularity and intensity of the grain. Adjust this after you've made a change to the other controls. Higher amounts make the grain finer and less noticeable.
Play with the parameters until you see an interesting grain pattern in the preview window of the filter, as shown in Figure 6, and then click OK. When the filter finishes, you should see your image take on a grain pattern. If you don't like the look, Undo (Ctrl-Z) and reapply the filter with different settings (Shift-Alt-F). You probably don't want to go too light on the effect here, because the next steps will soften the grain and mute its effect.

Figure 6. The Noise/Scatter HSV Filter Showing Typical Film Grain Parameters
Although you could stop at this step with decent results, there is room for improvement. If you examine a traditional grainy black-and-white photo, you can see that film grain tends to be most noticeable in the mid-tones and is much less so in the shadows and highlights. What we need is a way to control the blending so the highlights and shadows of the background layer get less of the grain effect. If you read my earlier tutorial on layers and layer masks (see “Fixing Photo Contrast with The GIMP”, LJ, April 2003), you might remember that we can control the blending of layers using a layer mask. The lighter a pixel is in the layer mask, the more opaque the corresponding pixel is in the upper layer; the more opaque it is, the stronger its effect is when blending with a pixel in the layer below. The trick to achieving the desired effect is to make our layer mask be a half-inverted copy of the background image. Read on, and you'll see what I mean.
In the Layers dialog, right-click on the Film Grain layer and choose Add Layer Mask. In the Add Mask Options dialog, choose White (Full Opacity) and click OK. Now click on the Background layer. Return your mouse focus to the image window and do a select all and then copy (Ctrl-A followed by Ctrl-C is the quickest). Return to the Layers dialog, and click on the layer mask icon in the Film Grain layer; it's the little white square next to the layer thumbnail, circled in Figure 7. Then, move your mouse focus back to the image window and paste (Ctrl-V). In the Layers dialog, click the Anchor button to anchor the pasted image into the layer mask. After this step, your Layers dialog should resemble Figure 7.
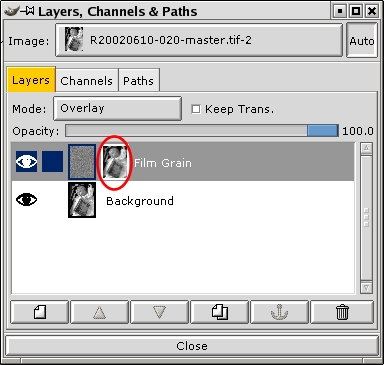
Figure 7. Adding a Layer Mask to the Film Grain Layer
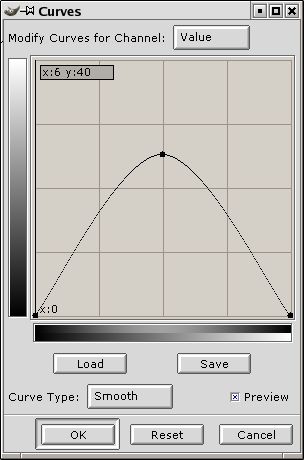
Figure 8. The Curves Dialog, Half-Inverting the Layer Mask
With the layer mask still selected, if you just pasted into it, bring up the Curves dialog by right-clicking in the image window and selecting Image→Colors→Curves. Click to add a control point in the middle of the linear graph. Then grab the right (upper) endpoint and drag it down to the lower right bottom, as shown in Figure 8. What you are doing is half-inverting the layer mask, making all highlights into shadows, so the mid-tones are the brightest part of the image. You also may want to drag the midpoint straight up a bit as I have done here to boost the brightness of the midtones—keep an eye on the image window while you are doing this so you can see the effect of the boost on the grain. When you're all done click OK; you should see a subtle difference in the way the grain shows up in the shadows and highlights. Overall, the grain effect is subdued somewhat, which is why we didn't want to go too subtle in the previous step.
To see the effect of the layer mask more clearly, hold the Ctrl key and click the layer mask icon in the Layers dialog. A little red outline should display around the icon, and the image window changes to show the blend without the effect of the layer mask. Ctrl-click the icon again to toggle the effect of the mask back on.
As a last step, consider applying a bit of Gaussian Blur to smooth the grain a little. Click the grain icon in the Layers dialog to select it, then go back to the image window and RC→Filters→Blur→IIR Gaussian Blur. Be aware that if you use anything other than a very small blur radius you counteract the effect of adding the grain in the first place and end up with a noisy, but not noticeably grainy image. A value between 1 and 3 should be sufficient if you used a high Value setting in the Scatter HSV filter. If you like the grain the way it is, skip the blurring step. The result I obtained in Figure 9 used the HSV Scatter settings shown in Figure 6 and a Gaussian Blur with a radius of one pixel.
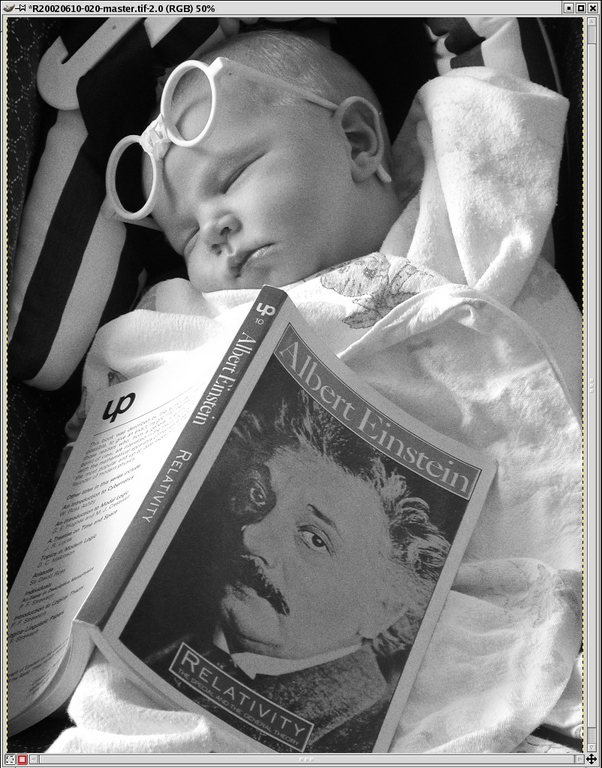
Figure 9. Black-and-White Version with Simulated Grain
Now that we have an artistic-looking black-and-white photo, let's sepia-tone it to add a more timeless and classic look. In the Layers dialog, make sure the Film Grain layer is selected, and click on the duplicate layer button at the bottom of the dialog; the entire layer is duplicated, including the layer mask. Double-click on the name Film Grain copy and change it to Sepia Tone. Change the blend mode of the new layer to Color; this applies the hue and saturation of the Sepia Tone layer with the value (luminance) of the composite layers below. Finally, click on the layer thumbnail icon in the Sepia Tone layer to select it, as opposed to its layer mask.
Click on the foreground color swatch in the main GIMP toolbox to bring up the Color Selection dialog, as you did before. Dial in the color (red = 162, green = 138 and blue = 101) and click OK. You should see the color swatch change to a hue of brown. Once you have this technique down, you can experiment with different tinting colors, but this is a good starting point.
Select the Fill tool (paint bucket) in The GIMP toolbox window and move your mouse focus to the image window. Do a select all (Ctrl-A), and click once in the window to fill it with the new color. Your Layers dialog should look something like Figure 10, and the image should take on an overall sepia tint, as shown in Figure 11.
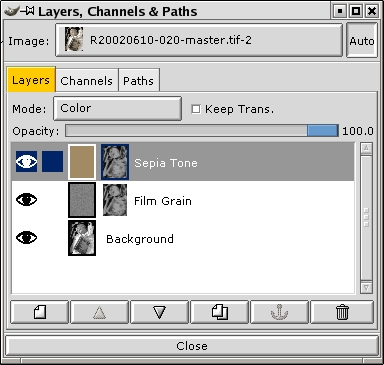
Figure 10. The Layers Dialog after Adding a Sepia Tone Layer
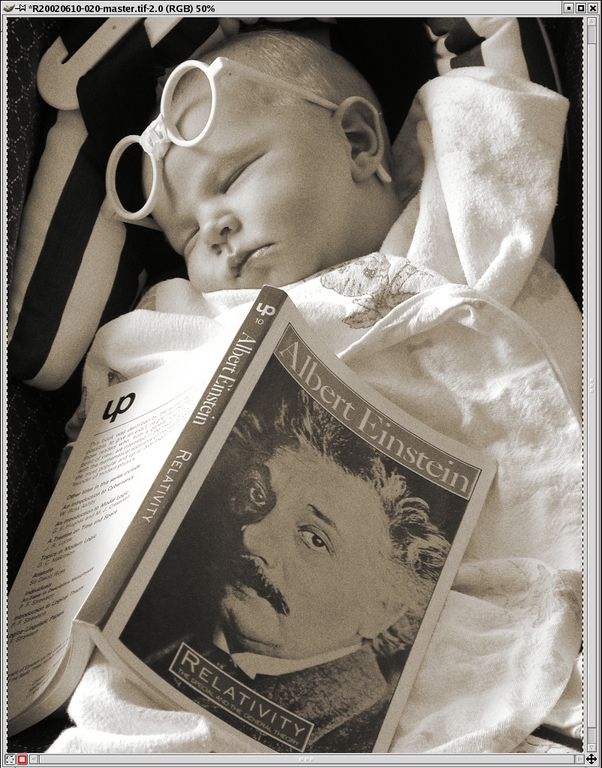
Figure 11. Grainy Photo after Sepia Toning
The use of the same layer mask in the Sepia Tone layer as the Film Grain layer is deliberate. In the traditional wet-darkroom process, the sepia toning occurs most in the mid-tones, and the lighter and darker areas appear to be less brown. You can use the same Ctrl-click trick on the layer mask to see its effect on the sepia toning. If you prefer the stronger sepia cast that you achieve without the layer mask, simply right-click on the layer and select Delete Layer Mask.
Time to add our final effect to make this image really stand out. We'll add a vignette, a sort of spotlight effect that draws the viewer's eye to the subject of the photograph by creating a gradual darkening moving radially away from the main subject. If a vignette is done subtly and properly, the viewer is not consciously aware of the manipulation. It is a technique particularly well suited to portraits.
In the Layers dialog, make sure that the Background layer is selected and click on the duplicate layer button at the bottom of the dialog. Double-click on the name Background copy and change it to Vignette. Right-click on the Vignette layer and add a layer mask with White (Full Opacity).
In The GIMP toolbox, click on the tiny versions of the black and white color swatches to restore the default foreground to black. Now double-click the Blend (Gradient) tool to select it and open the Tool Options dialog. In the dialog, select Radial as the Gradient type. Go back to the image window and click down in the center of the area where you want the center of the vignette spotlight to be, then drag outward toward a corner and release. In this example, I clicked in the baby's chin and dragged nearly to the upper-right corner. The only change you should notice is a radial gradient that appears in the layer mask icon, as shown in Figure 12.
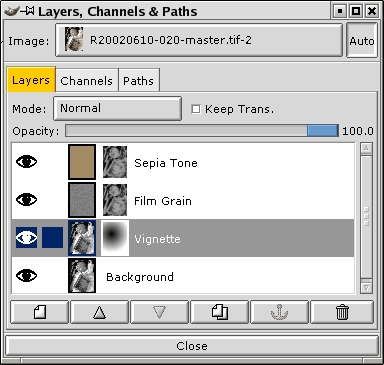
Figure 12. The Layers Dialog after Adding the Vignette Layer

Figure 13. Adjusting Levels to Finish the Vignette Effect
Go back to the Vignette layer in the Layers dialog and click on the layer icon to select it instead of the layer mask. Now, go to the image window and bring up the Levels dialog (RC→Image→Colors→Levels). Move the middle (gray) slider to the right a bit and release it, as shown in Figure 13. Check the effect in the image window and readjust the slider until you are satisfied with the effect, then click OK. You can see my final result in Figure 14; the vignette draws the eye to the baby's face and adds a pleasing shadowy contrast overall.
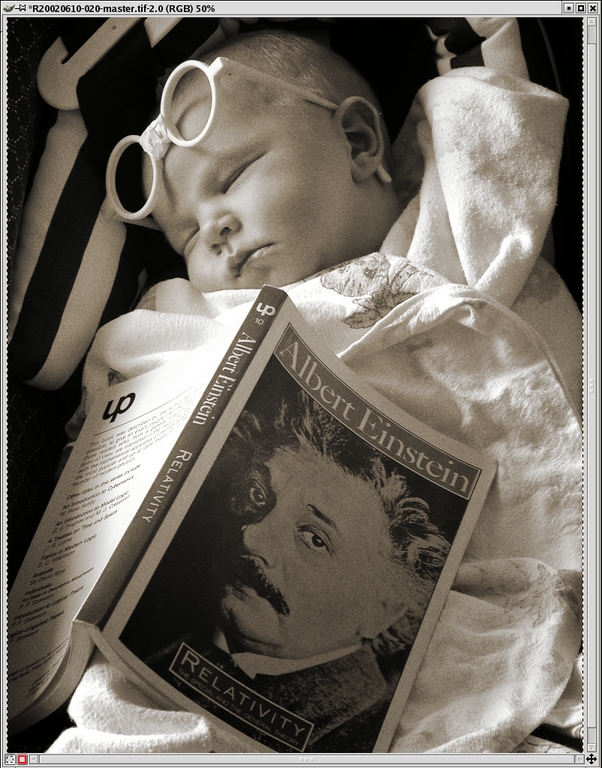
Figure 14. The Finished Image with All Effects Applied
If you need to redraw your gradient to try a different spotlight effect, simply select the Vignette layer mask icon, click the Blend tool and try again in the image window; the new gradient replaces the old.
Time to sit back and have some fun evaluating your handiwork. Try clicking the eye next to the various layers in the layers dialog to toggle their visibility on and off—an easy way to preview the different effects we have discussed. If you like the image better without one of the effects, delete that layer by selecting it and clicking the trash can icon.
If you want to do further image editing on the photo, it might be a good idea to save your work under a new name at this point or duplicate the image (Ctrl-D) and flatten it (RC→Layers→Flatten Image).
It's a good idea to give yourself a check-pointed result that you can start over with if further edits go awry. You can experiment with changing the hue and saturation, punch up the contrast with levels and curves or do any other desired edits at this point on the flattened version.
I hope I've given you a sense of the power of image layers in this article. Although a layered approach to image editing requires more memory resources, it pays off in great flexibility. So, slap some extra memory in your Linux box and build yourself a layered antique masterpiece.
Eric Jeschke (eric@redskiesatnight.com) holds a PhD in Computer Science from Indiana University and has worked as a software engineer, university professor and freelance consultant. He lives in Hawaii with his wife, kids and an overweight cat. Eric enjoys his family, outdoor adventures, taking photographs and running Linux.

