
Linux Tools for Professional Photography
A new breed of inexpensive, photo-quality products are revolutionizing the photo industry, and Linux is there with the tools to put these products to use. In 1990, while editing my first digital image on a Mac SE, I had visions of one day having all the power of a high-end photo retouching workstation in my own digital studio. Several years later, I had the Mac studio I had dreamed of but still was dependent on an outside service bureau for scanning and printing. Around 1996, I saw an early version of The GIMP and was excited at the possibility of moving my digital studio to Linux. Fast-forward to the present: inexpensive photo scanners and printers are available that offer professional results at affordable prices, and the Linux drivers and tools are there to take advantage. A color management work flow is starting to take shape on Linux, and The GIMP is maturing at a steady pace.
I now can go from scanned transparency through digital retouching to final output, all in my own studio running Linux. This article explains the steps required for creating professional digital prints with Linux by following one of my images through the process. Rather than go into details about compiling and installing Linux packages, I try to give a bird's-eye view of how the different pieces fit together and provide links to more detailed information.
Not much separates the workstation I use for photo editing from a good Linux desktop. Certainly, the more memory you have the better; I recommend 512MB as a minimum, and a fast disk is a real time-saver as well. My photo workstation is a dual-head, 1.7GHz P4 machine with 1GB of RAM and three 36GB, 10K RPM SCSI hard drives. What truly separates a photo editing setup from a generic desktop are the peripherals. Excellent photo-quality scanners and printers are now available for under $1,000 US. Most of these are supported under Linux, but always check the Linux compatibility pages before you buy one of these specialized devices. When looking for a scanner, cross-check advice from dedicated on-line photo forums, such as Photo.net, with the Linux compatibility information found on the VueScan and SANE Web sites. Because I shoot large format, 4" × 5" film, my choice in desktop scanners is limited to flatbed scanners with transparency adapters. For 35mm film scanning, the dedicated film scanners offer better results than flatbeds. For photo printers, it's hard to beat the current generation of Epson inkjets. The LinuxPrinting.org site provides a great utility to find out whether a particular printer is supported under Linux, and it even suggests the best driver to use.

Figure 1. Work-Flow Diagram for Color Management under Linux
Communication is all about having a standard vocabulary that two parties understand, and in the world of color communication the International Color Consortium (ICC) provides this lingua franca. All color devices have their own color space, meaning they are able to reproduce only a certain range of colors. This type of color is known as device-dependent color. In order to convert between different color spaces, a device-independent color space is needed. ICC uses a color description known as the CIE 1931 standard colorimetric observer to describe accurately the color space of any color device. ICC profiles are files that contain the information needed to translate the color space of a particular device to this device-independent color space. A special type of color space, called the working color space, is a device-independent color space used when editing an image. By having one common language and a translator from each different language, complete communication is possible. Although it's helpful to know all about color theory, it is not required to make good color prints. All you do need to know is that ICC profiles are used to convert the colors from one device to the colors of another device accurately.
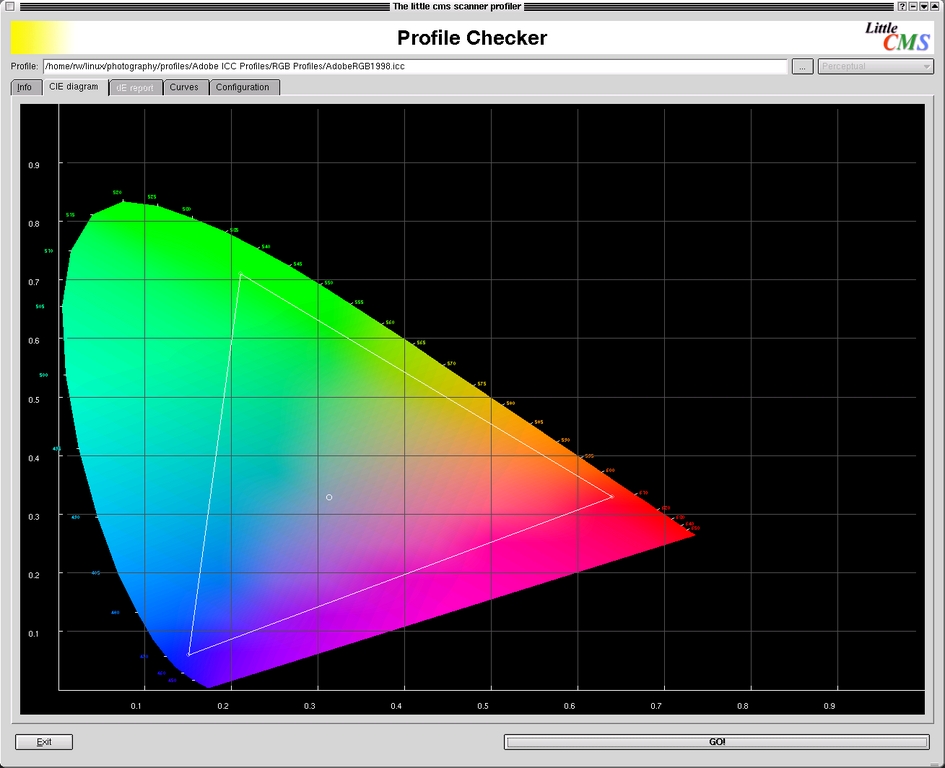
Figure 2. CIE diagram showing visual color space. The triangle shows the color space of the AdobeRGB 1998 working space.
An accurate monitor is vital for working with color photos. Professionals use a device called a colorimeter to measure the actual computer display and create an ICC profile that then is used by the OS to reproduce colors faithfully. Unfortunately, I am aware of no Linux drivers that support any of these devices. Even if you could get a monitor profile, The GIMP does not support using one for monitor display. Certainly, this is one feature in The GIMP I sorely miss. In fact, The GIMP bug #78265 documents the problem; hopefully, we will have this feature soon. In the meantime, we will do the best we can by carefully adjusting the monitor manually, using the controls built in to most quality monitors:
Set the monitor white point to 6,500K. This provides more yellow than the 9,300K that most monitors ship with, but it is much easier for your eyes to see correct color, which is why it's the industry standard recommendation.
Increase the monitor contrast to 100% and adjust the brightness until you can see most of the B Black Level strip in Norman Koren's excellent calibration chart, shown in Figure 3.
Adjust the display gamma using the gamma strip of Figure 3. To read the chart, squint your eyes until you can't discern the horizontal lines and find the location where the gray tone is the same across the strip; this is your current gamma. Adjust the display gamma using xgamma until the gamma is 2.2, the industry default.
Now adjust the separate R, G and B controls to make the gray of the target as neutral as possible. Use an image such as the color calibration chart, shown in Figure 3, to help adjust the monitor color balance. By focusing on the skin tones as well as neutral gray tones, you should be able to eliminate any gross color imbalances.
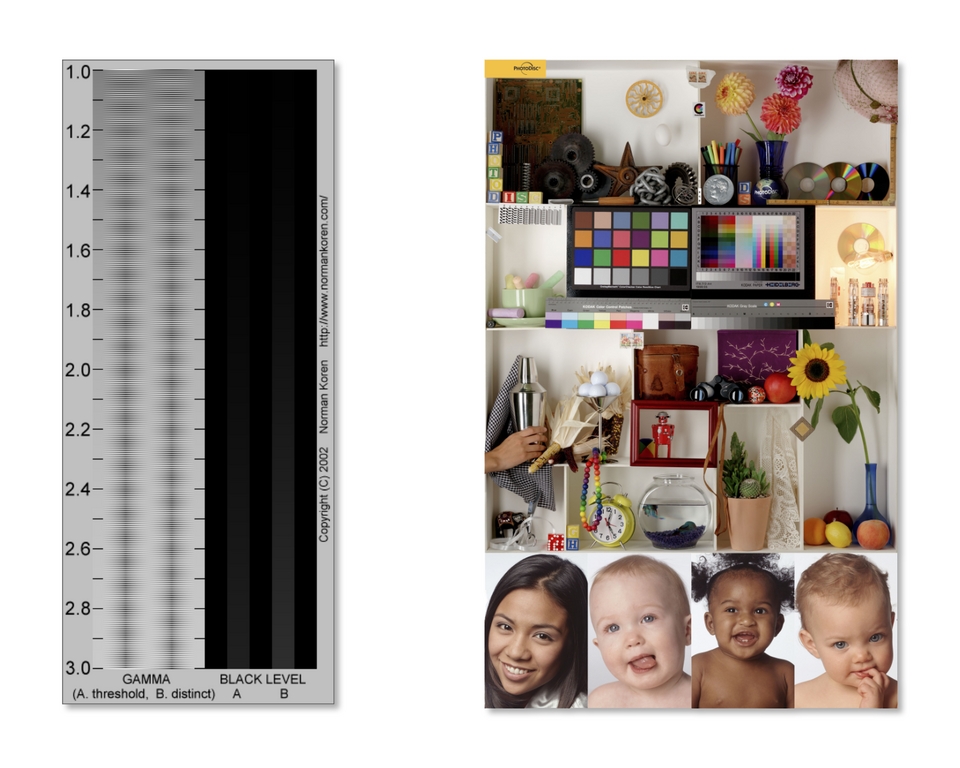
Figure 3. Monitor calibration images: on the left, Norman Koren's monitor gamma chart, and on the right, the Photodisc color calibration image. These printed examples should not be used for reference as their colors may have changed due to printing press inconsistencies.
In addition to a well-adjusted monitor, a consistent lighting environment is critical for accurate color viewing. Dim light is best, and by lighting your room with 5,000K daylight-balanced compact fluorescents, the white of a piece of paper should look very close to the white on your display. ISO 12646 goes into great depth on providing further guidelines on ambient viewing conditions. Bright colors in your environment alter your color perception, so watch out for brightly colored nearby walls, as well as bright backgrounds and colored windows in your Linux environment. My Linux desktop uses a plain gray background and black and white window decorations.
Now that we have a reasonably correct monitor and viewing environment, we can turn our focus to scanning. Both SANE and VueScan are excellent Linux solutions for scanning, I have chosen to use VueScan primarily because it's the same software I use on the Mac. Whichever scanning software you choose, it's important always to use the same software settings. This is vital for correct color, as the ICC profile we are about to create is valid only for the color settings used when making it. In order to make a scanner profile, it's necessary to have a known quantity to scan, called a color calibration target. The target I use is the Q-60 Color Input Target made by Kodak, and it is available from many high-end photo stores. Scan the target using your preferred scanning software; remember to save your settings, and always use the same settings moving forward.
Creating an ICC from this scan is made possible by the LProf profiling tools, available from the Little CMS Web site (see on-line Resources). Run kmeasurementool and open the scan. Go to the Options tab and select the correct pick template for the target used, in this case the Kodak column picker. Go back to the image tab and resize the green target outline. Once the little squares are lined up with the color patches in the scan, select Pick and then Save IT8 sheet. Now use kscannerprofiler to create a custom ICC profile for your scanner by first selecting the correct target vendor and batch ID. Each target comes with a date identifying the batch. Open the IT8 sheet file created above and enter an output profile filename for your ICC profile, then press GO. This ICC profile now can be used to interpret the color space of the scanner.

Figure 4. Creating the Scanner Profile Using Scanned Kodak Target
Now that we have profiled our scanner, we can scan an actual transparency. When scanning, it's helpful to know the true optical resolution of the scanner. Scanning at the maximum optical resolution captures as much detail as possible without making your file too large. When saving the file, use the TIFF format for best results as it is a lossless format.
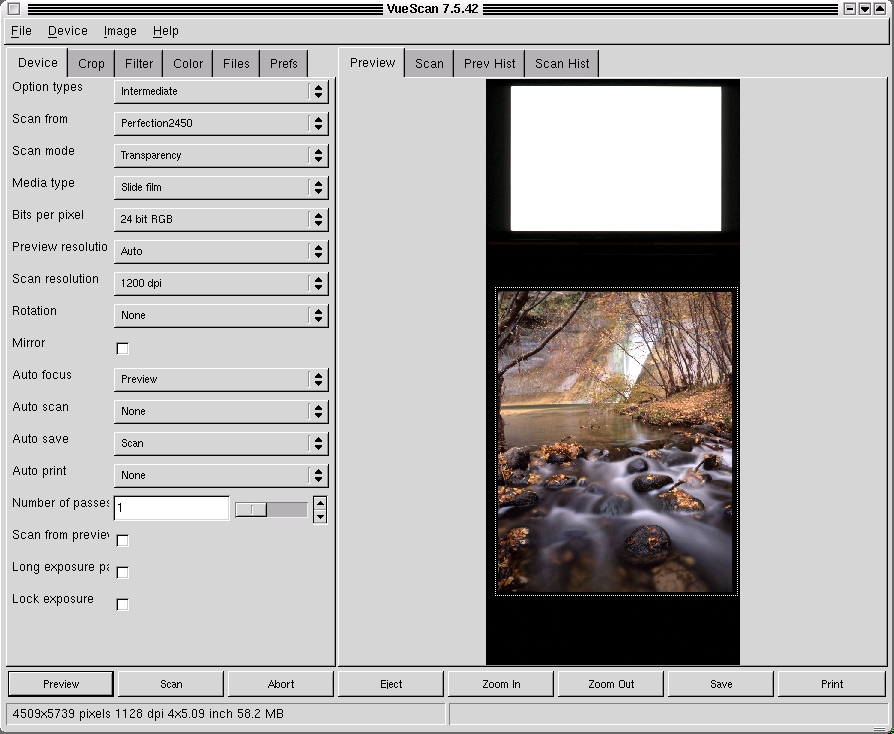
Figure 5. Making the Initial Scan Using VueScan
After scanning the transparency, the resulting TIFF file's color space is that of the scanner. I want to convert this color space to a working color space to do my image editing. A popular working color space is the Adobe 1998, a profile of which can be obtained from the Adobe Web site. Apply the scanner profile using tifficc, which is part of the Little CMS package, by running tifficc -i scanner.icc -o Adobe1998.icc scan.tiff scan_working.tiff, which converts the scanned TIFF image to our working color space.
A lot of the tools in The GIMP, as well as other image editing programs, aren't needed for photographic work. Most of my time is spent using the Levels or Curves tools. The first adjustment I make is to the overall exposure, and the best tool for this is Levels. Never use the Brightness/Contrast tool, as it tends to clip values. Open the Levels tool and slide the black and white points right up to the point where data (height) is apparent. Adjust the middle slider to lighten or darken the overall image.
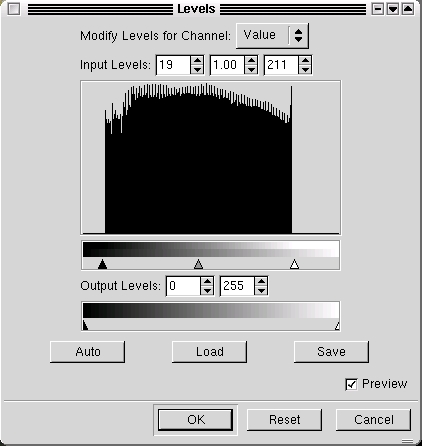
Figure 6. Using Levels in The GIMP for Exposure Adjustment
Cleaning up dust and scratches is the vital next step, and the Clone tool is perfect for this. Zoom in until the size of a dust spot is easily seen on the screen and then carefully scan the entire image. When you find a spot, select the Clone tool using a soft-edged brush that is slightly larger than the dust spot. Set the Clone Tool Options to 100% opacity and select aligned. Ctrl-click on an adjacent area to pick up an area to copy, release the Ctrl key and click directly on top of the spot. By using an opaque brush, the spot should be removed completely. The technique for removing scratches is similar, but you have to watch out for repeating patterns. With a little practice, you should be able to clone large sections without any telltale artifacts.

Figure 7. Using the Clone Tool to Remove Dust and Scratches
We now are ready to make a print. For me, the print is the final piece of art, and I spend a lot of time trying to create a print that really speaks to the viewer. I often will print out a picture 10–20 times, subtly making adjustments until I am happy with the image. I call this inkjet print my artist proof.
To prepare the image for printing, a few adjustments must be made that are specific to the print size. These adjustments are destructive, so save a copy of your image to a master file before getting started. First, resize the image by opening up the Scale Image dialog under The GIMP's Image menu. For inkjets I recommend 200PPI at your desired print size. Next, sharpen the image using the Unsharp Mask tool. Think of this as enhancing the edges in a photo. In case you're wondering why it's called unsharp, the name comes from the traditional photographic method of using a blurred (or unsharp) copy negative to increase the edge definition, and thus the perceived sharpness, of an image. Select Filter→Enhance→Unsharp Mask, and a dialog box appears with three sliders. Radius is how far away from the edge pixels are affected, Amount controls how much the pixels are changed and Threshold determines which edges are affected. To decide how much sharpening to apply, view the image at 100% and try a few settings. Unfortunately, Unsharp Mask does not yet have a preview, so you have to apply a setting, undo and repeat until you get the look you want. I am looking for the setting where the sharpening is barely obvious on my screen, generally starting with a radius of 1.0, a threshold of 3 and an amount of .75.
I use CUPS with Gimp-Print when printing to the Epson inkjets. Check the Gimp-Print Web page for instructions on getting this set up and running. By using Gimp-Print, all of the Epson-specific options are available in the Print menu. It also includes the Epson printer utility escputil, which allows for head cleaning and print alignment. Ideally, at this point we would be able to create an ICC profile for our printer; however, no software for Linux exists yet that does this. Instead, I recommend creating a standard set of adjustments using Gimp-Print's color adjust feature. To arrive at these adjustments, use a color test image such as the one we used for monitor calibration. Print the image, and look carefully at the results. You should be able to see details in the shadows and separation in the grayscale step tablet; the neutral and skin tones should not have a color bias. If this isn't the case, open the Print dialog box, select Image/Output Settings→Adjust Output and make the necessary changes. Repeat until your printout looks correct. Once you find a standard set of adjustments, write them down so you can use them as a starting point for future prints.

Figure 8. Using Gimp-Print's Color Adjust Dialog
The moment of truth has finally arrived—will the final print match what we have been viewing on the screen? Print out the image and compare it to the image onscreen. They should be very similar, but something is fundamentally different about looking at a print vs. the screen. Study the image and see where improvements can be made, and continue making refinements in The GIMP until you are satisfied.
For salable, fine-art prints, I prefer Lightjet prints made by a service bureau on a Cymbolic Sciences Lightjet printer. This printer uses lasers to expose the image onto conventional photo paper, most often Fuji Crystal Archive paper. Wilhelm Imaging Research tests (the authority on photo print life) show these prints have a display life of 60 years with little color shift or fading, significantly longer than most inkjet prints. These prints are indistinguishable from conventional photos and can be made as large as 4 × 5 feet.
Preparing the file for output on the Lightjet is similar to preparing it for inkjet printing. Start by going back to the original file that was saved, not the file for inkjet output. Again, resize the file to the correct physical dimensions, this time using 300PPI rather than 200PPI, sharpen the file using the technique described above and save it to a separate TIFF file. The service bureau I use, Calypso Imaging, offers Lightjet prints for photographers across the US. They also offer a discount if the file to be output has been resized and the correct ICC profile, available from their Web site, applied. Download the latest ICC profile and apply it to your image using tifficc. The image then is ready to be burned to CD-ROM or uploaded to Calypso's FTP site for final output.
A few days later I receive the final print, look back at the process used to create it and contemplate how, although my photo tools have changed, the goal remains the same—to create a print that conveys my feelings about my chosen subject. Finally, I am able to go through this entire process using Linux in combination with affordable desktop products, all in my own digital studio. Although a few areas still need improvements, Linux is very much up to the task. So get out there, take some photos and try out these Linux tools to make great photographic prints.
Resources for this article: /article/7704.
When RW Hawkins is not helping companies with their Linux servers, he is camping and backpacking with his 4 × 5 camera in the canyons of the Southwest. He lives in the Silicon Valley with his wife, who prefers pizza to camp food. His Web site, rwhawkins.com, offers a gallery of his fine-art prints as well as technical advice on digital imaging.

