
Programming under GNUstep—An Introduction
This article provides an introduction to GNUstep development. It guides the reader through installing GNUstep and developing a small application. The Objective-C language, a true object-oriented superset of ANSI C, is used in this article. Its syntax is simple, unambiguous and easy to learn.
OpenStep, which was proposed as an open standard by NeXT Computer, Inc., in 1994, is a collection of advanced object-oriented APIs designed for rapidly developing applications in the Objective-C language. It was designed to be implemented independently of the computer's operating system. To this end, there were implementations of the standard for Mach, Microsoft Windows (NT and 95), Sun Solaris and HP-UX.
In the early 1990s, GNUstep, a free implementation of the OpenStep standard, was born. GNUstep aims to be a fully compliant OpenStep implementation, supporting a wide range of operating systems, while being entirely free. GNUstep is released under the terms of the LGPL license. GNUstep currently works well on Linux, Solaris and most BSDs, and there is also preliminary support for Microsoft Windows.
As was widely reported at that time, Apple bought NeXT in 1996. Now, with Mac OS X, Apple is moving forward with Cocoa, an extension of the OpenStep API. While creating Cocoa, Apple added new classes that enrich the API. GNUstep is partially supporting those new features, and better support is being added every day.
GNUstep also offers a well-defined separation between the user-interface classes (part of the application kit) and the underlying windowing system. This layer, called gnustep-back, provides implementations for various windowing systems, allowing gnustep-gui to work properly under various back ends. Back ends currently are being developed for the X Window System, Microsoft Windows and Ghostscript. Figure 1 shows the different layers of GNUstep.

Figure 1. The Different Layers of GNUstep
GNUstep also offers bindings to other languages, like Java (using JIGS) and Ruby (using RIGS), allowing developers to create applications using those languages. Additionally, GNUstep offers powerful scripting capabilities through StepTalk, which allows you to create scriptable applications or servers using Smalltalk. Finally, GNUstep offers an extension so that Guile, a version of Scheme, can be used as a scripting language.
In order to compile GNUstep under Linux, that the following programs and libraries (with headers) need to be installed (versions indicated or higher): GNU make 3.75, GNU libc 2.1.2, GNU gcc 3.0.3, XFree86 4.1, ffcall 1.8, OpenSSL 0.9.6c (not required but recommended), libtiff 3.5.5 and libxml 2.2.3.
Once all those requirements are satisfied, you are now ready to download and compile GNUstep. We are going to install an unstable release of GNUstep because new features have been added recently that are worth using and mentioning, especially regarding Gorm—the Graphical Object Relationship Modeler. Gorm is a clone of OpenStep's excellent interface-builder application. Gorm allows the developer to create user interfaces quickly from a palette of standard objects.
Get the following releases from the GNUstep web site: GNUstep make 1.5.1, GNUstep base 1.5.1, GNUstep gui 0.8.3, GNUstep back 0.8.3 and Gorm 0.2.0.
Once you have downloaded those releases, you are ready to install GNUstep. You must first install GNUstep make, base, gui and finally, back. Look at the INSTALL file of each release carefully for installation instructions. For detailed instructions on installing GNUstep, refer to the GNUstep Build Guide for Unix Systems (see Resources).
Once GNUstep is compiled and installed, load the proper set of environment variables by executing a shell script (adjust the path, if necessary).
Bash users would type:
# . /usr/GNUstep/System/Makefiles/GNUstep.sh
And, C-shell users would type:
# . /usr/GNUstep/System/Makefiles/GNUstep.cshTo compile and install Gorm, simply uncompress the file and type (as root):
# cd Gorm
# make
# make install
Now that GNUstep and Gorm are compiled and installed, you can develop your small application, a simple TIFF image viewer. This application will use the Model-View-Controller (MVC) design. The MVC design pattern separates a software component into three pieces: a model, a view and a controller. Figure 2 shows how the MVC pattern is used in our small application.
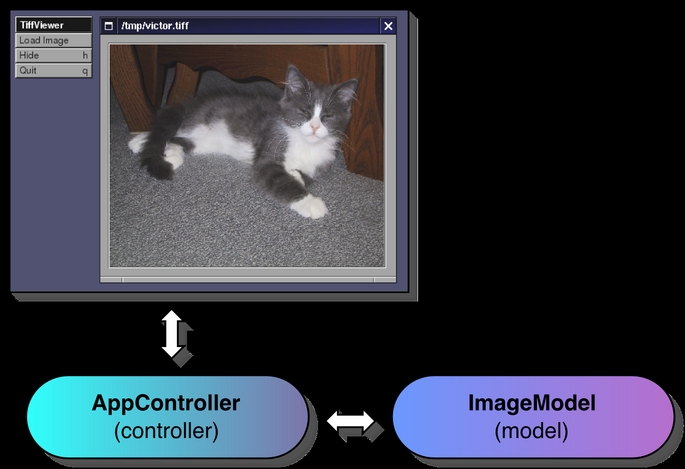
Figure 2. Using the MVC Pattern
Under GNUstep, use Gorm to create the views of an application. This application allows you to create the user interface of your application. Once created, the user interface will be saved as an archive file (containing a serialized object graph) in its own subdirectory. To start Gorm, simply type:
# openapp Gorm.app
Once Gorm has started, show the Inspector and the Palettes windows by clicking on the Inspector... and Palettes... menu items from the Tools menu. Now, create a new application by clicking on the New Application menu item from the Document menu. Once those steps are completed, your desktop should look like Figure 3.
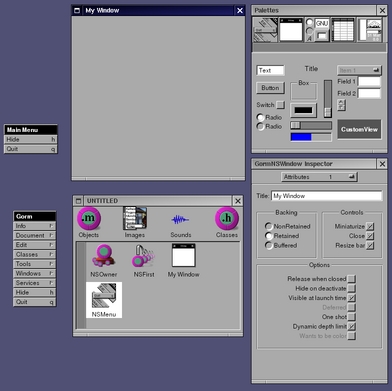
Figure 3. Creating a New Application
Let's examine Figure 3 in order to explain the different elements. Table 1 shows the different elements, and their roles.
Table 1. Parts of the Gorm Interface
From the Palettes window, drag an NSImageView object to the empty window (My Window) and drop it. Figure 4 shows the icon that represents the NSImageView object.

Figure 4. NSImageView Object
Now, click on the NSImageView in the window, and the inspector window will update itself so you can set the correct attributes to this object. Set the border to Line Border and the scaling to To Fit. The Inspector window for the attributes of the NSImageView should look like Figure 5.
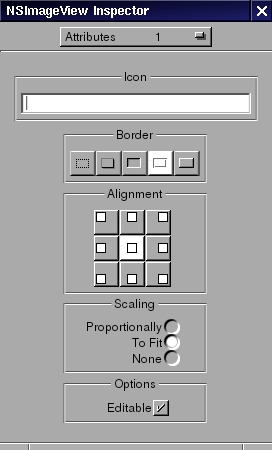
Figure 5. The Inspector Window for the Attributes of NSImageView
Now, from the Inspector window, select the Size item from the combo box at the top to set the auto-sizing properties of the NSImageView object. Setting the auto-sizing properties to NSImageView will allow the object to resize properly if the user resizes the window. Set the parameters by clicking on the lines inside the Auto-sizing box to look like those in Figure 6.
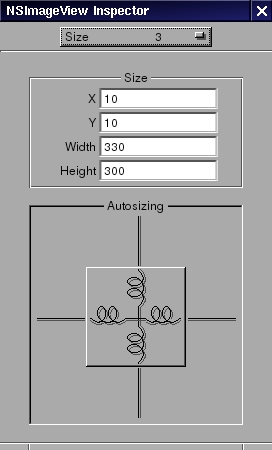
Figure 6. Setting the Auto-Sizing Parameters
Next set the window attributes. Click on My Window in the File window. Set the title to Tiff Viewer in the Inspector window. The Inspector window for the attributes should look like Figure 7.

Figure 7. Setting the Window Attributes
You need to add a menu item so you can open an image file. To create a new menu item, choose the menu palette from the Palettes window, drag the Item menu to the Main Menu (above the Hide menu item) and drop it. Click on the newly created Item menu option in the Main Menu, set its title from the Inspector window to Load Image and press Return.
Now, you need to create a controller class that will interact with the user interface. Click on the Classes icon from the File window and select the NSObject item from the tree view. Click on the Classes menu item in the Gorm menu, and select Create Subclass.... In the Classes tree view in the File window, you will now find a NewClass entry. Double-click on the NewClass item and replace the text with “AppController”.
Next, you need to create an outlet for your NSImageView object. An outlet is an instance variable that refers to an object—in this particular case, the NSImageView object. To add an outlet to your AppController class, click on the Outlet icon to the right of the AppController class (in the File window); click on the Classes menu item in the Gorm menu, and select Add Outlet/Action.... In the Classes tree view in the File window, you will now find a newOutlet entry as a child item of AppController. Double-click on the newOutlet item, and replace the text with “imageView”. Repeat these steps to add a window outlet.
After creating the outlet, you need to add an action to your controller. An action is a target-action method. To add one to the controller, click on the Action icon to the right of the AppController class (in the File window); click on the Classes menu item in the Gorm menu, and select Add Outlet/Action.... In the Classes tree view in the File window, you will now find a newAction: entry as a child item of AppController. Double-click on the newAction: item, and replace the text with “loadImage:”.
You are now ready to instantiate your AppController class in order to produce a particular object from its class template. You need to instantiate your controller class because Gorm connects live objects. Select the AppController item in the File window's tree view, and click on the Instantiate menu item from the Classes menu.
Now you can now connect your live objects (in this case, NSImageView) to your outlets and set the action. To connect the NSImageView object to your AppController instance, click the Objects icon in the File window, then, while pressing the Ctrl key, click and drag from the AppController icon (from the File window) to the NSImageView object in the Tiff Viewer window. Click on the imageView item in the Inspector window, and click on the button Connect. This connects the NSImageView live object to the imageView outlet. To connect the window outlet, while pressing the Ctrl key, click and drag the AppController icon (from the File window) to the My Window icon (from the File window). Now, click on the window item from the Inspector window, and finally, click on the Connect button. Figure 8 illustrates the connection being made between the window object and its outlet.

Figure 8. The Connection Being Made between the Window Object and Its Outlet
To set the action of the Load Image menu item, Control-click and drag on the menu item to the AppController instance icon in the File window. Then, click on target in the Inspector window, select the loadImage: item, and click on the Connect button. This sets the action of the Load Image menu item to loadImage:. So, when the Load Image menu item receives a click from the user, the loadImage: method will be invoked.
Now, save everything by choosing the Save menu item from the Document menu. Give it the name MainMenu. This creates a MainMenu.gorm directory, holding the archived view of the application.
Finally, create the AppController class' source files by selecting the AppController class entry in the Classes tree view and choose the Create Class's Files... from the Classes menu. Leave the names as they are and simply click on the OK button. This creates two files: AppController.m and AppController.h.
Now, quit Gorm, open your favorite editor and modify AppController.h so it looks like Listing 1. The complete source code with comments is available; see Resources.
Then, modify AppController.m (the implementation of the AppController class) so that it looks like Listing 2.
Now, create a very basic Model for the application—ImageModel. This small class will hold the current displayed image. Now create the implementation of the ImageModel class as shown in Listings 3 and 4.
Now, create a small property list, shown in Listing 5, in which you specify the application name, description and the name of the main Gorm file to load upon startup.
Listing 5. TiffViewerInfo.plist
Then, create a small GNUmakefile in order to compile and link your small application. The GNUmakefile should look like Listing 6.
Finally, compile and start the small application:
# make
# openapp TiffViewer.app
Once the application starts, click on the Load Image menu item and select a TIFF file. It should display properly in the window, as shown in Figure 9.
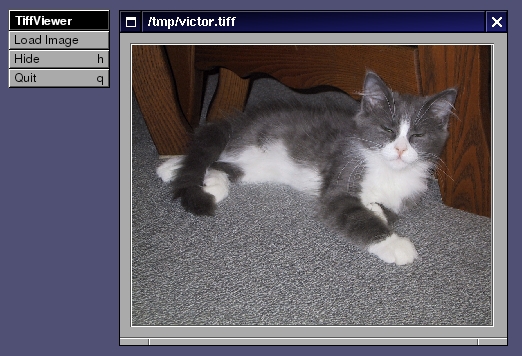
Figure 9. Displaying an Image
When porting an application from GNUstep to Mac OS X (or the other way around), some important things must be considered. For example, when porting to Mac OS X, you have to redo the user interface using Interface Builder under Mac OS X. The following steps are needed to port the application to Mac OS X:
From the File menu of Project Builder, select New Project... and select Cocoa Application. Click on the Next button.
Specify the project name (Tiff Viewer) and the project location. Click on the Finish button.
Now, select the Classes node and add the files AppController.m and ImageModel.m from the Project menu.
Expand the Other Sources node and delete the main.m file.
Expand the Resources node and double-click on the MainMenu.nib node. This will start Interface Builder.
Much like you did under Gorm, drag and drop the NSImageView in the empty window and the Load Image menu item in the File menu.
Because the controller class (AppController) was created in the previous section, you simply can reuse it under Mac OS X. In Interface Builder, from the Classes menu, choose Read Files.. and select AppController.h.
From the File window, click on the Classes tab, select AppController and from the Classes menu, choose Instantiate AppController.
Now, connect the outlets and the action like we did under Gorm.
Save the modified interface, and quit Interface Builder.
From the Build menu in Project Builder, choose Build and run. This will compile and launch the application.
Once the application is launched, choose Load Image from the file menu and select a picture to show. The final result should look like Figure 10.

Figure 10. The Same Application Running under Mac OS X
As you can see, we have ported the application without rewriting a single line of code. Even if the application is quite simple, complex applications can be developed under GNUstep and easily ported to Mac OS X. Affiche and GNUMail.app are good examples of applications that are portable between GNUstep and Mac OS X.
Going the other way, more care should be taken when porting applications from Mac OS X to GNUstep. First, you have to redo the user interface of the application using Gorm. Secondly, GNUstep currently does not provide an implementation of some Cocoa classes like NSToolbar, NSDrawer or any core foundation services. To avoid problems when porting a Mac OS X application using those unimplemented functionalities to GNUstep, you will need to use conditional compilation. Finally, one or more GNU Makefiles must be created in order to compile the application under GNUstep.
As we have seen in this article, developing a GNUstep application is relatively easy. GNUstep offers a rich, clean and consistent API for developing true cross-platform applications in the Objective-C language.
New application kit back ends are being developed for Microsoft Windows, DirectFB and Ghostscript, thus allowing support for a wider range of computing environments. Also, OpenGL support has recently been added through the implementation of the NSOpenGLView class.
Finally, GNUstep-based distributions are emerging. For example, the LinuxSTEP Project aims to create a fully integrated, desktop Linux operating environment that is not bound by some of the more traditional approaches of common Linux distributions.
All listings referred in this article are available by anonymous download at ftp.linuxjournal.com/pub/lj/listings/issue108/6418.tgz.
email: ludovic@Sophos.ca
Ludovic Marcotte (ludovic@inverse.ca) holds a Bachelor degree in Computer Science from the University of Montréal. He is currently a software architect for Inverse inc., a small IT consulting company located in downtown Montréal.
